- Cisco Community
- Technology and Support
- Data Center and Cloud
- Data Center and Cloud Knowledge Base
- CloudCenter Integration Fundamentals: Callout Topics - IPAM
- Subscribe to RSS Feed
- Mark as New
- Mark as Read
- Bookmark
- Subscribe
- Printer Friendly Page
- Report Inappropriate Content
- Subscribe to RSS Feed
- Mark as New
- Mark as Read
- Bookmark
- Subscribe
- Printer Friendly Page
- Report Inappropriate Content
on 02-14-2017 09:13 AM
Summary:
One of CloudCenter’s differentiating capabilities is the granular control of distinct lifecycle stages provided by the platform. An administrator and/or application architect can design and implement either specific tasks to be executed or orchestrate a flow of multiple tasks to be performed in succession. One such capability is the option to incorporate “Callout” scripts, which can be configured per Cloud Region. There is already a great resource to explain the three main “topics” and their functional purpose. These topics: vmNaming, ipam and ipamDealloc can be implemented to assign discrete names to the deployed virtual machines (especially if there is an existing naming convention), to allow the provisioned virtual machine to adhere to the conventions of an existing IP Address Management ecosystem tool (e.g. InfoBlox, Active Directory) and to allow that same virtual machine to undergo the de-provisioning process as standardized by the same ecosystem tool. The focus of this document is to outline the steps required for integrating a CloudCenter-deployed Windows Server to Active Directory via the ipam “Callout” topic. This outline will assume that DHCP leases are available to the application nodes, that there is a reachable domain controller as declared by DNS, that the privileged credentials to complete the domain join operation is known and valid and that optional configurations such as Secure Dynamic Updates are validated. In the test environment, VMware and been integrated with CloudCenter - the reason for this is forthcoming. In a VMware environment, the ipam topic allows either the native VMware Customization Specification to facilitate and complete the domain join - Customization Specifications also help manage data such as the Product Key, the Administrator password, the IP address scheme, etc. In a non-VMware environment where the administrator does not have the option to utilize a Customization Specification, CloudCenter provides a list of native variables to facilitate and complete the domain join operation. Whether the Customization Specification or the CloudCenter native variables are used to join computers to the domain, the process to prepare the Windows image for this workflow is different than the one described in this document. The delineation of significance is that sysprep is not required as part of the image creation when using the Customization Specification or the native variables, since either method will initialize sysprep. If the image has undergone sysprep prior to the shutdown, as specified by the aforementioned document, and the ipam topic is attempting to “reconfigure” it, a race condition will occur between the sysprep operation initiated by the Windows OS and the sysprep operation initiated by the ipam topic - this conflict will invariably produce errors. These errors may not be reported by CloudCenter because they occur at the OS level and not at an integration level. For best results, monitor the osmosix.log file in debug mode to view errors reported by the ipam topic.
Setup:
The callout topics are configured per Cloud Region in CloudCenter, so the steps enumerated herein must be performed on the CloudCenter Orchestrator appliance. The callout topics are derived from the /usr/local/cliqr/callout directory, which must be added explicitly and which required a restart of tomcat:
- Once logged in to the CloudCenter Orchestrator, create the callout directory and change to that directory
- Type [root@esentprs-cco]# mkdir -p /usr/local/cliqr/callout/ipam && cd /usr/local/cliqr/callout/ipam
- Create the callout.conf file to set key values (below is a sample of the contents in the callout.conf file)
- name=ipam
- type=exec
- topic=ipam
- debug=true
- executable=run.sh
- reinject=true
- disabled=false
- In this example, the executable file is named run.sh - create this file and populate it with the content from the sample scripts below
- Once the file is created, ensure that it is executable
- Type [root@esentprs-cco ipam]# chmod 777 run.sh
- If the version of CloudCenter is 4.7, change the ownership of the callout and subsequent child folders
- Type [root@esentprs-cco ipam]# chown -R cliqruser:cliqruser /usr/local/cliqr/callout
- Once the file is created, ensure that it is executable
- Optional - set the log4j.xml file to “Debug” mode (this file is found in the /usr/local/tomcat/webapps/ROOT/WEB-INF directory)
- Optional - set the output of the osmosix.log to display
- Type [root@esentprs-cco ipam]# tail -f /usr/local/tomcat/logs/osmosix.log | tee calloutput.log
- Deploy an application profile from the CloudCenter Manager and monitor the log output
Scenarios:
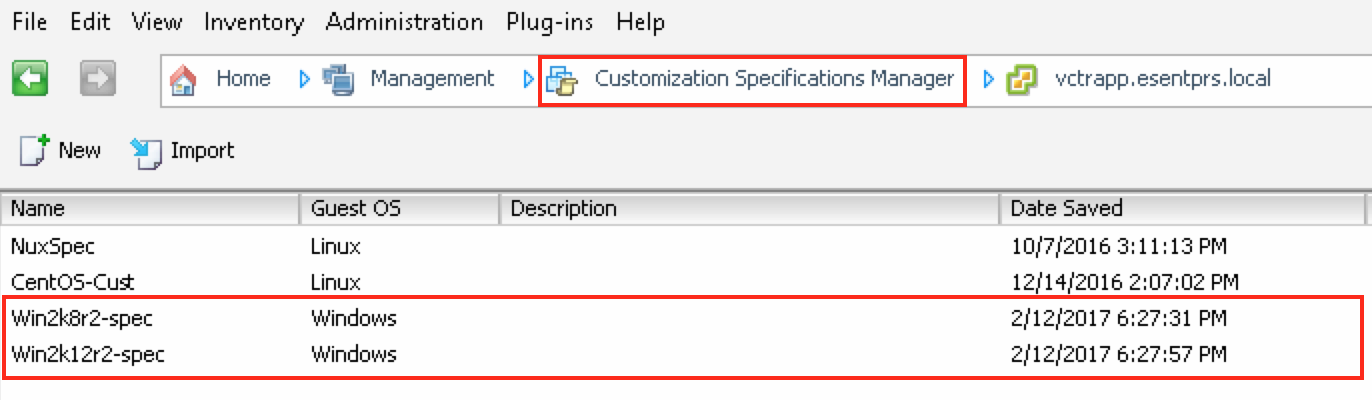
- To use the Customization Specification native to the vCenter management domain, follow these steps
- Create the Customization Specification in vCenter
- Populate the run.sh file with the following text
#!/bin/bash echo "osHostname=$vmName" if [ "$eNV_osName" == "Windows" ] && [ "$eNV_imageName" == "Windows Server 2008" ] echo "This is Windows Server 2008" elif [ "$eNV_osName" == "Windows" ] && [ "$eNV_imageName" == "Windows Server 2012" ] echo "This is Windows Server 2012" else echo "This is Linux OS" fi |
- To use the variables native to the CloudCenter platform, follow these steps
- Populate the run.sh with the following
#!/bin/bash echo "osHostname=$vmName" if [ "$eNV_osName" == "Windows" ] && [ "$eNV_imageName" == "Windows Server 2008" ] echo "This is Windows Server 2008" echo "domainAdminName=svcADJoin" echo "domainAdminPassword=p@ssw0rd" elif [ "$eNV_osName" == "Windows" ] && [ "$eNV_imageName" == "Windows Server 2012" ] echo "This is Windows Server 2012" echo "domainAdminName=svcADJoin" echo "domainAdminPassword=p@ssw0rd" else echo "This is Linux OS" fi |
- NOTE: the primary difference between these two examples is that the first contains the custSpec variable and the second does not contain the custSPec variable but rather the domainName, domainAdminName and domainPassword variables. In the first scenario, since the vCenter provided Customization Specification will initiate the sysprep process it will assign values as specified in the specification. In the second one, CloudCenter will leverage the values as specified by the variables within the script.
Troubleshooting:
- A common error produced by the callout topics (as seen via the osmosix log) is the following
- com.osmosix.gateway.GatewayServiceException: Cloud : Vmware, Service : VmwareComputeService, Error Code : OperationError, Error Message : Full Name missing Root Cause: Full Name missing
- Caused by: com.cliqr.cloud.exception.CloudBladeException: Cloud : Vmware, Service : VmwareComputeService, Error Code : OperationError, Error Message : Full Name missing Root Cause: Full Name missing
- Caused by: com.cliqr.cloud.exception.CloudServiceException: Full Name missing Root Cause: Full Name missing
- Caused by: java.lang.NullPointerException: Full Name missing
- com.osmosix.gateway.GatewayServiceException: Cloud : Vmware, Service : VmwareComputeService, Error Code : OperationError, Error Message : Full Name missing Root Cause: Full Name missing
- NOTE: This error is a bit misleading - it is a general error message for the numerous possible errors that may exist in the run.sh file or the named script (if the name is different than run.sh)
- If this error occurs, test the script in the native shell context
- First, set the value of the variables in the script (in this example there are three: vmName, eNV_osName and eNV_imageName)
- Type [root@esentprs-cco ipam]# vmName=“testVM_windows2008”
- Type [root@esentprs-cco ipam]# eNV_osName=“Windows”
- Type [root@esentprs-cco ipam]# eNV_imageName=“Windows Server 2008”
- Type [root@esentprs-cco ipam]# ./run.sh
- If there is an error in the script the output will indicate the line numbers containing the offending text
- Enter vi to edit the script file
- Type [root@esentprs-cco]# vi run.sh
- In vi mode, type :set number to view the line numbers
- Enter vi to edit the script file
- First, set the value of the variables in the script (in this example there are three: vmName, eNV_osName and eNV_imageName)
- Another common error can be produced by vCenter itself during the customization “reconfiguration” workflow - the error is displayed in the vCenter management console

- To resolve this and like errors, ensure that the image has NOT undergone sysprep
Helpful links:
Find answers to your questions by entering keywords or phrases in the Search bar above. New here? Use these resources to familiarize yourself with the community:
