- Cisco Community
- Technology and Support
- Collaboration
- Collaboration Knowledge Base
- CUBAC to CUP Integration Failure - Database Mapping Issue (User_Profile)
- Subscribe to RSS Feed
- Mark as New
- Mark as Read
- Bookmark
- Subscribe
- Printer Friendly Page
- Report Inappropriate Content

- Subscribe to RSS Feed
- Mark as New
- Mark as Read
- Bookmark
- Subscribe
- Printer Friendly Page
- Report Inappropriate Content
10-15-2012 07:10 AM - edited 03-12-2019 09:54 AM
Overview
The Cisco Unified Department/Business Attendant Consoles (CUDAC or CUBAC) are not able to integrate with Cisco Unified Presence (CUP) as they should due to a software defect in the database. This is being tracked under Cisco defect CSCuc46791 and is confirmed to impact at least the 9.0.1.10 release.
Symptoms
All users in the Directory will have a Presence status of Unknown ( ) in the Presence Status column (
 ) of the Directory. If this column is not visible you may add it under Preferences > Directory. Select Default Presence Icon from the Available column and move it to Displayed column using the right-facing arrow button.
Figure 1 - Attendant Console Client Directory Preferences
Additionally, the User Profile field in the Contact Details will be blank. This needs to contain the username as it appears in the End User Configuration page of Cisco UC Manager (CUCM). Without this value populated, Presence Subscriptions cannot be sent to the CUP server.
Figure 2 - Contact Details Context Menu
Figure 3 - Contact Details with User Profile Field Highlighted
Background
The CUxAC server builds the Directory by querying CUCM via the AXL API after you have enabled Directory Synchronization (System Configuration > Directory Synchronization menu) and restarted the LDAP Plug-in service (Engineering > Service Management menu). To be more precise, it queries the contents of the enduser table and copies a subset of the fields. Optionally, if you have defined any Directory Rules, or Directory Filtering in Department edition, the import will be filtered to import only the End User objects that meet your filter criteria.
For the CUP Integration to work CUxAC must build the Presence URI for each user since the enduser table in CUCM does not contain this directly. The Presence URI consists of a left- and right-hand side. CUP uses the Username (userid field) from CUCM for the LHS of the Presence URI. In CUxAC the left-hand-side (LHS) is determined by the value selected under Preferences > Presence. By default this is set to User Profile and it should not be changed; User Profile is mapped to the userid field from CUCM.
Figure 4 - Attendant Console Client Presence Preferences with User Profile Highlighted
The Right-Hand-Side (RHS) is determined by the Proxy Domain. This is defined in the CUPS Connectivity (Engineering menu) through the Proxy Domain field. It must match the value specified in CUP Administration under System > Cluster Topology > Settings.
Figure 5 - CUxAC Administration CUPS Connectivity with Proxy Domain Highlighted

Figure 6 - CUP Administration Cluster-Wide Toplogy Settings with Domain Name Highlighted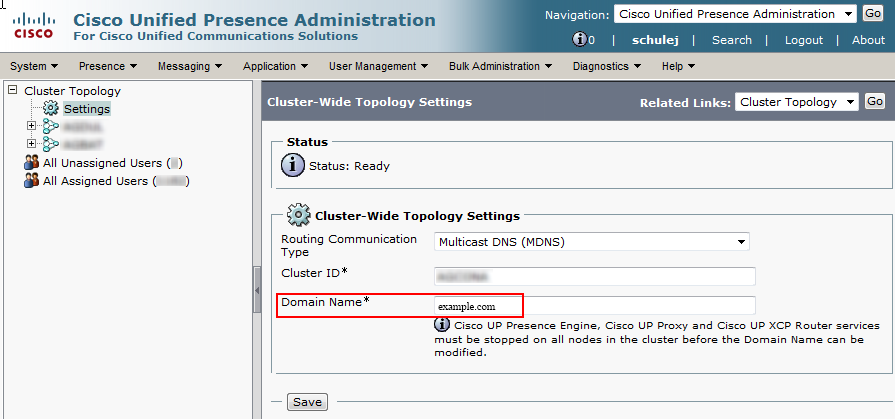
When CUxAC has both sides of the URI it will send individual SIP SUBSCRIBE messages to the CUP server to watch the status of each user. You can easily watch this process using a packet capture utility such as Wireshark on the CUxAC server. For the sake of brevity I have not included the entire SIP dialog here. What's important is that the To: header be a properly formatted Presence URI for a user on CUP. If it isn't, the subscription will fail and the status will show unknown in the Attendant Console client.
Cause
The SUBSCRIBE message is never sent by CUxAC because it does not have a LHS value to build a complete Presence URI with. This was observed in Figure 3 when the Contact Details window showed a blank User Profile field. This is happening because the database table that maps field names from CUCM to field names within CUxAC is missing the record for User Profile. Without this the LDAP Plug-in service never stores the Username from CUCM.
Workaround
Until Cisco releases a version that addresses this defect you can follow these steps to manually add the User Profile field mapping. These steps were provided by a Development Engineer under SR 623463861; however, I offer them with no warranty express or implied. Implement this at your own risk.
- Open SQL Management Studio. If using SQL Express this was installed automatically on the CUxAC server.
- Backup the ATTCFG database. Skip this step at your own peril!
- Expand the ATTCFG and Tables elements and locate the dbo.Ext_Source_Mapping table.
- Alternate-click on the table name and choose Edit Top 200 Rows
- Add a new record and populate the fields as follows; end result shown in Figure 7. All values are case sensitive!
- EXS000001
- EXM000007
- <blank> (not NULL)
- enduser
- userid
- Contact_Items
- User_Profile
- <blank> (not NULL)
- R
Figure 7 - Microsoft SQL Management Studio Editing Table with Newly Created Row Highlighted
- Restart all services through Engineering > Service Management. Even for small directories it may take a several minutes for the synchronization to occur after the service starts.
- Login to the Attendant Console. If you follow Figures 2 and 3 to see the Contact Details, you should now see a value in the User Profile field.
If you still do not see presence status after completing this workaround you likely have another integration issue. The most common is forgetting to add an Incoming ACL on CUP to allow CUxAC server to bypass SIP DIGEST authentication.
Purging the Directory
As a last resort it may be necessary to clear the local database tables that contain the directory records. This should not be necessary; however, the procedure is documented here for reference.
CAUTION: Completing these instructions will result in data loss. Any modifications to the Contact Details (e.g. notes, additional phone numbers or email addresses, device choice for CTI observation, etc) will be lost!
- Open CUxAC Administration http://<servername>/webadmin and login.
- Choose System Configuration > Directory Rules from the menu. NOTE: The process for Department edition will vary slightly since it uses Directory Filtering instead of Directory Rules.
- Choose the default rule (or add a new one if none exist).
- Select Add New to create a new filter.
- Choose telephoneNumber and set it Equal to 99999, or another pattern you know will match zero records.
- Restart all services through Engineering > Service Management. Even for small directories it may take several minutes for the synchronization to occur after the service starts.
- Login to the Attendant Console client and verify that you see a completely blank directory. If any entries exist in the directory something matched your filter; return to step five.
- Once you have verified that the directory is empty, return to the Directory Rule and delete the filter you created in step five.
- Restart all services through Engineering > Service Management. Remember that it may take a few minutes for the directory synchronization to complete.
- Login to the Attendant Console. The Directory should again contain records. If you follow Figures 2 and 3 to see the Contact Details, you should now see a value in the User Profile field.

")
- Mark as Read
- Mark as New
- Bookmark
- Permalink
- Report Inappropriate Content
We need more documents that expose the inner workings of the available solutions. I believe in understanding how something works. To what level? I leave that up to individual preference.
Hopefully Cisco will fix the root cause, and this workaroud will no longer be required, but until then, keep writing great documents!
Also, thanks for the link to the RFC on the SIP extension for SUBSCRIBE messages.
- Mark as Read
- Mark as New
- Bookmark
- Permalink
- Report Inappropriate Content
This is not relevant to Premium Edition as stated, this only affects Department Edition and Business Edition as in Enterprise and Premium Edition you can edit the field mappings through the Web Admin page.
Also, you should not need to do a "new" sync of the directory and therefore lose any configured notes or additional information. Once the update has been made to the database as mentioned, restart the Attendant Console service for the change to take affect. At this point, if you have Auto Synhronization seleted for "On Start-up" and "On reconned" then restart the LDAP Plug-in service and the infomration will then be displayed. If you do not have these options selected then the updates will take place during the next scheduled sync.
- Mark as Read
- Mark as New
- Bookmark
- Permalink
- Report Inappropriate Content
Thanks for the clarification Jamie. Before making modifications to the document I have a follow-up question or two:
- Is the User Profile field mapping missing in Premium and Enterprise? In other words, does the administrator need to userid to User Profile through the UI in 9.0.1.10 Premium/Enterprise?
- If yes, is CSCuc46791 tracking for all editions or only the Department/Business behavior?
As far as dumping the directory: That's encouraging to hear that it should update existing records. We tried repeatidly and couldn't get the User_Profile column to populate until we did a "new" sync. I'll rephrase this section of the document to at least label this part optional/last-resort.
- Mark as Read
- Mark as New
- Bookmark
- Permalink
- Report Inappropriate Content
No problem.
The mapping is in place by default on Enterprise and Premium Edition, there is no need for the user to have to add this mapping in the Web Admin.
CSCuc46791 is for Business Edition only, I will need to check if the defect exists in Department Edition as well.
I done a WebEx session with someone when this was first found and having the records update withouth "dumping" the directory worked fine.
Find answers to your questions by entering keywords or phrases in the Search bar above. New here? Use these resources to familiarize yourself with the community: