- Cisco Community
- Technology and Support
- Collaboration
- Collaboration Knowledge Base
- Mobile Connect-Configuration
- Subscribe to RSS Feed
- Mark as New
- Mark as Read
- Bookmark
- Subscribe
- Printer Friendly Page
- Report Inappropriate Content
- Subscribe to RSS Feed
- Mark as New
- Mark as Read
- Bookmark
- Subscribe
- Printer Friendly Page
- Report Inappropriate Content
08-27-2012 10:55 PM - edited 03-12-2019 09:52 AM
- Introduction
- Requirement
- Configuration steps
- 1.) Service Activation
- 2.) End User Configuration
- 3.) Mobility Softkey template
- 4.)Assign template to Phone
- 5.) Configure a Remote destination Profile
- 6.) Create a new Remote Destination
- Checklist
- Q: When I press the mobility softkey I get "Mobile Connect Off" "You are not a valid Mobile Connect User
- Related Links
Introduction
Mobile Connect features enable you to answer incoming calls on the desktop phone or cellular phone, to pick up in-progress calls on the desktop phone or cellular phone without losing the connection, and to originate enterprise calls from the cellular phone. You can perform these functions:
•![]() Pick up incoming calls on your desk or cellular phone. Incoming calls ring simultaneously on your desktop phone and cellular phone. When you answer one of the lines, the call is connected and the other phone stops ringing.
Pick up incoming calls on your desk or cellular phone. Incoming calls ring simultaneously on your desktop phone and cellular phone. When you answer one of the lines, the call is connected and the other phone stops ringing.
•![]() Move from your desktop phone to cellular phone or from your cellular phone to desktop phone during a call without losing the connection.
Move from your desktop phone to cellular phone or from your cellular phone to desktop phone during a call without losing the connection.
•![]() Use Mobile Voice Access of Cisco MobilityManager to initiate a call from a remote phone as if you were using your enterprise desktop phone. Mobile Voice Access is an integrated voice response (IVR) system used to initiate Mobile Connect calls and to activate or deactivate Mobile Connect capabilities. When you initiate a call using Mobile Voice Access, you can switch between your desktop phone during the call and back again without losing the connection.
Use Mobile Voice Access of Cisco MobilityManager to initiate a call from a remote phone as if you were using your enterprise desktop phone. Mobile Voice Access is an integrated voice response (IVR) system used to initiate Mobile Connect calls and to activate or deactivate Mobile Connect capabilities. When you initiate a call using Mobile Voice Access, you can switch between your desktop phone during the call and back again without losing the connection.
When using Cisco Mobile Connect, you must add your mobile and other phones that you want to use to make and receive calls using the same directory numbers as your desk phone. These phones are called remote destinations.You can also define access lists to restrict or allow calls from certain numbers to be sent to your mobile phone.
Cisco Mobile Connect is an enterprise mobility service that associates your desktop IP phone number with up to four remote phone destinations such as your mobile phone to allow enterprise mobile workers to receive all phone calls to their IP phone number at multiple phone destinations simultaneously. There is no dependency on the type of phone or service provider used to reach the remote phone destination.Mobile Connect will allow users to receive an outside call on their desktop or mobile phone, they can also move back from a mobile phone to their desktop phone, also while in a mobile connect call they can use the mid-call enterprise features offered by Cisco Unified Communications Manager.
Requirement
CUCM 8.x
Configuration steps
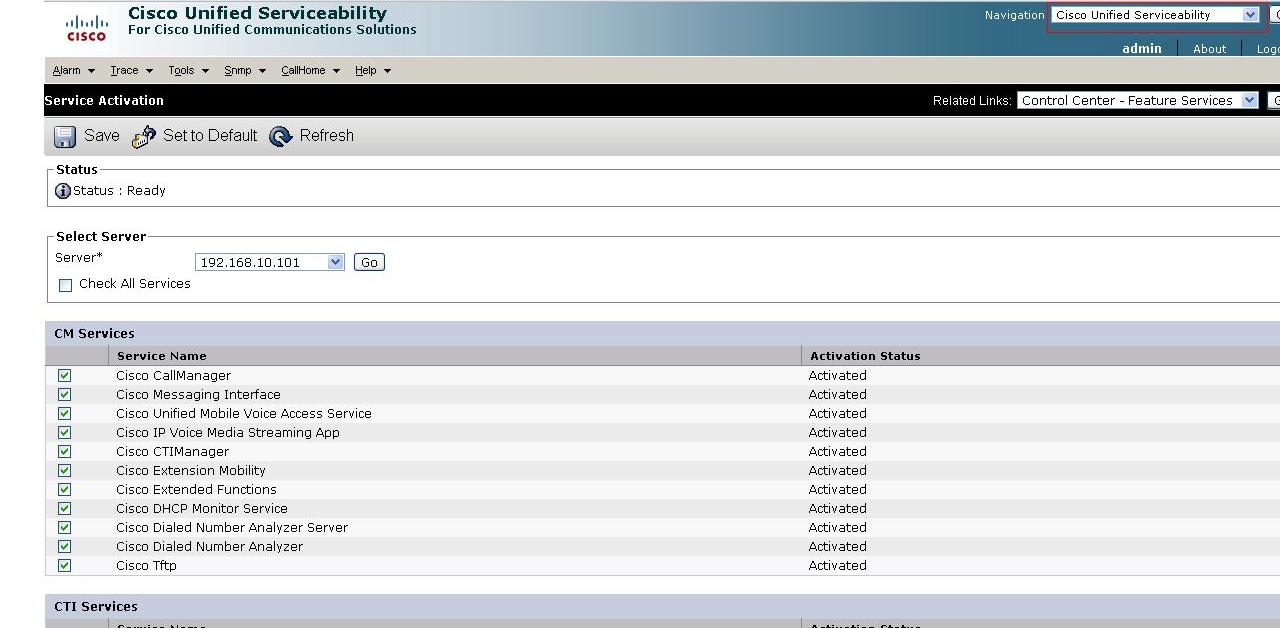
1.) Service Activation
Step 1:-Go to Cisco Unified Serviceability page.
Step 2:- In the menu Tools > Service Activation, activate the Cisco Unified Mobile Voice Access Service. When activated, verify that the Cisco Unified Mobile Voice Access service is started using the Control Center > Feature Services.
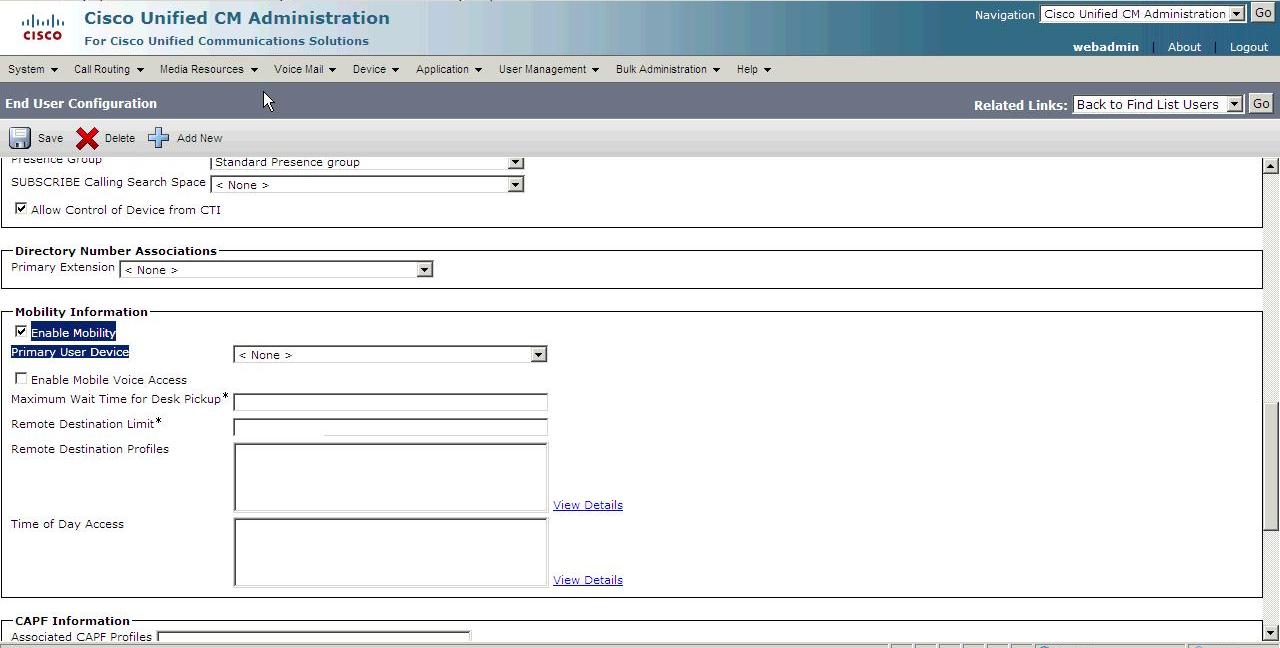
2.) End User Configuration
Step 1:- Go to the Cisco Unified Communications Manager Administration page
Step 2:- Select User Management
Step 3:- Select End User
Step 4:- Click Add New.
Step 5:- Configure user and Check the enable mobility check box. Select SAVE.
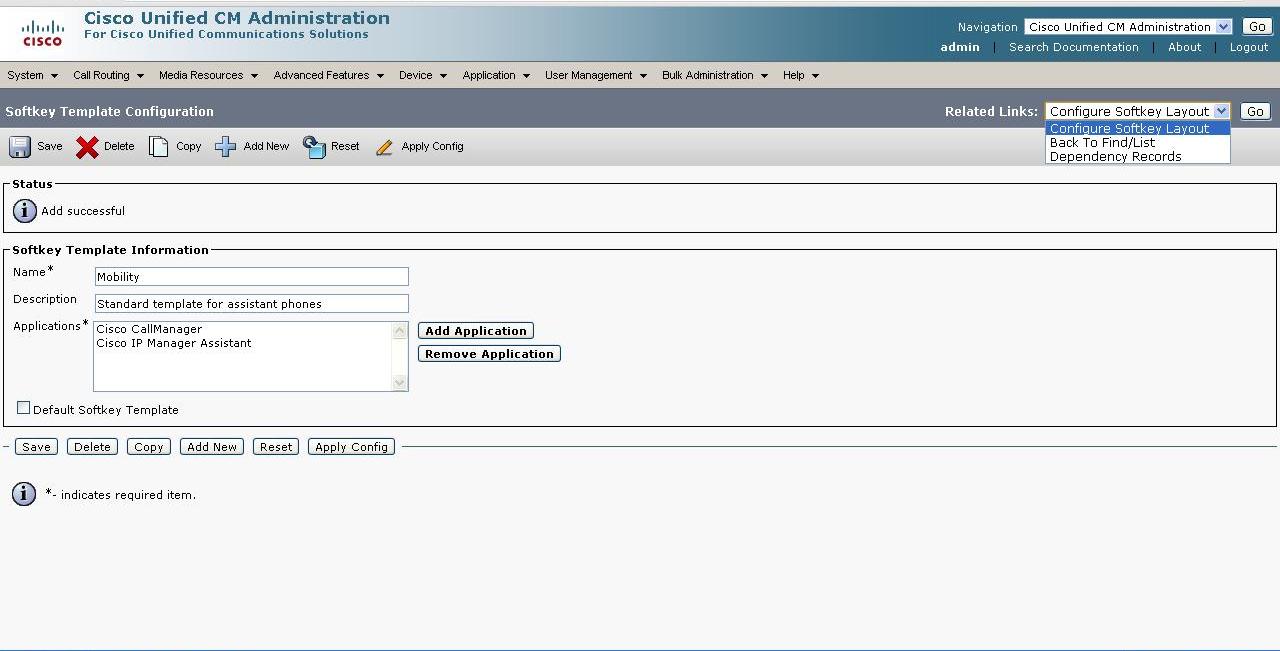
3.) Mobility Softkey template
Step 1:- Go to the Cisco Unified Communications Manager Administration page
Step 2:- Select Device.
Step 3:- Select Device Settings.
Step 4:- Select Softkey Template.
Step 5:-Select Add New
Step 6:- Change the softkey template name.
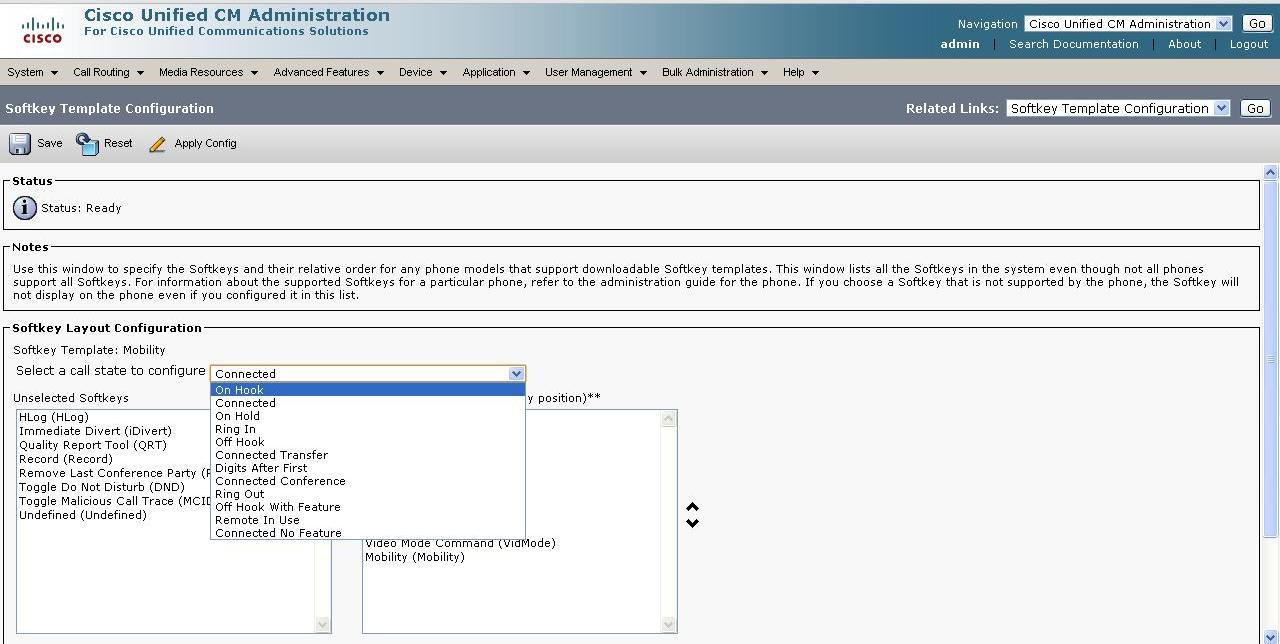
Step 7:- Select "Configure Softkey Layout" from Related Links option. Click Go.

Assign the Mobility softkey for the following call states:
On Hook
Connected
4.)Assign template to Phone
Then assign the newly created softkey template to the IP phones that are configured for Cisco Unified Mobility and reset the IP phones.
Step 1:- Go to the Cisco Unified Communications Manager Administration page.
Step 2:- Select Device.
Step 3:- Select Phone.
Step 4:- Select Add new.
Step 5:- Select the appropriate settings for your phone such as Device pool, CSS, MRGL's, device security profile, location, etc and select the newly configured mobility SoftKey Template.Click Save.

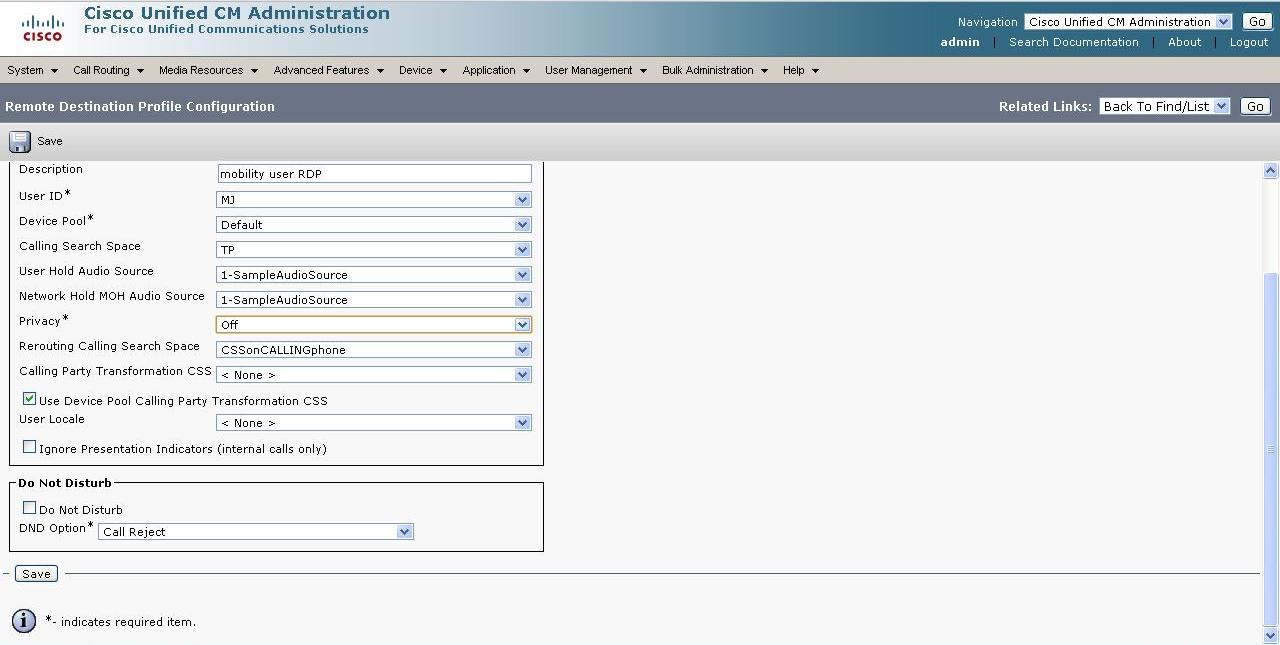
5.) Configure a Remote destination Profile
Step 1:- Go to the Cisco Unified Communications Manager Administration page
Step 2:- Select Device Settings.
Step 3:- Select Remote Destination Profile.
Step 4:- Select and Click the Add New button
Step 5:- Configure the settings like name,description,User ID: mobility user,device Pool,Calling Search Space,User Hold Audio Source,Network Hold MOH Audio Source,Privacy: off,Rerouting Calling Search etc and click Save.
Step 6:-Configure DN by clicking on the Line[1].Click Save.
6.) Create a new Remote Destination
1. ![]() Sign in to your User Options web page.
Sign in to your User Options web page.
2. ![]() Select User Options > Mobility Settings > Remote Destinations.
Select User Options > Mobility Settings > Remote Destinations.
3. ![]() Select Add New.
Select Add New.
4. ![]() Enter the following information:
Enter the following information:
–![]() Name—Enter a name for the mobile (or other) phone.
Name—Enter a name for the mobile (or other) phone.
–![]() Destination Number—Enter your mobile phone number.
Destination Number—Enter your mobile phone number.
5. ![]() Select your remote destination profile from the drop-down list box. Your remote destination profile contains the settings that apply to remote destinations that you create.
Select your remote destination profile from the drop-down list box. Your remote destination profile contains the settings that apply to remote destinations that you create.
6. ![]() Select the Mobile Phone check box to allow your remote destination to accept a call sent from your desk phone.
Select the Mobile Phone check box to allow your remote destination to accept a call sent from your desk phone.
7. ![]() Select the Enable Mobile Connect check box to allow your remote destination to ring simultaneously with your desk phone.
Select the Enable Mobile Connect check box to allow your remote destination to ring simultaneously with your desk phone.
8. ![]() Select one of the following options in the Ring Schedule area (the ring schedule drop-down list boxes include only the access lists that you have created):
Select one of the following options in the Ring Schedule area (the ring schedule drop-down list boxes include only the access lists that you have created):
–![]() All the time—Select this option if you do not want to impose day and time restrictions on ringing the remote destination.
All the time—Select this option if you do not want to impose day and time restrictions on ringing the remote destination.
–![]() As specified below—Select this option and select from the following items to set up a ring schedule based on day and time:
As specified below—Select this option and select from the following items to set up a ring schedule based on day and time:
a. ![]() Select a check box for each day of the week you want to allow calls to ring the remote destination.
Select a check box for each day of the week you want to allow calls to ring the remote destination.
b. ![]() For each day, select All Day or select the beginning and ending times from the drop-down lists.
For each day, select All Day or select the beginning and ending times from the drop-down lists.
c. ![]() Select the time zone from the drop-down list box.
Select the time zone from the drop-down list box.
9. Select one of these ringing options:
–![]() Always ring this destination.
Always ring this destination.
–![]() Ring this destination only if the caller is in the allowed access list that you select.
Ring this destination only if the caller is in the allowed access list that you select.
–![]() Do not ring this destination if the caller is in the blocked access list that you select.
Do not ring this destination if the caller is in the blocked access list that you select.
10. ![]() Select Save.
Select Save.
Checklist
Step 1:- Activate the Cisco Unified Mobile Voice Access Service in Cisco Unified Serviceability. You must activate this service on the first node in the cluster.
Step 2:- Configure user accounts.
Note:- Make sure that you check the Enable Mobility check box and the Enable Mobile Voice Access check box in the End User
Configuration window.
Note:- Checking the Enable Mobility check box triggers licensing to consume device license units (DLUs) for Mobile Connect.
Step 3:- Create access lists for Mobile Connect by assigning each list to the Mobile Connect user and specifying whether the list is an allowed or blocked list.
Step 4:- Create remote destination profiles and assign each user to a profile.
Step 5:- Associate desktop directory numbers (DNs) for the user.
Step 6:- Add remote destinations by selecting the previously-defined profile as part of the configuration.
Step 7:- In the Service Parameters Configuration window:
• Choose True for Enable Mobile Voice Access and enter the Mobile Voice Access Number, which is the DID number that end users use to
reach Mobile Voice Access.
Note:- To make Mobile Voice Access calls, you must configure these service parameters and check the Enable Mobile Voice Access check
box in the End User Configuration window.
• Choose True for Enable Enterprise Feature Access to enable access to hold, resume, transfer, and conference features from remote
destinations.
Step 8:- Configure the directory number for Mobile Voice Access.
Step 9:- As an alternative, configure Enterprise Feature Access Two-Stage Dialing (also known as Enterprise Feature Access) by configuring a service parameter and the enterprise feature access DID directory number.
Note:- Enterprise Feature Access provides the same functionality as Mobile Voice Access but does not support the IVR component. Also,
Enterprise Feature Access does not require configuration of the H.323 gateway nor VXML.
Step 10:- Configure mobility settings for dual-mode phone handoff.
Step 11:- Configure a Mobility softkey for the phone user that uses Mobile Connect.
Step 12:- Configure time-of-day access for users. Use the fields in the When Mobile Connect is Enabled pane of the Remote Destination Configuration window to do so.
The following performance counters can be viewed in the RTMT tool to track the health and utilization of Unified Mobility:-
•![]() \Cisco Mobility Manager\MobilityFollowMeCallsAttempted
\Cisco Mobility Manager\MobilityFollowMeCallsAttempted
Increments each time a call to an enterprise number is extended to a remote destination via Mobile Connect.
•![]() \Cisco Mobility Manager\MobilityFollowMeCallsIgnoredDueToAnswerTooSoon
\Cisco Mobility Manager\MobilityFollowMeCallsIgnoredDueToAnswerTooSoon
Increments each time a Mobile Connect call extended to a remote destination is pulled back because the call is answered before the Answer Too Soon Timer expires (single enterprise voicemail box feature).
Q: When I press the mobility softkey I get "Mobile Connect Off" "You are not a valid Mobile Connect User
Refer https://supportforums.cisco.com/message/3025360#3025360
Related Links

")
- Mark as Read
- Mark as New
- Bookmark
- Permalink
- Report Inappropriate Content
Nice documment. 5 Stars
- Mark as Read
- Mark as New
- Bookmark
- Permalink
- Report Inappropriate Content
It appears that version 10.0 onward when the end user pages were replaced with Self-Care portal, the ability to set access list has gone. Does anyone know if there is a way to allow end users to set their own allow or blocked list for mobile connect?
Find answers to your questions by entering keywords or phrases in the Search bar above. New here? Use these resources to familiarize yourself with the community: