
Turn on suggestions
Auto-suggest helps you quickly narrow down your search results by suggesting possible matches as you type.
Showing results for
- Cisco Community
- Technology and Support
- DevNet Hub
- DevNet Networking
- Networking Blogs
- Template based provisioning with Cisco Prime Infrastructure – Part 1
5551
Views
26
Helpful
13
Comments
Options
- Subscribe to RSS Feed
- Mark as New
- Mark as Read
- Bookmark
- Subscribe
- Printer Friendly Page
- Report Inappropriate Content
06-28-2016
05:39 AM
While APIC-EM is used for "policy based" network configuration, not all network device attributes are exposed through policy at this point. This will be an evolution as the policy model gets filled out. More on policy models and what this means for simplification in a later blog.
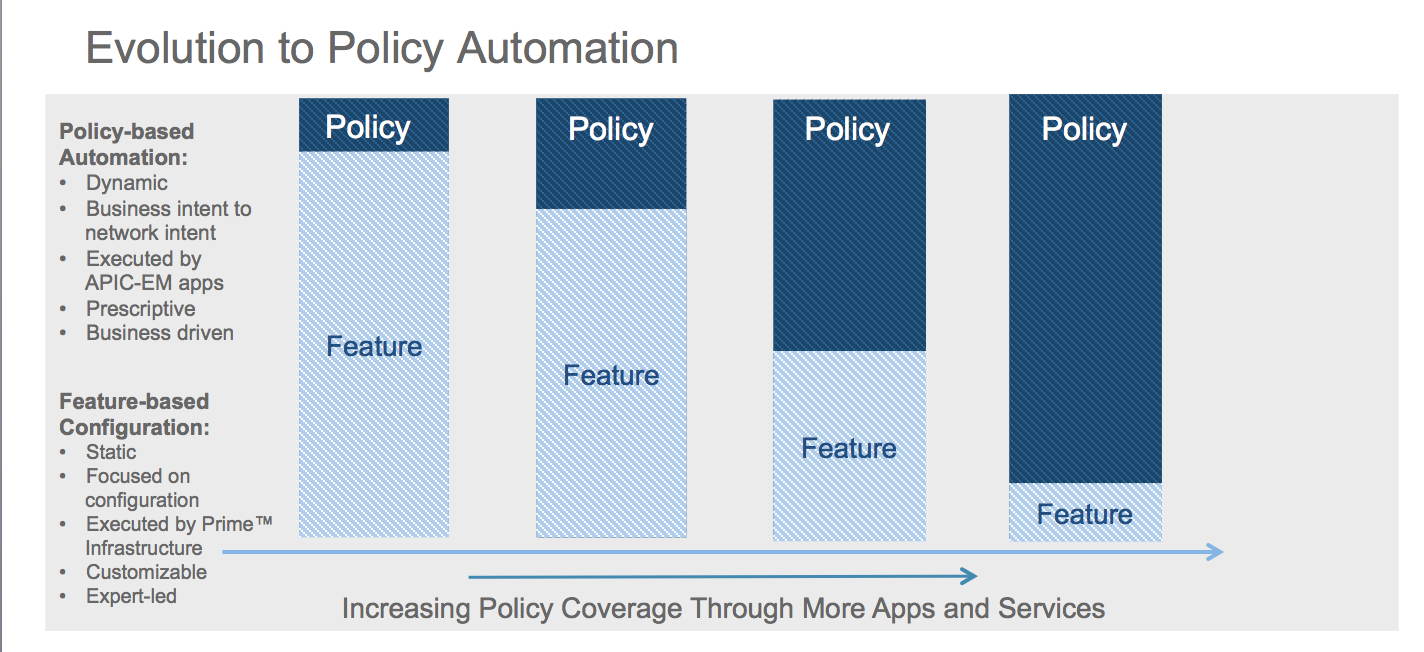
A common question is "How can the non-policy based elements be automated?" For example, configure a VLAN on a switchport. The good news is Prime Infrastructure (PI) exposes a REST API for Configuration Templates, which does exactly this (and lots more). There are 186 templates predefined in PI3.1
This blog provides an outline of template-based configuration using Cisco Prime Infrastructure API. In particular, assigning a VLAN to an interface using the “Configure Interface” template. The next blog in the series will cover some more advanced topics.
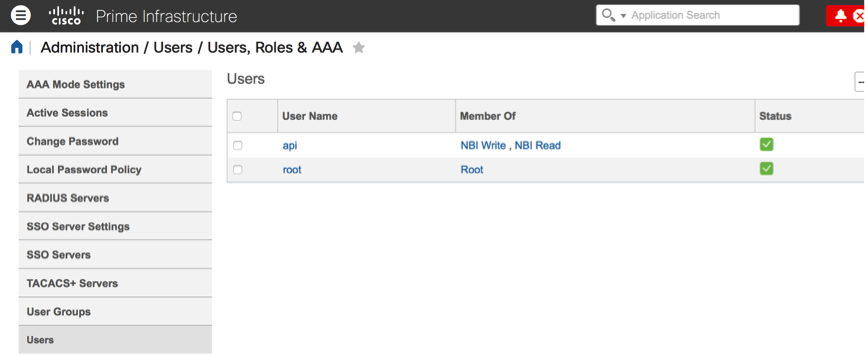
Getting Started
Make sure you have an API user defined in Prime Infrastructure (PI)
Admin->Users Roles & AAA
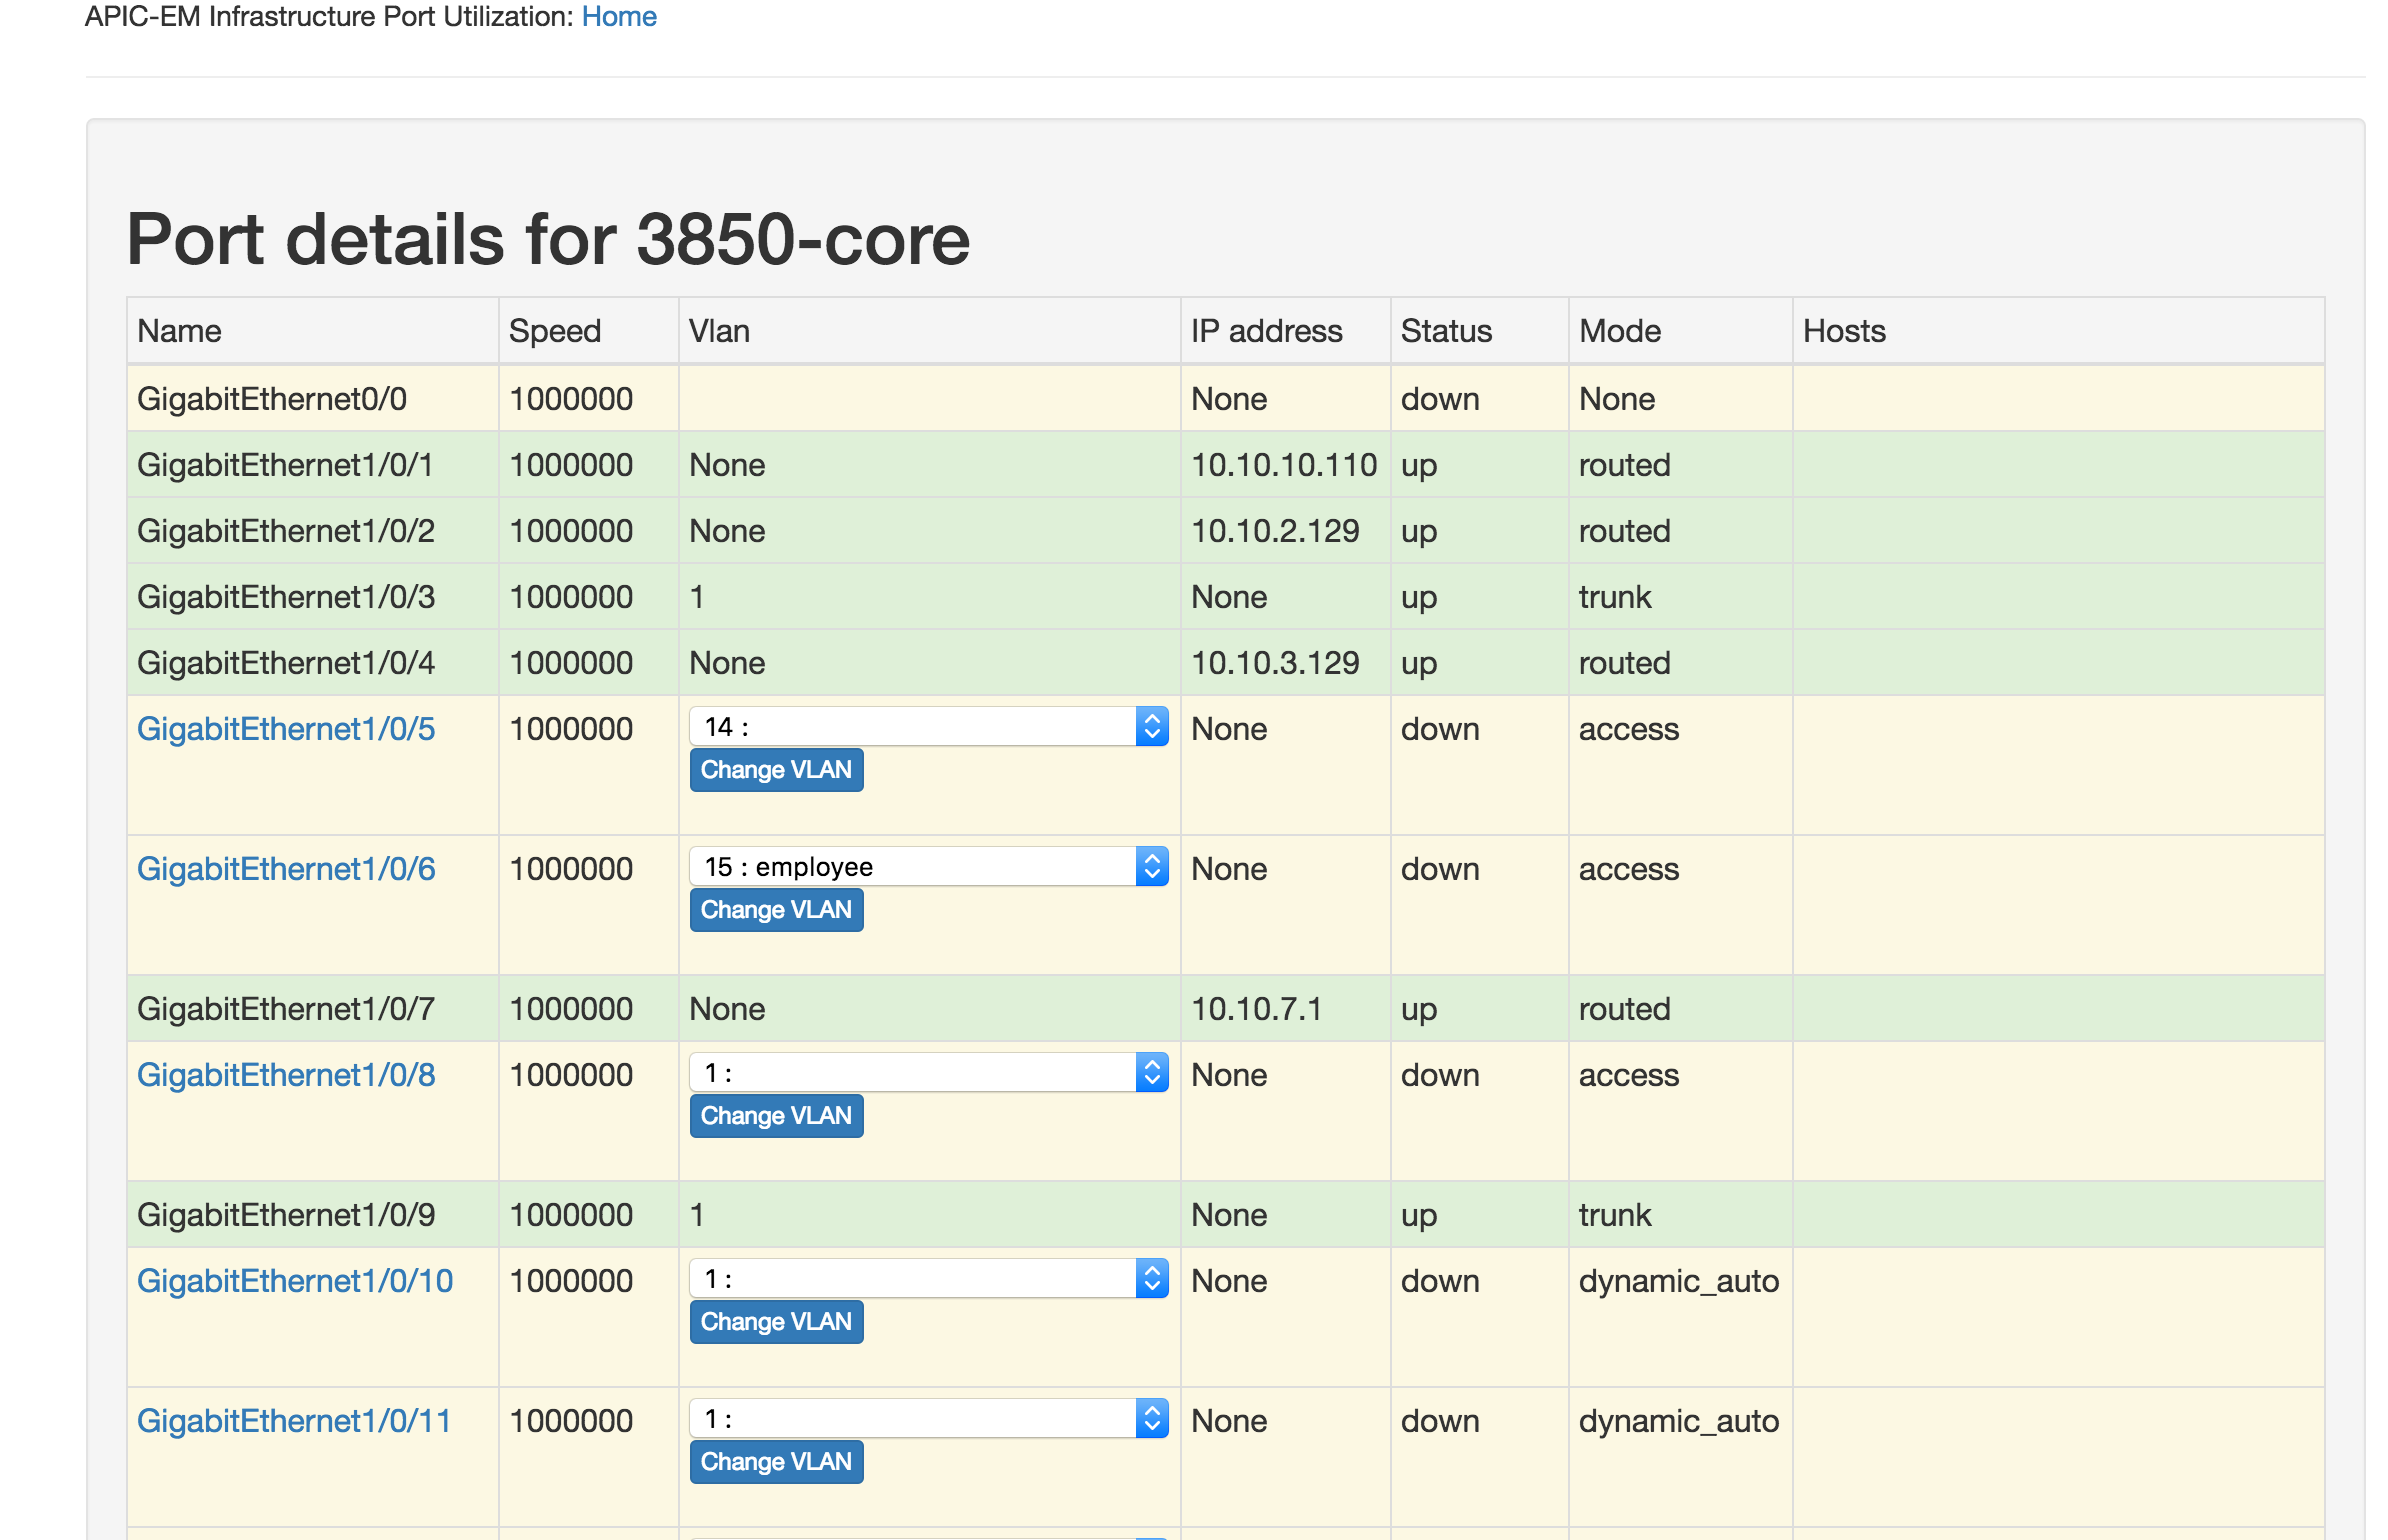
An example – VLAN assignment
Here is an example of a simple web application written using Prime Infrastructure configuration template. The UI is not particularly elegant, but this only took 30 minutes to write. When the user selects a vlan on a switch port, a PI template is used to make the configuration change.
First a bit about templates
Templates are predefined command sequences in PI. There are a 186 built-in templates and you can define new ones. A template can be applied to a device via an API call. A template has a name and an id.
The ID of the “Configure Interface” template is 541541. ID might be different on your instance of PI. Below is a JSON schema for the parameters that you can use in the "Configure Interface" template. Do not worry about how this was generated; we will cover that in the next blog.
{
"cliTemplateCommand": {
"targetDevices": {
"targetDevice": {
"targetDeviceID": "<DEVICEID>",
"variableValues": {
"variableValue": [
{
"name": "Description",
"value": ""
},
{
"name": "InterfaceName",
"value": "required"
},
{
"name": "NativeVLan",
"value": ""
},
{
"name": "StaticAccessVLan",
"value": ""
},
{
"name": "TrunkAllowedVLan",
"value": ""
},
{
"name": "VoiceVlan",
"value": ""
},
{
"name": "spd",
"value": ""
},
{
"name": "A1",
"value": ""
},
{
"name": "duplexField",
"value": ""
},
{
"name": "PortFast",
"value": ""
}
]
}
}
},
"templateName": "Configure Interface"
}
}
How to find the targetDeviceID
You will notice the template has an attribute called "targetDeviceID". The template will be applied to this device. Every device in PI has a unique identifier, which is available through an API call. The simplest way is to do a lookup by IP address.
https://{{pi-server}}/webacs/api/v1/data/Devices?ipAddress=10.10.8.100
Will return a record (in JSON or XML) as follows. 610622 is the DeviceID
{
"queryResponse": {
"@last": "0",
"@first": "0",
"@count": "1",
"@type": "Devices",
"@responseType": "listEntityIds",
"@requestUrl": "https://adam-pi/webacs/api/v1/data/Devices?ipAddress=10.10.8.100",
"@rootUrl": "https://adam-pi/webacs/api/v1/data",
"entityId": [
{
"@type": "Devices",
"@url": "https://adam-pi/webacs/api/v1/data/Devices/610622",
"$": "610622"
}
]
}
}
Apply the template to the device
The previous step obtained the "targetDeviceID" to identify the device, which the template will be applied to. Other variables can now be filled in, for example, the "InterfaceName", the "Description" and the "StaticAccessVLAN". The variable "A1" defines the mode of the switchport, which will be "Access".
All variables need to be present, even if they are not being used. For example, in this case “VoiceVlan” is not used, so it is just set to "".
{
"cliTemplateCommand" : {
"targetDevices" : {
"targetDevice" : {
"targetDeviceID" : "610622",
"variableValues" : {
"variableValue": [
{
"name": "InterfaceName",
"value": "gigabitethernet1/0/2"
},
{
"name": "Description",
"value": "Fred1"
},
{
"name": "StaticAccessVLan",
"value": "8"
},
{
"name": "A1",
"value": "Access"
},
{ "name": "NativeVLan", "value": ""},
{ "name": "duplexField","value": ""},
{ "name": "TrunkAllowedVLan","value": "" },
{ "name": "spd","value": "" },
{ "name": "VoiceVlan" ,"value": ""},
{ "name": "PortFast","value": "" }
]
}
}
},
"templateName" : "Configure Interface"
}
}
A very simple REST API call is required to apply this template to the device. Here is a python snippet to do this. Notice this is a PUT method, not a POST.
PUT https://{{pi-server}}/webacs/api/v1/op/cliTemplateConfiguration/deployTemplateThroughJob.json
PAYLOAD below: Remember to use the Content-Type : application/json header
{
"cliTemplateCommand" : {
"targetDevices" : {
"targetDevice" : {
"targetDeviceID" : "610622",
"variableValues" : {
"variableValue": [
{
"name": "InterfaceName",
"value": "gigabitethernet1/0/2"
},
{
"name": "Description",
"value": "Fred1"
},
{
"name": "StaticAccessVLan",
"value": "8"
},
{
"name": "A1",
"value": "Access"
},
{ "name": "NativeVLan", "value": ""},
{ "name": "duplexField","value": ""},
{ "name": "TrunkAllowedVLan","value": "" },
{ "name": "spd","value": "" },
{ "name": "VoiceVlan" ,"value": ""},
{ "name": "PortFast","value": "" }
]
}
}
},
"templateName" : "Configure Interface"
}
Monitoring the status of the job
The PUT API call above will create a deployment job. Deployment jobs are asynchronous, meaning a response will be provided straight away, but that does not indicate success/failure. The response will contain a "jobName", which you can poll to obtain the job status.
{
"mgmtResponse": {
"@responseType": "operation",
"@requestUrl": "https://adam-pi/webacs/api/v1/op/cliTemplateConfiguration/deployTemplateThroughJob",
"@rootUrl": "https://adam-pi/webacs/api/v1/op",
"cliTemplateCommandJobResult": {
"jobName": "JobCliTemplateDeployIOSDevices07_35_57_626_PM_06_28_2016",
"message": "An deploy job has been successfully created. "
}
}
}
The following REST call finds the status of the job.
GET
https://{{pi-server}}/webacs/api/v1/data/JobSummary.json?jobName=JobCliTemplateDeployIOSDevices07_35_57_626_PM_06_28_2016
In this case it is completed. The last field in "@displayName" indicates completed. The "jobNumber" is 560885
{
"queryResponse": {
"@last": "0",
"@first": "0",
"@count": "1",
"@type": "JobSummary",
"@responseType": "listEntityIds",
"@requestUrl": "https://adam-pi/webacs/api/v1/data/JobSummary?jobName=JobCliTemplateDeployIOSDevices07_35_57_626_PM_06_28_2016",
"@rootUrl": "https://adam-pi/webacs/api/v1/data",
"entityId": [
{
"@type": "JobSummary",
"@displayName": "CliTemplateDeployIOSDevices,JobCliTemplateDeployIOSDevices07_35_57_626_PM_06_28_2016,COMPLETED",
"@url": "https://adam-pi/webacs/api/v1/data/JobSummary/560885",
"$": "560885"
}
]
}
}
The jobNumber can be used to get more details of execution:
GET https://{{pi-server}}/webacs/api/v1/data/JobSummary/560885.json
With the following result:
{
"queryResponse": {
"@type": "JobSummary",
"@responseType": "getEntity",
"@requestUrl": "https://adam-pi/webacs/api/v1/data/JobSummary/560885",
"@rootUrl": "https://adam-pi/webacs/api/v1/data",
"entity": [
{
"@dtoType": "jobSummaryDTO",
"@type": "JobSummary",
"@url": "https://adam-pi/webacs/api/v1/data/JobSummary/560885",
"jobSummaryDTO": {
"@displayName": "CliTemplateDeployIOSDevices,JobCliTemplateDeployIOSDevices07_35_57_626_PM_06_28_2016,COMPLETED",
"@id": "560885",
"completionTime": "2016-06-28T19:36:28.727+10:00",
"description": "Cli Template Deploy for IOS devices",
"duration": 0,
"jobName": "JobCliTemplateDeployIOSDevices07_35_57_626_PM_06_28_2016",
"jobStatus": "COMPLETED",
"jobType": "CliTemplateDeployIOSDevices",
"lastStartTime": "2016-06-28T19:36:27.700+10:00",
"resultStatus": "SUCCESS",
"runId": 6477369,
"runStatus": "COMPLETED",
"username": "api"
}
}
]
}
}
If you want the full details of the execution of the job, you can use the following API call.
GET
https://{{pi-server}}/webacs/api/v1/op/jobService/runhistory.json?jobName=JobCliTemplateDeployIOSDevices07_35_57_626_PM_06_28_2016
The output is below and is very detailed.
{
"mgmtResponse": {
"@responseType": "operation",
"@requestUrl": "https://adam-pi/webacs/api/v1/op/jobService/runhistory?jobName=JobCliTemplateDeployIOSDevices07_35_57_626_PM_06_28_2016",
"@rootUrl": "https://adam-pi/webacs/api/v1/op",
"job": {
"description": "Cli Template Deploy for IOS devices",
"jobId": 560885,
"jobName": "JobCliTemplateDeployIOSDevices07_35_57_626_PM_06_28_2016",
"jobStatus": "COMPLETED",
"jobType": "CliTemplateDeployIOSDevices",
"runInstances": {
"runInstance": {
"completionTime": "2016-06-28T19:36:28.727+10:00",
"lastStartTime": "2016-06-28T19:36:27.700+10:00",
"resultStatus": "SUCCESS",
"results": {
"result": [
{
"property": "JobCliTemplateDeployIOSDevices07_35_57_626_PM_06_28_2016",
"value": "1/1 template configurations successfully applied."
},
{
"property": 610622,
"value": "configlet:\n interface gigabitethernet1/0/2\n description Fred1\n switchport mode access\n switchport ACCess vlan 8 \n \n \n \n \n \n \n \n exit\n\n\n\n\n\n\n\n\n\n\n response:\n<cliChunks><cliChunk><cli>terminal width 0\nconfig t\ninterface gigabitethernet1/0/2\ndescription Fred1\nswitchport mode access\nswitchport ACCess vlan 8\nexit\n</cli><response><![CDATA[terminal width 0\n3650-dns#config t\nEnter configuration commands, one per line. End with CNTL/Z.\n3650-dns(config)#interface gigabitethernet1/0/2\n3650-dns(config-if)#description Fred1\n3650-dns(config-if)#switchport mode access\n3650-dns(config-if)#switchport ACCess vlan 8\n3650-dns(config-if)#exit\n3650-dns(config)#]]></response></cliChunk></cliChunks>"
}
]
},
"runId": 6477369,
"runStatus": "COMPLETED"
}
}
}
}
}
Back to Prime Infrastructure
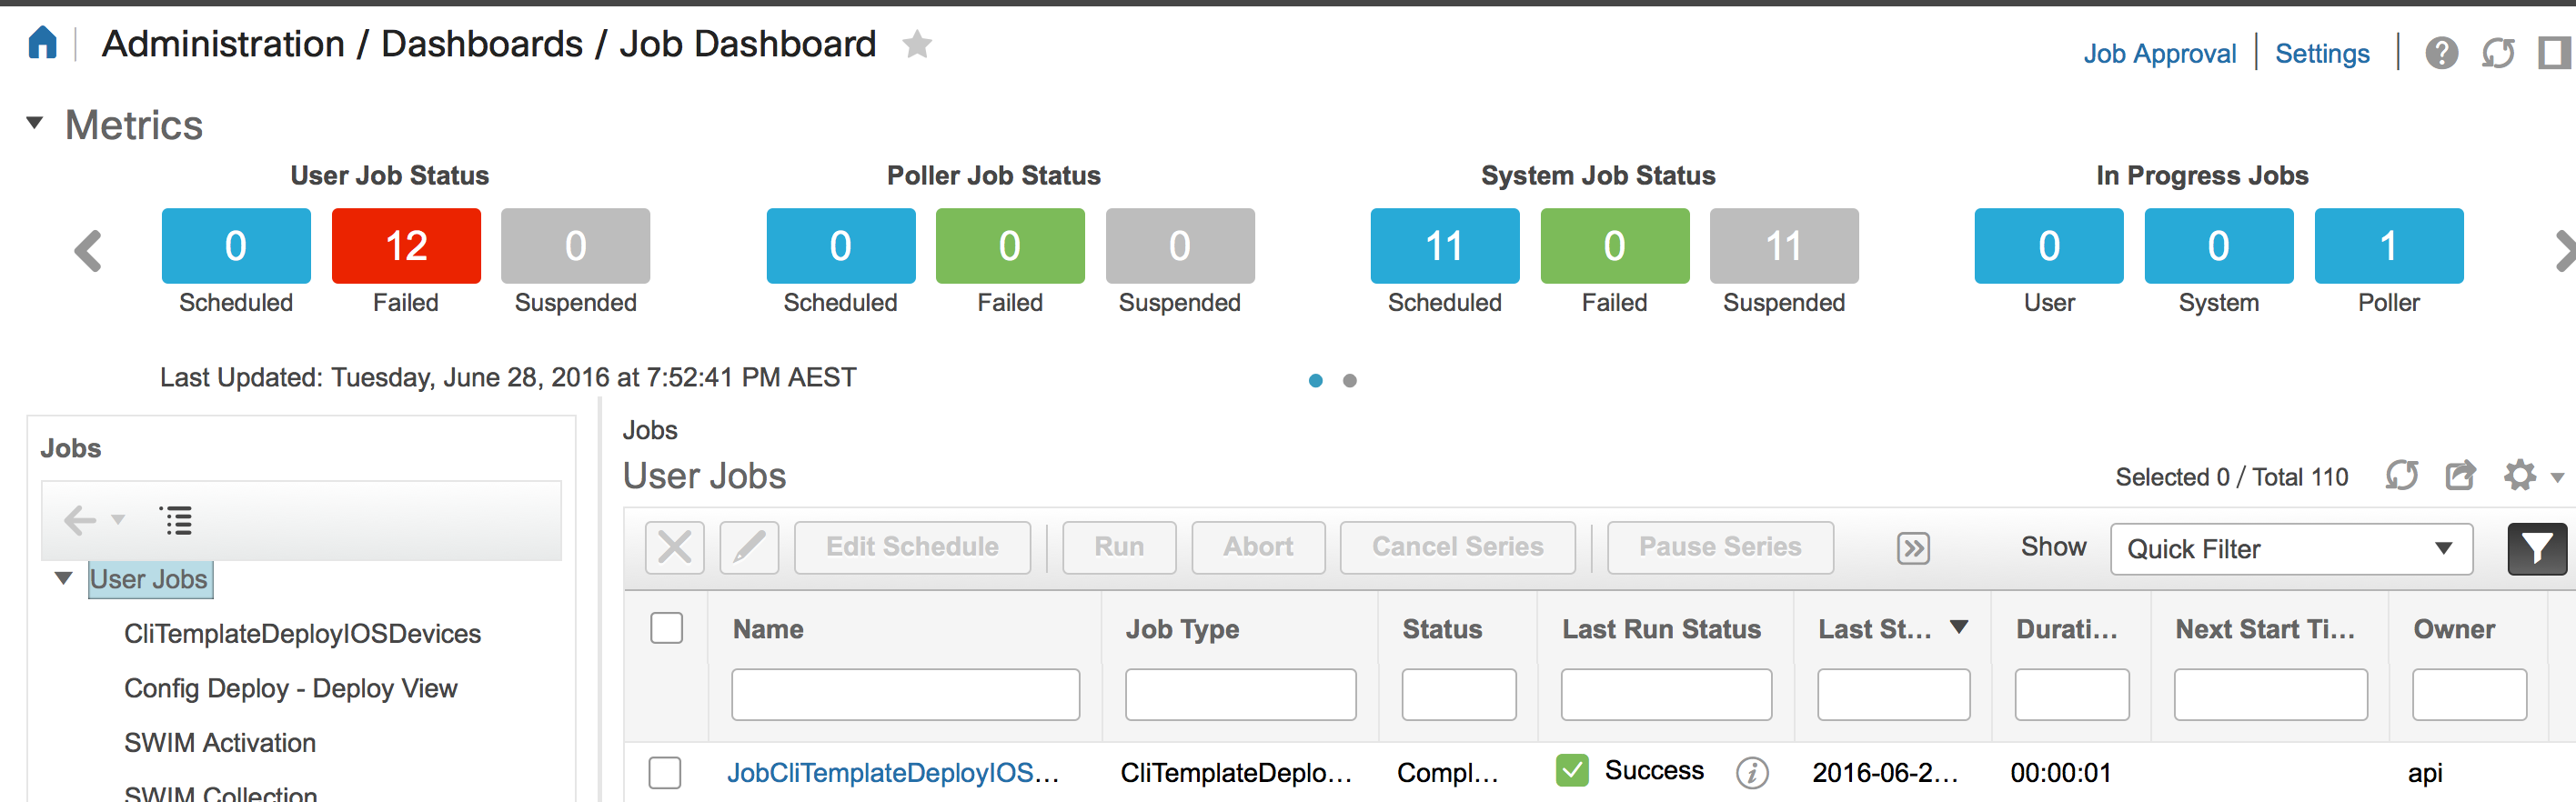
The job is also displayed in the PI job Dashboard. Note the user is “api”, and that it was successful. The interface on the switch has now been assigned to vlan 8.
Wrapping up
That should give you a good understanding of how to use the PI template REST APIs. This is enough to write the "Vlan change" application mentioned at the top of the article.
The second part of this blog will go into more details, including a python tool for generating template schemas and example of a "generic" template execution script that can run any template.
For more examples on Prime Infrastructure API, you could visit Cisco Devnet.
Thanks for reading
Labels:
13 Comments
You must be a registered user to add a comment. If you've already registered, sign in. Otherwise, register and sign in.
Getting Started
Find answers to your questions by entering keywords or phrases in the Search bar above. New here? Use these resources to familiarize yourself with the community:
Customers Also Viewed These Support Documents