- Cisco Community
- Technology and Support
- Networking
- Networking Knowledge Base
- Understanding LAN Management Solution (LMS) Discovery
- Subscribe to RSS Feed
- Mark as New
- Mark as Read
- Bookmark
- Subscribe
- Printer Friendly Page
- Report Inappropriate Content
- Subscribe to RSS Feed
- Mark as New
- Mark as Read
- Bookmark
- Subscribe
- Printer Friendly Page
- Report Inappropriate Content
04-14-2010 10:19 AM - edited 08-29-2017 09:24 AM
- Introduction
- Configuring LMS Discovery
- Discovery Modules
- SNMP Settings
- Discovery Filters
- Global Settings
- Discovery Configuration File
- Running LMS Discovery
- Scheduling a Discovery Job
- Troubleshooting CSDiscovery
- Discovery Logs
- Other Debugging Help
- Additional Help
Introduction
The ability for CiscoWorks LAN Management Solution to discover devices on the network has existed for a long time. In the beginning (i.e. with CiscoWorks for Switched Internetworks or CWSI), Discovery was part of Campus Manager, and served two purposes. The first was to find new devices, and the second was to build a layer 2 topology of the network. Because of that, Discovery was something that had to be run periodically (usually multiple times per day) to catch changes to the layer 2 topology.
In LMS 2.5, Discovery was broken out into a separate daemon called DeviceDiscovery. While it was still part of the Campus Manager application, it no longer collected information needed to build the layer 2 network topology. Instead, its only jobs were to find new devices in the network, and to update existing device attributes such as hostname, management IP address, and display name in the Device Credential Repository (DCR). The job of building the layer 2 network topology was placed into a new process called Campus Data Collection, and was left to the ANIServer daemon. Because of this separation of Discovery and Data Collection, it was no longer necessary to run Discovery periodically. In fact, in a stable network, Discovery should not be run much at all as it provides no additional value.
Even though Discovery was separated from the layer 2 topology construction, it was still bound to Campus Manager, and still required all devices to participate in Cisco Discovery Protocol (CDP) in order to be discovered. This changed in LMS 3.0.1. In LMS 3.0.1, Discovery was removed from Campus Manager, and placed into Common Services. Common Services Discovery (CSDiscovery) retained the ability to discover devices via CDP, but also added a slew of new protocols such as ping sweep, routing table, and ARP.
In this document, we are going to explore how to configure CSDiscovery, how Discovery works, and how to troubleshoot problems with Discovery. LMS 3.2 and 4.1 will be used for examples, but most of the information will also apply to LMS 3.0.1, LMS 3.1, and LMS 4.0.
Hold on tight, and keep your arms and legs in the forum.
Configuring LMS Discovery
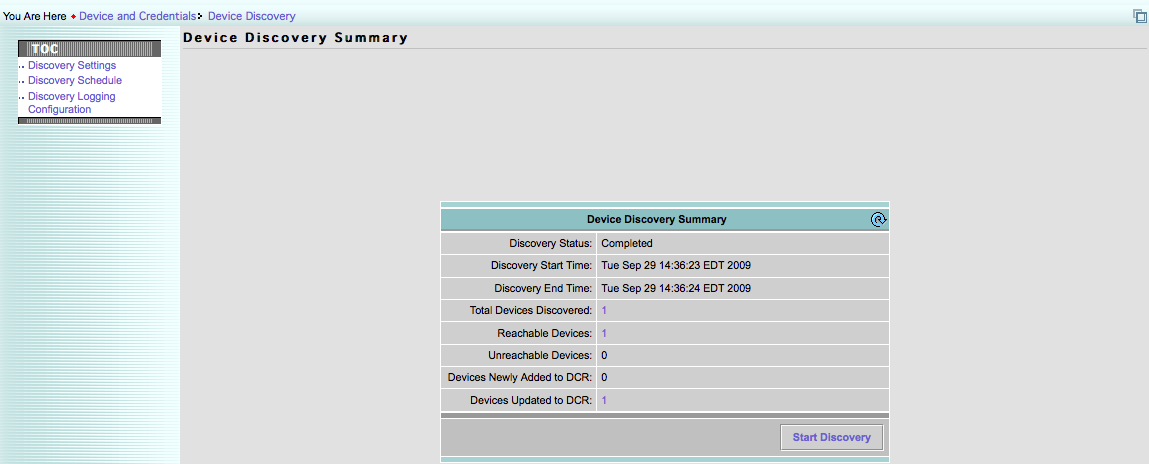
All Discovery configuration is done under Common Services > Device and Credentials > Device Discovery (LMS 3.x) or Inventory > Device Administration > Discovery > Settings (LMS 4.x). See Figure 1.
Figure 1:
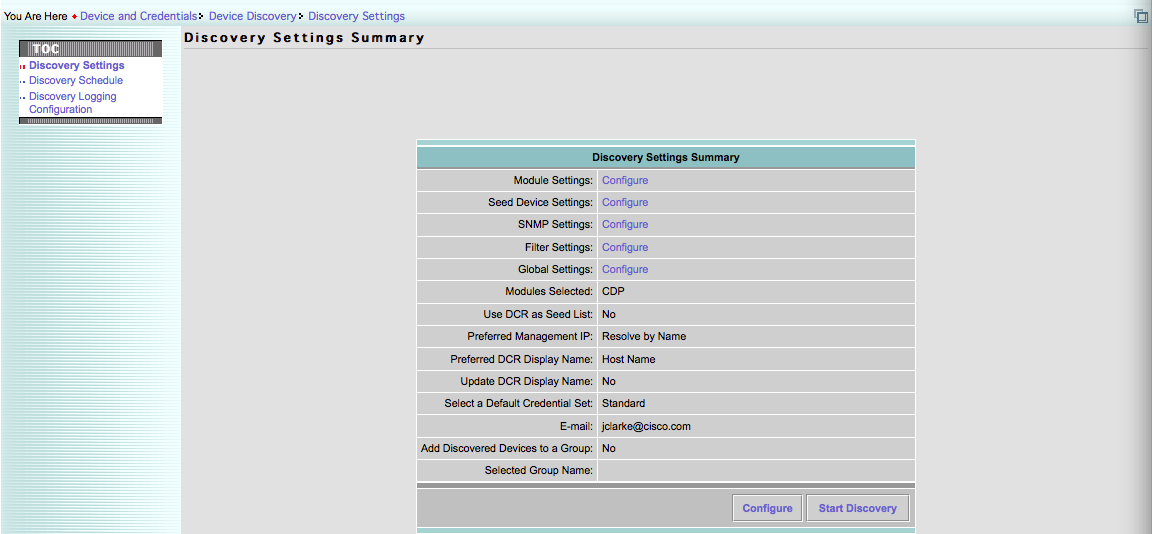
The first thing to do is click on Discovery Settings in the Table of Contents (TOC). See Figure 2.
Figure 2:
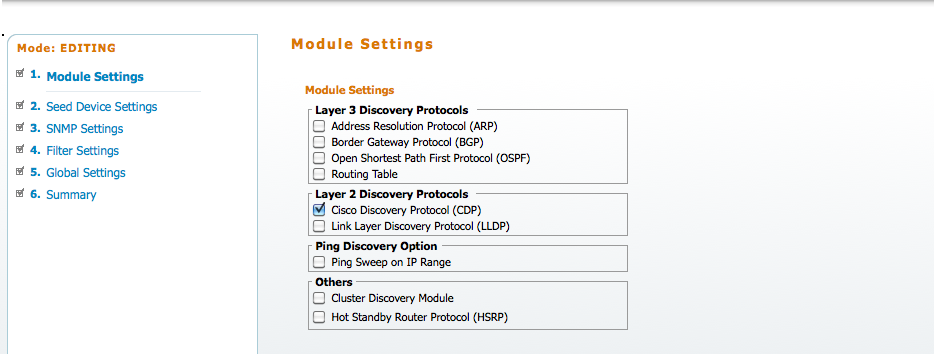
The first task is to select the desired Discovery modules. You can choose to enable one or more of "Address Resolution Protocol (ARP)", "Border Gateway Protocol (BGP)", "Open Shortest Path First Protocol (OSPF)", "Routing Table", "Cisco Discovery Protocol (CDP)", "Link Layer Discovery Protocol (LLDP) (LMS 4.1 only)", "Ping Sweep on IP Range", "Cluster Discovery Module", and "Hot Standby Router Protocol (HSRP)". See Figure 3.
Figure 3:
Discovery Modules
In general, each Discovery module will require you to configure one or more seed devices from which Discovery will start. You will also have the option to "Use DCR as Seed List." If that option is enabled, then every device which is already in DCR will be used by the individual Discovery modules. That can have the effect of speeding up Discovery in some cases, especially if you are using multiple SNMP credentials. However, if you want to restrict Discovery with hop count, you should not enable "Use DCR as Seed List" as the DCR devices will not have a hop count associated with them (see CSCsu88678).
The hop count metric (when available) allows you control how deep Discovery recurses in the network looking for devices. For example, a hop count of 1 will tell Discovery to stop after polling all of the peers of the seed device. A hop count of 2 will cause Discovery to stop after it queries all of the peers of the seed device, then all of those devices' peers (and so on).
In general, most users go with a combination of CDP and Ping Sweep On IP Range for their Discovery modules. These have the ability to discover a campus as well as a WAN.
Address Resolution Protocol (ARP)
The ARP module requires you to specify a seed list and/or enable "Use DCR as Seed List." You can also associate a hop count to each seed device. When this module is enabled, Discovery will query each seed device (and its peers) for their ARP tables via SNMP. The specific objects used are:
- ipNetToMediaNetAddress
- ipNetToMediaPhysAddress
- ipNetToMediaIfIndex
- ipNetToMediaType
The ARP module depends on the Routing Table module described below. Only once the routing table has been queried for devices can the ARP module process those devices. If a device was not processed by the Routing Table module, then the ARP module will skip it. The Routing Table module will get selected automatically when the ARP module is selected.
For each found ARP entry, Discovery will check the MAC address to see if it is a Cisco devices (i.e. the OUI belongs to Cisco). If not, the device will be discarded. If the discovered device is a Cisco device, its ipNetToMediaNetAddress (i.e. the IP address) will be added to the queue of devices to process. IP addresses which start with "127.0.0" or end with "0.0.0" will be discarded.
NOTE: The ARP module is IPv4 only. IPv6 does not use ARP.
Border Gateway Protocol (BGP)
The BGP module requires you to specify a seed list and/or enable "Use DCR as Seed List." You can also associate a hop count to each seed device. When this module is enabled, Discovery will query the BGP routing table on each seed device (and its peers) via SNMP. The object used is bgpPeerRemoteAddr from the BGP4-MIB.
Each peer address found which does not begin with "127.0.0" or end with "0.0.0" will be added to the queue of devices to process.
NOTE: The BGP module is not Virtual Routing and Forwarding (VRF) aware, nor is it IPv6 aware. The module will only query the physical device, and not the VRF contexts. It will also only find IPv4 peer addresses.
Open Shortest Path First (OSPF)
The OSPF module requires you to specify a seed list and/or enable "Use DCR as Seed List." You can also associate a hop count to each seed device. When this module is enabled, Discovery will query the OSPF routing table on each seed device (and its peers) via SNMP. The object used is ospfNbrIpAddr from the OSPF-MIB.
Each peer address found which does not begin with "127.0.0" or end with "0.0.0" will be added to the queue of devices to process.
NOTE: The OSPF module is IPv4-only. It will not find IPv6 OSPFv3 peers.
Routing Table
The routing table module requires you to specify a seed list and/or enable "Use DCR as Seed List." You can also associate a hop count to each seed device. When this module is enabled, Discovery will query the entire routing table on each seed device (and its peers) via SNMP. The objects used are:
- ipRouteNextHop
- ipRouteType
- ipRouteMask
- ipRouteIfIndex
- ipRouteDest
Only routes which have an ipRouteType of 4 (or indirect) are processed. Other routes are either direct (i.e. connected) or invalid and will be ignored by Discovery. Each ipRouteNextHop (or next hop IP address) will be added to the queue of devices to be processed.
NOTE: The Route Table module does not support VRFs or IPv6. Only the routing table of the physical device will be queried, and only IPv4 next hop addresses will be processed.
Cisco Discovery Protocol (CDP)
The CDP module requires you to specify a seed list and/or enable "Use DCR as Seed List." You can also associate a hop count to each seed device. This module's name is actually a bit of a misnomer. The CDP module is actually a general-purpose neighbor discovery module. It supports CDP, ILMI, and ELMI neighbor discovery protocols.
When this module is enabled, Discovery will query the CDP cache on each seed device (and its peers) via SNMP. The objects used (from the CISCO-CDP-MIB) are:
- cdpCacheAddressType
- cdpCacheAddress
- cdpCacheDeviceId
- cdpCacheDevicePort
- cdpCachePlatform
- cdpCacheCapabilities
For ATM devices which are running ILMI, the following SNMP objects will be used (from the ATM-MIB):
- atmInterfaceMyNeighborIpAddress
- atmInterfaceMyNeighborIfName
For WAN devices supporting ELMI, the following SNMP objects will be used (from the CISCO-FRAME-RELAY-MIB):
- cfrElmiLinkStatus
- cfrElmiArStatus
- cfrElmiRemoteStatus
- cfrElmiNeighborArStatus
- cfrElmiNeighborIpAddress
- cfrElmiNeighborIfIndex
- cfrElmiNeighborVendorName
- cfrElmiNeighborPlatformName
- cfrElmiNeighborDeviceName
The CDP module offers another configuration option, and that is to Jump Router Boundaries. If this option is enabled, then the CDP module will process devices which have the 0x0001 (or Router) capability. If this option is disabled, then routers will not be processed. If the cdpCachePlatform contains the [case-insensitive] regular expression "^.*ip phone.*$" (meaning the device is an IP phone), or if the platform string is listed in a static list of non-SNMP reachable devices, then it will not be processed. The reason for this is that IP phones and certain other CDP-supporting devices do not support SNMP. Trying to query them for their CDP caches would just prolong Discovery. By default, the list of CDP platforms which do not support SNMP are:
- Cisco IP Phone 7970
- Cisco IP Phone 7960
- Cisco IP Phone 7940
- Cisco IP Phone 7910
- Cisco IP Conference Station 7935
- Cisco IP Phone 7905
- Cisco IP Phone 7912
- Cisco IP Phone 7902
- Cisco ATA 186
- Cisco ATA 188
- Cisco VG248
- Cisco IP Conference Station 7936
- Communicator (Windows 2003)
- Communicator (Windows XP)
For ILMI and ELMI, only neighbors which have an IP address that does not begin with "127.0.0" or end with "0.0.0" will be processed.
The CDP module supports IPv4 and IPv6.
Link Layer Discovery Protocol (LLDP)
The LLDP discovery module is new to LMS 4.1. The LLDP module requires you to specify a seed list and/or enable "Use DCR as Seed List." You can also associate a hop count to each seed device.
When this module is enabled, Discovery will query the LLDP cache on each seed device (and its peers) via SNMP. The objects used (from the LLDP-MIB) are:
- lldpRemManAddrOID
- lldpRemSysCapEnabled
The LLDP module offers another configuration option, and that is to Jump Router Boundaries. If this option is enabled, then the LLDP module will process devices which have the 0x0008 (or Router) capability. If this option is disabled, then routers will not be processed. If the lldpRemSysCapEnabled has bit 5 (0x0004) set, then the device is an IP phone, and it will be ignored. The reason for this is that IP phones and certain other LLDP-supporting devices do not support SNMP. Trying to query them for their LLDP caches would just prolong Discovery.
The LLDP module only supports IPv4.
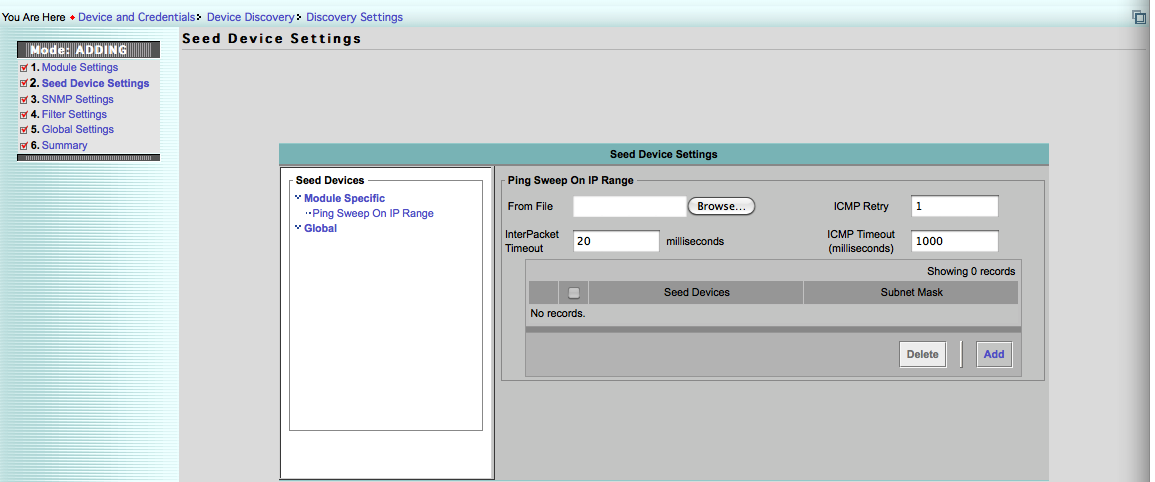
Ping Sweep On IP Range
The Ping Sweep module does not require seed devices. Instead, you must specify a list of subnets and network masks which will be pinged. For each subnet, the Ping Sweep module will send an ICMP packet to each host address in the subnet. If the device does not respond after 1 second, it will be considered an unreachable address. Each pass of the Ping Sweep module will ping 254 IPs at once. The gap between each one of the ICMP packets is 20 ms by default, but can be modified. You can also modify the 1 second timeout, and even add more retries. See Figure 4.
Figure 4:
If you only have a few subnets, the defaults may be fine. However, if you have quite a few subnets, or if you are going to be sweeping class B or larger subnets, you can easily see that Discovery could take a long time. For example, say you have multiple class C (or smaller) subnets carved out of the class B 172.16.0.0/16. DCR can only handle 50,000 devices, and the largest single LMS installation can support 10,000. A full class B can have over 65,000 hosts. That's not a problem, though, because most of these addresses will probably not be network devices. However, if you choose to sweep the entire range, you will be hitting all of these devices that you do not care about. What's worse is that if you have large gaps of unused addresses in this subnet, that can stall Discovery.
So, the first suggestion would be to specify discrete, small (i.e. class C or smaller) subnets as much as possible. If you must use larger subnets, consider decreasing the ICMP Timeout to something more reasonable. For example, it may be that all devices in your network will respond to a ping in under 10 ms. In that case, drop the ICMP Timeout to 10. If your network can take the flood of ICMP packets, consider decreasing the Inter Packet Timeout to 10 as well. Finally, setting the retries to 0 can also speed up Discovery when it encounters those unused addresses.
In summary, recommended settings for a fast network with ample bandwidth are:
ICMP Retry : 0
Inter Packet Timeout : 10 ms
ICMP Timeout : 10 ms
You may notice in Figure 4 above that the first column in the table is labeled "Seed Devices." This is misleading. As stated before, you should specify subnets and subnet masks. For example, your Ping Sweep targets may look like:
| Seed Devices | Subnet Mask |
|---|---|
| 172.16.0.0 | 255.255.0.0 |
| 10.1.1.0 | 255.255.255.248 |
LMS 4.1 adds the ability to specify subnet ranges using CIDR notation rather than typing out the full subnet mask. The examples above could be written in the following way using CIDR notation:
| Seed Devices | Subnet Mask |
|---|---|
| 172.16.0.0/16 | |
| 10.1.1.0/29 |
Note: If both the CIDR notation and the subnet mask are specified, then the CIDR notation will be used.
For each of the IPs which are reachable, Discovery will query them with SNMP. Only those IPs which are both ICMP reachable and SNMP reachable will be added to the queue for further processing. The Ping Sweep module supports both IPv4 and IPv6 addresses.
Cluster Discovery Module
The Cluster module requires you to specify a seed list and/or enable "Use DCR as Seed List." You can also associate a hop count to each seed device. When this module is enabled, Discovery will query switch cluster information from the seed devices (and their peers) using SNMP. The objects used (from the CISCO-CLUSTER-MIB) are:
- ccMemberNumber
- ccMemberOperStatus
- ccStatusClusterName
- ccStatusClusterMode
The seed devices for the Cluster module should be the cluster commanders for each switch cluster. If Discovery determines that the switch is a cluster commander, it will attempt to poll each members cluster number and operational status. For switch clusters, the member number is important. That number will be appended to the SNMP community string when attempting to manage that node in the cluster.
For example, if you have a three-node cluster of 3560 switches, and you are using the SNMP community string "public" on your devices, the commander will be manageable using the community string "public." However, in order to communicate with cluster member 1, you must query the commander with the community string "public@es1." To query cluster member 2, you must query the commander with community string "public@es2."
All reachable clusters and their members will be added to DCR as cluster-managed devices. Discovery will also take care of creating the cluster containers in DCR.
NOTE: The Cluster module does not support IPv6. Only clusters which have a commander with an IPv4 address will be processed.
Hot Standby Routing Protocol (HSRP)
The HSRP module requires you to specify a seed list and/or enable "Use DCR as Seed List." You can also associate a hop count to each seed device. When this module is enabled, Discovery will query the HSRP state database on each seed device (and its peers) via SNMP. The objects used are (from the CISCO-HSRP-MIB):
- cHsrpGrpVirtualIpAddr
- cHsrpGrpActiveRouter
- cHsrpGrpStandbyRouter
Each address returned (i.e. the virtual IP, active router IP, and standby router IP) will be processed provide their addresses do not start with "127.0.0" or end with "0.0.0". Every HSRP group configured on a seed device will be processed.
NOTE: The HSRP module does not support IPv6. Only HSRP peers with IPv4 addresses will be processed.
SNMP Settings
After the Discovery modules and seed devices are configured, the SNMP credentials used by Discovery must be configured. For seed devices which are obtained from DCR, the SNMP credentials configured in Discovery will not be used. Instead, those SNMP credentials associated with the DCR device will be used for Discovery. In this manner, Discovery can be a bit quicker since it would not have to do testing of multiple SNMP credentials.
Discovery supports all three commonly used versions of SNMP: SNMPv1, SNMPv2c, and SNMPv3. Discovery supports both SNMPv3 authNoPriv and SNMPv3 authPriv. If configured to do so, Discovery will fallback from SNMPv3 to SNMPv2c to SNMPv1 when trying to communicate with a device. Discovery will proceed when it finds the first working credential match.
The way Discovery decides which credentials to use for a given device is by the target associated with the credentials. A target is an IPv4 or IPv6 address or wildcarded address. The wildcards are '*' which means match anything, or "[X-Y]" to denote a range (e.g. [1-128] to match all numbers in the inclusive range from 1 to 128). Sample targets include:
10.*.*.*
172.[16-18].*.*
2001::1234:5:6:*
192.168.1.1
Discovery will prefer the most complete match. So, if you have two targets specified:
192.168.1.*
192.168.1.2
When Discovery is asked to provide credentials for 192.168.1.2, it will use the explicit 192.168.1.2 target entry even though the 192.168.1.* entry is listed first, and would otherwise match. If you configured multiple identical targets, then Discovery will attempt each target's credentials in series until a valid credential is found. When it is, the credential for that target will be associated with the device.
In addition to the targets and the credentials themselves, you can also specify the SNMP timeout and retry values associated with each target entry. It is very important to be as precise as possible with timeouts and retries. SNMP timeouts work in a doubling manner in LMS. That is, say you have configured a 6 second SNMP timeout with 3 retries. In a linear model, you would expect LMS to wait a maximum of 18 seconds before moving on. However, in LMS, the first attempt (retry 0), LMS will poll the device and wait up to 6 seconds for a reply. If the reply does not come, LMS will poll the device again (retry 1); but this time, LMS will wait 12 seconds for a reply. If a reply still does not come, LMS will poll the device again (retry 2), and wait 24 seconds for a reply. If the reply still does not come, LMS will poll a final time (retry 3), and wait 48 seconds for a reply. So, the maximum time spent waiting for one device is:
6 + 12 + 24 + 48 = 90 seconds
So you can see how critical it is to make sure that you have reasonable timeouts and retries. A leading recommendation is:
SNMP Timeout : 6
SNMP Retries : 1
Based on this recommendation, Discovery would spend no more than 18 seconds on one SNMP credential per device before moving on.
Discovery Filters
In addition to the filtering done implicitly in each Discovery module, you can specify additional pre and post-filters. Filtering controls which devices are contacted by Discovery and added/updated in DCR. Filtering can be done in one of two modes: Include or Exclude. You cannot do both at the same time. A filter can be applied on IP address, DNS name, sysObjectID, or sysLocation. You cannot apply multiple filter criteria. If no filters are specified, then all SNMP reachable devices not implicitly filtered by the Discovery modules will be added or updated in DCR.
IP Address Filters
The most common filtering criterion is IP address. IP address filtering allows you to include or exclude devices based on the IP addresses configured on them. This is important to note. The filtering is NOT just done on the management IP, but on potentially all IP addresses on the device.
Filters are specified using the same wildcard syntax that was used for SNMP Settings targets. That is, you can either specify a full IPv4 or IPv6 address, or use the wildcard '*' to stand for any octet value, or '[X-Y]' to signify a range. For example, valid filters include:
10.1.1.*
192.168.1.1
192.168.210.[66-67]
2003:a00::*
For all seed devices, filtering will first be done before any device is contacted. If the management IP (if the device is in DCR), or the seed IP is listed in the exclude filters, the device will not be contacted by Discovery. If the filter mode is Include, and the IP is NOT present in the filter list, then the device will not be contacted by Discovery. This latter part is a behavior change that was introduced in LMS 3.1 as part of the fix for CSCsq17289. Prior to that, pre-filtering would only be done if the filter mode was Exclude.
If Discovery is able to contact a device with SNMP, it will attempt to poll the ipAddrTable of the device. If this is successful, filtering will then be applied on all of the IPs configured on the device. If the filter mode is Exclude, and any of the IPs configured on the device match the exclude filter list, then the device will be excluded (i.e. not added to DCR or modified in DCR). If the filter mode is Include, then if any of the IPs match the include filter list, the device will be fully processed by Discovery (i.e. added or updated in DCR).
DNS Domain Filters
You can also choose to filter devices based on their DNS domain names. Filtering on DNS name will be done prior to the calculation of the preferred management IP. By default, the DNS name is determined using either the system resolver, or by directly querying the DNS servers which are configured on the LMS server. If the resolver lookup succeeds, then the direct DNS query will not be attempted.
The DNS filters, unlike the IP address filters, are specified as Java regular expressions. For example, the following are some valid DNS filter expressions:
.*\.cisco\.com
[sr]-.*\.company\.com
switch[123]\.company\.(com|org)
SysObjectID Filters
Filtering can be done on a device's sysObjectID as well. The sysObjectID specifies the device type. Using this filter criterion, you can filter out (or include) certain device types.
The SysObjectID filters are specified as Java regular expressions. For example, the following are some valid SysObjectID filter expressions:
1\.3\.6\.1\.4\.1\.9\..*
1\.3\.6\.1\.4\.1\.9\.1\.476
1\.3\.6\.1\.4\.1\.9\.1\.50[123]
SysLocation Filters
If you are using sysLocation in your network to indicate where devices are located, you can configure filters to include or exclude certain locations. The data in sysLocation need not be an actual location, though. It could be any string you want. By setting sysLocation accordingly, you can use SysLocation filters to do custom filtering of devices.
The SysLocation filters are specified as Java regular expressions. For example, the following are some valid SysLocation filter expressions:
San Jose, CA
.*USA
Building 1[012]
Other Filters
Besides the filters you can configure in the GUI, there is one other type of filter. If you use the CDP Discovery module, you can choose to exclude certain CDP IDs. This is very helpful for preventing IP phones and Light-weight Access Points (LWAPPs) from slowing down Discovery. The list of CDP IDs to exclude is found in the system-config.xml file. See the section on Discovery configuration files below for more details on this file. The CDP ID section looks like the following:
<CDPID>
<CDP Platform="Cisco IP Phone 7970"/>
<CDP Platform="Cisco IP Phone 7960"/>
<CDP Platform="Cisco IP Phone 7940"/>
<CDP Platform="Cisco IP Phone 7910"/>
<CDP Platform="Cisco IP Conference Station 7935"/>
<CDP Platform="Cisco IP Phone 7905"/>
<CDP Platform="Cisco IP Phone 7912"/>
<CDP Platform="Cisco IP Phone 7902"/>
<CDP Platform="Cisco ATA 186"/>
<CDP Platform="Cisco ATA 188"/>
<CDP Platform="Cisco VG248"/>
<CDP Platform="Cisco IP Conference Station 7936"/>
<CDP Platform="Communicator (Windows 2003)"/>
<CDP Platform="Communicator (Windows XP)"/>
</CDPID>
Simply add new CDP IDs (as seen in "show cdp neighbor" output) to this list. Be sure to add the trailing '/' to maintain the well-formedness of the XML document. Be very careful when modifying this file. If the syntax is corrupted, Discovery will not work.
Global Settings
The last piece to configure are the Discovery global settings. They control what a device' management IP address will be, how the device will appear when it is added to DCR, what additional credentials to apply to a device in DCR, etc. See Figure 5.
Figure 5:
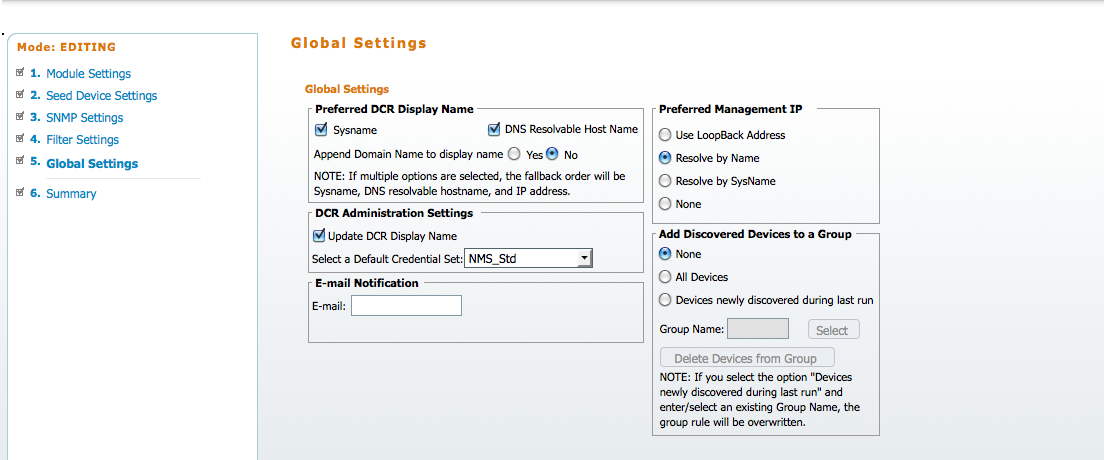
These settings have stirred much conversation (and controversy) from users. Let's try and demystify them.
Preferred DCR Display Name
The preferred DCR display name option allows you to control how a device will appear in the various LMS device selectors once the device is added to DCR. The option selected here will also affect devices which have their display names updated in DCR. See the DCR Administration section below.
NOTE: Device Fault Manager (DFM) (or Fault Management in LMS 4.x) is the one LMS application that will not respect display name. Devices may not appear with the same display name in DFM device selectors as they do in other LMS applications.
You have a choice of three display name options prior to LMS 4.1.
- IP Address
- Host Name
- FQDN
The IP Address option will update DCR with the management IP address of the device. Therefore, the device will appear in LMS device selectors by IP. This option refers to both IPv4 and IPv6 addresses. If a device is determined to have an IPv6 management IP, then that IP will show up in LMS device selectors.
The Host Name option will update DCR with the short hostname of the device. The short hostname is the value of hostname before the first dot (i.e. the hostname without the domain name component [e.g. core-router]).
The FQDN option will update DCR with the fully-qualified hostname of the device. This is the hostname plus the domain name component (e.g. core-router.cisco.com).
In LMS 4.1, the preferred DCR display name settings have changed somewhat. LMS 4.1 supports the ability to use the device's sysName as its display name without doing any additional name resolution on it. This is a great option, especially in environments that do not have DNS or in which hosts files are not fully populated. The other option is to select DNS Resolvable Host Name. If this option is selected, then the device's hostname (if it can be determined though DNS or hosts file resolution) will be used for the display name. If neither option is selected, then the IP address will be used. If you wish the display name to be an FQDN, choose the radio button to Append Domain Name to display name.
DCR Administration Settings
The DCR Administration section allows you to specify whether or not you want to update DCR display names for reachable devices found during Discovery, and what additional credentials you wish to apply to devices.
If you check the box to Update DCR Display Name each reachable device found by Discovery which is already in DCR will have its display name attribute updated based on the chosen method in the Preferred DCR Display Name section. NOTE: Be careful with this option. If you are using customized display names (e.g. those which are not IP addresses, hostnames, or FQDNs,) then those customizations will be overwritten when Discovery runs.
You can also choose to apply a credential set to all newly discovered devices. A credential set contains additional credentials such as an SNMP read-write community string, VTY username, enable password, etc. It is definitely recommended to define credential sets and/or credential set policies to make sure that a device which gets added to DCR as part of Discovery will be fully manageable by applications such as Resource Manager Essentials (RME).
Email Notification
If a valid email address (or addresses) is specified here, then notifications will be sent when the following events occur.
- Discovery jobs completes
- A new Discovery job is scheduled
- A Discovery job is stopped
Multiple email addresses can be specified separated by commas.
Preferred Management IP
This is probably the single most confusing part of Discovery. How does Discovery determine what IP address (and optionally hostname) is used to manage a given device? How are changes to this information handled in DCR? Let's go through each option one-by-one, and sort things out.
Use LoopBack Address
This option is the most popular. However, its name is a bit misleading. While Discovery will prefer a loopback IP address, it will attempt to use other addresses if a loopback is not found. The algorithm operates in the following steps. Once a valid IP is found, the algorithm stops, and a management address is chosen.
- Discovery searches through all IP (IPv4 and IPv6) addresses configured on the device for the loopback with the HIGHEST IP address.
- Loopback interfaces are determined as those interfaces with an ifType of 24 (i.e. softwareLoopback).
- IPv4 addresses are preferred over IPv6 addresses. If no IPv4 addresses exist on any loopback, then an IPv6 address will be chosen.
- Only a reachable IP will be chosen. If the target loopback IP is not SNMP reachable, it will be skipped.
- If no loopback IP addresses are found, Discovery will move on to ethernet interfaces. The ethernet interface with the HIGHEST IP will be chosen.
- Ethernet interfaces are determined as those interface with an ifType of 6 (ethernetCsmacd) or 26 (ethernet3Mbit).
- IPv4 addresses are preferred over IPv6 addresses. If no IPv4 addresses exist on any ethernet interface, then an IPv6 address will be chosen.
- Only a reachable IP will be chosen. If the target ethernet IP is not SNMP reachable, it will be skipped.
- If no ethernet interface IP addresses are found, Discovery will move on to token ring interfaces. The token ring interface with the HIGHEST IP will be chosen.
- Token ring interfaces are determined as those interfaces with an ifType of 8 (iso88024TokenBus) or 9 (iso88025TokenRing).
- IPv4 addresses are preferred over IPv6 addresses. If no IPv4 addresses exist on any token ring interface, then an IPv6 address will be chosen.
- Only a reachable IP will be chosen. If the target token ring IP is not SNMP reachable, it will be skipped.
- If no token ring interface IP addresses are found, Discovery will move on to serial interfaces. The serial interface with the HIGHEST IP will be chosen.
- Serial interfaces are determined as those interfaces with an ifType of 22 (propPointToPointSerial).
- IPv4 addresses are preferred over IPv6 addresses. If no IPv4 addresses exist on any serial interface, then an IPv6 address will be chosen.
- Only a reachable IP will be chosen. If the target serial IP is not SNMP reachable, it will be skipped.
- If no serial interface IP addresses are found, Discovery will move on to virtual interfaces (e.g. VLAN interfaces). The virtual interface with the HIGHEST IP will be chosen.
- Virtual interfaces are determined as those interfaces with an ifTYpe of 53 (propVirtual).
- IPv4 addresses are preferred over IPv6 addresses. If no IPv4 addresses exist on any virtual interface, then an IPv6 address will be chosen.
- Only a reachable IP will be chosen. If the target virtual IP is not SNMP reachable, it will be skipped.
- If no matching IP is found, then the management IP will be the IP by which the device was found by Discovery.
Resolve By Name
This is the default preferred management IP algorithm. This algorithm works by resolving the IP address by which Discovery found the device. Based on this, both a management IP and a hostname is obtained. The algorithm performs the following steps.
- Perform a system resolver and optionally a direct DNS lookup of the IP address by which Discovery found the device.
- If the system resolver lookup succeeds, the direct DNS query is not done.
- If a hostname is found, resolve the hostname back to an IP address.
- If the IP address returned when resolving the hostname is the same as the discovered IP, then the discovered IP becomes the preferred management IP.
- If the IP returned by the lookup is different from the discovered IP, then that new IP is checked for SNMP reachability. If the new IP is reachable, then it becomes the preferred management IP.
- Any failure will result in the original discovered IP becoming the preferred management IP.
- The hostname found in step 2 will become the device's DCR hostname.
Resolve By SysName
This option obtains the preferred management IP by looking at the sysName of the device. This option is a bit misleading, though. The sysName as it is is not simply used for the hostname or even the display name. More processing is done. The algorithm performs the following steps.
- The value of sysName (if it exists) is looked up using the system resolver.
- If an IP address is found, that IP is a valid IP for the current device, and that IP is SNMP reachable it is set as the preferred management IP.
- If either step 1 or step 2 fails, then the preferred management IP will be set to the originally discovered IP.
None
Sounds boring, doesn't it? This option says that Discovery should not attempt to do any additional steps to obtain a management IP, and instead use the IP by which Discovery found the device.
NOTE: Discovery started doing the additional reachability check in LMS 3.2 as part of the fix for CSCsu48696. Prior to that, an unreachable IP could have been chosen as the management IP.
Obtaining a Hostname
Once Discovery has determined a preferred management IP, it will attempt to find a hostname for the device. This hostname will be updated in DCR. If the preferred management IP method is set to Resolve By Name then the hostname is already known in that process. If the method is set to either Use LoopBack Address or Resolve By SysName then a system resolver or direct DNS query will be performed on either the preferred management IP or the originally discovered IP. If the system resolver lookup returns a valid hostname, the direct DNS query will not be done. If the method is set to None then the hostname will be set the original IP address by which the device was discovered.
IP and Hostname Updates To DCR
If Discovery finds a new management IP or hostname for a device which already exists in DCR, DCR will be modified with the new values. Unlike the checkbox to control DCR display name updates, there is no option to disable this behavior. To avoid changes, consider setting the preferred management IP method to None.
Add Discovered Devices to a Group
If you wish to add all discovered devices (i.e. those found to be reachable when Discovery runs) to a user-defined group, check the Add Discovered Devices to a a Group box, then specify the group into which devices should be added. You can choose either to create a new group, or use an existing Common Services user-defined group. Using this option is helpful to sort out those devices which were recently found by Discovery. Note: prior to LMS 4.1, ALL devices discovered in a given Discovery cycle will be added into this group.
LMS 4.1 adds the ability to add only newly discovered devices into a group. This is useful if you want to be able to easily spot brand new devices found on each Discovery cycle. If you wish to only group newly discovered devices, then select the Devices newly discovered during last run. If this option is selected, each time Discovery runs, the group contents will be overwritten with those devices that are newly discovered.
Discovery Configuration File
While you should perform all Discovery configuration steps in the LMS GUI, it is helpful to know where the changes will be stored. The configuration file for the global Discovery settings (i.e. those used when you start an adhoc discovery in the GUI) can be found in NMSROOT/conf/csdiscovery/CSDiscovery-config.xml. NMSROOT is the path into which LMS was installed. By default, this is C:\PROGRA~1\CSCOpx on Windows, and /opt/CSCOpx on Solaris or the Soft Appliance (LMS 4.1 only).
The CSDiscovery-config.xml file is a well-formed XML document, but it is not very pretty to look at in a simple text editor. The XML is all found on one line. If you do want to view this file in a more human readable way, open it in either Firefox or Internet Explorer on Windows, or run this command to "pretty" it up on Solaris or the Soft Appliance (LMS 4.1 only):
xmllint --format /opt/CSCOpx/conf/csdiscovery/CSDiscovery-config.xml | less
The static system configuration data (e.g. MAC address OUIs, non-SNMP reachable CDP platform IDs, etc.) are kept in the NMSROOT/conf/csdiscovery/system-config.xml file. This file can be viewed just like CSDiscovery-config.xml. Again, this file should not be modified manually as any corruption to the format can result in Discovery being unable to run.
Both configuration files are included in the standard LMS data backup.
Running LMS Discovery
Once Discovery has been properly configured, it can be started manually by clicking on the Start Discovery button. See Figure 6.
Figure 6:
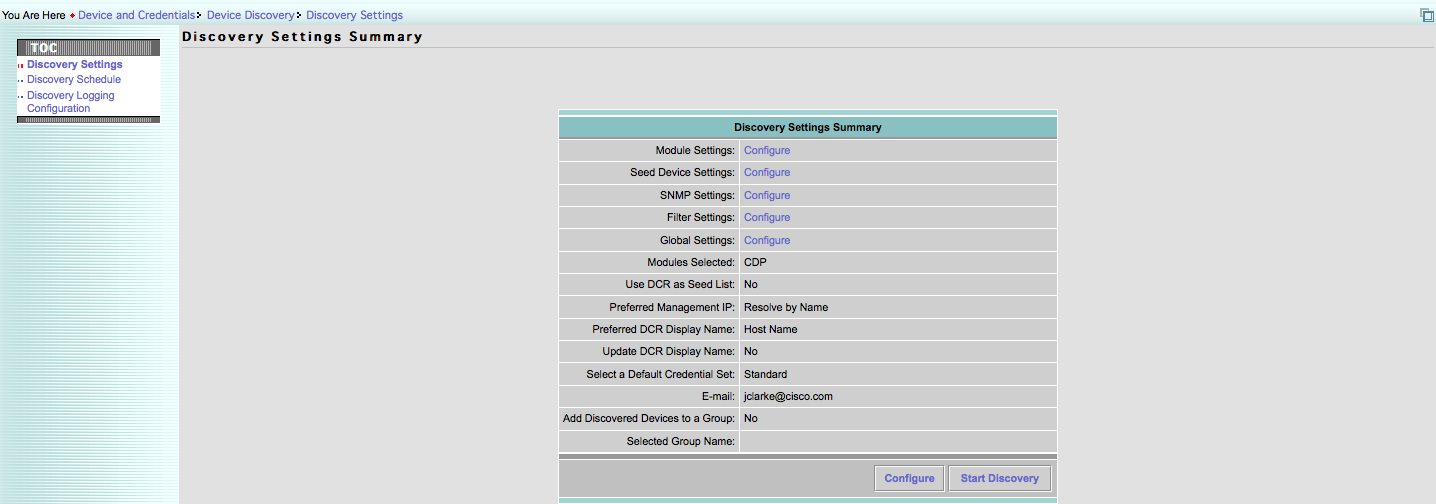
This will start the CSDiscovery daemon. You can run the pdshow command and see that the CSDiscovery process is now running. It will continue to run until Discovery completes, and which time the process will shutdown. Starting Discovery manually is called running an adhoc Discovery. This will always use the global CSDiscovery-config.xml file mentioned above.
The results of the last adhoc Discovery will be stored in the NMSROOT/conf/csdiscovery/DiscoveryStatusObj file. This is a binary file which stores information about each device found during the Discovery run. If this file grows too large, it can be safely removed after a Discovery run completes.
When Discovery completes, all SNMP REACHABLE devices will be either added to DCR, or updated in DCR if they already exist. Those devices which are not SNMP reachable will be listed in the Discovery summary, but will not be added to or modified in DCR.
Scheduling a Discovery Job
If you wish to run Discovery periodically, you can schedule Discovery jobs to run. This can be done from Common Services > Device and Credentials > Device Discovery > Discovery Schedule (LMS 3.x) and Inventory > Device Administration > Discovery > Schedule (LMS 4.x). See Figure 7.
Figure 7:

It is important to note that scheduled Discovery jobs will NOT use the CSDiscovery-config.xml from the NMSROOT/conf/csdiscovery directory. Instead, each scheduled Discovery job will create a directory under NMSROOT/objects/csdiscovery named after the job ID. Within this directory will be a copy of the global (or adhoc) CSDiscovery-config.xml file at the time the Discovery job was CREATED. If you make changes to the Discovery settings after scheduling Discovery jobs, you can either delete the scheduled job, and schedule it again; or you can click the Edit Settings button shown in Figure 7 above. The leading recommendation is to delete and recreate the scheduled job to prevent duplicating the configuration work.
Troubleshooting CSDiscovery
First and foremost, there have been a lot of bugs fixed along the way in Common Services Discovery. If you are not already running LMS 3.2, you should download the appropriate "mega-patch" for LMS 3.0.1 and 3.1 from http://www.cisco.com/cgi-bin/tablebuild.pl/cw2000-cd-one. The bug ID for the cumulative patch is CSCtb16166 for LMS 3.0.1 and CSCta35248 for LMS 3.1. The bugs fixed are:
- CSCsk82551 : LMS301:Discovery related information logging in daemons.log
- CSCsm13114 : The CDP Discovery module does not ignore IP phones
- CSCsm66330 : CS Discovery duplicates devices in DCR
- CSCsm66348 : Discovery creates files with clear text credentials
- CSCso45657 : Discovery may not properly resolve IP addresses to hostnames
- CSCso81920 : Running Discovery through CWA leaks cmf database connections
- CSCsq63152 : HTTP Status 500 error thrown while launching Discovery screen
- CSCsr50954 : While start the CSDiscovery process, its not started properly.
- CSCsk88625 : NGD discovery hangs - If debug is enabled
- CSCsu48696 : Discovery uses addresses which are not reachable
- CSCsv42110 : Discovery hangs sporadically
- CSCsv65933 : Discovery does not update display name in DCR
- CSCsv67569 : Cluster Module is not working expected if the other modules are selected
- CSCsl99637 : Discovery stops with an error and no devices are discovered
- CSCsl74516 : Device type not updated by discovery
- CSCsq17289 : Discovery must contact a device before filtering it
- CSCsq34071 : Include function is not working properly in discovery
- CSCsv76704 : SNMPv2c/SNMPV3 credentials are printed in ngddiscovery,csdiscovery.log
- CSCsw62109 : Discovery is not sending Notification mails
- CSCsx20329 : Discovery job status shows running when job triggered during DCR down
- CSCsy14740 : Device Type not getting updated after discovery
- CSCsu35478 : Post filtering is not working for pingsweep module
- CSCsq37833 : IP postfiltering behaves different when some devices SNMP not reachable
- CSCsm94130 : ClassCastException while processing Exclude IPs
- CSCsj93562 : Issue with the global seed device settings for ARP and RT
- CSCsj04687 : Filter option "Exclude- DNS Domain" is not working as expected
- CSCse62443 : Inconsistency in the behavior between IP filter and DNS domain filter
If you have gotten this far in the document, and you are wanting to see how to troubleshoot a problem, just go ahead and apply this patch before going any further. If you're already on LMS 3.2, or if applying the patch did not resolve the issue, then read on. There are a few known bugs not fixed by these patches, but are fixed in LMS 3.2. Make sure you're not seeing one of these:
- CSCsw21205 : Discovery filters are empty when scheduled Discovery settings are viewed
- CSCsu88678 : DCR seed devices do not respect hop count
- CSCsu82153 : Discovery does not support SNMPv1
The last bug is of special importance if you're trying to discover an older device such as a PIX running 6.x code. In that case, you will need to upgrade to LMS 3.2 to get SNMPv1 fallback support.
One of the most common issues encountered with Discovery stems from the different configuration files used for adhoc Discovery versus scheduled Discovery. If you are seeing something happening (e.g. DCR display names being updated) even if the feature is not enabled, then check to make sure your scheduled configuration settings match what you expect them to be under Common Services > Device and Credentials > Device Discovery > Discovery Schedule > View Settings (LMS 3.x) or Inventory > Device Administration > Discovery > Settings (LMS 4.x).
Discovery Logs
Discovery can write a lot of useful information to its two log files. When troubleshooting Discovery problems, it is helpful to look at these logs, and perhaps enable additional debugging. The two log files Discovery uses are CSDiscovery.log and ngdiscovery.log. The CSDiscovery.log is used for UI logging. That is, when you launch the Discovery web screens, errors and debugging information will be logged here. This log will also hold information regarding starting Discovery jobs or adhoc Discoveries.
The ngdiscovery.log is used to hold errors and debugging data about Discovery jobs and adhoc Discoveries. When a Discovery runs, this log will contain all of the information about Discovery contacting devices, newly found devices, etc. Once all of the devices are found, CSDiscovery will hand the list of reachable devices to the DCR piece to do the updates. Data about the DCR updates will be found in the CSDiscovery.log. So, when you want a complete picture of Discovery, get both log files.
NOTE: Before doing any kind of log file analysis, you should clear out the contents of CSDiscovery.log and ngdiscovery.log so you have a fresh slate from which to start.
Configuring Debugging
All Discovery debugging can be enabled under Common Services > Device and Credentials > Device Discovery > Discovery Logging Configuration (LMS 3.x) or Admin > System > Debug Settings > Discovery Logging Configuration (LMS 4.x). See Figure 8.
Figure 8:
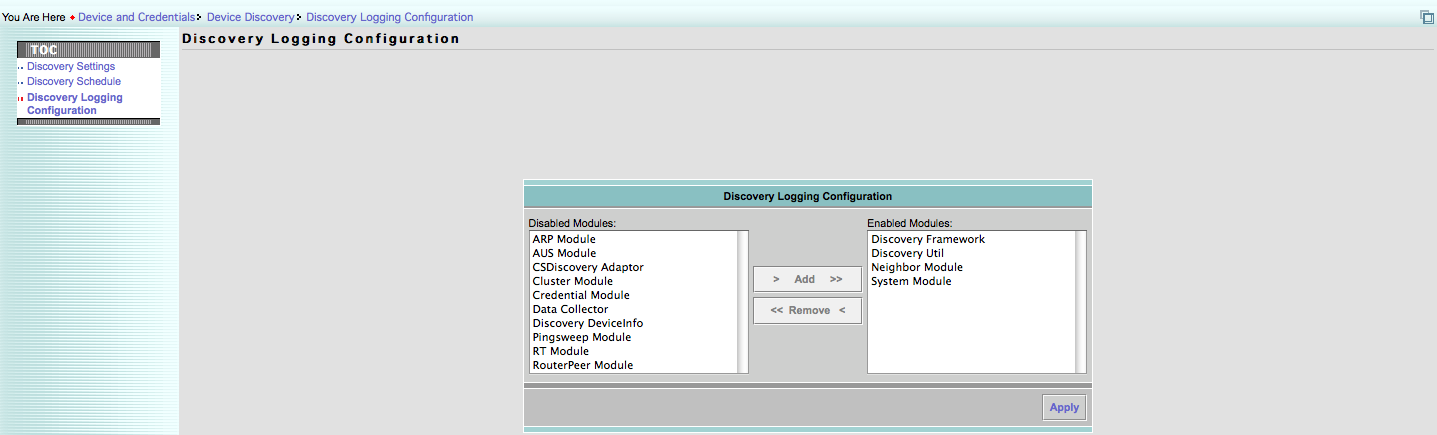
Below are the various logging modules, and what they control.
- ARP Module : Enable debugging output for the ARP Discovery module
- AUS Module : Enable debugging for Auto-Update Server managed devices
- CSDiscovery Adaptor : Enable debugging for the Common Services/Discovery interface
- Cluster Module : Enable debugging for the switch cluster Discovery module
- Credential Module : Enable debugging for the reading and processing of Discovery credentials
- Data Collector : Enable debugging for the low-level SNMP data collection component
- Discovery DeviceInfo : Enable debugging for the polling of device identity information
- Discovery Framework : Enable general Discovery debugging
- Discovery Util : Enable debugging for the interface to performing DCR updates
- Neighbor Module : Enable debugging for the CDP/ELMI/ILMI/LLDP Discovery modules
- Pingsweep Module : Enable debugging for the ping sweep on range Discovery module
- RT Module : Enable debugging for the route table Discovery module
- RouterPeer Module : Enable debugging for the BGP/OSPF/HSRP Discovery modules
- System Module : Enable debugging for preferred management IP and hostname resolution
The most useful general purpose modules are Discovery Framework, Discovery Util, and System Module. You should also enable any Discovery modules debugging you may require based on the modules you have selected.
Understanding the Log File Data
If you do not know where to begin when reading through the log files, consider searching for the case-sensitive string, "ERROR" or "FATAL". These are usually good starting points. If you are trying to troubleshoot a specific device, search the log for that device's IP address and hostname. You can also search for typical patterns such as "Timeout". For example, if a device cannot be contacted using the community strings configured in Discovery, you will see:
Timeout when querying system table from device /x.x.x.x
If a device is not allowed based on the filter rules, you will see:
Device /x.x.x.x is filtered by IPFilter configuration.Will be discarded.
If a device is already known to DCR by a different IP, it may appear as if Discovery is silently skipping the device. That is, you see it in the list of reachable devices found by Discovery, but you cannot find it in the DCR device selector. In that case, check the log for a line such as:
Address /y.y.y.y is a reachable IP address for /x.x.x.x
Here, "y.y.y.y" is the address found by the preferred management IP algorithm, and "x.x.x.x" is the address as it appears in the seed or discovered list. In this case, you would expect to see y.y.y.y (or the hostname to which y.y.y.y resolved) in the DCR device selector. If this is not what you want, you will need to reconfigure the preferred IP address selection so that your desired address is used as the preferred management IP.
Other Debugging Help
In addition to the CSDiscovery.log and ngdiscovery.log files, it is often useful to see a sniffer trace of Discovery. This is especially helpful if you are trying to troubleshoot why one device isn't being found, or is showing up as unreachable. In that case, filter on all SNMP (i.e. udp/161) traffic to the device, then run a new adhoc Discovery. The sniffer trace plus the logs make a great combo, and provide a complete picture of the whole Discovery process.
If you do not have another sniffer application (and Wireshark is a great choice), you can use the Packet Capture tool in the LMS Device Center. Figure 9 shows how to create a capture which filters all SNMP traffic to and from one IP address.
Figure 9:
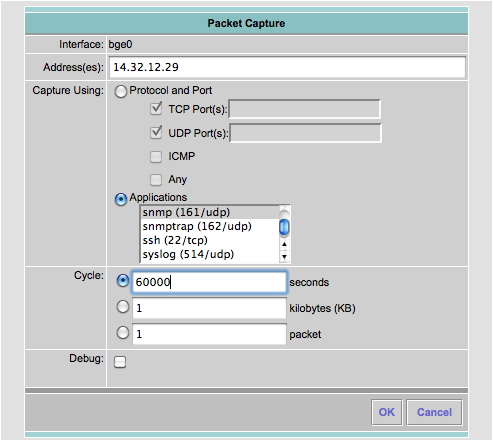
NOTE: The number of seconds is bumped up quite a bit, but not to worry, the trace can always be stopped manually once the desired packets have been captured.
Additional Help
If you require additional help either configuring or troubleshooting Discovery, you can always post to the Cisco Support Communities Network Management forum, or open a TAC Service Request.
- Mark as Read
- Mark as New
- Bookmark
- Permalink
- Report Inappropriate Content
Great Work Joe,
I just have a small remark about this.
Three of my customers understood it exactly like you mention below, that newly discovered devices go in a group,(to get e.g. administrated with extra values like what rack they are in or their role (backbone, distribution, etc))
Add Discovered Devices to a Group
If you wish to add all newly discovered devices to a user-defined group, check the Add Discovered Devices to a a Group box, then specify the group into which devices should be added. You can choose either to create a new group, or use an existing Common Services user-defined group. Using this option is helpful to sort out those devices which were recently found by Discovery.
You can't add the newly discovered devices to a group like this. All reachable devices are added to this group after each discovery.
As a workaround I use a user_defined_field, that gets a value whenever a discovered is "known". Any device that doesn't have a value in this user_defined_field is therefore a device newly added, either by discovery, device add or bulk import.
Cheers,
Michel
- Mark as Read
- Mark as New
- Bookmark
- Permalink
- Report Inappropriate Content
This is more a question.
I like to know, when during the discovery, an IP address is discovered via CPD or another module, does the discover first check if this address is not already present on any of the known devices?
Won't it try to get the systemname and see if that is known? Or load the interface table?
And how does it decide it is a new device?
I ask this because I see on some discoveries it brings in "existing" devices with the IP address as displayname.
I asume this is due to DNS failures but I haven't gotten to the bottom of this yet.
Cheers,
Michel
- Mark as Read
- Mark as New
- Bookmark
- Permalink
- Report Inappropriate Content
Yes, it checks if the device is already present in DCR. That's how it knows to update a device in DCR versus adding a new one. It will search through DCR for devices with an IP address on the discovered device.
If you have chosen to update display name, and the algorithm to choose the management IP finds an IP which does not resolve, you can get the behavior you describe.
- Mark as Read
- Mark as New
- Bookmark
- Permalink
- Report Inappropriate Content
You're right, this was unclear. I removed the word "newly," and added a clarifying clause. However, the goal of the group was to categorize recently found devices. Group membership should be short-lived until the devices can be sorted into a more permanent group.
- Mark as Read
- Mark as New
- Bookmark
- Permalink
- Report Inappropriate Content
I'm not sure what the value added of this group is. I've spoken to the TAC about this and they were not able to explain the purpose either, but insisted the product functions as designed.
I think I can create a group of reachable device in Campus, as it has a notion of a device's reachability.
No big deal, but a real "newly decovered devices" group would be usefull in my opinion. I know at least 3 existing LMS customers that agree.
Cheers,
Michel
- Mark as Read
- Mark as New
- Bookmark
- Permalink
- Report Inappropriate Content
I agree. I filed an enhancement request for this: CSCtg43970.
- Mark as Read
- Mark as New
- Bookmark
- Permalink
- Report Inappropriate Content
ARP module depends on RT module , In module setting page if ARP is selected ,RT gets automatically selected , once RT completes processing the device only then ARP will collect the ARP table and process the device.
- Mark as Read
- Mark as New
- Bookmark
- Permalink
- Report Inappropriate Content
You're right. I didn't talk about module dependencies. I added a bit about that for ARP. Thanks.
- Mark as Read
- Mark as New
- Bookmark
- Permalink
- Report Inappropriate Content
In Obtaining a Hostname section
>If the preferred management IP method is set to Resolve By SysName then the hostname is already known in that process.
I hope it should be Resolve By Name
- Mark as Read
- Mark as New
- Bookmark
- Permalink
- Report Inappropriate Content
>In Resolve By SysName section
> 1. The value of sysName (if it exists) is looked up using the system resolver.
> 2. If an IP address is found, and that IP is SNMP reachable is set as the preferred management IP
Also the resolved IP address is verified with the IP address table of the discovered device ,to check if the resolved ip is valid for this device .
- Mark as Read
- Mark as New
- Bookmark
- Permalink
- Report Inappropriate Content
>In Resolve By Name section
> 4. If the IP returned by the lookup is different from the discovered IP, then that new IP is checked for SNMP reachability. If the new IP is reachable, then it becomes the preferred management IP.
In what scenario IP returned by the lookup will be different.
Is it when same hostname is configued for different IPs in Forward lookup and Reverse lookup of DNS?
- Mark as Read
- Mark as New
- Bookmark
- Permalink
- Report Inappropriate Content
You're right, that was a typo. It's been fixed.
- Mark as Read
- Mark as New
- Bookmark
- Permalink
- Report Inappropriate Content
Yep, I clarified that, and fixed the grammar typo.
- Mark as Read
- Mark as New
- Bookmark
- Permalink
- Report Inappropriate Content
Yes, exactly. One could have asymmetric DNS configured.
- Mark as Read
- Mark as New
- Bookmark
- Permalink
- Report Inappropriate Content
excellent paper !
TY for your efforts into the deeps of CSDis
I wonder what parts of the info still apply to LMS4.2.1 (With SP1 i.e.)
specially inregards to CDPIDs exclueed.
I am looking into getting AIR-LAPxxxx excluded, and I have read this paper. Leaves me wondering like this:;
Can I add wildcard like ? - ie AIR-LAP or do i need one forevery CDP AP platform, like 1142, 1231 etc
Got me thinking more, when I saw the IP Phone 7960
I got IP Phone 7961 in my network, but they are NOT in this list and NOT in Unreachalbe eighter ?!
how can that happend ?
Any comments on these two issues will be gladly appreciated.
Also I would like to hear from anyone how runs LMS4.2.1. and have this LWAP AP CDPID Excluded devices working.
Regards
Find answers to your questions by entering keywords or phrases in the Search bar above. New here? Use these resources to familiarize yourself with the community: