はじめに
FTD(Firepower Threat Defense) にて Intrusion Policy を利用されている場合、デフォルトでは検知したパケット全てに対し Intrusion Event を生成しているわけではありません。デフォルトでは 1分間(60秒間) で複数検知した場合でも 1つの Intrusion Event 生成のみの挙動となります。以下は PROTOCOL-ICMP PING(SID:384) を有効にし FTD 上に毎秒 Ping(icmp echo) を送った場合のデフォルトの挙動です。本記事ではこれらの設定確認や変更方法についてご案内致します。7.0.4 の FTDv/FMCv にて動作確認を行っております。

snort2 の場合
snort2 をご利用の場合は Intrusion Policy 全体に適用する方法と個別の rule(SID) に設定する方法がございます。
Intrusion Policy 全体に適用する方法
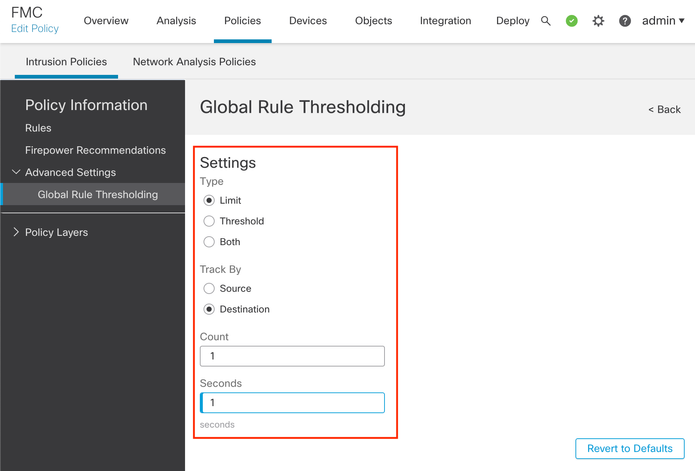
Intrusion Policy 内の Global Rule Thresholding の機能にて実現します。
FMC Policies > Access Control > Intrusion から該当する Intrusion Policy の Snort 2 Version を選択します。

Advanced Settings > Intrusion Rule Thresholds が Enabled になっていることを確認し Edit を選択します。
Type, Track By, Count, Seconds を設定します。以下は毎秒単位で検知させたい場合の例です。

Policy Information > Commit Changes で Intrusion Policy の変更を保存し、その後で Deploy を実行し FTD に変更を適用します。
この設定は FTD 上では /ngfw/var/sf/detection_engines/<UUID>/ 配下の threshold.conf で確認できます。
<変更前>
admin@toishika-ftd704:/ngfw/var/sf/detection_engines/45ebd596-4cea-11ed-bdaf-1a9b8a3e9110$ cat threshold.conf
policy config
{
policy_ID 2;
policy_Name intrusion_policy;
policy_UUID ac2764d8-4d03-11ed-b722-dd2b363f90ca;
threshold
{
gid 0;
sid 0;
type limit;
track by_dst;
count 1;
seconds 60;
}
}

<変更後>
admin@toishika-ftd704:/ngfw/var/sf/detection_engines/45ebd596-4cea-11ed-bdaf-1a9b8a3e9110$ cat threshold.conf
policy config
{
policy_ID 2;
policy_Name intrusion_policy;
policy_UUID 36b2f2ac-4d0e-11ed-8e02-d3f664d007a0;
threshold
{
gid 0;
sid 0;
type limit;
track by_dst;
count 1;
seconds 1;
}
}
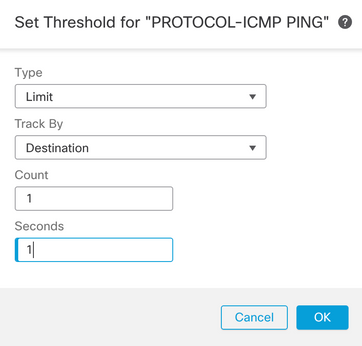
Intrusion Policy の Snort 2 Version を選択、Rules より該当の rule(SID) を選択、Thresholds の Add を選択します。

Type, Track By, Count, Seconds を設定します。

Policy Information > Commit Changes で Intrusion Policy の変更を保存し、その後で Deploy を実行し FTD に変更を適用します。
この設定は FTD 上では /ngfw/var/sf/detection_engines/<UUID>/ 配下の threshold.conf で確認できます。
admin@toishika-ftd704:/ngfw/var/sf/detection_engines/45ebd596-4cea-11ed-bdaf-1a9b8a3e9110$ cat threshold.conf
policy config
{
policy_ID 2;
policy_Name intrusion_policy;
policy_UUID 3d28967c-4d0f-11ed-ba19-bf254f7c87aa;
threshold
{
gid 0;
sid 0;
type limit;
track by_dst;
count 1;
seconds 60;
}
threshold
{
gid 1;
sid 384;
type limit;
track by_dst;
count 1;
seconds 1;
}
}
1秒ごとに Intrusion Event を検知させることができます。

詳細は以下をご確認ください。
snort3 の場合
snort3 をご利用の場合は個別の rule(SID) に対して設定する方法のみとなります。以下が手順となります。
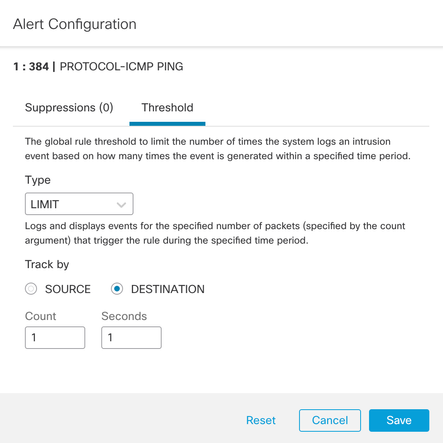
Objects > Intrusion Rules > Snort3 All Rules に進み該当の rule(SID) を選択 Alert Configuration の箇所を選択してください。

Type, Track By, Count, Seconds を設定します。

Deploy を実行し FTD に変更を適用します。
この設定は FTD 上では /ngfw/var/sf/detection_engines/<UUID>/ 配下の threshold.lua で確認できます。
admin@toishika-ftd704:/ngfw/var/sf/detection_engines/45ebd596-4cea-11ed-bdaf-1a9b8a3e9110$ cat threshold.lua | grep -A10 "user_defined_event_filter ="
user_defined_event_filter = {
{
gid = 1,
sid = 384,
type = 'limit',
track = 'by_dst',
count = 1,
seconds = 1
},
}
Snort3 の場合は Global Threshold の変更は対応しておりませんが以下のように Snort2 と同等の初期設定がされています。
admin@toishika-ftd704:/ngfw/var/sf/detection_engines/45ebd596-4cea-11ed-bdaf-1a9b8a3e9110$ cat snort3.global.lua | grep -A9 "global_threshold ="
global_threshold = {
{
count = 1,
gid = 0,
seconds = 60,
sid = 0,
track = 'by_dst',
type = 'limit'
}
}
1秒ごとに Intrusion Event を検知させることができます。

詳細は以下をご確認ください。
おわりに
今回は毎秒 Intrusion Event を生成させる方法をご案内致しましたが Event の生成が増えるほど FTD/FMC の負荷は高くなります。検証用途では問題ございませんが実環境に変更を適用される場合は事前の検証にて動作確認を頂くようお願いいたします。