How many of you have spent countless hours installing operating systems on bare metal? If you're like me you've been through creating a master CD image, PXE booting, and all manner of fun tools like Cobbler, Razer, xCAT, Rocks, crowbar, warewulf... just to name just a few! If you're like me, you also consider yourself a failure anytime you have to do it manually or even worse burn actual DVDs! These methods have actually been around for a long time. However, in UCS 2.2(2c) in 2014 Cisco quietly introduced a new way to automatically install operating systems that most people still don't know about.
Venerable PXE
The art of PXE booting to install operating systems has been in use for as long as I've been in IT. It is the gold standard for managing hundreds or thousands of bare metal operating systems and I've personally used it on clusters ranging from 10 to 1,600 node systems. PXE booting involves having the computer boot up and instead of immediately looking at its local disk for an operating system, it instead looks at the network for direction. PXE images themselves have undergone quite a transformation in the last few years. Before you had to use the TFTP protocolonly, but with the advent of gPXE and the follow-on iPXE you can now use HTTP, iSCSI, or even FCoE to remotely boot.
Issues with PXE
But there are issues with setting up a PXE environment which is why most enterprises still install using manual methods. These challenges include:
DHCP Setup - In order for PXE to work, you need to know the MAC address or UUID of the server you wish to install and populate the DHCP server with the files and commands to install it.
HTTP Setup - If using iPXE then DHCP needs to be coordinated with where the HTTP server is serving out the installation media.
Updates over time - Servers change and installation media does as well. Keeping these systems in sync can be challenging
Network Setup - PXE only works if there are solid network settings in place. Often doing this setup and ensuring correctness can take more time than actually installing the OS and many enterprise networks do not want the additional overhead of these services (which can do much disruption) running on top of the network.
All of this coordination seems like a lot to configure on an enterprise network, especially if the time taken to set this up takes longer than just installing the operating system to begin with!
Advantages of Automated Installations
Even with the problems of setting up a PXE environment there are still many advantages to be gained by having an automated installation environment set up for your servers. These include:
Immutable Infrastructure - This is the idea that instead of doing patch management, we simply blow all the old stuff away and install a fresh OS with the latest updates on it. This can work great for VMware, Windows, and Linux. This way you are assured that your Operating system is fresh and clean without legacy bloat.
Consistency of Images - If your server farm provides a private cloud for your applications, ensuring the servers are consistent goes a long way to making sure performance and libraries are available for those applications to run better.
Quick Changing - If business dictates that certain servers are no longer necessary for other operations they can be provisioned to act in a different capacity. Automated installation can change the identity of a server from being an ESX server to being a Hyper-V server in very little time.
vMedia Policy FTW!
It would be nice then if we could get the advantages of Automated Installation capabilities without the disadvantages of having to set up a complicated PXE environment or install any of these other tools like Cobbler, etc. This is where UCS shines and is unsurpassed by any other platform.
A vMedia policy is a policy that states what installation media should be automatically mounted by a service profile before it boots up. The only requirements to make an automated installation is to create a vMedia policy, attach it to a service profile, and then have a web server where virtual media can be accessed.
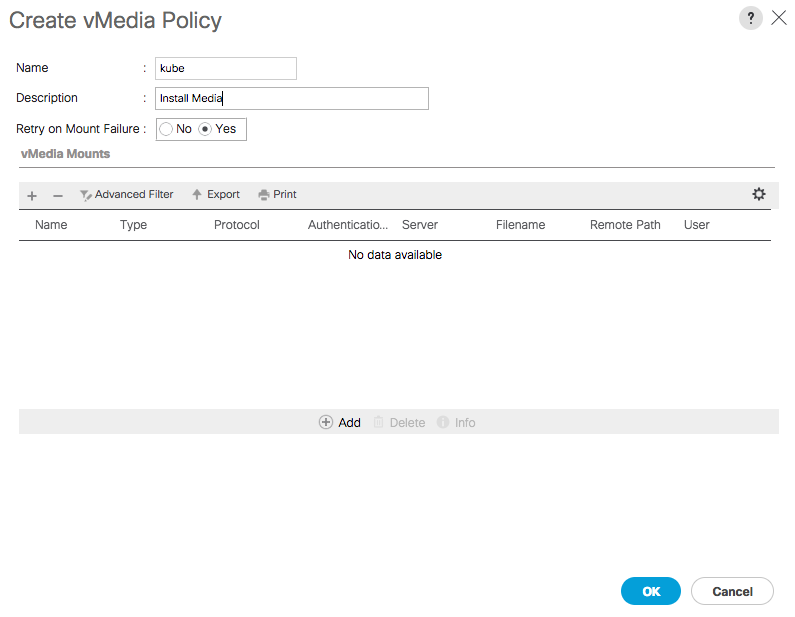
Creating a vMedia policy can be done on any UCS with firmware 2.2(2c) or greater. In the server tab, there is a section to create vMedia. In the example below, we are creating a policy for our Kubernetes bare metal nodes, so we call the policy "kube"
We can then add two vMedia mounts.
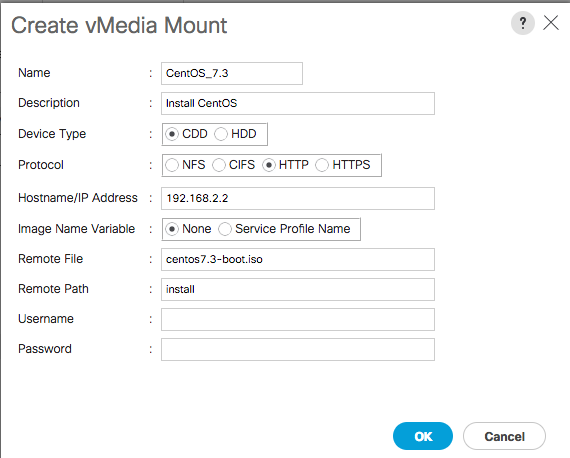
A modified ISO image for installation
An image created that contains only a kickstart file
A kickstart file is unique for each service profile. Since one of my service profiles is named "kube01", I have created an image that is available at http://192.168.2.2/install/kube01. Setting the vMedia profile as shown below makes this possible:
We of course could instead script all of this with something like the below, using the UCSM Python SDK
def createKubeVirtualMedia(handle):
print "Adding Virtual Media Policy"
from ucsmsdk.mometa.cimcvmedia.CimcvmediaMountConfigPolicy import CimcvmediaMountConfigPolicy
from ucsmsdk.mometa.cimcvmedia.CimcvmediaConfigMountEntry import CimcvmediaConfigMountEntry
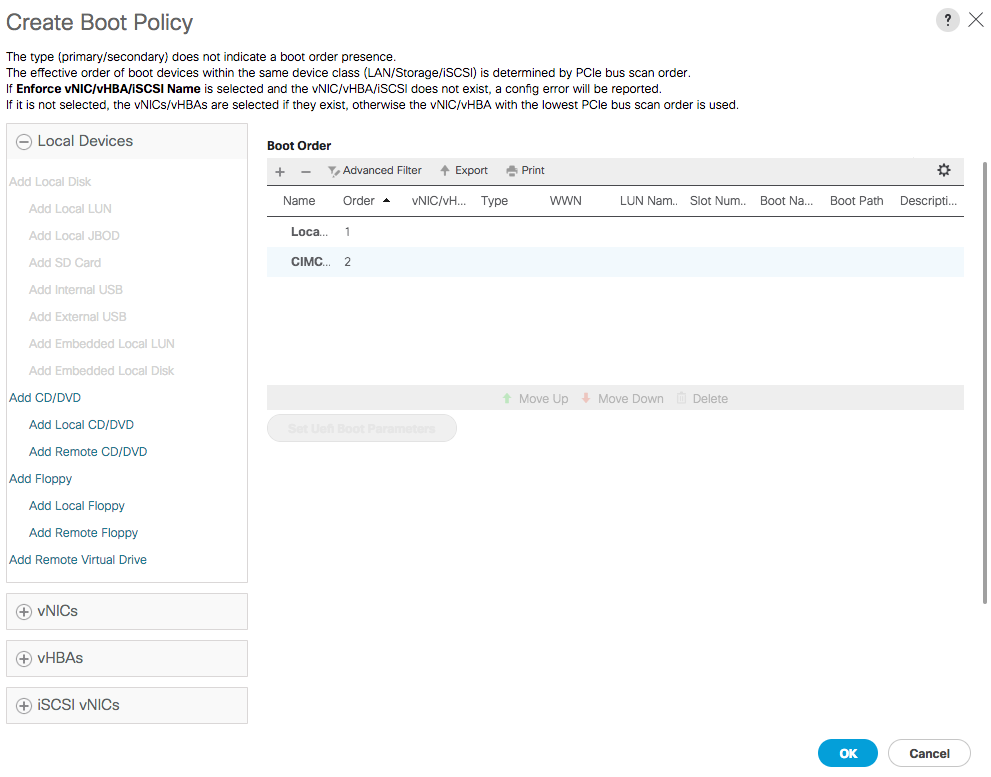
The last step is to create a boot policy that installs from the Hard Drive first, and then if no Operating System is found on the Hard Drive, to then use the virtual media to install. This is done as shown below. We first boot from the local drive and then add the CIMC mounted virtual media as the secondary boot option.
Attaching this to a service profile then gives us all we need for automated operating system installations! By attaching a Disk Scrub policy to automatically scrub the disks after the service profile is assigned we can then create other vMedia profiles to install other operating systems by simply assigning them to other Service Profile Templates. In this way you could have complete control over multiple operating systems that boot up and change them faster than ever.
If you've been following along all the way up to this point the one question you may have is: How do I create the Kickstart Images and how do I create the CentOS / Red Hat boot media to automatically run a kickstart with no manual intervention? We've got you covered. Head on over to our Github pages to have a look. There you will see how we actually create the ISO files as well as show screen shots from the classic UCS Manager. We've also created a video to show how this works. Once the service profiles are created the entire process is automatic with no manual intervention other than pulling up KVM consoles so we can watch it boot.
We've had problems in setting the boot order to HD first and then CIMC boot. When the server boots it doesn't see an OS and then errors and says "no bootable OS press any key to continue" Then we have to open KVM console to press the "any" key. Then it will boot to the second item in the boot order, i.e. PXE or CIMC mounted iso.
Thanks for the question. What is the hardware? Blades or Rack mounts? I created a scrub policy so that when the service profile is disconnected it will wipe out the master boot record. But that doesn't sound like your problem.
"No bootable OS press any key to continue" tells me that it didn't recognize the CIMC mounted image as a bootable image. When you did it the second time, did it install from the CIMC remote mount? Attached is another shot of the vMedia policy.
These are blade servers. My boot order is "SD Card" (We intend to load ESX on the SD Cards) first and "CIMC Mounted CD/DVD" second. When the server attempts to boot it attempts to boot from the SD Card first, which has no OS, yet. Instead of simply skipping the SD cards and moving to the CIMC Mounted ISO, it stops booting with this error. We have to open a KVM Console to the blade and hit the enter key to get it to move to the second item in the boot order.
Our current work around is to have a separate boot order policy that only has CIMC Mounted CD/DVD as the only item in the boot order. Once it boots from the scripted ESX iso and loads ESX on the SD Cards, then we have to change to a different boot order policy that only has SD cards.
If there was some way the we could only have one boot order policy with SD card as order 1 and CIMC as order 2 and have the server smart enough to know there is no OS on the SD cards so skip and move to order 2 that would be ideal. I've been unable to find anything in a BIOS policy to fix this.
Grr... I think I have one server like that I can check out. Let me try it out today and see what I can get. It *should* work, but probably never tested until you tested it! In which case we should open a bug. Let me try it out first.
We are trying to do PXE-less automated installation of ESXi on UCS in our lab. Could you please help in creating the kickstart images and boot iso images for ESXI. Can we follow the same steps and commands that you have done for Centos installation (PXE-less Automated UCS Installation of RedHat/CentOS).
Of course! Happy to help. There is a great CiscoLive video where Chris Atkinson goes over this topic of ESXi. In his talk he uses a local ks.cfg on the boot media itself and doesn't require a separate kickstart iso image.
You would probably not use the same steps for ESXi that you do for CentOS. It's pretty similar on the UCS side but preparing the installation media is a bit different.
Thanks for your reply. I was able to view the pdf for UCS provisioning using vMedia policy.But unfortunately the video is not playing when i click on the session video link in the above link that you provided.
created a vmedia policy as you detailed. I'm only trying to assign an iso just enabling cdd, but i'm getting a config error for the policy. I was able to refer to it in my boot policy. It is a b200 m4 with 2.2.6c f/w.
Find answers to your questions by entering keywords or phrases in the Search bar above. New here? Use these resources to familiarize yourself with the community: