- Cisco Community
- Technology and Support
- Wireless - Mobility
- Wireless
- image is not displaying after uploading the customized web page
- Subscribe to RSS Feed
- Mark Topic as New
- Mark Topic as Read
- Float this Topic for Current User
- Bookmark
- Subscribe
- Mute
- Printer Friendly Page
image is not displaying after uploading the customized web page
- Mark as New
- Bookmark
- Subscribe
- Mute
- Subscribe to RSS Feed
- Permalink
- Report Inappropriate Content
07-19-2013 08:23 PM - edited 07-04-2021 12:28 AM
Hi all,
We have uploaded the customized web auth bunde in the 5508 WLC. While uploading we didn't get any error.
But once the clients connect and got redirection , the logo in the web page is not displaying.
Any help would be appreciated....
Thanks,
Regards,
Vijay.
- Labels:
-
Other Wireless Topics
- Mark as New
- Bookmark
- Subscribe
- Mute
- Subscribe to RSS Feed
- Permalink
- Report Inappropriate Content
07-19-2013 11:37 PM
Vijay,
It maybe something to do with the html coding. You can test the default bundle for sanity.
Sent from Cisco Technical Support iPhone App
- Mark as New
- Bookmark
- Subscribe
- Mute
- Subscribe to RSS Feed
- Permalink
- Report Inappropriate Content
07-20-2013 12:10 AM
Hi viten ,
Just we have edited the html file with below ,
can u plz tell how to do the sanity check for the bundle?
Thanks
Regards,
Vijay


- Mark as New
- Bookmark
- Subscribe
- Mute
- Subscribe to RSS Feed
- Permalink
- Report Inappropriate Content
07-20-2013 06:20 AM
Did you include your logo in the same directory as the HTML file. The fine name should be yourlogo.jpg
Sent from Cisco Technical Support iPhone App
*** Please rate helpful posts ***
- Mark as New
- Bookmark
- Subscribe
- Mute
- Subscribe to RSS Feed
- Permalink
- Report Inappropriate Content
07-21-2013 02:37 AM
Hi all ,
Again we have created the web bundle with the two files . After that it got worked.
Thank u all for the support.
Regards,
Vijay.
- Mark as New
- Bookmark
- Subscribe
- Mute
- Subscribe to RSS Feed
- Permalink
- Report Inappropriate Content
07-21-2013 07:36 PM
Hello,
Downloading a Customized Web Authentication Login Page
You can compress the page and image files used for displaying a web authentication login page into a.tar file for download to a controller. These files are known as the webauth bundle. The maximum allowed size of the files in their uncompressed state is 1 MB. When the .tar file is downloaded from a local TFTP server, it enters the controller's file system as an untarred file.

Note ![]() If you load a webauth bundle with a .tar compression application that is not GNU compliant, the controller cannot extract the files in the bundle and the following error messages appear: "Extracting error" and "TFTP transfer failed." Therefore, we recommend that you use an application that complies with GNU standards, such as PicoZip, to compress the .tar file for the webauth bundle.
If you load a webauth bundle with a .tar compression application that is not GNU compliant, the controller cannot extract the files in the bundle and the following error messages appear: "Extracting error" and "TFTP transfer failed." Therefore, we recommend that you use an application that complies with GNU standards, such as PicoZip, to compress the .tar file for the webauth bundle.
Note ![]() Configuration backups do not include extra files or components, such as the webauth bundle or external licenses, that you download and store on your controller, so you should manually save external backup copies of those files or components.
Configuration backups do not include extra files or components, such as the webauth bundle or external licenses, that you download and store on your controller, so you should manually save external backup copies of those files or components.
Follow these guidelines when preparing the customized login page:
•![]() Name the login page "login.html." The controller prepares the web authentication URL based on this name. If the server does not find this file after the webauth bundle has been untarred, the bundle is discarded, and an error message appears.
Name the login page "login.html." The controller prepares the web authentication URL based on this name. If the server does not find this file after the webauth bundle has been untarred, the bundle is discarded, and an error message appears.
•![]() Include input text boxes for both a username and password.
Include input text boxes for both a username and password.
•![]() Retain the redirect URL as a hidden input item after extracting from the original URL.
Retain the redirect URL as a hidden input item after extracting from the original URL.
•![]() Extract and set the action URL in the page from the original URL.
Extract and set the action URL in the page from the original URL.
•![]() Include scripts to decode the return status code.
Include scripts to decode the return status code.
•![]() Make sure that all paths used in the main page (to refer to images, for example).
Make sure that all paths used in the main page (to refer to images, for example).
•![]() Ensure that no filenames within the bundle are greater than 30 characters.
Ensure that no filenames within the bundle are greater than 30 characters.
You can download a login page example from Cisco WCS and use it as a starting point for your customized login page. See the "Downloading a Customized Web Auth Page" section in the Using Templates chapter of the Cisco Wireless Control System Configuration Guide, Release 7.0, for instructions.
Using the GUI to Download a Customized Web Authentication Login Page
To download a customized web authentication login page from the controller GUI, follow these steps:
Step 1 ![]() Make sure that you have a TFTP server available for the file download. See the guidelines for setting up a TFTP server in Step 8 of the "Using the CLI to Choose the Default Web Authentication Login Page" section.
Make sure that you have a TFTP server available for the file download. See the guidelines for setting up a TFTP server in Step 8 of the "Using the CLI to Choose the Default Web Authentication Login Page" section.
Step 2 ![]() Copy the .tar file containing your login page to the default directory on your TFTP server.
Copy the .tar file containing your login page to the default directory on your TFTP server.
Step 3 ![]() Choose Commands > Download File to open the Download File to Controller page (see Figure 11-14).
Choose Commands > Download File to open the Download File to Controller page (see Figure 11-14).
Figure 11-14 Download File to Controller Page
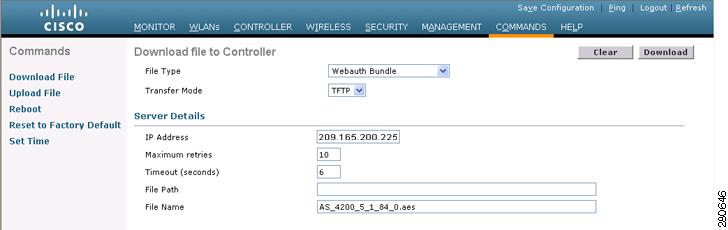
Step 4 ![]() From the File Type drop-down list, choose Webauth Bundle.
From the File Type drop-down list, choose Webauth Bundle.
Step 5 ![]() From the Transfer Mode drop-down list, choose TFTP or FTP.
From the Transfer Mode drop-down list, choose TFTP or FTP.
Step 6 ![]() In the IP Address text box, enter the IP address of the TFTP server.
In the IP Address text box, enter the IP address of the TFTP server.
Step 7 ![]() If you are using a TFTP server, enter the maximum number of times the controller should attempt to download the .tar file in the Maximum Retries text box.
If you are using a TFTP server, enter the maximum number of times the controller should attempt to download the .tar file in the Maximum Retries text box.
The range is 1 to 254.
The default is 10.
Step 8 ![]() If you are using a TFTP server, enter the amount of time in seconds before the controller times out while attempting to download the *.tar file in the Timeout text box.
If you are using a TFTP server, enter the amount of time in seconds before the controller times out while attempting to download the *.tar file in the Timeout text box.
The range is 1 to 254 seconds.
The default is 6 seconds.
Step 9 ![]() In the File Path text box, enter the path of the .tar file to be downloaded. The default value is "/."
In the File Path text box, enter the path of the .tar file to be downloaded. The default value is "/."
Step 10 ![]() In the File Name text box, enter the name of the .tar file to be downloaded.
In the File Name text box, enter the name of the .tar file to be downloaded.
Step 11 ![]() If you are using an FTP server, follow these steps:
If you are using an FTP server, follow these steps:
a. ![]() In the Server Login Username text box, enter the username to log into the FTP server.
In the Server Login Username text box, enter the username to log into the FTP server.
b. ![]() In the Server Login Password text box, enter the password to log into the FTP server.
In the Server Login Password text box, enter the password to log into the FTP server.
c. ![]() In the Server Port Number text box, enter the port number on the FTP server through which the download occurs. The default value is 21.
In the Server Port Number text box, enter the port number on the FTP server through which the download occurs. The default value is 21.
Step 12 ![]() Click Download to download the .tar file to the controller.
Click Download to download the .tar file to the controller.
Step 13 ![]() Choose Security > Web Auth > Web Login Page to open the Web Login page.
Choose Security > Web Auth > Web Login Page to open the Web Login page.
Step 14 ![]() From the Web Authentication Type drop-down list, choose Customized (Downloaded).
From the Web Authentication Type drop-down list, choose Customized (Downloaded).
Step 15 ![]() Click Apply to commit your changes.
Click Apply to commit your changes.
Step 16 ![]() Click Preview to view your customized web authentication login page.
Click Preview to view your customized web authentication login page.
Step 17 ![]() If you are satisfied with the content and appearance of the login page, click Save Configuration to save your changes.
If you are satisfied with the content and appearance of the login page, click Save Configuration to save your changes.
Using the CLI to Download a Customized Web Authentication Login Page
To download a customized web authentication login page using the controller CLI, follow these steps:
Step 1 ![]() Make sure that you have a TFTP server available for the file download. See the guidelines for setting up a TFTP server in Step 8 of the "Using the CLI to Choose the Default Web Authentication Login Page" section.
Make sure that you have a TFTP server available for the file download. See the guidelines for setting up a TFTP server in Step 8 of the "Using the CLI to Choose the Default Web Authentication Login Page" section.
Step 2 ![]() Copy the .tar file containing your login page to the default directory on your TFTP server.
Copy the .tar file containing your login page to the default directory on your TFTP server.
Step 3 ![]() Specify the download mode by entering this command:
Specify the download mode by entering this command:
transfer download mode tftp
Step 4 ![]() Specify the type of file to be downloaded by entering this command:
Specify the type of file to be downloaded by entering this command:
transfer download datatype webauthbundle
Step 5 ![]() Specify the IP address of the TFTP server by entering this command:
Specify the IP address of the TFTP server by entering this command:
transfer download serverip tftp-server-ip-address.
Note ![]() Some TFTP servers require only a forward slash (/) as the TFTP server IP address, and the TFTP server automatically determines the path to the correct directory.
Some TFTP servers require only a forward slash (/) as the TFTP server IP address, and the TFTP server automatically determines the path to the correct directory.
Step 6 ![]() Specify the download path by entering this command:
Specify the download path by entering this command:
transfer download path absolute-tftp-server-path-to-file
Step 7 ![]() Specify the file to be downloaded by entering this command:
Specify the file to be downloaded by entering this command:
transfer download filename filename.tar
Step 8 ![]() View your updated settings and answer y to the prompt to confirm the current download settings and start the download by entering this command:
View your updated settings and answer y to the prompt to confirm the current download settings and start the download by entering this command:
transfer download start
Step 9 ![]() Specify the web authentication type by entering this command:
Specify the web authentication type by entering this command:
config custom-web webauth_type customized
Step 10 ![]() Enter the save config command to save your settings.
Enter the save config command to save your settings.
Step 11 ![]() Follow the instructions in the "Using the CLI to Verify the Web Authentication Login Page Settings" section to verify your settings.
Follow the instructions in the "Using the CLI to Verify the Web Authentication Login Page Settings" section to verify your settings.
Customized Web Authentication Login Page Example
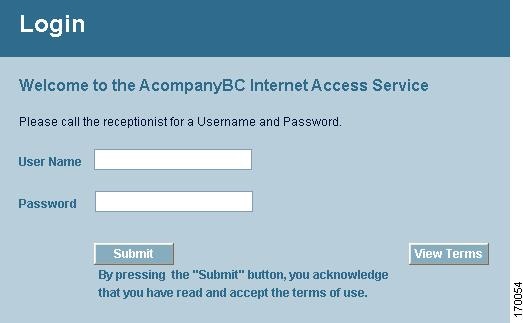
Figure 11-15 shows an example of a customized web authentication login page.
Figure 11-15 Customized Web Authentication Login Page Example
Using the CLI to Verify the Web Authentication Login Page Settings
Enter the show custom-web command to verify your changes to the web authentication login page. This example shows the information that appears when the configuration settings are set to default values:
Cisco Logo..................................... Enabled
CustomLogo..................................... Disabled
Custom Title................................... Disabled
Custom Message................................. Disabled
Custom Redirect URL............................ Disabled
Web Authentication Mode........................ Disabled
Web Authentication URL......................... Disabled
This example shows the information that appears when the configuration settings have been modified:
Cisco Logo..................................... Disabled
CustomLogo..................................... 00_logo.gif
Custom Title................................... Welcome to the AcompanyBC Wireless LAN!
Custom Message................................. Contact the System Administrator for a
                                                                  Username and Password.
Custom Redirect URL............................ http://www.AcompanyBC.com
Web Authentication Mode........................ Internal
Web Authentication URL............................ Disabled
Assigning Login, Login Failure, and Logout Pages per WLAN
You can display different web authentication login, login failure, and logout pages to users per WLAN. This feature enables user-specific web authentication pages to be displayed for a variety of network users, such as guest users or employees within different departments of an organization.
Different login pages are available for all web authentication types (internal, external, and customized). However, different login failure and logout pages can be specified only when you choose customized as the web authentication type.
Using the GUI to Assign Login, Login Failure, and Logout Pages per WLAN
To assign web login, login failure, and logout pages to a WLAN using the controller GUI, follow these steps:
Step 1 ![]() Choose WLANs to open the WLANs page.
Choose WLANs to open the WLANs page.
Step 2 ![]() Click the ID number of the WLAN to which you want to assign a web login, login failure, or logout page.
Click the ID number of the WLAN to which you want to assign a web login, login failure, or logout page.
Step 3 ![]() Choose Security > Layer 3.
Choose Security > Layer 3.
Step 4 ![]() Make sure that Web Policy and Authentication are selected.
Make sure that Web Policy and Authentication are selected.
Step 5 ![]() To override the global authentication configuration web authentication pages, select the Override Global Config check box.
To override the global authentication configuration web authentication pages, select the Override Global Config check box.
Step 6 ![]() When the Web Auth Type drop-down list appears, choose one of the following options to define the web authentication pages for wireless guest users:
When the Web Auth Type drop-down list appears, choose one of the following options to define the web authentication pages for wireless guest users:
•![]() Internal—Displays the default web login page for the controller. This is the default value.
Internal—Displays the default web login page for the controller. This is the default value.
•![]() Customized—Displays custom web login, login failure, and logout pages. If you choose this option, three separate drop-down lists appear for login, login failure, and logout page selection. You do not need to define a customized page for all three options. Choose None from the appropriate drop-down list if you do not want to display a customized page for that option.
Customized—Displays custom web login, login failure, and logout pages. If you choose this option, three separate drop-down lists appear for login, login failure, and logout page selection. You do not need to define a customized page for all three options. Choose None from the appropriate drop-down list if you do not want to display a customized page for that option.
Note ![]() These optional login, login failure, and logout pages are downloaded to the controller as webauth.tar files. For details on downloading custom pages, see the "Downloading a Customized Web Authentication Login Page" section.
These optional login, login failure, and logout pages are downloaded to the controller as webauth.tar files. For details on downloading custom pages, see the "Downloading a Customized Web Authentication Login Page" section.
•![]() External—Redirects users to an external server for authentication. If you choose this option, you must also enter the URL of the external server in the URL text box.
External—Redirects users to an external server for authentication. If you choose this option, you must also enter the URL of the external server in the URL text box.
You can choose specific RADIUS or LDAP servers to provide external authentication on the WLANs > Edit (Security > AAA Servers) page. Additionally, you can define the priority in which the servers provide authentication.
Step 7 ![]() If you chose External as the web authentication type in Step 6, choose AAA Servers and choose up to three RADIUS and LDAP servers using the drop-down lists.
If you chose External as the web authentication type in Step 6, choose AAA Servers and choose up to three RADIUS and LDAP servers using the drop-down lists.
Note ![]() The RADIUS and LDAP external servers must already be configured in order to be selectable options on the WLANs > Edit (Security > AAA Servers) page. You can configure these servers on the RADIUS Authentication Servers page and LDAP Servers page.
The RADIUS and LDAP external servers must already be configured in order to be selectable options on the WLANs > Edit (Security > AAA Servers) page. You can configure these servers on the RADIUS Authentication Servers page and LDAP Servers page.
Step 8 ![]() Establish the priority in which the servers are contacted to perform web authentication as follows:
Establish the priority in which the servers are contacted to perform web authentication as follows:
Note ![]() The default order is local, RADIUS, LDAP.
The default order is local, RADIUS, LDAP.
a. ![]() Highlight the server type (local, RADIUS, or LDAP) that you want to be contacted first in the box next to the Up and Down buttons.
Highlight the server type (local, RADIUS, or LDAP) that you want to be contacted first in the box next to the Up and Down buttons.
b. ![]() Click Up and Down until the desired server type is at the top of the box.
Click Up and Down until the desired server type is at the top of the box.
c. ![]() Click the < arrow to move the server type to the priority box on the left.
Click the < arrow to move the server type to the priority box on the left.
d. ![]() Repeat these steps to assign priority to the other servers.
Repeat these steps to assign priority to the other servers.
Step 9 ![]() Click Apply to commit your changes.
Click Apply to commit your changes.
Step 10 ![]() Click Save Configuration to save your changes.
Click Save Configuration to save your changes.
For more info please check the following link:
http://www.cisco.com/en/US/docs/wireless/controller/7.0/configuration/guide/c70users.html
Find answers to your questions by entering keywords or phrases in the Search bar above. New here? Use these resources to familiarize yourself with the community:
