Working:
First we need to assume that you have a standard Cisco ISE configuration built. here we are using Cisco UCS to host a virtualized ISE appliance, Active Directory and other services. For hardware, we have used a
- Cisco 3560 switch running on 12.2 55E (downgraded from 12.2 58),
- ASA 5505 (for outbound NAT) and
- Cisco Wireless network consisting of two APs and WLC appliance (NOTE: WLC should be running on 7.X code for Radius between ISE and WLC to work).

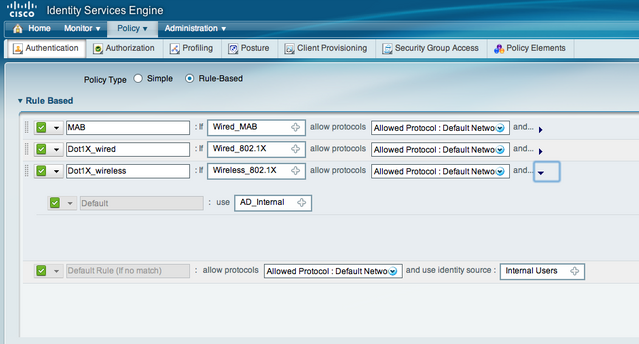
Before Starting, its VERY important to check the time in AD (windows clock) and ISE (show clock command). If the time is not synched, radius authentication will fail (see ISE monitor image above). Once groups are added, test AD users in ISE under external identity store, AD, Connect and check "AD / ISE" integration is working. You go to Authentication and verify you have a default 802.1x policy. Click the little triangle and change the ISE identity sources to AD (see below). This will ask ISE to send query to AD for any device accessing the network using 802.1x. Next go to Network Devices under Administration and add a new network device.
On WLC, go to security and add ISE for radius authentication and accounting. Make sure to match the shared secret used in ISE! Next create the WLAN for your environment. Under Security and Layer 2 in your WLAN, make sure Auth Key Mgmt is set to 802.1x. Under the AAA Server tab add your services via selecting from the scroll down section or manually. Under advanced, check AAA override and scroll down to radius NAC under NAC state. Enable your WLAN and save.
Back in ISE, go to Profiling under Policy and select the mobile profiles you want to include in your lab. Each profile by default will state “Use Hierarchy”. Change this to “Create Matching Identity Group” (see image below).

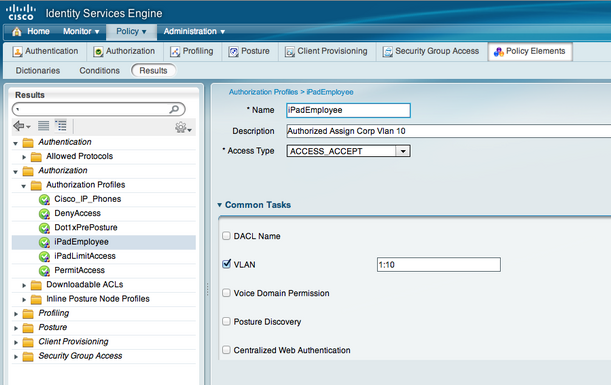
Next go to Rules under Policy and click down into the Authorization Profiles section under Authorization. This section tells what to do with authorized users. In our ISE lab, we created an iPad Employe and iPad Guest policy which employees were put into VLAN 10 and guests in VLAN 20. You can put users on the same vlan and apply ACLs for control, create a redirection if posture is desired or other combinations of security. Spend time learning the different options for authorization.
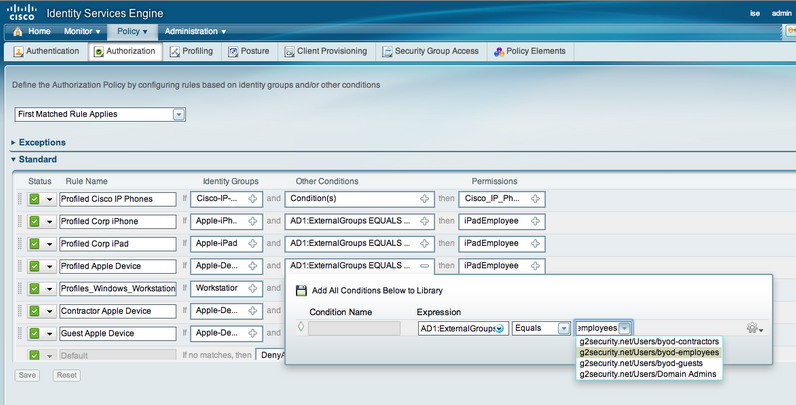
The final step is buiding your ISE Authorization policy under the Policy tab. We created rules for specified devices as the Identity Source such as Apple-iPad and Apple-Device as seen in the default profiling section. NOTE: The device profiles you changed to “Create Matching Identity Group” will appear here. Under conditions, click new condition, select your AD, select = and whichever group of users should apply. Below is our ISE policy covering general Apple Devices, Ipads, Iphones and PC workstations for employees and guests. An example is the Identity Group is Apple-iPad, Condition is AD users = to AD_group_employes then apply iPadEmployees which means all iPads used by Employees will end up in Vlan 10 as specified by the iPadEmployee policy.
Acknowledgment:
ISE with Wireless Devices