- Cisco Community
- Technology and Support
- Security
- Network Security
- Manual Nat (twice Nat) Answers
- Subscribe to RSS Feed
- Mark Topic as New
- Mark Topic as Read
- Float this Topic for Current User
- Bookmark
- Subscribe
- Mute
- Printer Friendly Page
Manual Nat (twice Nat) Answers
- Mark as New
- Bookmark
- Subscribe
- Mute
- Subscribe to RSS Feed
- Permalink
- Report Inappropriate Content
03-31-2012 08:18 AM - edited 03-11-2019 03:49 PM
There seems to be a large number of the subject queries in one form or another. Having acquired an asa 5505 and using 8.43 firmware and the ADSM gui for router configuration it has not been an easy transition from other products. I have come to understand embedded NAT objects for basic port forwarding but am at a loss on configuring twice nat or manual nat, not really ever dealing with it before, or in this manner.
What I would like to suggest to the experts and to those with the ability to give advice to document editers is to include far more ADSM web gui examples and discussion for manual nat. The tools are all there - in the nat rules editing page, the display of the rules pictorially and the packet flow at the bottom of the page (and finally thru packet tracing). What is needed is more on the actual entries on the nat editing pages and the logic and explanation of those entries. In this forum what I would like to see is when there are responses that they include both the CLI recommended entries b AND the associated adsm web gui pics. With good documents for reading and examples in the forum, I think there should be much less confusion allowing more attention to some very complex scenarios. I personally feel a bit embarrassed to be asking basic questions and appreciate the responses but with improvements in docs and forum answers the number of such questions should drop. At the very least I and others like me will get better edumecated. To be clear am not looking for the easy cookie cutter right answers, I am looking to understand CIsco packet routing through explanations of the web gui entries. In fact, I am learning far more by trying to understand the web gui vice simply copying and entering CLI commands. In terms of documents, for example, there should be a very thorough explanation of the relationship between "Translated Addr:" in the first NAT editing page with "Destination Inteface" in the second Advanced page .
Thanks.
Examples below of what I am talking about (note examples are simple embedded NAT object (port forwarding rules). I can finally handle external users requiring access to internal servers. :-) But that is just the surface.


I have added the packet tracing jpegs for further context. There is an UNNAT lookup entry (first trace block, out of view on the pic) a concept which is missing in the documentation I've read that needs to be added but it is illuminating in how the router handles traffic. What is also interesting is the fourth jpeg which also shows the flow designation of a packet and its handling internally (new packet or one that is associated with an existing packet (previously identified and put in an appropriate table xlate etc)).


- Labels:
-
NGFW Firewalls

")
- Mark as New
- Bookmark
- Subscribe
- Mute
- Subscribe to RSS Feed
- Permalink
- Report Inappropriate Content
03-31-2012 09:33 AM
Hi,
I've personally always preferred using CLI over GUI. Probably comes due to the fact I started with old Cisco switches and routers.
When I first used a Cisco PIX the switch from switches/routers was a bit hard. The configuration format in 6.x was totally different from the IOS. After I upgraded the first PIX to software 7.0 it was abit more familiar already. Interfaces were now configured like in the switches and routers. Also the permitting traffic through the device used access-lists.
I was just beginning to handle all the different NAT setups (atleast the ones we run into) and then came 8.3 (and 8.4) which totally changed the NAT configuration format
I still find myself configuring the NAT through CLI. I use the CLI because I like beeing able to see the whole device configuration without jumping from tab to tab and clicking drop down menus. I mostly use ASDM to edit existing configurations or something that might not be as familiar with. Though my goal usually is to learn to configure the same from the CLI after I've done it a couple of times from GUI interface.
If you're only using ASDM GUI to configure the ASA, I suggest you go "Tools -> Preferences" and from there enable the option "Preview commands before sending them to the device" This will basicly show you all configurations that you are going to apply in the CLI format. I think this preview setting is off by default.
EDIT2: One really helpfull thing is also the fact that you can get help for almost every configuration page on the ASDM GUI. I think theres almost always a direct "Help" button that opens information about the configuration page in question and clarifies all the options you have on the page. Again, as I haven't used much ASDM, I dont know if they clarify the things you are asking for.
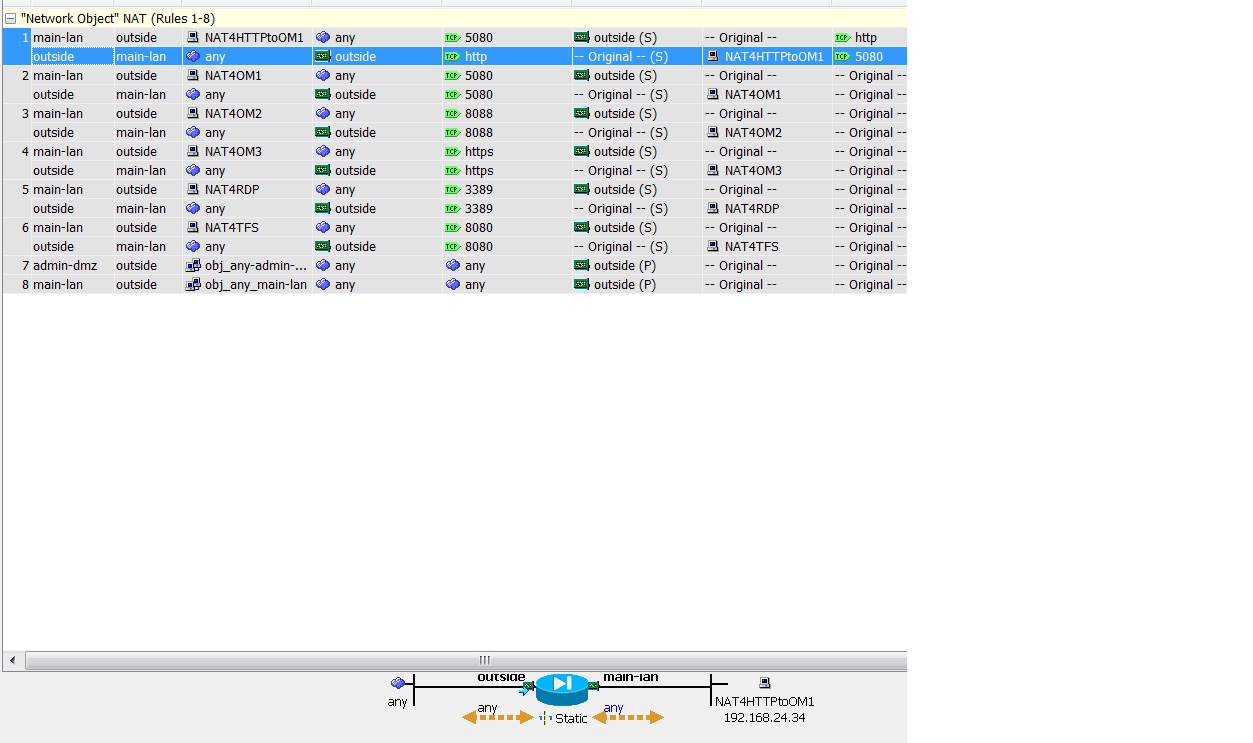
The first 2 pictures to my understanding illustrate the configuration of a port forwarding using the "outside" interfaces address.
The first pictures Translated Address just refers that you are going to use the "outside" interfaces IP address (whatever it might be) to configure a NAT. The ASDM has a habit of giving names to IP addresses which can confuse you. The same line might as well contain an IP address in numeric format if you for example had a small public subnet at your disposal for NAT translations.
The second pictures source/destination interface just basically tells you the interfaces between which the NAT is beeing performed. Either of these can also be specified as "any".
I'll give you a couple of examples
EXAMPLE 1
- The below configuration basicly tells the ASA that it will PAT all outbound (outside) traffic from the source networks defined in the object-group to the outside interface address. It also tells that the source interface can be any interface on the ASA.
- So basically if you keep adding interfaces to an ASA that need (Or networks behind them) default PAT translations when they use the Internet, you can just keep adding "network-object x.x.x.x y.y.y.y" statements with the new networks under the object-group and the ASA will do PAT for them. You wont have to configure any additional NAT statements.
object-group network DEFAULT-PAT-SOURCE-NETWORKS
description Source Networks for PAT
network-object 10.10.10.0 255.255.255.0
network-object 192.168.0.0 255.255.255.0
network-object 172.16.8.0 255.255.255.0
nat (any,outside) after-auto source dynamic DEFAULT-PAT-SOURCE-NETWORKS interface
EXAMPLE 2
- The below configuration basically tells the ASA that the DMZ server will be visible to other hosts behind other ASA interface with the same NAT ip of "1.2.3.4". This could apply to situations where you want to access the DMZ server with the same public IP address from both the Internet and the LAN.
- This could help with situations where your LAN uses public DNS and that DNS points to the servers public IP address. With this NAT configuration even though you LAN hosts are connecting to a public IP address the device will still be accessible from the LAN since you're NATing the DMZ server towards all interfaces.
object-network DMZ-PUBLIC-STATIC
description Static Public IP for DMZ server
host 192.168.10.10
nat (dmz,any) static 1.2.3.4 dns
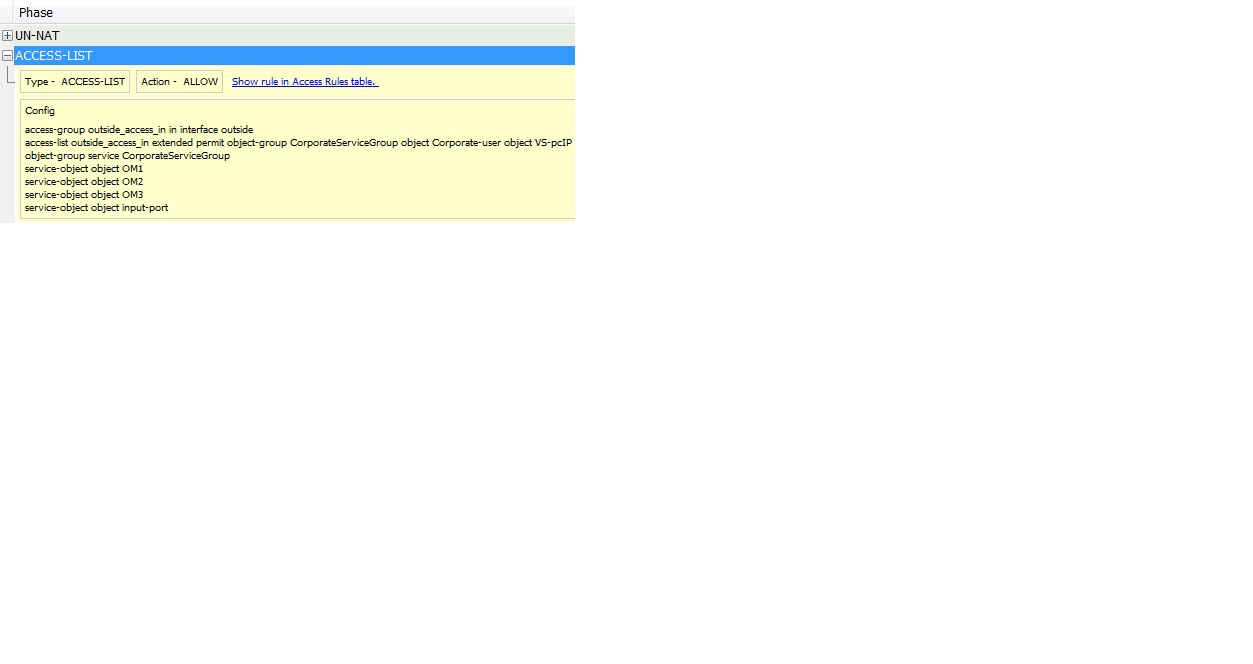
The UN-NAT section to my understanding just tells you that a connection coming from outside to a NAT IP is basically forwarded to the actual lan host IP address and not the public IP the user was originally connecting to.
To be honest I don't really know how to configure well with the ASDM as I usually just use the CLI. Because of that I'm sometimes at a loss on how to configure the most simple things because I've only done them on the CLI.
Hope some of this was helpfull to you
EDIT: Didn't realize I wrote so much
- Jouni
- Mark as New
- Bookmark
- Subscribe
- Mute
- Subscribe to RSS Feed
- Permalink
- Report Inappropriate Content
03-31-2012 11:48 AM
Only that it points out there is a gap in user knowledge and documentation and examples addressed in a coherent manner. :-) Much thanks for your thoughts!
Discover and save your favorite ideas. Come back to expert answers, step-by-step guides, recent topics, and more.
New here? Get started with these tips. How to use Community New member guide
