- Cisco Community
- Technology and Support
- Networking
- Networking Knowledge Base
- Detecting of MAC/Probe Spoofing with AI Spoofing Detection
- Subscribe to RSS Feed
- Mark as New
- Mark as Read
- Bookmark
- Subscribe
- Printer Friendly Page
- Report Inappropriate Content
- Subscribe to RSS Feed
- Mark as New
- Mark as Read
- Bookmark
- Subscribe
- Printer Friendly Page
- Report Inappropriate Content
on 07-22-2021 08:41 AM
- Overview:
- Pre-Requisites:
- AI Cloud registration:
- Enabling NetFlow on Cisco DNA Center and switches
- AI Spoofing detection and UI interaction:
- Rapid Threat Containment
Overview:
AI spoofing detection is a feature in AI Endpoint Analytics released in Cisco DNA Center v2.2.2.3, that identifies endpoints impersonating a legitimate endpoint connected to the network. This helps prevent bad actors and unauthorized devices gaining access to the network to do further harm. Typically, impersonation attempts use techniques such as MAC spoofing or Probe spoofing to gain access.
With MAC spoofing, bad actors clone the MAC address of a legitimate endpoint to a different device they use to connect to the network. With probe spoofing, bad actors forge packets that spoofs the identity of the endpoint using protocols such as CDP/DHCP etc. This could be in conjunction with MAC spoofing or separate. The goal is to get the same level of access as the legitimate endpoint
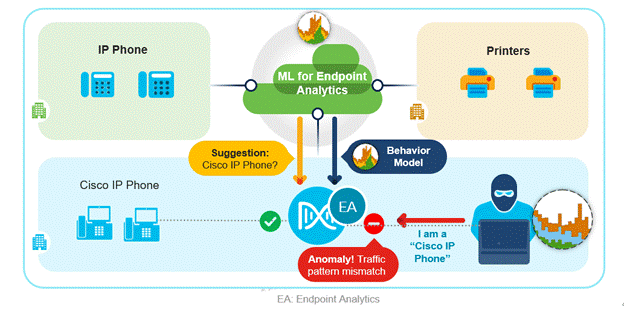
Here is how ‘AI Spoofing Detection’ works. This feature builds a behavioural profile of the endpoint by looking at their traffic patterns. A legitimate endpoint type will have a certain type of traffic pattern. These traffic patterns from different endpoints are analysed by AI Analytics cloud service crowdsourced from many customers to create machine learning (ML) models. ML models are constantly trained in the cloud and downloaded to Cisco DNA Center. These models are then used to compare with traffic flows coming from the endpoints connected to the network. Deviations from the models are detected and inference made about a possible anomaly. An anomaly event is triggered with high, medium and low probability along with an indicator called Trust Score.
Trust Score is a measure of trustworthiness of the endpoint, higher the Trust Score higher the trustworthiness and vice versa. Customers can use this additional context that identifies endpoint anomalies such as spoofing and take action.
Pre-Requisites:
This feature requires Cisco DNA Center 2.2.2.3 or later and Cisco Catalyst 9000 switches running IOS XE 17.3.1 or later
AI Cloud registration:
This feature is driven by AI/ML. First step is to enable AI/ML cloud. Cisco DNA Center should be able to talk to the AI cloud for this functionality to work to download the ML models of different endpoints. This needs cloud communication that requires cloud registration. This functionality may not work in air gapped environments. For air gapped environments please reach out to account team/partner or product management team
Go to the Cisco DNA Center appliance web UI to complete the ML Cloud registration and verify the following.
-
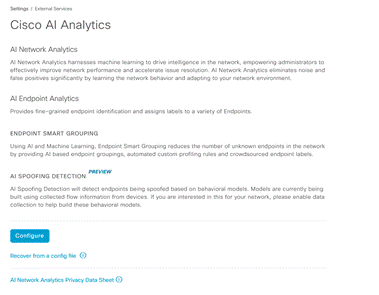
System > Settings > External Services > Cisco AI Analytics
-
Click on Configure and enable Endpoint Smart Grouping and AI spoof detection option. Choose the appropriate region based on your location and where you prefer to send endpoint meta data to. Click Next.
Click on checkbox to accept the Cisco Universal Cloud Agreement terms and click on “Enable” at the bottom of the screen.
-
Once the registration is completed a Success pop-up message will show up:
It will also download the private key of your Cisco DNA Center certificate used to send endpoint telemetry to cloud. Information sent to ML cloud is encrypted using this. Store it in a safe location.
-
Enable AI Spoofing Detection: Slide the button in the screen to the right to enable AI spoofing Detection and click Update. Accept the Terms and Conditions. This option is available from Cisco DNA Center v2.2.2.3 onwards.
From Cisco DNA Center UI: Go to Policy > Click on AI Endpoint Analytics to start the UI.
If your system is upgraded or installed for the first time you will see a Trustscore dashlet for the first time. Click on ‘Install and enable trust score sources’. When you go back to ‘AI Endpoint Analytics’ overview you should see the Trust Score dashlet enabled as shown below.
Enabling NetFlow on Cisco DNA Center and switches
In Cisco DNA Center, Click Hamburger Menu > Design > Network Settings and click on Telemetry tab. Within the NetFlow section, enable Cisco DNA Center to collect NetFlow.
AI spoofing detection feature is officially supported in Cat9k access switches only. We will expand to other supported network devices as well. That said, NetFlow metadata can still be gathered and aggregated in Cisco DNAC from different Cat9k platform Cat9k access switches, Cat 9800 WLC, 9500 distribution switches and Cisco Traffic Telemetry Appliance. This will be used for Cisco AI cloud services to build/tune/train behavioral models.
Enabling NetFlow on the switchports: From Cisco DNA Center UI, Go to Hamburger Menu > Provision > Inventory > Select the site and click/check the box to the left of the switch requiring the NetFlow configuration.
Click Actions dropdown > Telemetry > select Enable Application Telemetry. This enables NetFlow on all the ports. If you want to selectively enable it only on certain ports then the port description needs a key word “lan” for telemetry per port configuration to happen. If not, NetFlow is turned on in all ports.
If you want/need to manually configure NetFlow on the device then an example is shown here:
________________________________________________________________________
flow exporter DNAC
destination 10.62.140.77 DNAC IP
transport udp 6007
option interface-table timeout 10
option vrf-table timeout 10
option sampler-table
option application-table timeout 10
option application-attributes timeout 10
flow monitor fnf-avc-mon
exporter DNAC
cache timeout inactive 10
cache timeout active 60
record fnf-avc-ipv4
flow record fnf-avc-ipv4
match ipv4 version
match ipv4 protocol
match application name
match connection client ipv4 address
match connection server ipv4 address
match connection server transport port
match flow observation point
collect flow direction
collect connection initiator
collect connection new-connections
collect connection client counter packets long
collect connection client counter bytes network long
collect connection server counter packets long
collect connection server counter bytes network long
collect timestamp absolute first
collect timestamp absolute last
# Interface configurtion for access ports connected to endpoints
Interface GigabitEthernet1/0/13.
ip flow monitor fnf-avc-mon input
ip flow monitor fnf-avc-mon output
______________________________________________________________
AI Spoofing detection and UI interaction:
Go to Endpoint Analytics application as mentioned below to start the UI. You must open the left panel by clicking the icon to the left of DNA Center.
From Cisco DNA Center UI: Go to Policy > Click on AI Endpoint Analytics to start the UI.
AI spoofing detection feature uses this Trust Score to send alerts to the dashboard/overview screen. Admins can take action based on the actual score. We will discuss this in the next section.
The Endpoint inventory screens are also augmented to accommodate a smooth workflow to take action once an anomaly is detected when such an endpoint becomes available in the network. This can be used for mitigating the alerts coming from these endpoints.
When an endpoint exhibits anomalous behavior while impersonating a legitimate endpoint, you can click on the low/medium/high scores from the overview screen in the Trust Score dashlet that takes you to the Endpoint inventory screen below.
You can toggle the Focus from All Endpoints to Trust Score
You will see the endpoint entries within the ‘Trust Score’ view. Remember, you will only see the endpoints that have a trust score associated in this view.
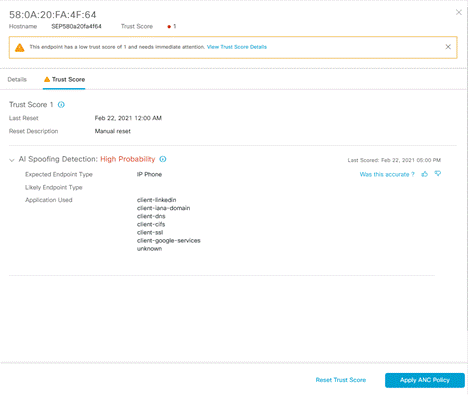
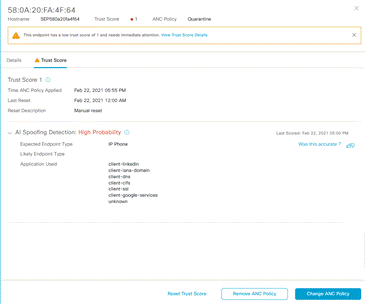
Click on the ‘Trust Score’ link to see the details on the side panel to the right and to take action. The details page will give you the following
-
When the endpoint is last seen in the network.
-
What is the likely endpoint type of this endpoint
-
Type of application traffic coming out of this endpoint.
-
Probability of detecting an anomaly.
-
Why the Trust Score was reset.
In the example above you can see application traffic going to LinkedIn and CIFS traffic that is atypical of a IP Phone. You can also see that AI Endpoint Analytics has detected that this endpoint is misbehaving with high probability.
Upon seeing this alert, admins can take a few actions from the screen.
-
Admin can apply ANC policy (discussed in the next section) that will change access policies of the endpoint to block or limit access.
-
Admins can do further investigation on the endpoint that requires manual intervention and then reset the Trust Score as needed.
-
Admins can help improve the efficacy of AI/ML by providing feedback if this is useful or not.
Rapid Threat Containment
Rapid Threat Containment (RTC) is a mechanism that allows Cisco DNA Center and other products to contain the threat by swiftly acting on the infrastructure to block or quarantine the endpoints. This is done via Cisco ISE Adaptive Network Control (ANC) policy a mechanism to receive action from other products such as Cisco DNA Center, Cisco Secure Network Analytics (Stealthwatch) or Firepower etc. as well as third party products, that are integrated with Cisco ISE via pxGrid.
When Security/IT admin sees an alert with a low or medium trust score, they can apply ‘ANC policy’ directly from Cisco DNAC Center that allows Cisco ISE to carry out those actions on the switchports connected to the endpoint. Using ANC policy, ISE then sends a change of authorization to perform the action on the switchport connected to the endpoint that will limit or block access to the endpoint. There are different actions that can be taken on the switchport connected to an endpoint such as shutdown or terminate connection/ reauthenticate etc.
For this to happen, you need to create the ANC policy in Cisco ISE.
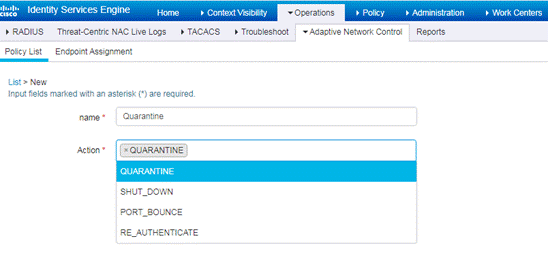
Login to ISE UI, go to Operations > Adaptive Network Control.
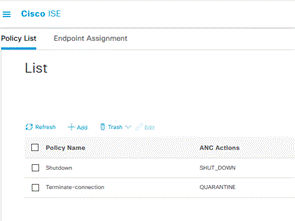
Go to Policy List menu to view the list and create a new ANC policy. Cisco ISE supports following action Quarantine, Port-Bounce, Re-authenticate or Shutdown the ports connected to the endpoints that can be used in the policy.
-
Create a policy for each of the action you want to use to isolate the endpoint.
-
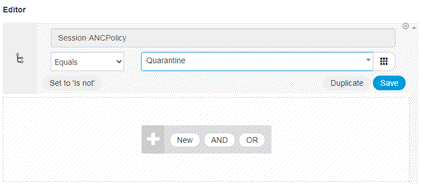
From ISE UI, you need to go to Policy, Policy sets > Global exception policy. Add a condition for Session:ANCPolicy equals <Action value >, assign Deny access as shown below, or alternatively you could assign an SGT (that limits access to the resources). Create an authorization policy exception in the Policy set which should be on the top above all authorization policies
You can do this as a Global exception or Local exception. Add an exception policy using the following attributes/conditions shown below.
Session:ANCPolicy equals Quarantine
The policy can look like the following. You can also create an ACL/SGT to prevent access and add it under Results > Profiles.
-
You can observe the ISE logs to see the status of endpoint by going to Operations > ISE logs from ISE UI.
-
Once ANC Policy is applied, you can also “Remove ANC Policy” from Cisco DNA Center by clicking on the relevant button from the screen.
(Exception: ANC Policy that shuts down the port requires manual intervention to enable the switchport again)
Find answers to your questions by entering keywords or phrases in the Search bar above. New here? Use these resources to familiarize yourself with the community:
