- Cisco Community
- Technology and Support
- Security
- Security Knowledge Base
- Getting Started with ISE
- Subscribe to RSS Feed
- Mark as New
- Mark as Read
- Bookmark
- Subscribe
- Printer Friendly Page
- Report Inappropriate Content
- Subscribe to RSS Feed
- Mark as New
- Mark as Read
- Bookmark
- Subscribe
- Printer Friendly Page
- Report Inappropriate Content
04-25-2017 11:32 PM - edited 02-21-2020 10:02 PM
- Installing ISE
- Requirements
- Background Information
- CLI Setup
- Administrative User Interface (GUI)
- Managing Certificates
- Requirements
- Importing CA to ISE Trusted Certificates
- Certificate Signed Request
- Wildcard Certificates
- Joining ISE to Active Directory
- Visibility Setup Wizard
- Easy Connect
- Switchport Configuration for MAB
Installing ISE
Requirements
- ISE image either .iso or .ova
- DNS services
- NTP services
Background Information
Cisco Identity Services Engine (ISE) is a network based Access Control and Policy Enforcement Platform that enables enterprises to enforce compliance, enhance infrastructure security, and streamline their service operations. The unique architecture of Cisco ISE allows enterprises to gather real-time contextual information from network devices (NADs), users and devices (Endpoints), the administrator can then use that information to make proactive governance decisions and enforce policies by tying identity to various network elements including access switches, wireless LAN controllers (WLCs), virtual private network (VPN) gateways, and data center switches. Cisco ISE is a key component of the Cisco Security Group Access Solution.
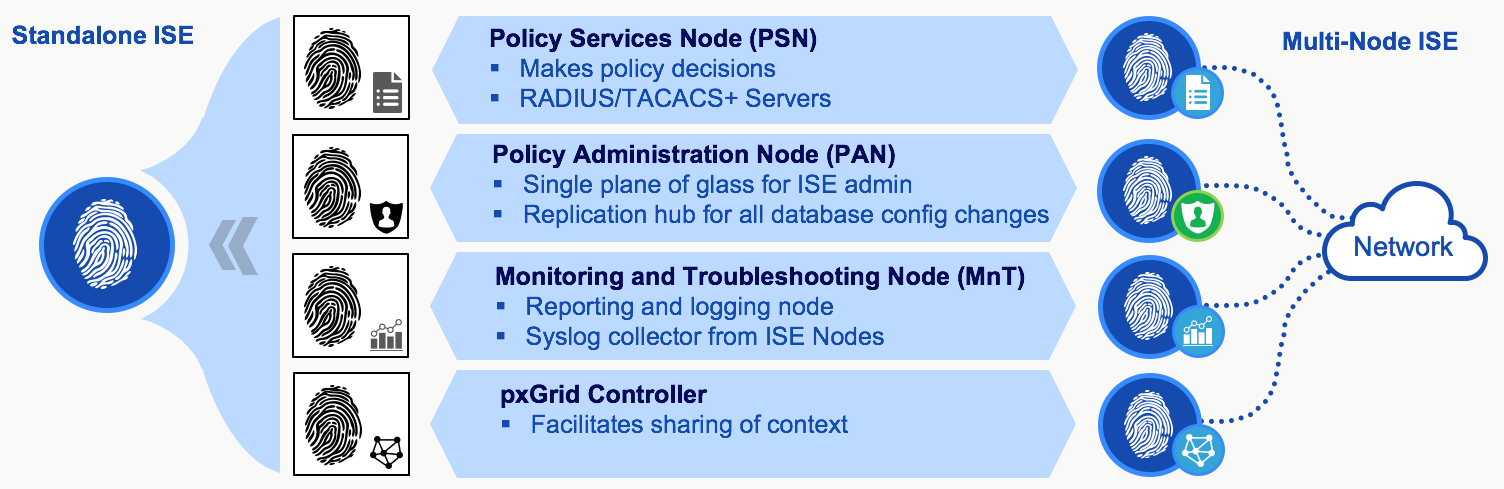
Refer to Set Up Cisco ISE in a Distributed Environment for a more depth understanding of ISE distributed deployment (Multi-Node) and terminologies.
In this document we will focus on deploying ISE as a standalone node
During the setup, you will need to provide the following information:
- Hostname
- IP Address of ISE
- Netmask
- Default Gateway
- DNS Domain
- Name Server
- NTP Server
- Time Zone
- Username
- Password
Note: When purchasing ISE appliances you receive ISE pre-deployed. This document focuses on installing ISE on VM.
Refer to Install ISE on a VMware Virtual Machine for ISE installation and upgrade guide on VM.
CLI Setup
1. Boot .ISO file. You will be prompted with the following boot options page:
Welcome to the Cisco Identity Services Engine Installer
Cisco ISE Version: 2.x.x.x

Available boot options:

[1] Cisco ISE Installation (Keyboard/Monitor)
[2] Cisco ISE Installation (Serial Console)
[3] System Utilities (Keyboard/Monitor)
[4] System Utilities (Serial Console)

Enter boot option and press <Enter>.

boot: _
2. Select option 1
3. Once installation is complete power on the VM. You will be presented with a login screen where you will type ‘setup’ to configure the VM:
**********************************************
Please type ‘setup’ to configure the appliance
**********************************************
localhost login:

Note: It is critical to have ip connectivity to NTP, otherwise ISE internal clock will be out of sync and can render the system unusable until re-installed.

Enter hostname[]: ISE2-2
Enter IP address[]: 10.0.15.10
Enter IP netmask []: 255.255.255.0
Enter IP default gateway[]: 10.0.15.1
Enter default DNS domain[]: demo.local
Enter primary nameserver[]: 10.0.15.20
Add secondary nameserver? Y/N [N]:
Enter NTP server[time.nist.gov]: 192.168.1.1
Add another NTP server? Y/N [N]:
Enter system timezone[UTC]:
Enable SSH service? Y/N [N]:Y
Enter username[admin]
Enter password:
Enter password again:

Do not user ’Ctrl-C’ from this point on...

Installing Applications...

=== Initial  Setup for Application: ISE ===

Welcome to the ISE initial setup.The purpose of this setup is to
Provision the internal ISE database. This setup is non-interactive,
And will take roughly 5 minutes to complete.
4. Once ISE reboots, log into ISE via SSH with your user credentials that you created in the initial setup (This will verify that both SSH and user credentials are working correctly ) . Check NTP status and make sure clock is synchronized.
Administrative User Interface (GUI)
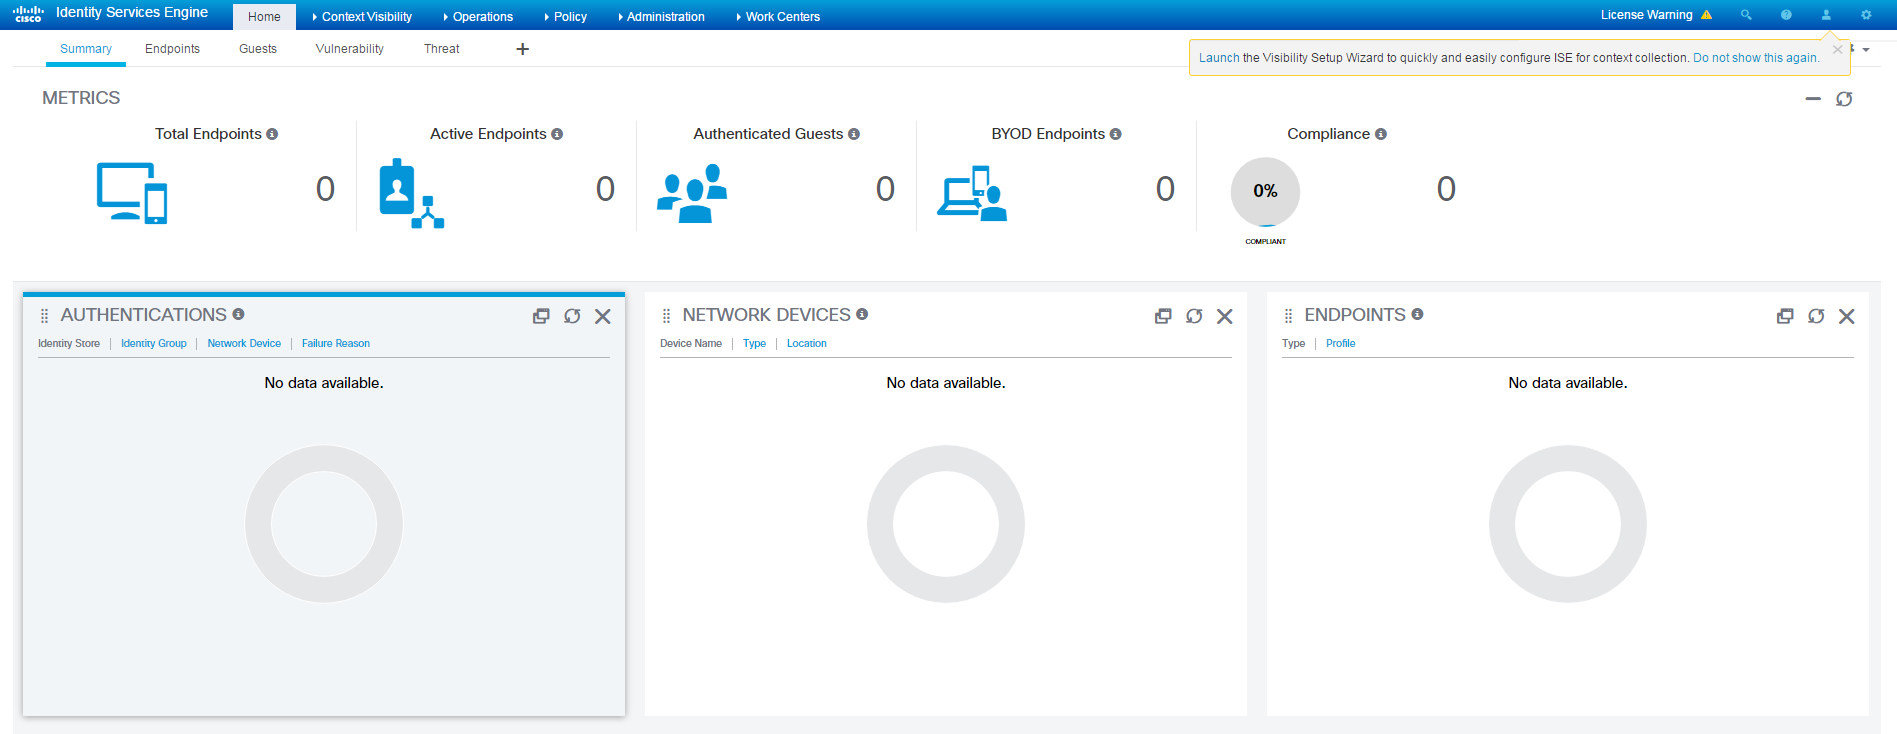
5. Navigate to ISE GUI by applying either your ISE DNS name (If you have DNS support) or IP address in web browser
6. Login as the admin and the password you supplied in initial setup
7. Once logged in you should be presented with ISE dashboard
The following video shows how to install ISE in a VM:
Managing Certificates
Requirements
- Microsoft CA
A certificate is an electronic document that identifies an individual, a server, a company, or other entity and associates that entity with a public key. A self-signed certificate is signed by its own creator. Certificates can be self-signed or digitally signed by an external Certificate Authority (CA). A CA-signed digital certificate is considered industry standard and more secure.
Cisco ISE provides a native Certificate Authority (CA) that issues and manages digital certificates for endpoints from a centralized console to allow employees to connect to the company's network using their personal devices. Cisco ISE CA supports standalone and subordinate deployments.
The Cisco Identity Services Engine (Cisco ISE) relies on public key infrastructure (PKI) to provide secure communication for the following:
- Client and server authentication for Transport Layer Security (TLS)-related Extensible Authentication Protocol (EAP) protocols
- HTTPS communication between your client browser and the management server
For further in depth understanding of ISE PKI management please refer to the following
In this guide we will create a CA signed certificate (Microsoft CA) in order for ISE to identify itself for use by HTTPS, EAP and Admin portals.
Before we create a CSR (Certificate Signing Request) we need first to import the CAs Certificate under ‘Trusted Certificates’ to make sure ISE Trusts the external CA.
Importing CA to ISE Trusted Certificates
1. Import CA Certificate to ISE Trusted Certificates.
Navigate to the Active Directory Certificate Services Web Enrollment page (https://CA-IP-Address/certsrv) to download the CA certificate.
2. Click on the ‘Download a CA certificate, certificate chain, or CRL link’
3. On the page that comes up choose the radio button for ‘Base 64’ and click on the ‘Download CA certificate link’. This will download the CA certificate , save the file to your pc.
4. Login to ISE node and navigate to Administration > System > Certificates > Certificate Management > Trusted Certificates and click ‘Import’
5. Upload the CA certificate that you just download by clicking the ‘browse’ button
6. Provide name in the ‘Friendly Name’ Field
7. Below 'Trusted For:' Check Mark the following

8. Provide a description in the “Description” field and click ‘submit’
Now that we have added the CA certificate in our Trusted Certificate Store, we can now issue a
Certificate Signed Request (CSR) and bind the resulting certificate to ISE.
Certificate Signed Request
1. Issue CSR under Administration > System > Certificates > Certificate Signing Requests and click on ‘Generate Certificate Signing Requests (CSR)’
2. On the following page provide following information
Under ‘Usage’ – In this example we will choose ‘Multi-Use’ although you can choose to use the certificate for separate services
Under ‘Node’ mark your Node name
Under ‘Subject’ with the exception of ‘Common Name (CN)’ field the other values are optional and are best used in a fashion that is clear to you.
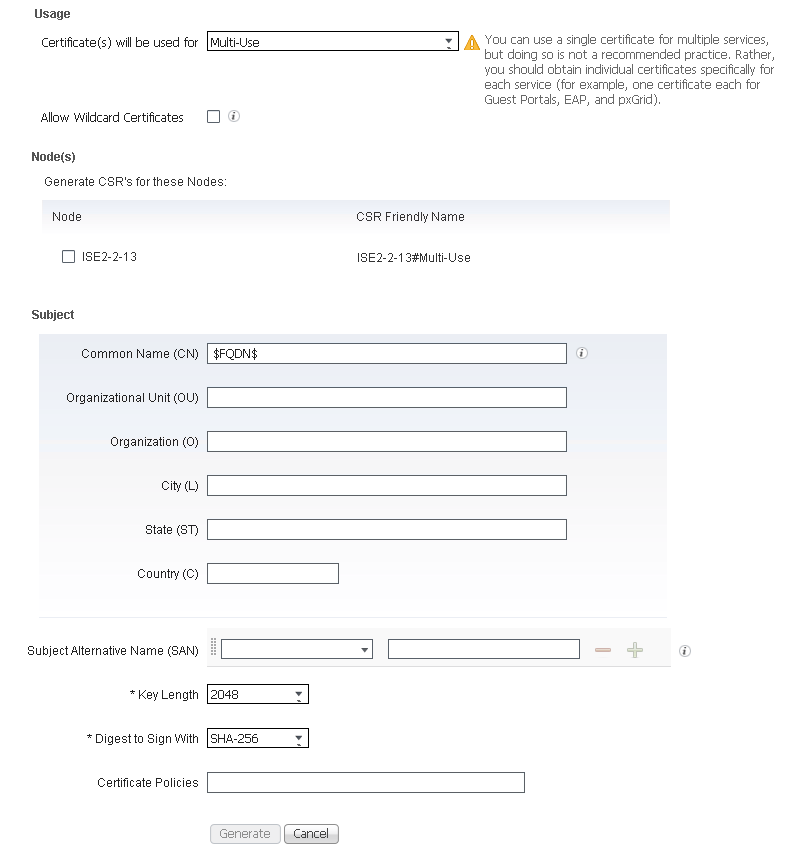
3. Click on ‘Generate’
A pop up window will appear , choose ‘Export’
4. Download file and , open with Notepad and copy the body of the text file
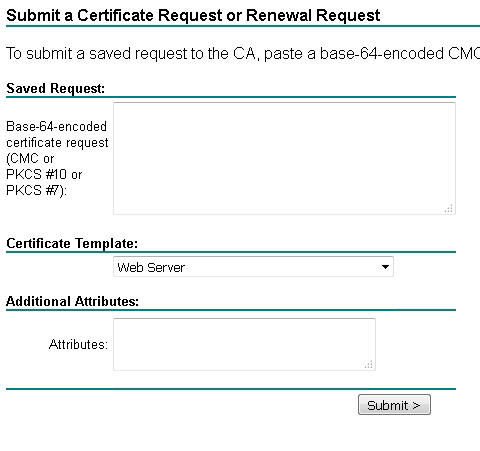
5. Re-open your Microsoft AD web enrollment page (https://CA-IP-Address/certsrv) and click on ‘Request a certificate’
6. Click on ‘advanced certificate request’
Paste the copied text from step 12 into the ‘saved request’ field
Under ‘Certificate Template’ in the drop down field choose ‘Web Server’ and click ‘Submit’
7. Choose the radio button for ‘Base 64’ encoded and click the Download certificate link. This will download the certificate signed by the CA that was generated from the CSR.
8. In ISE, navigate to Administration>System>Certificates>Certificate Management>Certificate Signing Request and check the box next to the CSR you previously created. Click on the ‘Bind Certificate’ button:
Upload the certificate that you previously downloaded by pressing the ‘Browse’ button and give it a friendly name for ISE.
9. Check the boxes next to Admin and EAP authentication. You can choose the Portal as well but this is used for Guest/Sponsor/Hotspot/BYOD etc…
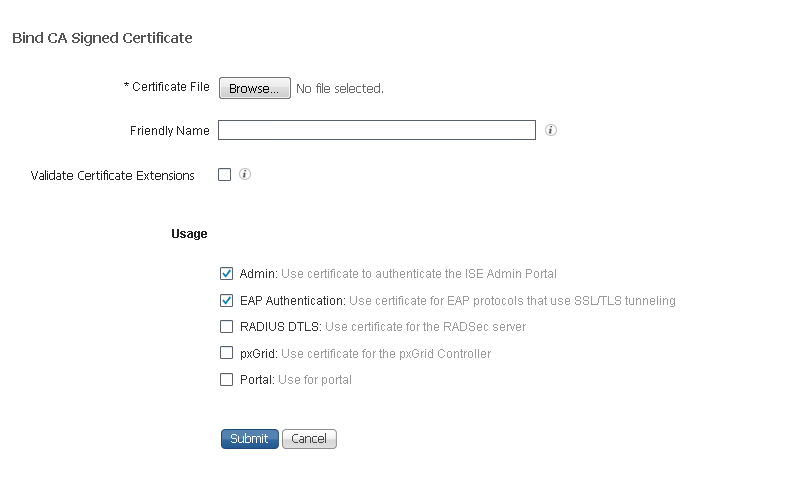
10. After you click ‘Submit’ ISE services will restart
Wildcard Certificates
ISE supports Wildcard Certificates, which is designed to allow a single certificate to protect more than one fully qualified domain name (FQDN), by representing the SAN with a wildcard notation (an asterisk and period before the domain name) and allows the certificate to be shared across multiple hosts in an organization. An example CN value for a wildcard certificate’s Subject Name would look like the following: *.securitydemo.net
If you configure a Wildcard Certificate to use *.securitydemo.net, that same certificate may be used to secure any host whose DNS name ends in “.securitydemo.net”, such as:
• aaa.securitydemo.net
• psn.securitydemo.net
• mydevices.securitydemo.net
• sponsor.securitydemo.net
In other words, *.securitydemo.net would not match ise.aaa.securitydemo.net, because the wildcard value was not in the host portion of the FQDN.
To understand the Pros and Cons for wildcard certificates refer to the following link
Microsoftnativesupplicants do not support wildcards in the subject of the certificate, so best practice is to use a generic hostname for the CN field of the subject and insert both the same generic hostname and the wildcard value in the SAN fieldas shown:
1. Navigate to the certificates section of the administrative GUI, “Administration > System > Certificates > Certificate Signing Requests”.
2. Click 'Generate Certificate Signing Request' (CSR)
3. Under 'Usage', click the “Certificate(s) will be used for” drop-down and select 'Multi-Use'
4. Select the “Allow Wildcard Certificates” check box
5. For the Certificate Subject, replace the $FQDN$ variable with a generic FQDN
6. Select at least two DNS Names under the Subject Alternative Name (SAN) section
One of the DNS Names must match the CN value from Step 4.
The other DNS Name should be the wildcard value.

7. Click 'Generate'
8. continue the same process as done in the previous section under 'Managing Certificates' step 11.
Joining ISE to Active Directory
When deploying ISE into an existing network infrastructure you will find that the customer already has an existing data base of username and passwords if it be LDAP/AD/ODBC/SQL etc...
By joining ISE to Active Directory we not only take advantage of using an external identity store data base but can leverage AD groups and machine attributes to enforce policies.
In this example we will demonstrate how to Join ISE to an existing AD database and importing groups and AD attributes
Note: It is crucial that NTP is in sync with AD, otherwise ISE node will fail to join AD.
Another point to keep in mind is that you have a DNS entry for your Domain Controller otherwise ISE will fail to locate the DC and fail to join.
1. Navigate to Administration>Identity Management>External Identity Sources>Active Directory and click 'Add'
2. In the 'Join Point Name' field, use the computer name of the AD server and add the domain name in the 'Active Directory Domain' field.

3. After clicking on 'Submit', a window will pop-up prompting for administrator domain credentials to add ISE to the domain.

Click 'Yes'
You will be prompt with the following pop-up
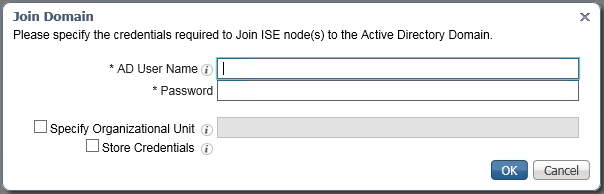
Use your AD administrator credentials and click ‘OK'.
4. At this point ISE will try to join the domain and if successful under ‘node status’ it should show as ‘Completed’
5. After ISE has joined to the domain, choose the DC under Active Directory (on the left hand side) and then click ‘Groups’ tab.
Click 'Add' and then ‘Select Groups from Directory’. At this point we can import Active Directory groups and us them in
Authentication and Authorization profiles.
6. You can add an asterisk in the ‘Name Filter’ field and click ‘Retrieve Groups…’.
Choose the groups you wish to add and click ‘OK’ and then ‘save’.
7. Next will add AD attributes by choosing the 'Attributes' tab and clicking on 'Add'
Choose 'Select Attributes From Directory'
Enter an existing user or machine account in the 'Sample User or Machine Account' and click on 'Retrieve Attributes...'
Check mark the attributes you wish to retrieve and click 'OK'
Click 'Save'
AD attributes provide us with additional flexibility when planning policies and profiles.Windows domain Admins can create custom
attributes on their DCs and import them.
Visibility Setup Wizard
Now that you have completed your ISE deployment it is time to discover your Network Devices and Endpoints.
ISE comes with a built in Visibility Setup Wizard also known as VSW to scan your endpoints and network devices by using SNMP Probes and NMAP as optional.
With the initial login to your newly installed Node you will be prompt (on the top right corner) with the Visibility Setup Wizard.

1. Click on the blue Launch link as you see above
2. Click ‘Next’
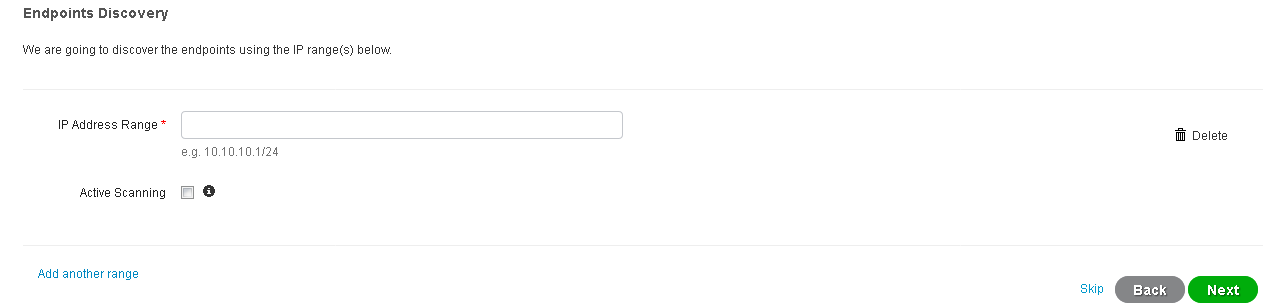
3. In the ‘IP address range’ field enter the range you wish to scan for endpoints discovery
The ‘Active Scanning’ option allows you to use NMAP as a scanning mechanism for endpoints
4. Click ‘Next’

In this step in the menu above you can choose either the 'Scan' option or add network devices manually by choosing the 'Add' option.
For this guide we will use 'Scan'
5. Once you click on 'Scan' in the above menu a pop up window will appear requesting the following information:
'IP Address Range ' - Enter the Address space you wish to scan for Network Devices
'SNMP Version' - Enter the version you are using in your Infrastructure
'RO Community' - Enter your Read Only Community string that are used in your Infrastructure
Once the above information is entered click on 'Scan' (which is in green)
When Scan is complete you should see network devices appear, if not make sure you have entered correct address space and SNMP settings.
6. Check mark the devices you wish to add and click on 'Add' (which is in green)
7. Click 'Next'
The following pop up will appear
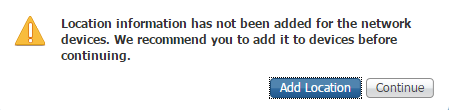
Adding the Location of the devices allows us to enforce policies based on device location.
For example you can create a condition that if a user is only logged in from a specific location you will allow full access.
In this example we will add the Location
8. Click on ‘Add Location’
9. In the ‘Apply’ field above enter your desired location.
10. Mark the check boxes beside the devices you wish to add the location to , and click on ‘Apply'
11. You should now see the location added , click on ‘Close’ and press ‘Next’
12. In this step you may add your node to Active Directory or skip this section and add it later (See Chapter 2 on how to Join ISE to AD).
In this example we will add the node by providing the following information:
| Display Name | Enter name of choice |
| Domain FQDN | Enter your Domain Name |
| ISE Node | Enter name of your Node |
| Username | AD Username (with privileges) |
| Password | AD Account Password |
Note: you have the ‘Test Connection’ option below which will verify if ISE is indeed communicating with AD.
13. Click 'Next'
You should see a ‘Configuration Summary’ page
14. Click ‘Done’
You will be returned to the Endpoint Dashboard.
The following is a video of the above install steps
Easy Connect

ISE 2.1 Introduced a new feature called Easy Connect where Microsoft Active Directory (AD) logins are used to passively map user information onto existing network sessions initiated with MAC Authentication Bypass (MAB)
ISE leverages the identity and group memberships from the passive identity (Passive ID) to enforce authorization based on policy elements.
ISE 2.2 Introduced a light weight ISE instance called ISE-PIC (Passive Identity Connector) which is a standalone module and passive information is shared among Cisco and other 3rd party applications with the support of PxGrid. With ISE-PIC you also have the option to later on upgrade to a PSN node with all its services (PAN, MnT, PSN and MnT).
This guide will focuse on enabling Easy Connect with the use of WMI (Windows Management Instramentation) Easy Connect feature is extremely effective for companies that want to conduct a more gradual deployment without the need for 802.1X. The following steps are needed to Complete Easy Connect deployment.
Step 1 Register NAD device with ISE
Step 2 Joining your ISE node to AD and importing AD Group
Step 3 Enable Easy Connect and ISE setup
Step 4 Switch and port configurations (AAA and MAB)
Step 1
1. Navigate to Administration>Network Resources>Network Devices
2. Click on 'Add'
3. Enter a name in the 'Name' field
Enter IP address of your network device under 'IP Address:' field

Mark the check box 'RADIUS Authentication Settings'
Enter a shared secret in the 'Shared Secret' field
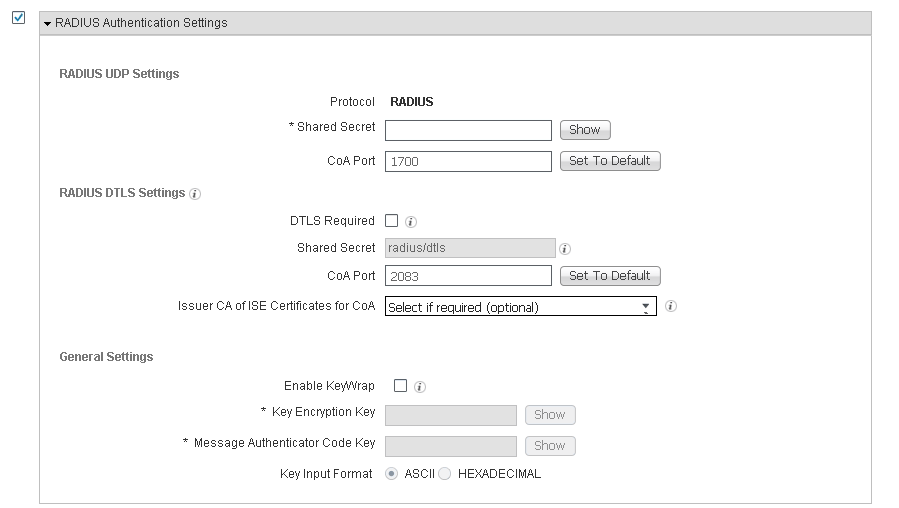
4 Click 'Submit'
Step 2
This step has been covered in the VSW section
Step 3
1. Navigate to Administration>System>Deployment and press on your Node device.
2. Click on the node host name
3. Mark the field ‘Enable Passive Identity Service’ and click ‘save’

4 Navigate to Administration>Identity Management>External Identity Sources and select your DC under the folder 'Active Directory' 5. Select in the menu above the Tab ‘PassiveID’
5. Click on ‘Add DCs’
6. Select your DC and click ‘OK’
7. Edit your DC by selecting it and clicking on ‘Edit’
8. Enter AD admin credentials and leave ‘Protocol’ field as WMI , you may select the ‘test’ option to verify your AD credentials.
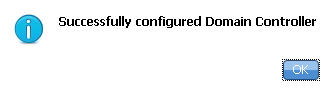
9. Click on ‘Configure’ once you receive the pop up window as below click ‘OK’ and then ‘Save’
10.Select the DC and click on ‘Config WMI’ on the upper menu above , you should see the following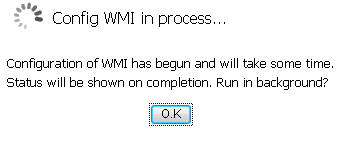
You should receive confirmation 'Successfully configured 1/1 DC' , click ‘OK’
At this stage if you log on to your DC, under services you should see a new service called 'Cisco ISE PassiveID Agent'
For validation, log into ISE and navigate to Operations>RADIUS>Live Logs
You should see a live session running and under the ‘Identity’ column will be the username you used to login to DC previously and ip address of the DC itself. This indicates that ISE is retrieving WMI events from the DC

Another indication ISE is retrieving WMI logs from DC is to navigate to Work Centers>PassiveID>Reports> then on the left plane under 'Passive ID Reports' select 'PassiveID'

After completing the ISE end configuration tasks, its time to configure the switch (NAD) with AAA settings and the port the device is connected to.
Switchport Configuration for MAB
Step 1: Configure your switch with the following global RADIUS configuration. please see the ISE Secure Wired Access Prescriptive Deployment Guide to get an explanation of these global RADIUS commands along with the switchport configuration options,
aaa new-model
!
!
aaa group server radius ise-group
server name ISE
!
aaa authentication dot1x default group ise-group
aaa authorization network default group ise-group
aaa accounting update newinfo
aaa accounting dot1x default start-stop group ise-group
!
aaa server radius dynamic-author
client 10.1.100.13
server-key 7 022F377E02152C711C62
auth-type any
!
radius server ISE
address ipv4 10.1.100.13 auth-port 1645 acct-port 1646
key 7 032D682E0F1C021C1E25
Step 2: Configure your switchport with the following commands in order to enable MAC authentication bypass (MAB) functionality. This will generate a RADIUS-based authentication request to ISE whenever you plugin a device to the switchport:
interface GigabitEthernet2/0/2
 switchport mode access
 authentication order mab
 authentication port-control auto
 mab
 dot1x pae authenticator
 spanning-tree portfast
!
Step 3: If you now connect a Windows endpoint to this switchport, you should that the switch authenticated the endpoint with ISE using MAB.
sw01#sh authentication sessions int g2/0/2

Interface MAC Address    Method  Domain Status Fg Session ID
----------------------------------------------------------------------
Gi2/0/2 a036.9f38.a6e1 mab    DATA    Auth 0A016402000000C8C9EB953D
Notice how the method of authentications states ‘mab’
Step 4: Look at the live logs in ISE under Operations > RADIUS > Live Logs

Step 5: Now lets login to endpoint with AD credentials and look at the live logs

Notice how below 'Identity' we now see the user that logged in.
We now have the User ID , IP Address and MAC Address .
All this information was provided without the use of 802.1x...how easy is that?
Find answers to your questions by entering keywords or phrases in the Search bar above. New here? Use these resources to familiarize yourself with the community: