- Cisco Community
- Technology and Support
- Security
- Security Knowledge Base
- How to: Integrate Cisco ISE MDM with Microsoft Intune
- Subscribe to RSS Feed
- Mark as New
- Mark as Read
- Bookmark
- Subscribe
- Printer Friendly Page
- Report Inappropriate Content
- Subscribe to RSS Feed
- Mark as New
- Mark as Read
- Bookmark
- Subscribe
- Printer Friendly Page
- Report Inappropriate Content
11-23-2020 01:54 AM - edited 07-08-2024 04:00 AM
Introduction
Mobile Device Management (MDM) servers secure, monitor, manage, and support mobile devices deployed across mobile operators, service providers, and enterprises. MDM servers act as a policy server that controls the use of some applications on a mobile device (for example, an email application) in the deployed environment. However, the network is the only entity that can provide granular access to endpoints based on access control lists (ACL). Cisco ISE queries the MDM servers for the necessary device attributes to create ACLs that provide network access control for those devices.
Following document illustrates how to integrate Microsoft Intune server as an MDM server in ISE and validate it.
Microsoft Azure Intune Integration
- Log in to the Microsoft Azure portal.
- Go to your Active Directory domain > App registrations, click New registration.
- In the Register An Application window displayed, enter a value in the Name field and select Accounts in this organizational directory only radio button. Click Register.
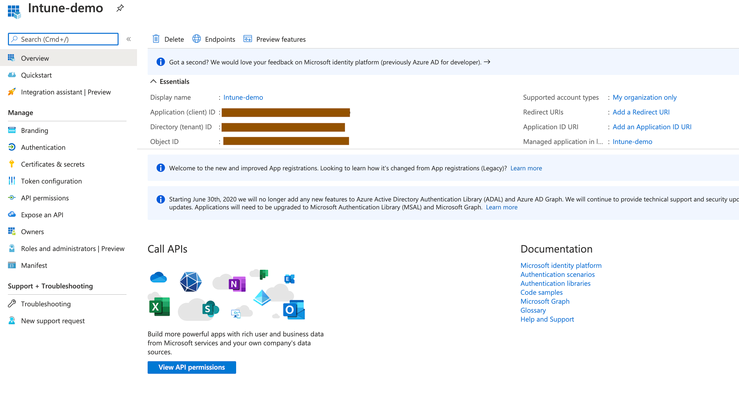
- The Overview window of the newly registered application is displayed.
- With the above window open, log in to the Cisco ISE administration portal from other browser tab. From the main menu, choose Administration > System > Certificates > System Certificates.
- Check the Default self-signed server certificate or certificate used for admin purpose, and click Export. Then, click View for the details of this certificate. Scroll down the displayed Certificate Hierarchy dialog box to the Fingerprints area. You will refer to these values at a later step.
- In the Microsoft Azure AD portal, click Certificates and Secrets under newly registered application from the left menu pane. Click Upload Certificate and upload the certificate you just exported from Cisco ISE.
- After the certificate uploads, verify that the Thumbprint value displayed on the window matches the Fingerprint value in the Cisco ISE certificate.
- Choose Manifest from the left menu pane. In the content displayed, check the value of displayName. The value must match the common name mentioned in the Cisco ISE certificate.
- Choose API Permissions from the left menu pane. Add the following API permissions.
- Collect the following details from the Overview window of the application:
- Application (client) ID
- Directory (tenant) ID
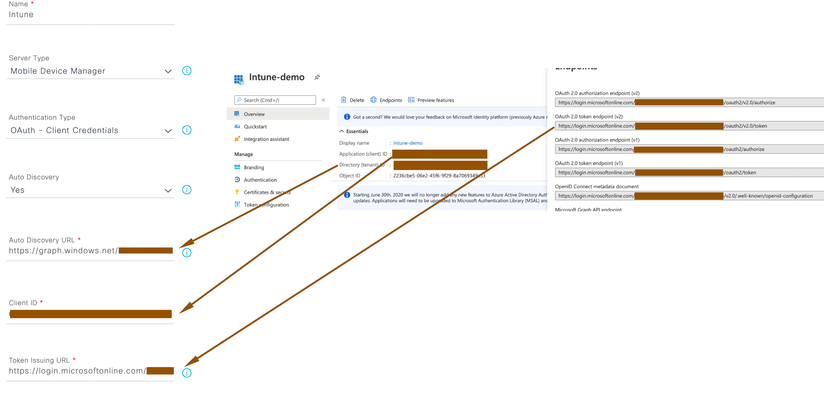
- Click Endpoints on the Overview window and copy the value of the Oauth 2.0 Token Endpoint (V2) field
Cisco ISE Configuration
Now that we have configured required config on Microsoft Azure Intune side, we will now try to integrate it with Cisco ISE configuration.
- In order to have secure communication between ISE and Intune, you are supposed to import the required certificates from Microsoft and import into ISE. Download the Microsoft Intune certificates from https://www.digicert.com/kb/digicert-root-certificates.htm in the PEM (chain) format. Microsoft releases new certificates periodically. If the integration fails with the error “Connection Failed to the MDM server: There is a problem with the server Certificates or ISE trust store,” we recommend that you take a packet capture on the Cisco ISE PAN to determine the exact certificates sent by the MDM server. When you know which certificates are in use, you can download the certificates from the Microsoft PKI repository. Make sure to download the certificates required for trusted communication between Cisco ISE and Microsoft Intune.
Note
You may need to import new root certificates to enable a successful connection between Microsoft Intune and Cisco ISE. See Intune certificate updates: Action may be required for continued connectivity.
- In the Cisco ISE administration portal, choose Administration > System > Certificates > Trusted Certificates. For each of the four certificates you just downloaded, carry out the following steps:
- Click Import.
- Click Choose File and choose the downloaded certificate from your system.
- Allow the certificate to be trusted for use by Infrastructure and Cisco Services. In the Usage area, check the Trust for authentication within ISE and Trust for authentication of Cisco Services check boxes.
- Click Save.
- Using the noted client ID, Directory ID and Oauth 2.0 Token Endpoint, in the Cisco ISE administration portal, choose Administration > Network Resources > External MDM. Click Add
- Name – name of the MDM server in ISE for reference.
- Choose OAuth – Client Credentials from the Authentication Type drop-down list.
- In the Auto Discovery URL field, enter “https://graph.windows.net/< Directory (tenant) ID>”
- In the Client ID field, enter the Application (client) ID value from the Intune application.
- In the Token Issuing URL field, enter the Oauth 2.0 Token Endpoint (V2) value.
- Enter the required values for the Polling Interval and Time Interval For Compliance Device ReAuth Query fields.
NOTE: Ensure to configure proxy if your ISE need to reach out to Microsoft through proxy.
- Click Test Connection to ensure Cisco ISE can connect to the Microsoft server.
- When the connection test is successful, choose Enabled from the Status drop-down list. Click Save.
- Ensure ISE shows intune configuration after saving.
Verification
Following section is to validate the integrated ISE + Microsoft Intune server to get the endpoint compliance/attributes and accordingly admin the endpoint network access.
- In the Cisco ISE administration portal choose Administration > Network Resources > External MDM. The Intune server added must be displayed in the list of MDM Servers.
- Navigate to Policy > Policy Sets and create authorization policies in a policy set as shown below. Basically, we are trying to create policies for
- UnRegistered
- Registered & Compliant
- Registered & NonCompliant
- You can now authenticate using the endpoint which was registered against MDM Intune server and verify whether your configuration is working fine or not. If everything is working fine, endpoint should be matching with the policies that you have written above.
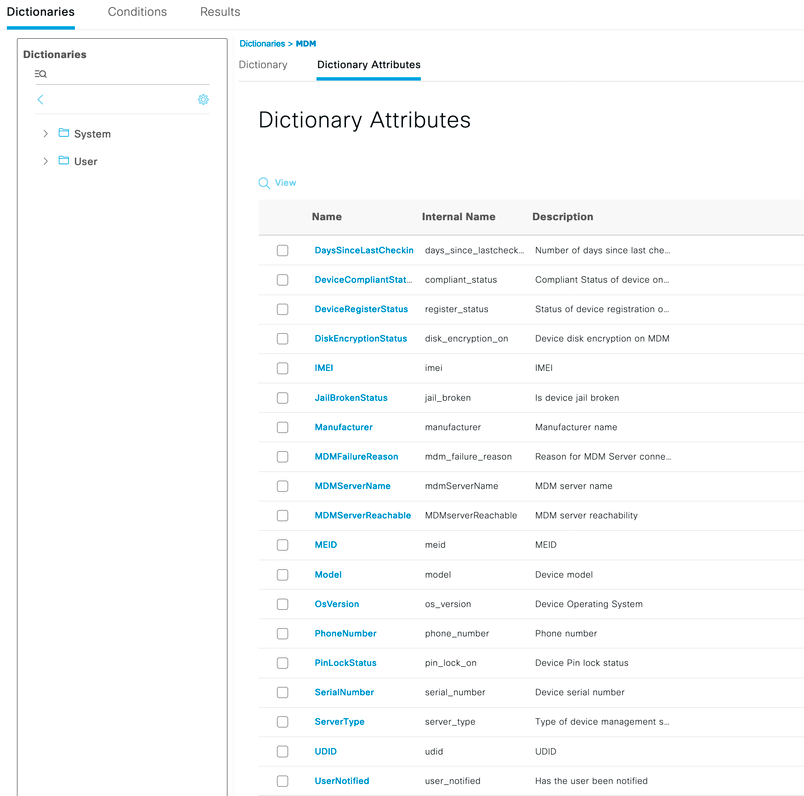
- You can come to know the attributes retrieved from MDM Intune server by going to context-visibility - > endpoints > Compliance > <endpoint-ID>
NOTE: Cisco ISE supports Microsoft Intune, an endpoint management solution, as an MDM integration. Microsoft Intune supports Cisco ISE as a network access control (NAC) service, and communications between the two systems are governed by Microsoft's NAC integration designs as detailed in Network access control (NAC) integration with Intune.
From March 24, 2024, Microsoft will no longer support the Intune NAC service API which supports MAC address and UDID-based queries. Only Microsoft Compliance Retrieval API, or NAC 2.0 API, will be supported. NAC 2.0 API supports GUID and MAC address-based queries since July 31, 2023.
After March 24, 2024, you must upgrade to one of the following Cisco ISE releases to continue using your Microsoft Intune integrations:
- Cisco ISE Release 3.1 Patch 8
- Cisco ISE Release 3.2 Patch 4
The earlier patches of these releases, and Cisco ISE Release 3.0 and earlier, cannot retrieve device registration and compliance information from connected Microsoft Intune servers from March 24, 2024.
With Microsoft's NAC 2.0 API, Cisco ISE can only retrieve the following endpoint attribute information:
Compliance Status
Managed by Intune
MAC Address
Registered Status
- You can also inspect MDM attributes retrieved from MDM through External Mobile Device Management Reports by navigating to Operations > Reports > Reports > Endpoints & Users > External Mobile Device Management reports
Find answers to your questions by entering keywords or phrases in the Search bar above. New here? Use these resources to familiarize yourself with the community:


