- Cisco Community
- Technology and Support
- Security
- Security Knowledge Base
- UCS (Fabric Intreconnect) integration with ACS 5.4 (Tacacs+)
- Subscribe to RSS Feed
- Mark as New
- Mark as Read
- Bookmark
- Subscribe
- Printer Friendly Page
- Report Inappropriate Content
- Subscribe to RSS Feed
- Mark as New
- Mark as Read
- Bookmark
- Subscribe
- Printer Friendly Page
- Report Inappropriate Content
10-11-2013 02:23 AM - edited 02-21-2020 10:00 PM
Introduction
Cisco UCS supports two methods to authenticate user logins:
Through user accounts local to Cisco UCS Manager. Remotely through one of the following protocols:
- LDAP
- RADIUS
- TACACS+
Configuring UCS (Fabric Interconnects)
Step 1 In the Navigation pane, click the Admin tab.
Step 2 On the Admin tab, expand All > User Management > TACACS+.
Step 3 In the Actions area of the General tab, click Create TACACS+ Provider.
Step 4 In the Create TACACS+ Provider dialog box:
a. Complete the fields with the information about the TACACS+ service you want to use like ip address, order, key, port & timeout.
b. Click OK.
Step 5 Click Save Changes.

Selecting a Primary Authentication Service
Console Authentication Service
If the system uses a remote authentication service, create a provider for that authentication service. If the system uses only local authentication through Cisco UCS, you do not need to create a provider first.
Procedure
Step 1 In the Navigation pane, click the Admin tab.
Step 2 On the Admin tab, expand All > User Management > Authentication.
Step 3 Click Native Authentication.
Step 4 In the Work pane, click the General tab.
Step 5 In the Default Authentication area, complete the following fields like Realm, provider Group, web session timeout.
Step 6 In the Console Authentication area, select the realm you want to use. In this example, I'm using NONE.
NONE- If the user account is local to this Cisco UCS domain, no password is required when the user logs into the console.
Step 7 Click Save Changes.
Role Policy for Remote Users
By default, if user roles are not configured in Cisco UCS Manager read-only access is granted to all users logging in to Cisco UCS Manager from a remote server using the LDAP, RADIUS, or TACACS protocols. For security reasons, it might be desirable to restrict access to those users matching an established user role in Cisco UCS Manager.
You can configure the role policy for remote users in the following ways:
Assign-default-role
Does not restrict user access to Cisco UCS Manager based on user roles. Read-only access is granted to all users unless other user roles have been defined in Cisco UCS Manager.The user is allowed to log in with a read-only user role. This is the default behavior.
No-login
Restricts user access to Cisco UCS Manager based on user roles. If user roles have not been assigned for the remote authentication system, access is denied. The user is not allowed to log in to the system, even if the username and password are correct.

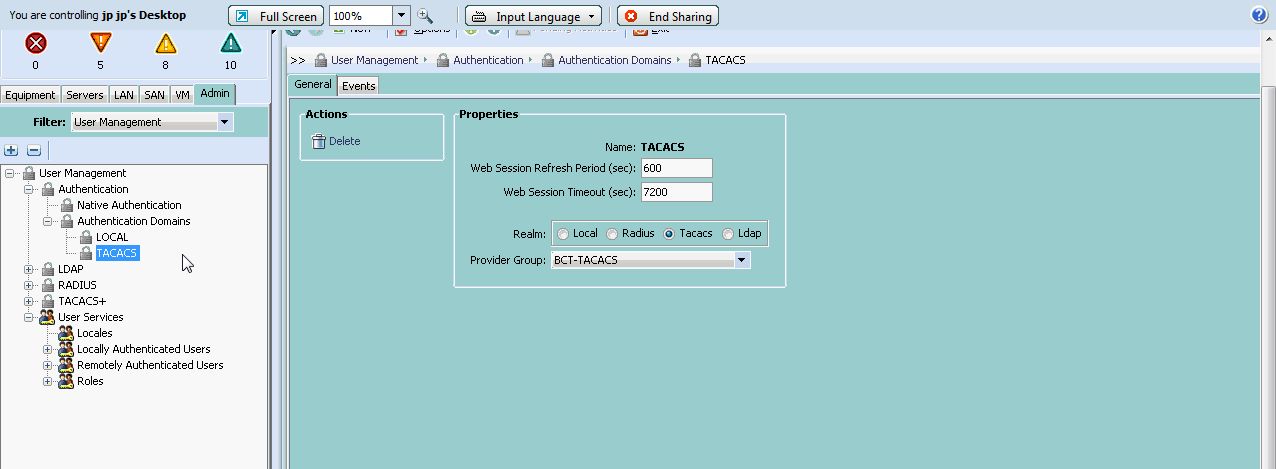
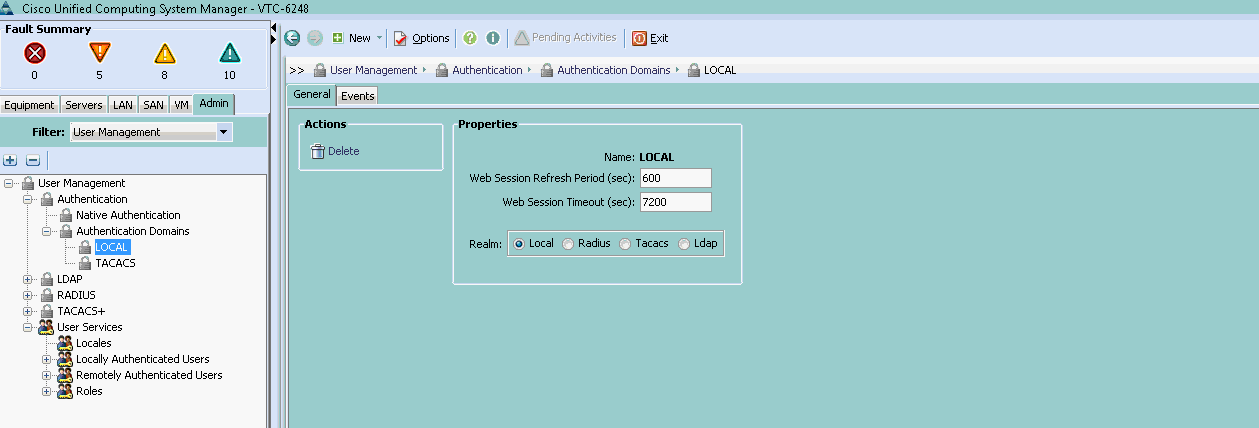
Authentication Domains
Authentication domains are used by Cisco UCS Manager to leverage multiple authentication systems. Each authentication domain is specified and configured during login. If no authentication domain is specified, the default authentication service configuration is used.
You can create up to eight authentication domains. Each authentication domain is associated with a provider group and realm in Cisco UCS Manager. If no provider group is specified, all servers within the realm are used.
Creating an Authentication Domain
Step 1 In the Navigation pane, click the Admin tab.
Step 2 On the Admin tab, expand All > User Management > Authentication.
Step 3 Right-click Authentication Domains and choose Create a Domain.
Step 4 In the Create a Domain dialog box, complete the following fields:
It would be good idea that we defined a local domain as well so that end user should have an option to choose the database he wanted to authenticate.
- Local—The user account must be defined locally in this Cisco UCS domain.
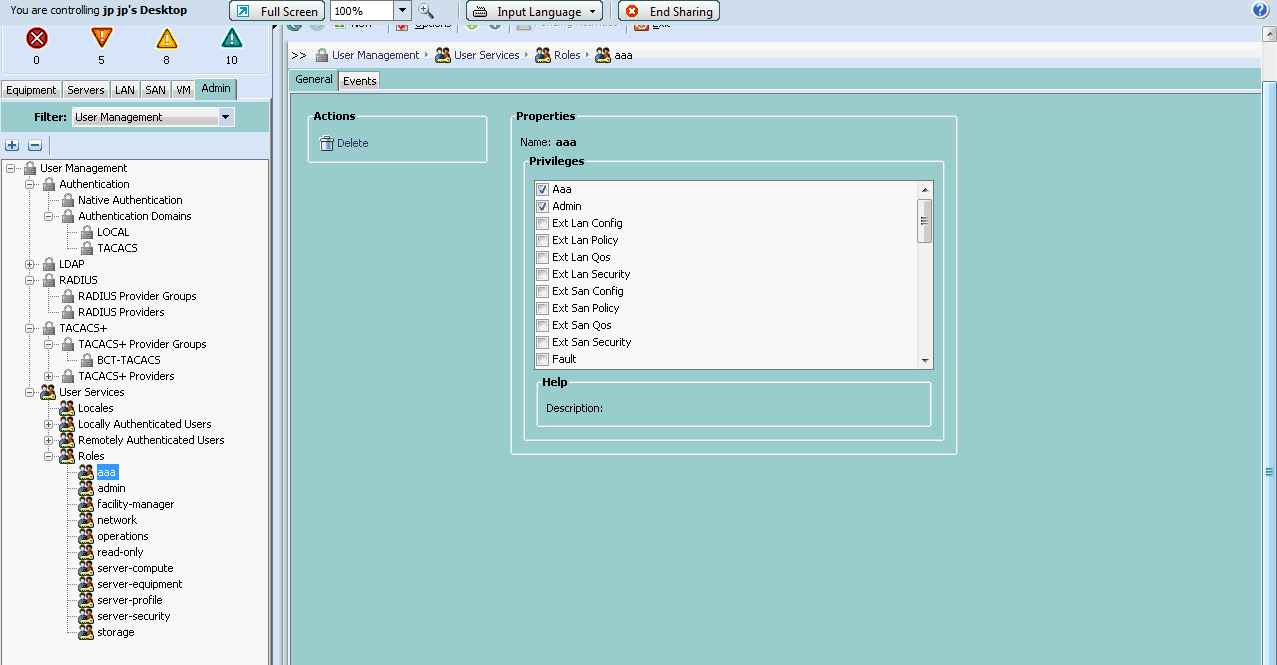
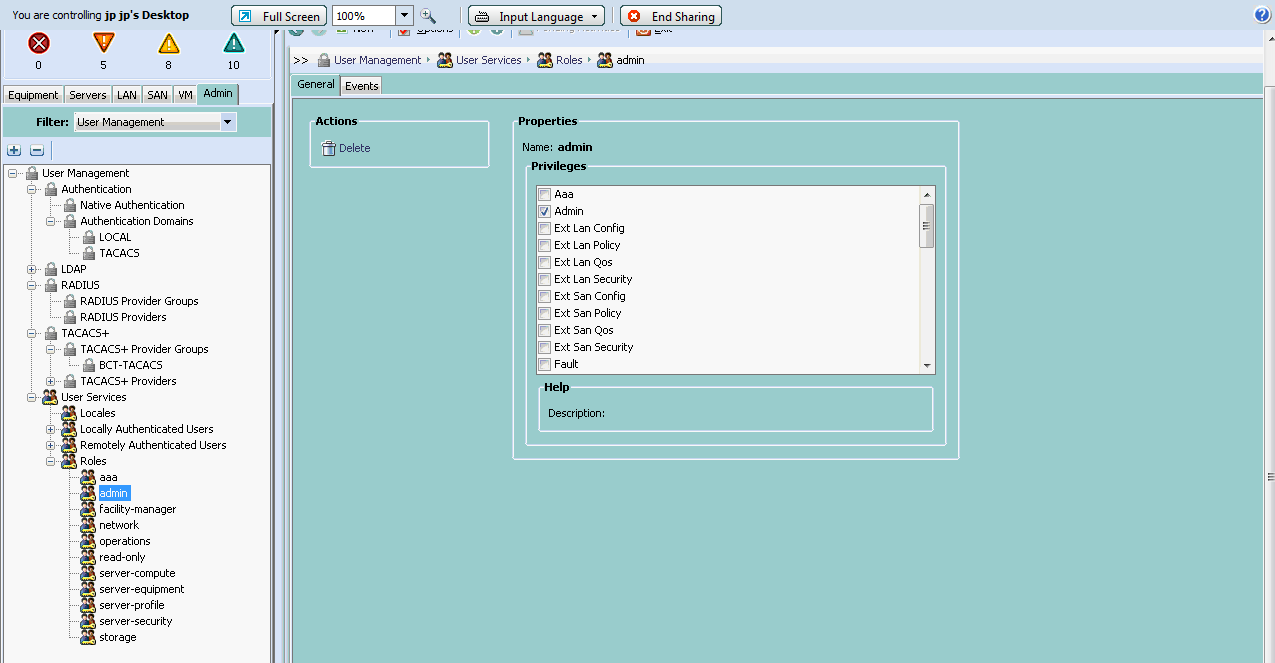
User Roles
User roles contain one or more privileges that define the operations that are allowed for a user. One or more roles can be assigned to each user. Users with multiple roles have the combined privileges of all assigned roles.
Detials about User roles http://tools.cisco.com/squish/d2e56
AAA Administrator
Read-and-write access to users, roles, and AAA configuration. Read access to the rest of the system.
Administrator
Complete read-and-write access to the entire system. The default admin account is assigned this role by default and it cannot be changed.
Setting up ACS
Configuring ACS to push the required roles. (Assuming UCS has already been added as a AAA-Tacacs+ client on the ACS and we have a user created)
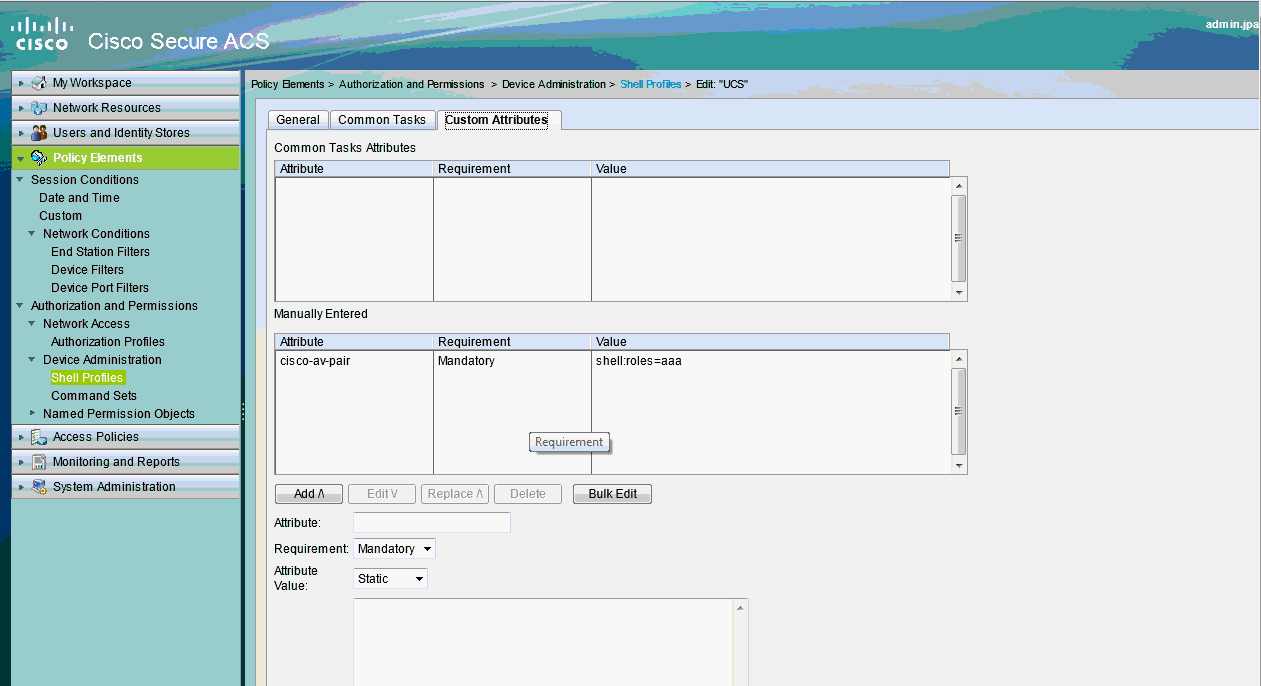
Step 1 Go to policy elements > Authorization and Permissions > Device administration > shell profiles.
Step 2 General > Name the shell profile like UCS
Step 3 Custom Attributes, enter the below listed fields and click on ADD.
Step 4 Save changes.
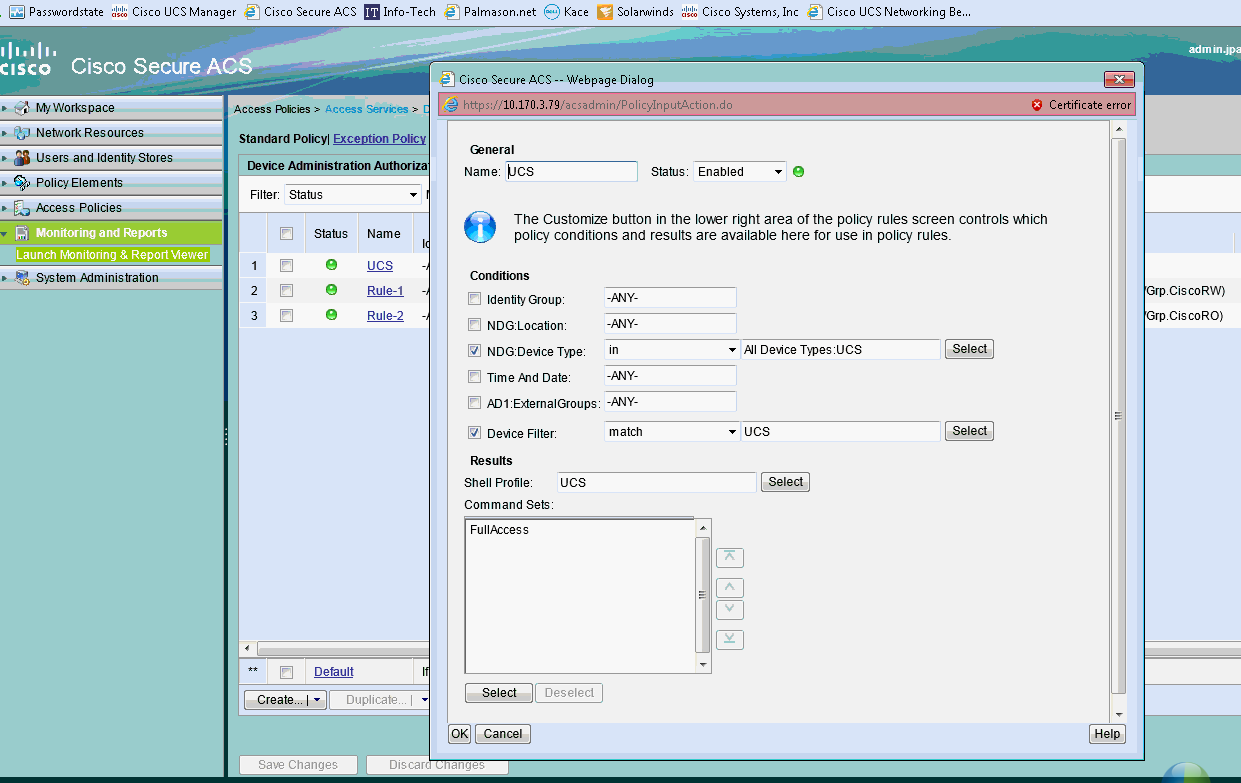
Step 1 Go to Access policies > Default device admin.
Step 2 Use any condition, we used NDG device type and Device Filter.
Step 3 Under shell profile > Click on Select > Choose the shell profile we created in the last step i.e UCS
Step 4 Save changes
Troubleshooting
Make sure we have reachability with tacacs.
Please check monitoring and reports > catalog > AAA protocols > tacacs authentication and authorization.
Reference
- Mark as Read
- Mark as New
- Bookmark
- Permalink
- Report Inappropriate Content
Attribute required to be pushed back from the TACACS+ server is: av-pair=shell:roles="admin aaa"
Reference: http://www.cisco.com/c/en/us/td/docs/unified_computing/ucs/sw/gui/config/guide/2-1/b_UCSM_GUI_Configuration_Guide_2_1/b_UCSM_GUI_Configuration_Guide_2_1_chapter_01000.html#task_1183892932424658889

- Mark as Read
- Mark as New
- Bookmark
- Permalink
- Report Inappropriate Content
Followed the directions and still am unable to authenticate via TACACS with anything more than read-only perms. Any ideas?
- Mark as Read
- Mark as New
- Bookmark
- Permalink
- Report Inappropriate Content
There is a typo in the above screenshot.
It should be "cisco-av-pair".
- Mark as Read
- Mark as New
- Bookmark
- Permalink
- Report Inappropriate Content
I lost connection in the middle of it, asked me to re-authenticate, local admin rejected. Tacacs users are all read only, I can not manager the environment anymore.
Find answers to your questions by entering keywords or phrases in the Search bar above. New here? Use these resources to familiarize yourself with the community: