
- Cisco Community
- Technology and Support
- DevNet
- DevNet Cloud Native
- Cloud Blogs
- How to deploy OpenStack Newton with OpenDaylight Boron and Open vSwitch
- Subscribe to RSS Feed
- Mark as New
- Mark as Read
- Bookmark
- Subscribe
- Printer Friendly Page
- Report Inappropriate Content
This blog has the steps to deploy OpenStack Newton with OpenDaylight Boron and Open vSwitch on CentOS-7 in VirtualBox on Mac laptop.
Below are the versions used:
- OpenStack DevStack stable Newton (GitHub - openstack-dev/devstack at stable/newton)
- OpenDaylight Boron (https://nexus.opendaylight.org/content/repositories/opendaylight.release/org/opendaylight/integration/distribution-karaf… or https://www.opendaylight.org/downloads)
- CentOS-7 (http://mirror.cc.columbia.edu/pub/linux/centos/7/isos/x86_64/CentOS-7-x86_64-Minimal-1611.iso)
- VirtualBox 5.0.30 (https://www.virtualbox.org/wiki/Downloads)
- Apple OS X El Capitan 10.11.6 Mac laptop
Below is the architecture:
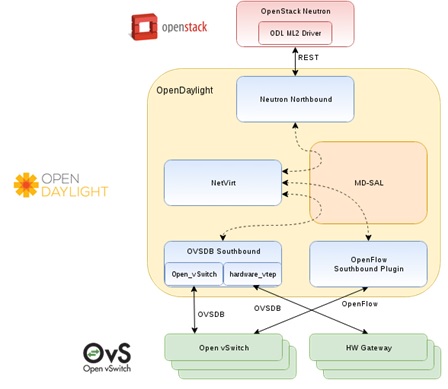
VirtualBox is installed on Mac laptop and the CentOS-7 VM is created in VirtualBox.
In VirtualBox, the CentOS-7-x86_64-Minimal-1611.iso image is used to boot a CentOS-7 VM with 4 GB RAM and the following two network adapters. A host-only adapter is not needed.
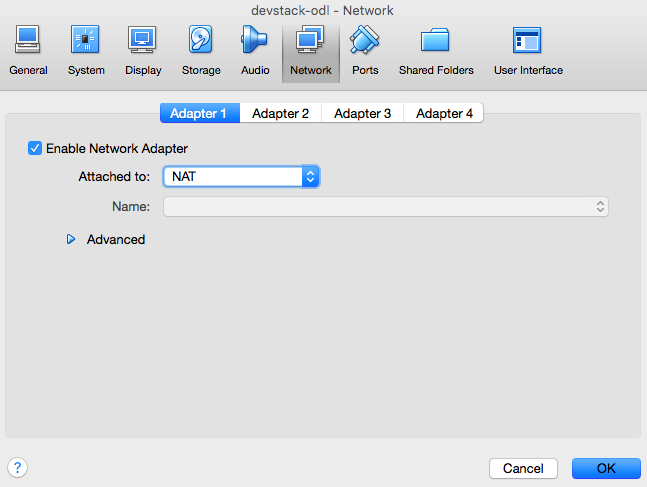
- eth0 as a NAT adapter
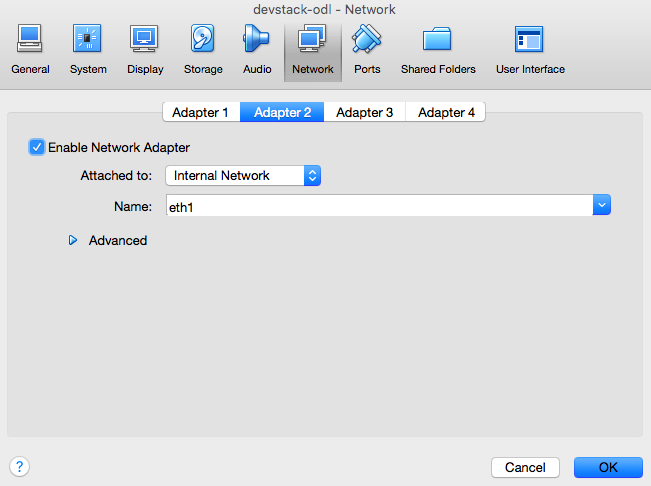
- eth1 as an internal network adapter
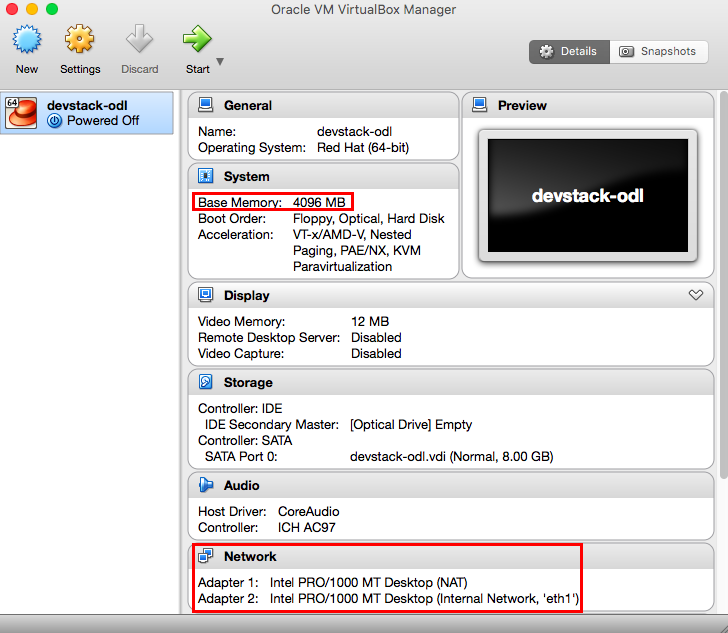
eth0 is a NAT adapter.
eth1 is an internal network adapter.
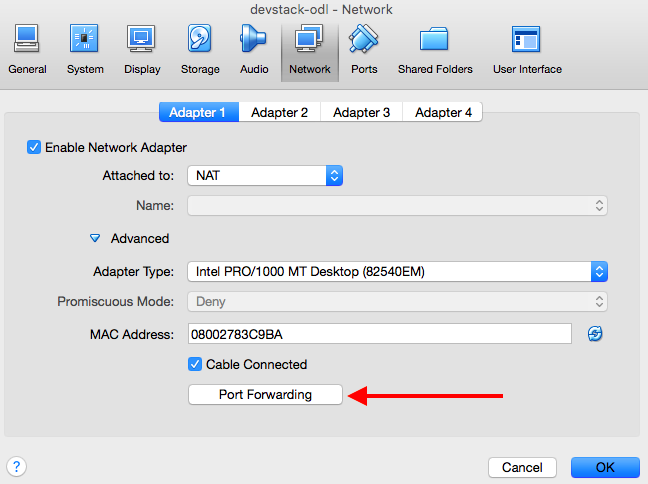
Run the following bash script to configure VirtualBox. It will forward the required TCP ports from the host (Mac laptop) to the guest (CentOS-7 VM) and will also create eth1 as an internal network adapter.
#!/bin/bash

# Forward TCP port 3022 on host to TCP port 22 on guest VM so
# that host can SSH into guest VM
if ! VBoxManage showvminfo devstack-odl | grep 3022 > /dev/null
then
    VBoxManage modifyvm devstack-odl --natpf1 "SSH,TCP,,3022,,22"
fi

# Forward TCP port 8080 on host to TCP port 80 on guest VM so
# that host can access OpenStack Horizon in browser
if ! VBoxManage showvminfo devstack-odl | grep 8080 > /dev/null
then
    VBoxManage modifyvm devstack-odl --natpf1 "HTTP,TCP,,8080,,80"
fi

# Forward TCP port 6080 on host to TCP port 6080 on guest VM so
# that host can access Nova VNC console in browser
if ! VBoxManage showvminfo devstack-odl | grep 6080 > /dev/null
then
    VBoxManage modifyvm devstack-odl --natpf1 "CONSOLE,TCP,,6080,,6080"
fi

# Forward TCP port 8282 on host to TCP port 8181 on guest VM so
# that host can access OpenDaylight web GUI at
# http://localhost:8282/index.html (admin/admin)
if ! VBoxManage showvminfo devstack-odl | grep 8282 > /dev/null
then
    VBoxManage modifyvm devstack-odl --natpf1 "ODL,TCP,,8282,,8181"
fi

# Forward TCP port 8187 on host to TCP port 8087 on guest VM so
# that we can curl the OpenDaylight controller
if ! VBoxManage showvminfo devstack-odl | grep 8187 > /dev/null
then
    VBoxManage modifyvm devstack-odl --natpf1 "ODL_neutron,TCP,,8187,,8087"
fi

# Add internal network adapter for guest VM
if ! VBoxManage showvminfo devstack-odl | grep eth1 > /dev/null
then
    VBoxManage modifyvm devstack-odl --nic2 intnet
    VBoxManage modifyvm devstack-odl --intnet2 "eth1"
fi

# Remove stale entry in ~/.ssh/known_hosts on host
if [ -f ~/.ssh/known_hosts ]; then
    sed -i '' '/\[127.0.0.1\]:3022/d' ~/.ssh/known_hosts
fi
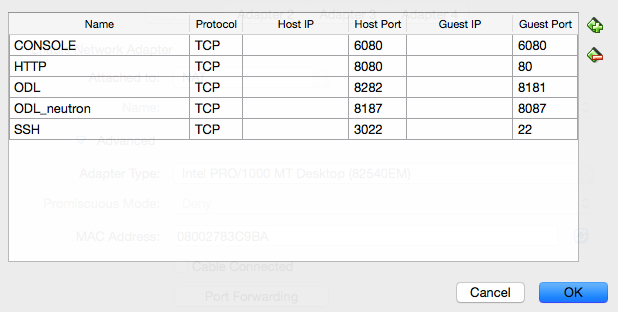
Below are the forwarded ports through eth0 (NAT interface) in VirtualBox. Host is the Mac laptop and the guest VM is CentOS-7 booted in VirtualBox.
- TCP port 3022 on host is forwarded to TCP port 22 on guest VM so that host can SSH into guest VM.
- TCP port 8080 on host is forwarded to TCP port 80 on guest VM so that host can access OpenStack Horizon in browser.
- TCP port 6080 on host is forwarded to TCP port 6080 on guest VM so that host can access Nova VNC console in browser.
- TCP port 8282 on host is forwarded to TCP port 8181 on guest VM so that host can access the OpenDaylight GUI in browser.
- TCP port 8187 on host is forwarded to TCP port 8087 on guest VM so that host can access neutron's ml2 ODL url in browser.
Below is the screenshot of the forwarded ports through eth0 (NAT interface) in VirtualBox.
Now, boot the CentOS-7 VM in VirtualBox. Choose "VDI" as the disk format for the VM.
When booting the CentOS-7 VM in VirtualBox, press the Tab key and type the following kernel boot options. This keeps the interface names as eth0 and eth1 in the CentOS-7 VM instead of enp0s*.
net.ifnames=0 biosdevname=0
Once the CentOS-7 VM boots, login into it and check the interfaces ("ip a" or "ifconfig"). eth0 will have an IP address like 10.0.2.15 and eth1 will not have any IP address. Check the default gateway ("ip route"). 10.0.2.2 will be the default gateway. Make sure that you can ping a public DNS name like www.google.com and www.cisco.com.
Below are the output snippets of "ip a" and "ip route" inside the CentOS-7 VM.
$ ip a
2: eth0: <BROADCAST,MULTICAST,UP,LOWER_UP> mtu 1500 qdisc pfifo_fast state UP qlen 1000
inet 10.0.2.15/24 brd 10.0.2.255 scope global dynamic eth0
3: eth1: <BROADCAST,MULTICAST,UP,LOWER_UP> mtu 1500 qdisc pfifo_fast state UP qlen 1000
link/ether 08:00:27:60:77:7e brd ff:ff:ff:ff:ff:ff
$ ip route
default via 10.0.2.2 dev eth0 proto static metric 100
10.0.2.0/24 dev eth0 proto kernel scope link src 10.0.2.15 metric 100
192.168.122.0/24 dev virbr0 proto kernel scope link src 192.168.122.1
From the Mac laptop, SSH into the CentOS-7 VM using the forwarded port 3022. Use the root password to login.
ssh -p 3022 root@127.0.0.1
Clone the DevStack Newton repository.
git clone https://git.openstack.org/openstack-dev/devstack -b stable/newton
Create stack user for DevStack. Alternatively, you can use useradd and passwd to create a new stack user, and give sudo access to the stack user by typing visudo, adding "stack ALL=(ALL) ALL" under "root ALL=(ALL) ALL", and saving the file.
cd devstack
./tools/create-stack-user.sh
su stack
whoami
echo $HOME
cd
pwd
exit
exit
Copy the local.conf file below to the devstack directory. It has the OpenStack core services (Horizon, Keystone, Nova, Neutron, Glance, RabbitMQ and MySQL) enabled. It uses OpenvSwitch (OVS) as the virtual switch and VLAN for tenant networks. It also enables the neutron ml2 ODL plugin to make neutron interact with OpenDaylight.
[[local|localrc]]
OFFLINE=True
HORIZON_BRANCH=stable/newton
KEYSTONE_BRANCH=stable/newton
NOVA_BRANCH=stable/newton
NEUTRON_BRANCH=stable/newton
GLANCE_BRANCH=stable/newton

ADMIN_PASSWORD=nomoresecret
DATABASE_PASSWORD=stackdb
RABBIT_PASSWORD=stackqueue
SERVICE_PASSWORD=$ADMIN_PASSWORD
LOGDIR=$DEST/logs
LOGFILE=$DEST/logs/stack.sh.log
LOGDAYS=2

ENABLED_SERVICES=rabbit,mysql,key
ENABLED_SERVICES+=,n-api,n-crt,n-obj,n-cpu,n-cond,n-sch,n-novnc,n-cauth
ENABLED_SERVICES+=,g-api,g-reg
ENABLED_SERVICES+=,horizon

# Neutron
DISABLED_SERVICES=n-net
ENABLED_SERVICES+=,q-svc,q-agt,q-dhcp,q-l3,q-meta,q-metering,neutron
PUBLIC_INTERFACE=eth0
Q_PLUGIN=ml2
ENABLE_TENANT_VLANS=True

# Enable neutron ODL plugin
enable_plugin networking-odl http://git.openstack.org/openstack/networking-odl stable/newton
ODL_MODE=allinone
Q_ML2_PLUGIN_MECHANISM_DRIVERS=opendaylight,logger
ODL_GATE_SERVICE_PROVIDER=vpnservice
disable_service q-l3
ML2_L3_PLUGIN=odl-router
ODL_PROVIDER_MAPPINGS=public:br-ex
Now, exit and SSH back in as the stack user into the CentOS-7 VM.
ssh -p 3022 stack@127.0.0.1
OpenDaylight requires Java 1.8.0 and Open vSwitch >= 2.5.0.
Install Java 1.8.0.
Java SE Development Kit 8 - Downloads
wget --header "Cookie: oraclelicense=accept-securebackup-cookie" http://download.oracle.com/otn-pub/java/jdk/8u112-b15/jdk-8u112-linux-x64.rpm
sudo yum localinstall jdk-8u112-linux-x64.rpm
java -version
rm -rf jdk-8u112-linux-x64.rpm
Install OpenDaylight Boron.
https://www.opendaylight.org/downloads
https://github.com/openstack/networking-odl
tar xvfz distribution-karaf-0.5.2-Boron-SR2.tar.gz
rm -rf distribution-karaf-0.5.2-Boron-SR2.tar.gz
cd distribution-karaf-0.5.2-Boron-SR2/
export JAVA_HOME=/usr/java/jdk1.8.0_112
echo $JAVA_HOME
Make sure that you are in the distribution-karaf-0.5.2-Boron-SR2 directory.
Start the OpenDaylight server.
sudo bash -c "export JAVA_HOME=/usr/java/jdk1.8.0_112 ; ./bin/start"
Wait for 5 minutes so that the ODL boron server is up.
Start OpenDaylight client and connect to the karaf shell.
sudo bash -c "export JAVA_HOME=/usr/java/jdk1.8.0_112 ; ./bin/client"
List the available ODL boron features in karaf shell.
opendaylight-user@root>feature:list
In the karaf shell, install the odl-netvirt-openstack bundle, dlux and their dependencies needed for OpenStack neutron.
opendaylight-user@root>feature:install odl-netvirt-openstack odl-dlux-core odl-mdsal-apidocs
List the installed ODL neutron northbound features.
opendaylight-user@root>feature:list -i | grep -i neutron
odl-neutron-service                            | 0.7.2-Boron-SR2  | x         | odl-neutron-0.7.2-Boron-SR2                | OpenDaylight :: Neutron :: API
odl-neutron-northbound-api                     | 0.7.2-Boron-SR2  | x         | odl-neutron-0.7.2-Boron-SR2                | OpenDaylight :: Neutron :: Northbound
odl-neutron-spi                                | 0.7.2-Boron-SR2  | x         | odl-neutron-0.7.2-Boron-SR2                | OpenDaylight :: Neutron :: API
odl-neutron-transcriber                        | 0.7.2-Boron-SR2  | x         | odl-neutron-0.7.2-Boron-SR2                | OpenDaylight :: Neutron :: Implementation
List the installed ODL OVS southbound features.
opendaylight-user@root>feature:list -i | grep -i ovs
odl-ovsdb-hwvtepsouthbound-api                 | 1.3.2-Boron-SR2  | x         | odl-ovsdb-hwvtepsouthbound-1.3.2-Boron-SR2 | OpenDaylight :: hwvtepsouthbound :: api
odl-ovsdb-hwvtepsouthbound                     | 1.3.2-Boron-SR2  | x         | odl-ovsdb-hwvtepsouthbound-1.3.2-Boron-SR2 | OpenDaylight :: hwvtepsouthbound
odl-ovsdb-southbound-api                       | 1.3.2-Boron-SR2  | x         | odl-ovsdb-southbound-1.3.2-Boron-SR2       | OpenDaylight :: southbound :: api
odl-ovsdb-southbound-impl                      | 1.3.2-Boron-SR2  | x         | odl-ovsdb-southbound-1.3.2-Boron-SR2       | OpenDaylight :: southbound :: impl
odl-ovsdb-library                              | 1.3.2-Boron-SR2  | x         | odl-ovsdb-library-1.3.2-Boron-SR2          | OpenDaylight :: library
List the installed ODL netvirt OpenStack features.
opendaylight-user@root>feature:list -i | grep -i openstack
odl-netvirt-openstack                          | 0.3.2-Boron-SR2  | x         | odl-netvirt-0.3.2-Boron-SR2                | OpenDaylight :: NetVirt :: OpenStack
Hit CTRL+d to exit from karaf shell.
Make sure that Open vSwitch's version is >= 2.5.0.
$ ovs-vsctl --version
ovs-vsctl (Open vSwitch) 2.5.0
Reboot the CentOS-7 VM and SSH in as the stack user.
ssh -p 3022 stack@127.0.0.1
Now, you are ready to deploy! ![]()
In the devstack directory, run stack.sh to deploy OpenStack Newton with OpenDaylight Boron and Open vSwitch.
./stack.sh
Below is the output of stack.sh once it finishes.
This is your host IP address: 10.0.2.15
This is your host IPv6 address: ::1
Horizon is now available at http://10.0.2.15/dashboard
Keystone is serving at http://10.0.2.15/identity/
The default users are: admin and demo
The password: nomoresecret
Verify if OpenDaylight has been correctly deployed with OpenStack.
Make sure that Open vSwitch is listening on TCP ports 6640 and 6653.
$ sudo ovs-vsctl show
3ee26796-ce1a-44a8-83eb-ebb0269c94b8
Manager "tcp:10.0.2.15:6640"
is_connected: true
Bridge br-int
Controller "tcp:10.0.2.15:6653"
is_connected: true
fail_mode: secure
Port br-int
Interface br-int
type: internal
Port "tap6caac5d1-9e"
Interface "tap6caac5d1-9e"
type: internal
ovs_version: "2.5.0"
$ sudo ovs-vsctl show | grep '6640\|6653'
Manager "tcp:10.0.2.15:6640"
Controller "tcp:10.0.2.15:6653"
Make sure that OpenDaylight, Open vSwitch and the OVSDB server are listening on TCP ports 6640 and 6653.
Note the PIDs of OpenDaylight (java), Open vSwitch and the OVSDB server.
$ sudo netstat -pan | grep ':6640\|:6653'
tcp 0 0 10.0.2.15:38298 10.0.2.15:6640 ESTABLISHED 18455/ovsdb-server
tcp 0 0 10.0.2.15:46744 10.0.2.15:6653 ESTABLISHED 18465/ovs-vswitchd
tcp6 0 0 :::6640 :::* LISTEN 2125/java
tcp6 0 0 :::6653 :::* LISTEN 2125/java
tcp6 0 0 10.0.2.15:6653 10.0.2.15:46744 ESTABLISHED 2125/java
tcp6 0 0 10.0.2.15:6640 10.0.2.15:38298 ESTABLISHED 2125/java
Make sure that these PIDs match what is seen in the output of "ps".
$ ps aux | grep '18455\|18465\|2125'
stack 2125 12.7 19.3 4342780 750692 pts/4 Sl 01:02 3:01 /usr/java/jdk1.8.0_112/jre/bin/java -Djava.security.properties=/opt/stack/opendaylight/distribution-karaf-0.6.0-SNAPSHOT/etc/odl.java.security -server -Xms128M -Xmx2048m -XX:+UnlockDiagnosticVMOptions -XX:+UnsyncloadClass -XX:+HeapDumpOnOutOfMemoryError -Dcom.sun.management.jmxremote -Djava.security.egd=file:/dev/./urandom -Djava.endorsed.dirs=/usr/java/jdk1.8.0_112/jre/lib/endorsed:/usr/java/jdk1.8.0_112/lib/endorsed:/opt/stack/opendaylight/distribution-karaf-0.6.0-SNAPSHOT/lib/endorsed -Djava.ext.dirs=/usr/java/jdk1.8.0_112/jre/lib/ext:/usr/java/jdk1.8.0_112/lib/ext:/opt/stack/opendaylight/distribution-karaf-0.6.0-SNAPSHOT/lib/ext -Dkaraf.instances=/opt/stack/opendaylight/distribution-karaf-0.6.0-SNAPSHOT/instances -Dkaraf.home=/opt/stack/opendaylight/distribution-karaf-0.6.0-SNAPSHOT -Dkaraf.base=/opt/stack/opendaylight/distribution-karaf-0.6.0-SNAPSHOT -Dkaraf.data=/opt/stack/opendaylight/distribution-karaf-0.6.0-SNAPSHOT/data -Dkaraf.etc=/opt/stack/opendaylight/distribution-karaf-0.6.0-SNAPSHOT/etc -Djava.io.tmpdir=/opt/stack/opendaylight/distribution-karaf-0.6.0-SNAPSHOT/data/tmp -Djava.util.logging.config.file=/opt/stack/opendaylight/distribution-karaf-0.6.0-SNAPSHOT/etc/java.util.logging.properties -Dkaraf.startLocalConsole=false -Dkaraf.startRemoteShell=true -classpath /opt/stack/opendaylight/distribution-karaf-0.6.0-SNAPSHOT/lib/karaf-jaas-boot.jar:/opt/stack/opendaylight/distribution-karaf-0.6.0-SNAPSHOT/lib/karaf-org.osgi.core.jar:/opt/stack/opendaylight/distribution-karaf-0.6.0-SNAPSHOT/lib/karaf.branding-1.8.0-SNAPSHOT.jar:/opt/stack/opendaylight/distribution-karaf-0.6.0-SNAPSHOT/lib/karaf.jar org.apache.karaf.main.Main
root 18455 0.0 0.0 43724 1696 ? S< 00:56 0:00 ovsdb-server /etc/openvswitch/conf.db -vconsole:emer -vsyslog:err -vfile:info --remote=punix:/var/run/openvswitch/db.sock --private-key=db:Open_vSwitch,SSL,private_key --certificate=db:Open_vSwitch,SSL,certificate --bootstrap-ca-cert=db:Open_vSwitch,SSL,ca_cert --no-chdir --log-file=/var/log/openvswitch/ovsdb-server.log --pidfile=/var/run/openvswitch/ovsdb-server.pid --detach --monitor
root 18465 0.0 0.9 268944 35496 ? S<Ll 00:56 0:01 ovs-vswitchd unix:/var/run/openvswitch/db.sock -vconsole:emer -vsyslog:err -vfile:info --mlockall --no-chdir --log-file=/var/log/openvswitch/ovs-vswitchd.log --pidfile=/var/run/openvswitch/ovs-vswitchd.pid --detach --monitor
Curl the OpenStack Horizon dashboard and make sure that there are no errors in the output.
$ curl localhost/dashboard
$
Curl the OpenDaylight GUI. Below is the expected output.
$ curl localhost:8181/index.html
<!DOCTYPE html>
<html lang="en">
<head>
<meta charset="utf-8" />
<title>OpenDaylight Dlux</title>
<meta name="description" content="overview & stats" />
<meta name="viewport" content="width=device-width, initial-scale=1.0" />
<script type="text/javascript">
var module = ['angular','ocLazyLoad','angular-ui-router','angular-translate', 'angular-sanitize', 'angular-translate-loader-static-files', 'angular-translate-loader-partial', 'angular-css-injector'];
var deps = ['common/config/env.module','app/core/core.module','common/login/login.module','common/authentification/auth.module','common/navigation/navigation.module','common/topbar/topbar.module','common/general/common.general.module','app/topology/topology.module','common/layout/layout.module'];
var e = ['oc.lazyLoad', 'ui.router', 'pascalprecht.translate', 'ngSanitize', 'angular.css.injector', 'app','app.core','app.common.login','app.common.auth','app.common.nav','app.common.topbar','app.common.general','app.topology','app.common.layout'];
// global variables
</script>
<!-- HTML5 shim and Respond.js IE8 support of HTML5 elements and media queries -->
<!--[if lt IE 9]>
<script src="assets/js/html5shiv.js"></script>
<script src="assets/js/respond.min.js"></script>
<![endif]-->
<!-- compiled CSS -->
<link rel="stylesheet" type="text/css" href="vendor/ng-grid/ng-grid.min.css" />
<link rel="stylesheet" type="text/css" href="vendor/select2-bootstrap-css/select2-bootstrap.css" />
<link rel="stylesheet" type="text/css" href="vendor/footable/css/footable.core.min.css" />
<link rel="stylesheet" type="text/css" href="vendor/footable/css/footable.standalone.min.css" />
<link rel="stylesheet" type="text/css" href="vendor/vis/dist/vis.min.css" />
<link rel="stylesheet" type="text/css" href="vendor/ng-slider/dist/css/ng-slider.min.css" />
<link rel="stylesheet" type="text/css" href="vendor/angular-material/angular-material.css" />
<link rel="stylesheet" type="text/css" href="vendor/material-design-icons/iconfont/material-icons.css" />
<link rel="stylesheet" type="text/css" href="assets/opendaylight-dlux-0.2.0.css" />
<link rel="stylesheet" href="assets/css/sb-admin.css" />
<script type="text/javascript" data-main="src/main.js" src="vendor/requirejs/require.js"></script>
<link rel="stylesheet" href="assets/css/font-awesome.min.css" />
<!-- the font-awesome is different from the 'official' one -->
<!-- application CSS -->
</head>
<body class="skin-3">
<div ui-view="mainContent" id="main-content-container"></div>
</body>
</html>
Check the OVS config.
$ sudo ovs-vsctl get Open_vSwitch . other_config
{local_ip="10.0.2.15", provider_mappings="public:br-ex"}
Make sure that the neutron configuration file /etc/neutron/neutron.conf has the following ODL entries.
[DEFAULT]
service_plugins = odl-router,neutron.services.metering.metering_plugin.MeteringPlugin
core_plugin = neutron.plugins.ml2.plugin.Ml2Plugin
Make sure that the neutron ml2 configuration file /etc/neutron/plugins/ml2/ml2_conf.ini has the following ODL entries.
[ml2]
mechanism_drivers = opendaylight,logger
[ml2_odl]
port_binding_controller = network-topology
password = admin
username = admin
Note the neutron ml2 ODL url:
$ grep 8087 /etc/neutron/plugins/ml2/ml2_conf.ini
Make sure that neutron-server is using the right configuration files that have the ODL entries.
$ ps aux | grep ml2
stack 7523 0.1 2.2 290596 88872 pts/8 S+ 01:05 0:04 /usr/bin/python /usr/bin/neutron-server --config-file /etc/neutron/neutron.conf --config-file /etc/neutron/plugins/ml2/ml2_conf.ini
Source userrc_early in the devstack directory and check neutron CLIs.
Check if all the neutron agents are running fine.
$ source userrc_early
$ neutron agent-list
+-----------------+----------------+--------------+-------------------+-------+----------------+--------------------+
| id              | agent_type     | host         | availability_zone | alive | admin_state_up | binary             |
+-----------------+----------------+--------------+-------------------+-------+----------------+--------------------+
| 7a84f626-a656   | DHCP agent     | devstack-odl | nova              | :-)   | True           | neutron-dhcp-agent |
| -426e-acae-     |                |              |                   |       |                |                    |
| 5395cb56822a    |                |              |                   |       |                |                    |
| 9a626977-97ed-  | Metering agent | devstack-odl |                   | :-)   | True           | neutron-metering-  |
| 486b-b9c4-2fb60 |                |              |                   |       |                | agent              |
| 9ebd69f         |                |              |                   |       |                |                    |
| de275c04-18bc-  | Metadata agent | devstack-odl |                   | :-)   | True           | neutron-metadata-  |
| 43f1-b01b-      |                |              |                   |       |                | agent              |
| 4ee9affc3654    |                |              |                   |       |                |                    |
+-----------------+----------------+--------------+-------------------+-------+----------------+--------------------+
Create a neutron network, subnet and a router.
neutron net-create test-net
neutron subnet-create --name test-subnet test-net 11.11.11.0/24
neutron router-create test-router

$ neutron net-list | grep test-net
| 66e9a2a1-de76-4c92-b84a-e9aafdf75ad7 | test-net | 65a0a59d-90b7-476f-b117-64d7c7ab4901 11.11.11.0/24      |

$ neutron subnet-list | grep test-subnet
| 65a0a59d-90b7-476f-b117-64d7c7ab4901 | test-subnet         | 11.11.11.0/24      | {"start": "11.11.11.2", "end": "11.11.11.254"}                              |

$ neutron router-list | grep test-router
| 618e0100-50a7-4251-94b3-029811789c1d | test-router | null
Curl neutron's ml2 ODL url and check if the neutron networks, subnets, routers and ports can be successfully retrieved.
$ curl -v -u admin:admin http://10.0.2.15:8087/controller/nb/v2/neutron/networks | grep '\"name\"'
      "name" : "public",
      "name" : "test-net",
      "name" : "private",

$ curl -v -u admin:admin http://10.0.2.15:8087/controller/nb/v2/neutron/subnets | grep '\"name\"'
      "name" : "test-subnet",      "name" : "public-subnet",
      "name" : "ipv6-public-subnet",
      "name" : "ipv6-private-subnet",
      "name" : "private-subnet",

$ curl -v -u admin:admin http://10.0.2.15:8087/controller/nb/v2/neutron/routers | grep '\"name\"'
      "name" : "router1",
      "name" : "test-router",

$ curl -v -u admin:admin http://10.0.2.15:8087/controller/nb/v2/neutron/ports
Curl neutron's ml2 ODL url and check if the neutron network topology can be successfully retrieved.
$ curl -v -u admin:admin http://10.0.2.15:8087/restconf/operational/network-topology:network-topology
Check the OpenFlow 1.3 table in the OVS bridge br-int:
$ sudo ovs-ofctl -O OpenFlow13 dump-flows br-int
OFPST_FLOW reply (OF1.3) (xid=0x2):
cookie=0x0, duration=3340.050s, table=0, n_packets=0, n_bytes=0, dl_type=0x88cc actions=CONTROLLER:65535
cookie=0x0, duration=3265.069s, table=0, n_packets=7, n_bytes=558, in_port=1,dl_src=fa:16:3e:46:31:aa actions=set_field:0x17->tun_id,load:0x1->NXM_NX_REG0[],goto_table:20
>NXM_OF_ETH_DST[],set_field:fa:16:3e:46:31:aa->eth_src,load:0x2->NXM_OF_ARP_OP[],move:NXM_NX_ARP_SHA[]->NXM_NX_ARP_THA[],move:NXM_OF_ARP_SPA[]->NXM_OF_ARP_TPA[],load:0xfa163e4631aa->NXM_NX_ARP_SHA[],load:0xa000002->NXM_OF_ARP_SPA[],IN_PORT
cookie=0x0, duration=899.385s, table=20, n_packets=0, n_bytes=0, priority=1024,arp,tun_id=0x51,arp_tpa=11.11.11.2,arp_op=1 actions=move:NXM_OF_ETH_SRC[]->NXM_OF_ETH_DST[],set_field:fa:16:3e:60:81:f2->eth_src,load:0x2->NXM_OF_ARP_OP[],move:NXM_NX_ARP_SHA[]->NXM_NX_ARP_THA[],move:NXM_OF_ARP_SPA[]->NXM_OF_ARP_TPA[],load:0xfa163e6081f2->NXM_NX_ARP_SHA[],load:0xb0b0b02->NXM_OF_ARP_SPA[],IN_PORT
cookie=0x0, duration=3340.083s, table=20, n_packets=16, n_bytes=1296, priority=0 actions=goto_table:30
cookie=0x0, duration=3340.050s, table=30, n_packets=16, n_bytes=1296, priority=0 actions=goto_table:31
Connect to the ODL karaf shell, and check if the neutron network, subnet and router that were created are captured in the ODL logs.
cd ~/distribution-karaf-0.5.2-Boron-SR2/
sudo bash -c "export JAVA_HOME=/usr/java/jdk1.8.0_112 ; ./bin/client"
opendaylight-user@root>log:display | grep test-net
Network{getName=test-net, getStatus=ACTIVE, getTenantId=Uuid [_value=fdd867a9-e0e4-46c1-8985-70b1cc590d7d], getUuid=Uuid [_value=66e9a2a1-de76-4c92-b84a-e9aafdf75ad7], isAdminStateUp=true, isShared=false, augmentations={interface org.opendaylight.yang.gen.v1.urn.opendaylight.neutron.l3.ext.rev150712.NetworkL3Extension=NetworkL3Extension{isExternal=false}, interface org.opendaylight.yang.gen.v1.urn.opendaylight.neutron.provider.ext.rev150712.NetworkProviderExtension=NetworkProviderExtension{getNetworkType=class org.opendaylight.yang.gen.v1.urn.opendaylight.neutron.networks.rev150712.NetworkTypeVxlan, getSegmentationId=81}}}
opendaylight-user@root>log:display | grep test-subnet
Subnet{getAllocationPools=[AllocationPools{getEnd=IpAddress [_ipv4Address=Ipv4Address [_value=11.11.11.254]], getStart=IpAddress [_ipv4Address=Ipv4Address [_value=11.11.11.2]], augmentations={}}], getCidr=IpPrefix [_ipv4Prefix=Ipv4Prefix [_value=11.11.11.0/24]], getDnsNameservers=[], getGatewayIp=IpAddress [_ipv4Address=Ipv4Address [_value=11.11.11.1]], getHostRoutes=[], getIpVersion=class org.opendaylight.yang.gen.v1.urn.opendaylight.neutron.constants.rev150712.IpVersionV4, getName=test-subnet, getNetworkId=Uuid [_value=66e9a2a1-de76-4c92-b84a-e9aafdf75ad7], getTenantId=Uuid [_value=fdd867a9-e0e4-46c1-8985-70b1cc590d7d], getUuid=Uuid [_value=65a0a59d-90b7-476f-b117-64d7c7ab4901], isEnableDhcp=true, augmentations={}}
opendaylight-user@root>log:display | grep test-router
Router{getName=test-router, getRoutes=[], getStatus=ACTIVE, getTenantId=Uuid [_value=fdd867a9-e0e4-46c1-8985-70b1cc590d7d], getUuid=Uuid [_value=618e0100-50a7-4251-94b3-029811789c1d], isAdminStateUp=true, isDistributed=false, augmentations={}}
Check ODL OpenFlow statistics and session statistics in the karaf shell:
opendaylight-user@root>ofp:showstats
FROM_SWITCH: no activity detected
FROM_SWITCH_TRANSLATE_IN_SUCCESS: no activity detected
FROM_SWITCH_TRANSLATE_OUT_SUCCESS: MSG[MultipartType] -> +1208 | 1208
FROM_SWITCH_TRANSLATE_SRC_FAILURE: no activity detected
FROM_SWITCH_PACKET_IN_LIMIT_REACHED_AND_DROPPED: no activity detected
FROM_SWITCH_NOTIFICATION_REJECTED: no activity detected
FROM_SWITCH_PUBLISHED_SUCCESS: MSG[PortStatusMessage] -> +6 | 6
FROM_SWITCH_PUBLISHED_FAILURE: MSG[MultipartReplyMessage] -> +6044 | 6044
TO_SWITCH_ENTERED: MSG[SetConfigInput] -> +1 | 1
TO_SWITCH_ENTERED: MSG[FlowModInputBuilder] -> +117 | 117
TO_SWITCH_ENTERED: MSG[RoleRequestInputBuilder] -> +4 | 4
TO_SWITCH_ENTERED: MSG[MultipartType] -> +7248 | 7248
TO_SWITCH_DISREGARDED: no activity detected
TO_SWITCH_RESERVATION_REJECTED: no activity detected
TO_SWITCH_READY_FOR_SUBMIT: MSG[] -> +4 | 4
TO_SWITCH_READY_FOR_SUBMIT: MSG[] -> +7248 | 7248
TO_SWITCH_READY_FOR_SUBMIT: MSG[] -> +118 | 118
TO_SWITCH_SUBMIT_SUCCESS: MSG[SetConfigInput] -> +1 | 1
TO_SWITCH_SUBMIT_SUCCESS: MSG[FlowModInputBuilder] -> +117 | 117
TO_SWITCH_SUBMIT_SUCCESS: MSG[RoleRequestInputBuilder] -> +4 | 4
TO_SWITCH_SUBMIT_SUCCESS_NO_RESPONSE: no activity detected
TO_SWITCH_SUBMIT_FAILURE: no activity detected
TO_SWITCH_SUBMIT_ERROR: no activity detected
REQUEST_STACK_FREED: MSG[RpcContextImpl] -> +118 | 118
OFJ_BACKPRESSURE_ON: no activity detected
OFJ_BACKPRESSURE_OFF: no activity detected

opendaylight-user@root>ofp:show-session-stats
SESSION : Uri [_value=openflow:185752284545496]
CONNECTION_CREATED : 1
Check the ODL web end points in the karaf shell.
opendaylight-user@root>web:list
ID  | State       | Web-State   | Level | Web-ContextPath           | Name
------------------------------------------------------------------------------------------------------------------------------
269 | Active      | Deployed    | 80    | /moon                     | org.opendaylight.aaa.aaa-shiro (0.5.0.SNAPSHOT)
273 | Active      | Deployed    | 80    | /oauth2                   | aaa-authn-sts (0.5.0.SNAPSHOT)
279 | Active      | Deployed    | 80    | /auth                     | aaa-idmlight (0.5.0.SNAPSHOT)
289 | Active      | Deployed    | 80    | /controller/nb/v2/neutron | org.opendaylight.neutron.northbound-api (0.8.0.SNAPSHOT)
296 | Active      | Deployed    | 80    | /restconf                 | MD SAL Restconf Connector (1.5.0.SNAPSHOT)
299 | Active      | Deployed    | 80    | /apidoc                   | MD SAL Rest Api Doc Generator (1.5.0.SNAPSHOT)
Make sure that the ODL configurations have the right entries for OpenStack neutron and Open vSwitch.
opendaylight-user@root>config:list | grep -i ovs
featuresBoot = config,standard,region,package,kar,ssh,management,odl-neutron-service,odl-restconf-all,odl-aaa-authn,odl-dlux-core,odl-mdsal-apidocs,odl-ovsdb-openstack,odl-neutron-logger
Pid: org.opendaylight.ovsdb.library
BundleLocation: mvn:org.opendaylight.ovsdb/library/1.4.0-SNAPSHOT
felix.fileinstall.filename = file:/opt/stack/opendaylight/distribution-karaf-0.6.0-SNAPSHOT/etc/org.opendaylight.ovsdb.library.cfg
service.pid = org.opendaylight.ovsdb.library
Hit CTRL+d to exit from karaf shell.
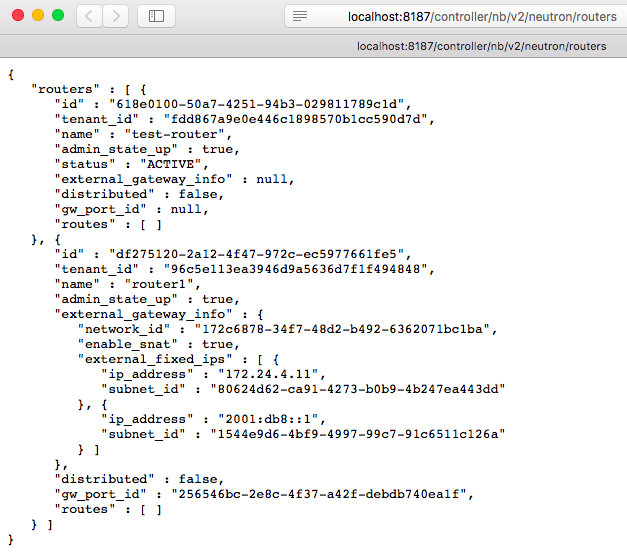
Since we have setup port forwarding on VirtualBox, the following links can be accessed on the Mac laptop to retrieve the neutron networks, subnets, ports and routers from neutron's ml2 ODL url!
http://localhost:8187/controller/nb/v2/neutron/networks
http://localhost:8187/controller/nb/v2/neutron/subnets
http://localhost:8187/controller/nb/v2/neutron/ports
http://localhost:8187/controller/nb/v2/neutron/routers
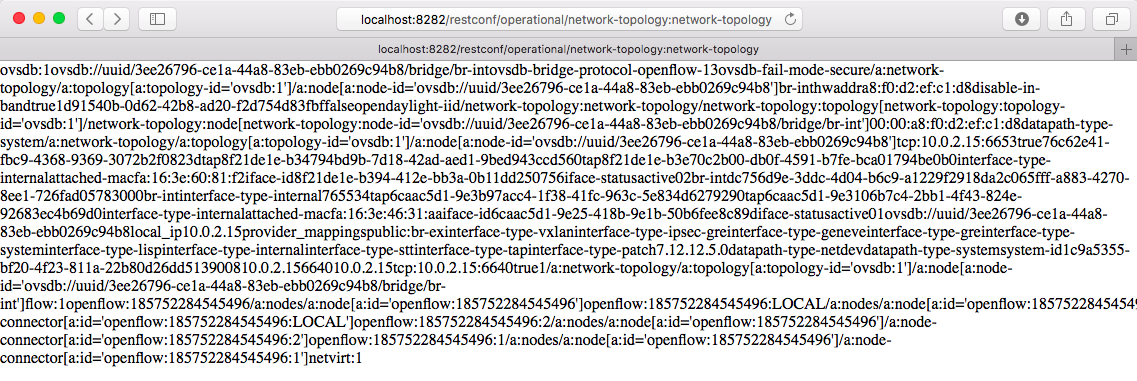
On the laptop, access the network topology at the ODL web endpoint using RESTCONF.
http://localhost:8282/restconf/operational/network-topology:network-topology
The OpenStack Horizon dashboard can be accessed on the Mac laptop at http://localhost:8080/. Use the username admin and password nomoresecret to login into Horizon.
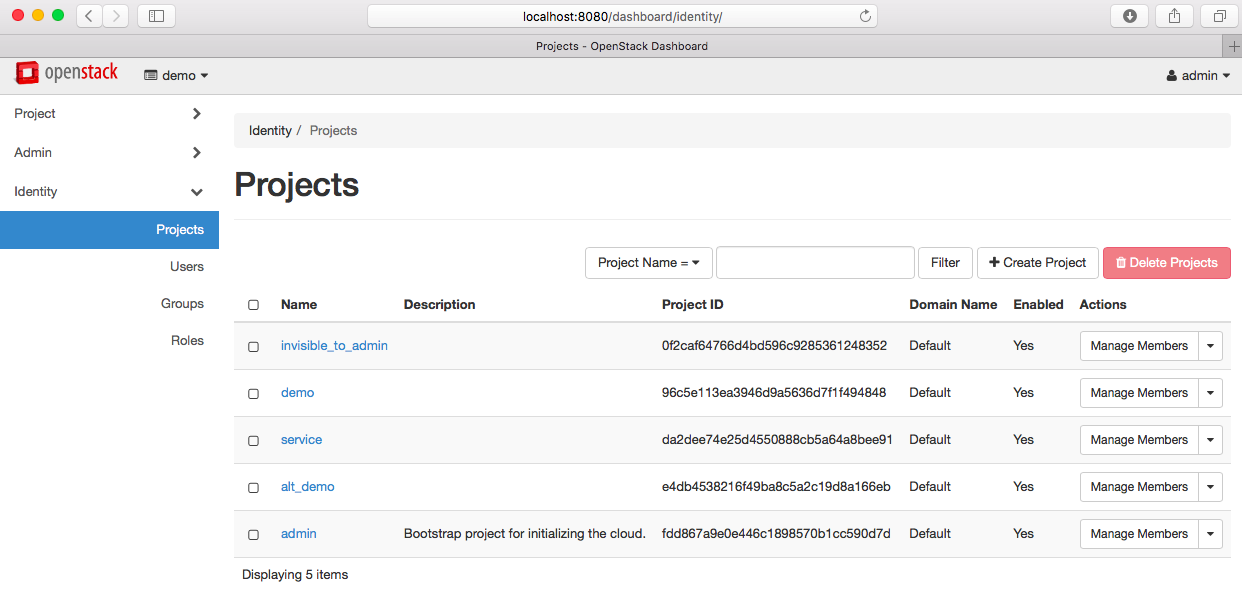
Congratulations! You've successfully deployed OpenStack Newton with OpenDaylight Boron and Open vSwitch!
Please refer my blog How to stack DevStack Newton on CentOS-7 in VirtualBox on Mac for steps to boot a nova instance in the OpenStack Horizon dashboard.
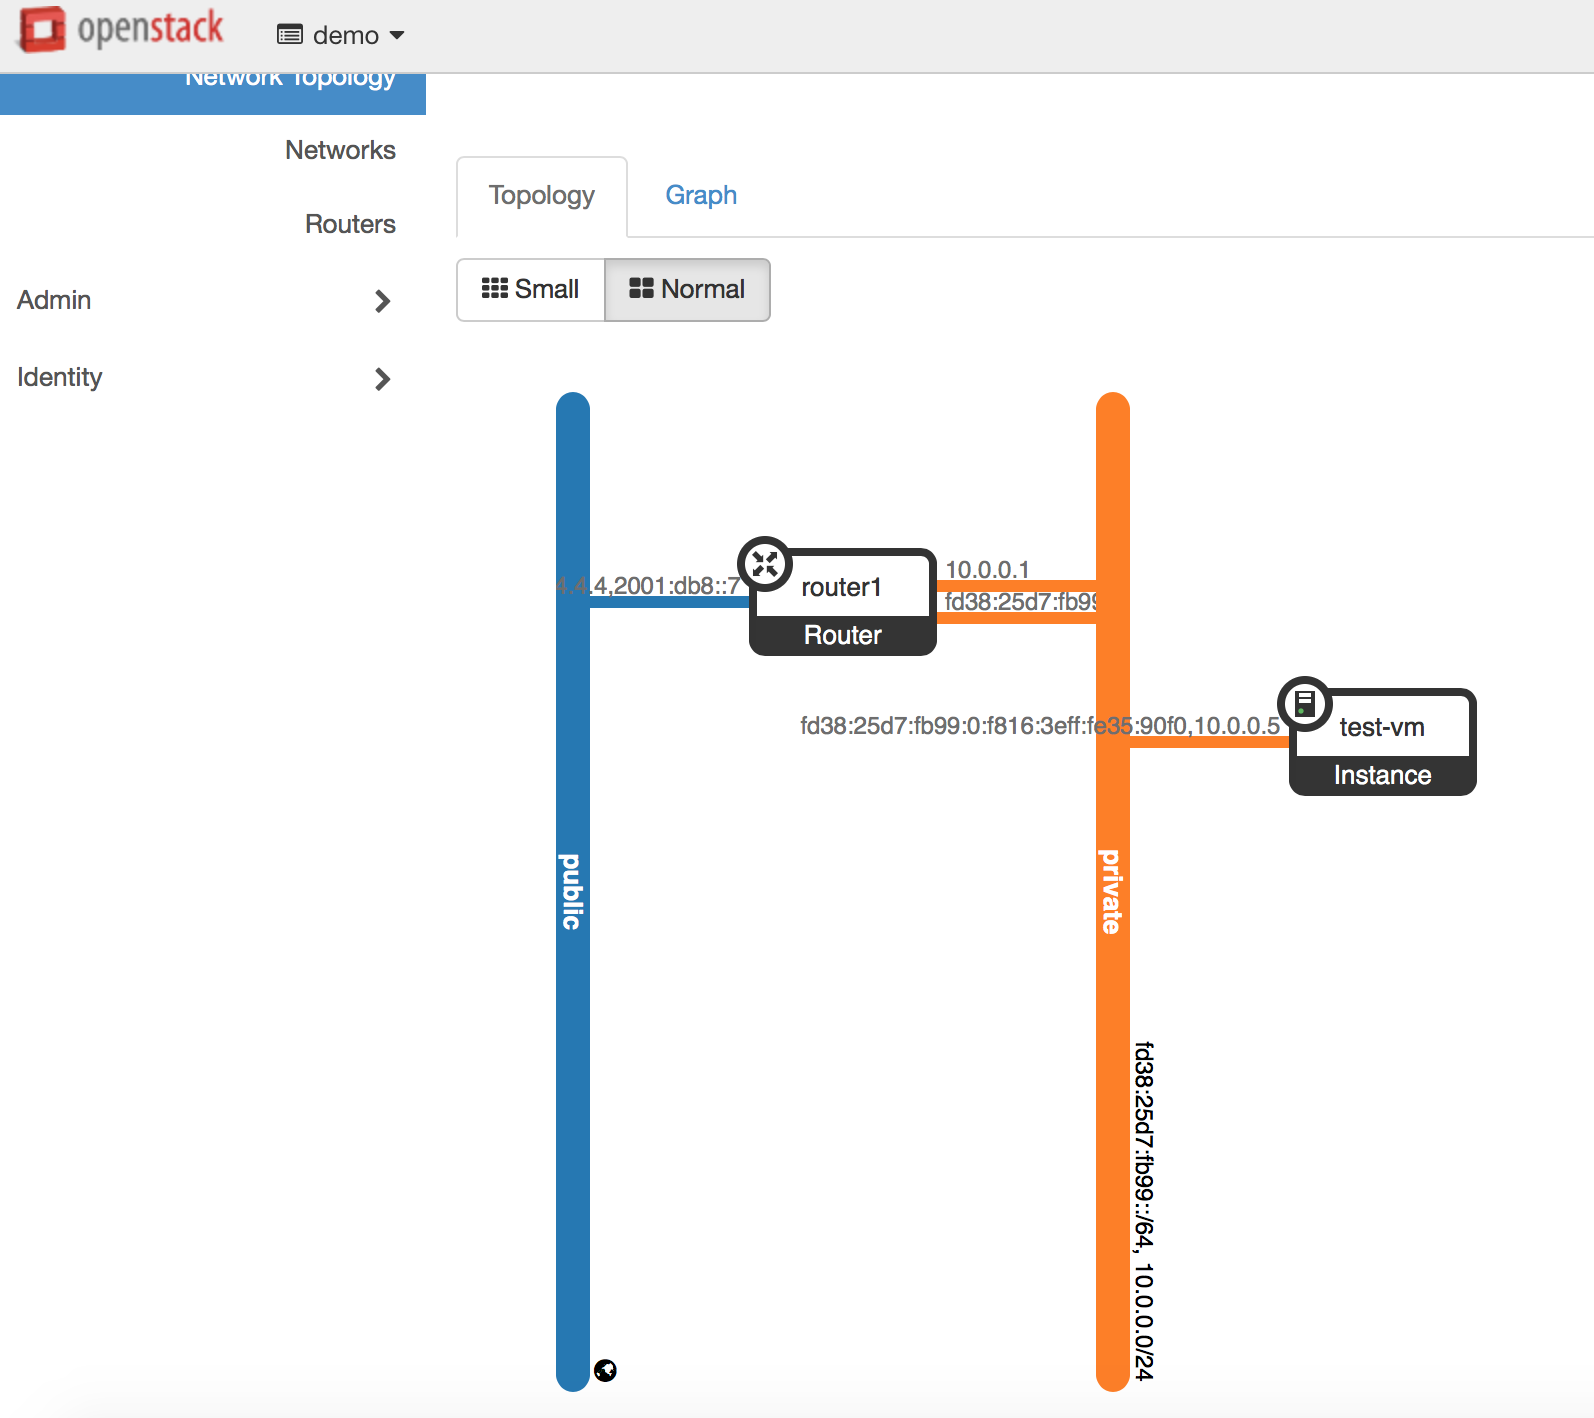
Boot a nova VM (test-vm) using cirros image, m1.tiny flavor, and attach it to the private network. Also, create a floating IP in the public network and associate it to the nova VM. Add security group rules to the "default" security group in order to SSH into and ping nova VMs.
$ cd ~/devstack

$ nova list
+--------------------------------------+---------+--------+------------+-------------+--------------------------------------------------------------------+
| ID                                   | Name    | Status | Task State | Power State | Networks                                                           |
+--------------------------------------+---------+--------+------------+-------------+--------------------------------------------------------------------+
| 3204114d-d3b2-4493-8115-abd0b463152a | test-vm | ACTIVE | -          | Running     | private=10.0.0.5, fd38:25d7:fb99:0:f816:3eff:fe35:90f0, 172.24.4.5 |
+--------------------------------------+---------+--------+------------+-------------+--------------------------------------------------------------------+

$ openstack security group rule create --protocol tcp --dst-port 22 default
$ openstack security group rule create --protocol icmp --dst-port -1 default
Find the DHCP namespace and SSH into the cirros VM from inside the DHCP namespace using the following credentials!
username: cirros
password: cubswin:)
$ neutron net-list | grep private
| f58ba1ee-9a21-4dea-ab96-10d06b2c46b5 | private | dda9ffee-b36c-400b-a93c-9ba3b36280ae fd38:25d7:fb99::/64 |

$ ip netns | grep f58ba1ee-9a21-4dea-ab96-10d06b2c46b5qdhcp-f58ba1ee-9a21-4dea-ab96-10d06b2c46b5

$ sudo ip netns exec qdhcp-f58ba1ee-9a21-4dea-ab96-10d06b2c46b5 ssh cirros@10.0.0.5
cirros@10.0.0.5's password:
$ ip a
1: lo: <LOOPBACK,UP,LOWER_UP> mtu 16436 qdisc noqueue
    link/loopback 00:00:00:00:00:00 brd 00:00:00:00:00:00
    inet 127.0.0.1/8 scope host lo
    inet6 ::1/128 scope host
       valid_lft forever preferred_lft forever
2: eth0: <BROADCAST,MULTICAST,UP,LOWER_UP> mtu 1450 qdisc pfifo_fast qlen 1000
    link/ether fa:16:3e:35:90:f0 brd ff:ff:ff:ff:ff:ff
    inet 10.0.0.5/24 brd 10.0.0.255 scope global eth0
    inet6 fe80::f816:3eff:fe35:90f0/64 scope link
       valid_lft forever preferred_lft forever
Here is the network topology you can see in http://localhost:8080/dashboard/project/network_topology/.
Hope this blog is helpful! ![]()
You must be a registered user to add a comment. If you've already registered, sign in. Otherwise, register and sign in.
Find answers to your questions by entering keywords or phrases in the Search bar above. New here? Use these resources to familiarize yourself with the community:
Cisco Cloud Native resources: