- Cisco Community
- Technology and Support
- Security
- Network Access Control
- Restrict sponsors from creating guest accounts
- Subscribe to RSS Feed
- Mark Topic as New
- Mark Topic as Read
- Float this Topic for Current User
- Bookmark
- Subscribe
- Mute
- Printer Friendly Page
- Mark as New
- Bookmark
- Subscribe
- Mute
- Subscribe to RSS Feed
- Permalink
- Report Inappropriate Content
11-03-2017 05:30 AM
Hi everyone,
we have setup a guest portal with sponsor approval.
Now, we want to create 2 user groups which each contains a set of users.
The one group should be able to do everything on the sponsor portal. (Create accounts, approve accounts, edit accounts, etc.)
And the other group should only be able to approve incomming requests.
The full-access group is working fine.
But when I am editing the "Only approve" group, I must enter a Guest Type to continue.
When I do this, this gives those users access to creating an user of that type.
Is there any possibility to have a group that would only be allowed to accept incomming requests but not create new users?
Solved! Go to Solution.
- Labels:
-
Identity Services Engine (ISE)
Accepted Solutions
")
")
- Mark as New
- Bookmark
- Subscribe
- Mute
- Subscribe to RSS Feed
- Permalink
- Report Inappropriate Content
11-03-2017 06:42 AM
There is no setting to allow or deny account creation
How many users are you wanting this to happen for? Maybe there’s a way to JavaScript and hide the create accounts option for certain user(s) or group (if visible to the page)
I would suggest also reaching out to the ISE product marketing team with details through your sales channel
If you’re up for some complexity to make this happen You might come up with a workaround such as this, would have to be tested but it’s a theory
2 sponsor portals
Create a sponsor portal with the pages/options for creation hidden with JavaScript
Point ISE to itself and only allow those groups that are denied access to create accounts
https://communities.cisco.com/docs/DOC-64526?mobileredirect=true
Create Another normal sponsor portal but only allowing those with full access to login using same method
- Mark as New
- Bookmark
- Subscribe
- Mute
- Subscribe to RSS Feed
- Permalink
- Report Inappropriate Content
11-03-2017 06:15 AM
You can do check this 
This is for own accounts i think you can create other groups and play with this option.
- Mark as New
- Bookmark
- Subscribe
- Mute
- Subscribe to RSS Feed
- Permalink
- Report Inappropriate Content
11-03-2017 06:26 AM
Hi Ognyan,
thanks for your responds.
That is already active. The issue is with the setting a bit above the screenshot.
There I have to define a user type that the group can create.
I don't want the option to create a guest account in the sponsor portal.
- Mark as New
- Bookmark
- Subscribe
- Mute
- Subscribe to RSS Feed
- Permalink
- Report Inappropriate Content
11-03-2017 06:31 AM
You speak about this ??? 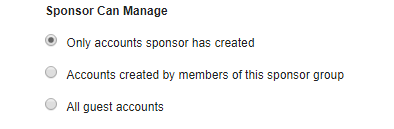
- Mark as New
- Bookmark
- Subscribe
- Mute
- Subscribe to RSS Feed
- Permalink
- Report Inappropriate Content
11-03-2017 06:42 AM
There is no setting to allow or deny account creation
How many users are you wanting this to happen for? Maybe there’s a way to JavaScript and hide the create accounts option for certain user(s) or group (if visible to the page)
I would suggest also reaching out to the ISE product marketing team with details through your sales channel
If you’re up for some complexity to make this happen You might come up with a workaround such as this, would have to be tested but it’s a theory
2 sponsor portals
Create a sponsor portal with the pages/options for creation hidden with JavaScript
Point ISE to itself and only allow those groups that are denied access to create accounts
https://communities.cisco.com/docs/DOC-64526?mobileredirect=true
Create Another normal sponsor portal but only allowing those with full access to login using same method
- Mark as New
- Bookmark
- Subscribe
- Mute
- Subscribe to RSS Feed
- Permalink
- Report Inappropriate Content
11-03-2017 10:08 AM
It maybe possible to do the javascript way, keep in mind the list of users would be visible in the view web page source.
We would populate a list of users in javascript, when they login they would be blocked the ability to see the create accounts page.
Are you interested in this? If so I will check with dev to see how long it may take and if we can dedicate the resources to that. They would need to manage the list via javascript on ISE portal page customization
Otherwise customer could develop their own portals via API (lot more work but more secure)
- Mark as New
- Bookmark
- Subscribe
- Mute
- Subscribe to RSS Feed
- Permalink
- Report Inappropriate Content
11-06-2017 12:07 AM
Hi Jason,
thanks for your feedback.
This should get us what we needed, thanks a lot!
Kind regards,
Jordy
- Mark as New
- Bookmark
- Subscribe
- Mute
- Subscribe to RSS Feed
- Permalink
- Report Inappropriate Content
11-06-2017 06:41 AM
Hi Jordy,
Could you please try these scripts?
1) For "Login" page:
<script>
$("[type='submit']").on('click', function(){
var user = $('[id="user.username"]').val();
localStorage.setItem('user', user);
});
</script>
You should to follow by these steps:
1. Open you portal
2. Click on "Portal page customization"
3. Choose "Login page"
4. Find "Optional content 2" field and click on "Toggle to HTML"
5. Insert script and click on "Toggle to HTML" to close this field.
2) For "Sponsor portal settings" page:
<script>
setTimeout(function(){
var currentUser = localStorage.getItem('user');
var userList = ['username1', 'username2', 'username3', 'username4'];
var hide = function() {
setTimeout(function(){
$('.ui-grid-c li:nth-child(1)').hide();
$('.ui-grid-c li:nth-child(2)').hide();
$('.ui-grid-c li:nth-child(4)').hide();
}, 500);
};
var verifiction = function() {
for (i=0; i<=userList.length; i++) {
if(currentUser == userList[i]) {
return true;
}
};
};
if(!verifiction()) {
hide();
$('.ui-grid-c li:nth-child(3) a').click();
}
}, 2000);
</script>
You should to follow by these steps:
1. Open you portal
2. Click on "Portal page customization"
3. Choose "Sponsor portal settings page"
4. Find "Optional content 2" field and click on "Toggle to HTML"
5. Insert script and click on "Toggle to HTML" to close this field.
2000 - this is a delay, you can increase/decrease it, depends on your server speed.
userList - list of your usernames. It should contains only data for user's, who has full access.
Thanks.
- Mark as New
- Bookmark
- Subscribe
- Mute
- Subscribe to RSS Feed
- Permalink
- Report Inappropriate Content
11-06-2017 07:09 AM
Hi Serhii,
Thank you for your feedback.
I can't find "Optional Content 2" under the Sponsor Portal Settings page.
I'm running version 2.2.0.470.
There is only one box stating "Instructional Text"
I've tried to enter the script in there, but no luck.
Thanks
- Mark as New
- Bookmark
- Subscribe
- Mute
- Subscribe to RSS Feed
- Permalink
- Report Inappropriate Content
11-06-2017 07:28 AM
Yea, you are right.
You should to use Instructional text field for that script.
- Mark as New
- Bookmark
- Subscribe
- Mute
- Subscribe to RSS Feed
- Permalink
- Report Inappropriate Content
11-06-2017 11:30 PM
Hi Serhii,
it worked with 5000 delay on the demo server and with 2000 at the live server.
Thanks a lot for the script!
Kind regards,
Jordy
- Mark as New
- Bookmark
- Subscribe
- Mute
- Subscribe to RSS Feed
- Permalink
- Report Inappropriate Content
11-07-2017 06:51 AM
Please keep in mind if someone is running developer tools they can manipulate this scripting as its loaded client side. This is the only option without having a server side feature. You would need to reach out through sales channel to our guest PM ameet kulkarni for that
- Mark as New
- Bookmark
- Subscribe
- Mute
- Subscribe to RSS Feed
- Permalink
- Report Inappropriate Content
11-06-2017 07:30 AM
Do you mean, script is doesn't work?
Could you please increase delay to 5000?
Discover and save your favorite ideas. Come back to expert answers, step-by-step guides, recent topics, and more.
New here? Get started with these tips. How to use Community New member guide