Background
This blog series covers some of the new API released as part of the APIC-EM 1.3 release of code.

This particular blog covers a new feature in the Plug and Play (PnP) application, configuration templates. Prior to version 1.3, the configuration file was a text file and did not support variables. If you wanted to use a template you needed to use Prime Infrastructure. In APIC-EM 1.3, template support has been added.
This blog looks at both the UI and API required for templates.
For all of these examples I am using a 3650 switch running 3.6.5 code, but you could use versions of 16.3.1 and 3.7.4 (For other platforms such 2960x please see release notes for details).
Setup
I am going to assume you have seen my earlier blogs Network Automation with Plug and Play (PnP) – Part 1 on the mechanics of PnP and how to configure discover (DHCP, DNS) etc.
Templates
A template is identical to a standard configuration file, except it has variables embedded in it. Templates use the "velocity" template language, the same as Prime Infrastructure. Variables start with the "$" character. For example there is a "hostname" variable in this example.
|
hostname $hostname
enable password xxx
!
username sdn password 0 xxx
!
ip http server
ip http secure-server
snmp-server community xxxx RO
!
line con 0
line vty 0 15
login local
transport input ssh telnet
end
|
When you view the template in APIC-EM, there are three views:
- Text view: the file above. Variables have a "$" at the start
- Form View: just shows the variables.
- Preview: Shows the complete configuration with variables filled in.
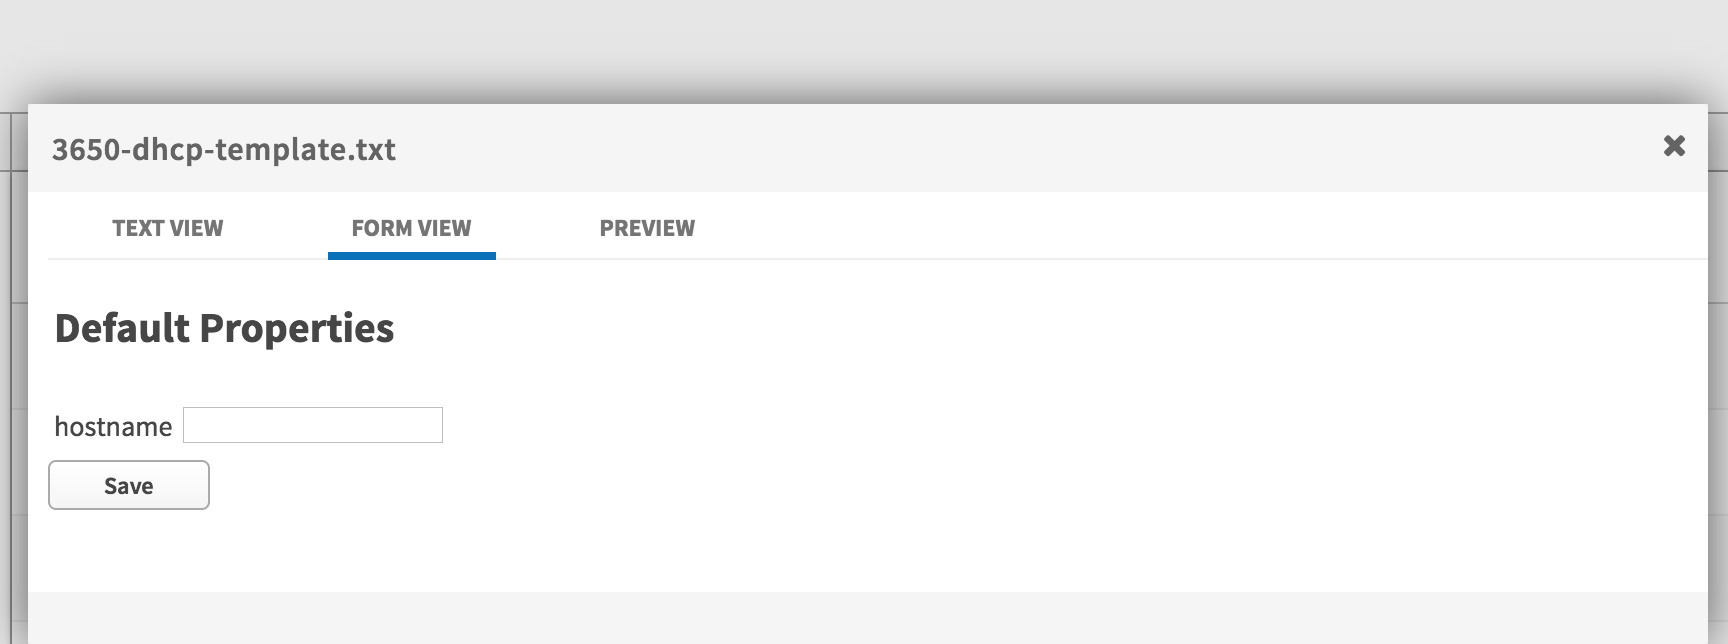
Templates can be uploaded the same as any other configuration file, through the user interface or the API.
Using the Template – User Interface
Templates are used in PnP rules in exactly the same way as normal configuration files. One extra step is to fill in the variables. In this example I am going to use a pre-defined rule, but templates work with unclaimed devices as well.
NOTE: You do not need a specific suffix on a template file. The controller searches the configuration file for variables, and if they are present, the file is treated as a template.
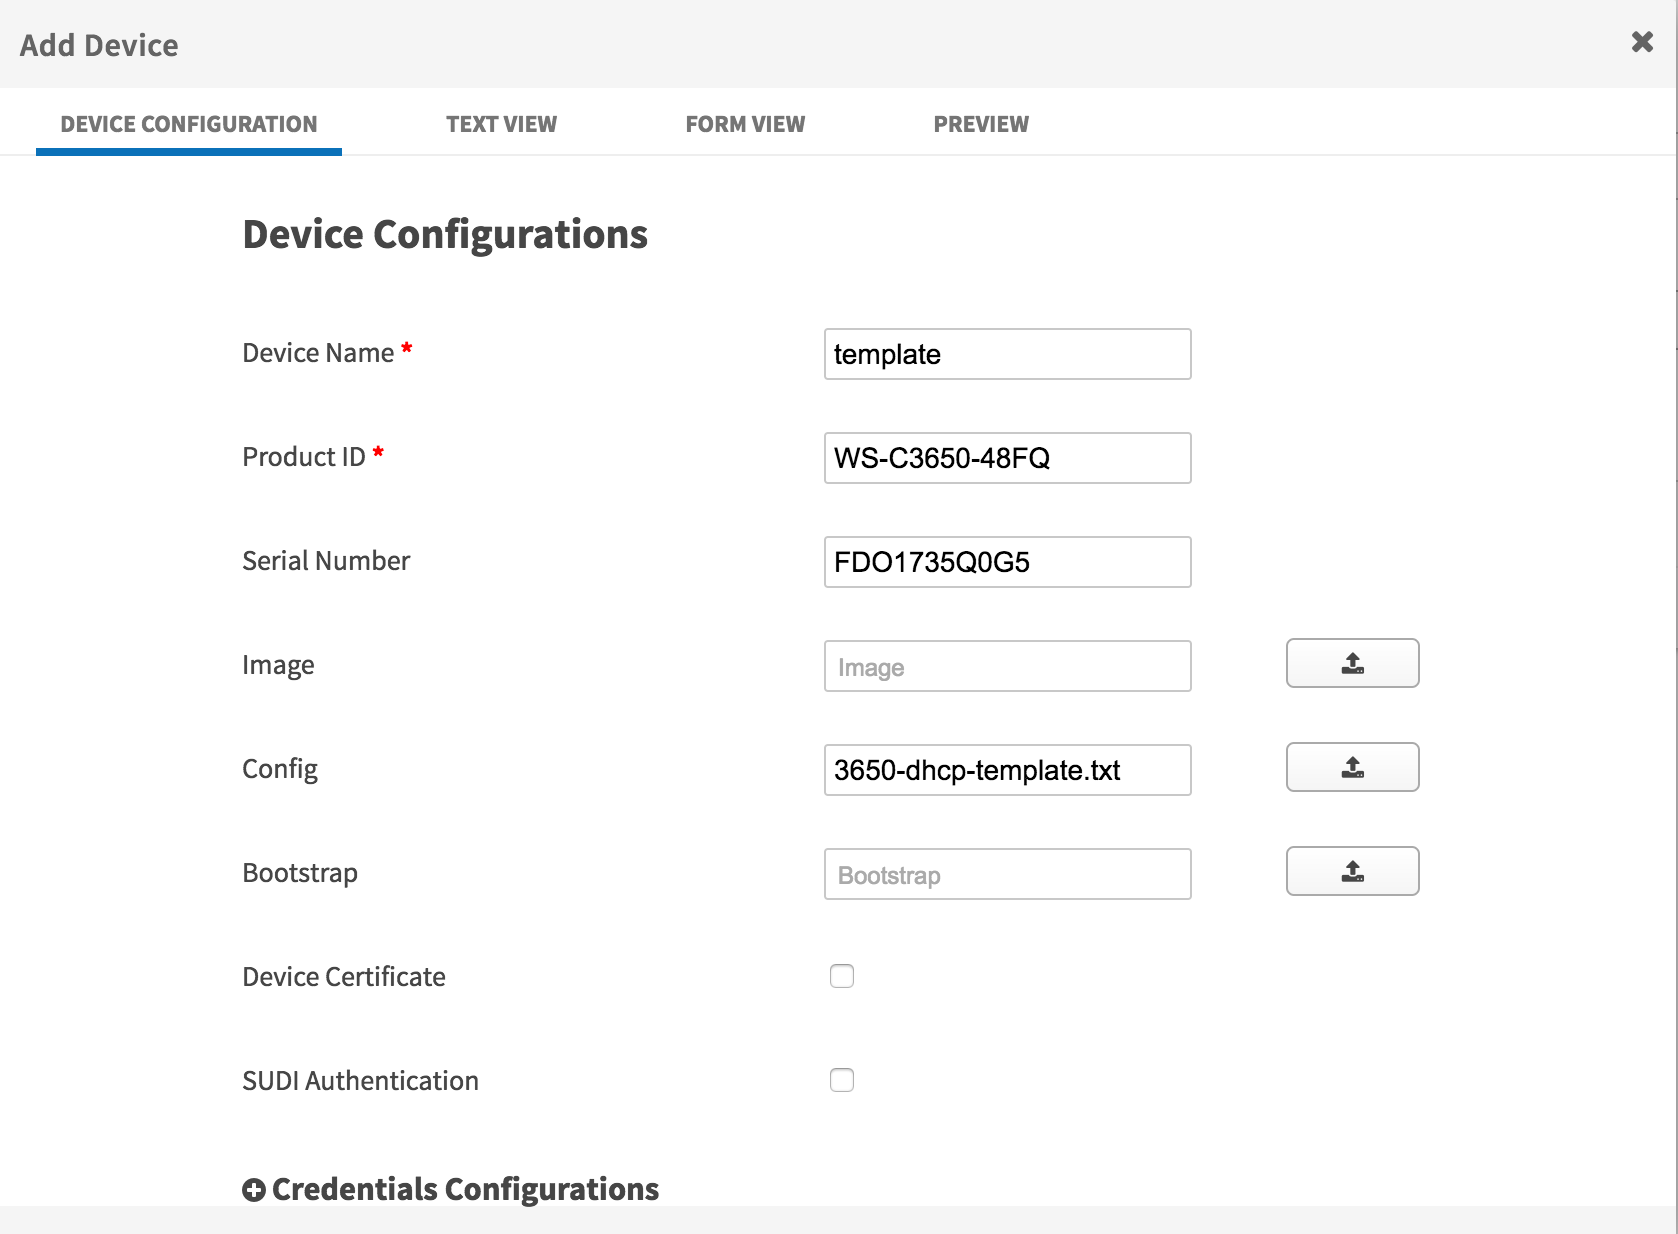
I then need to select the "Form View" to fill in the variables. This example has only one variable "hostname"

I then need to select "Device Configuration" and scroll down to the bottom of the page to "Add" the Device.
NOTE: I have also configured some stack parameters. These are only required as I am also using a stack of switches.
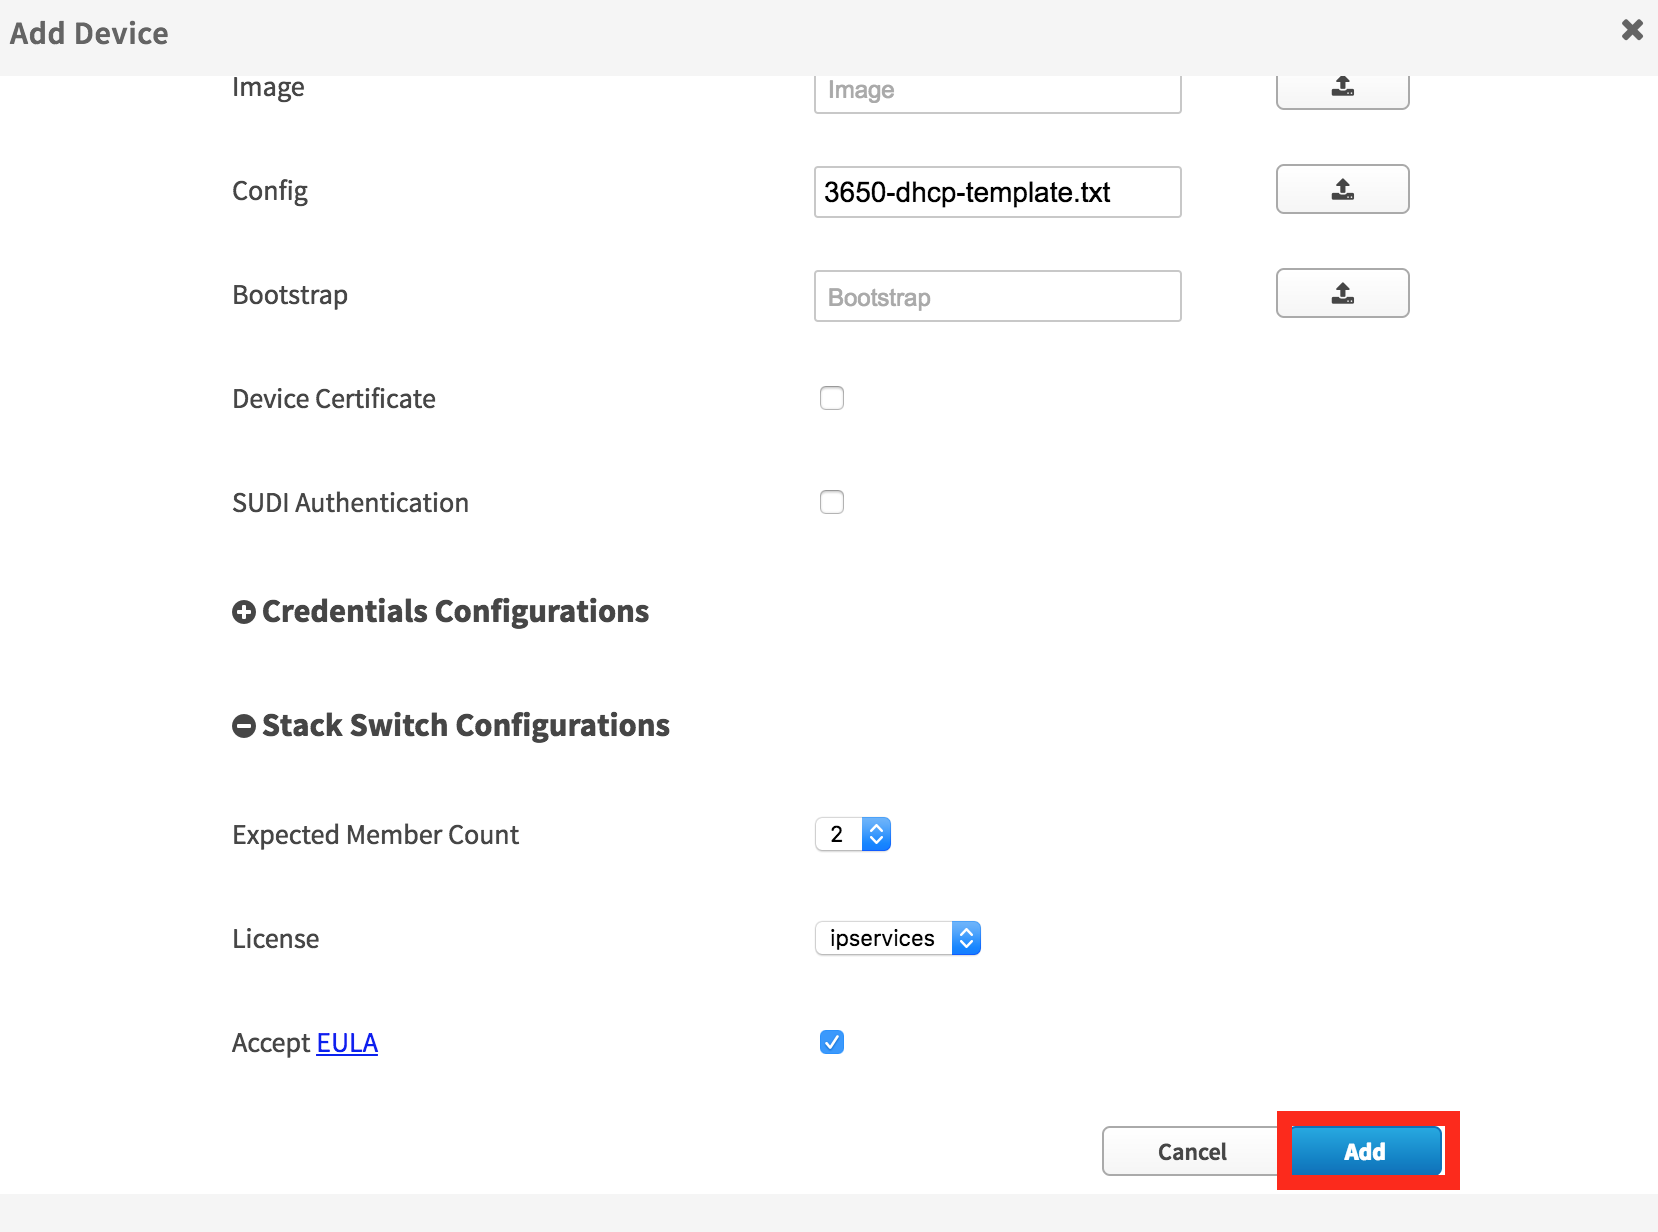
Now the rule has been added successfully.

Once the switch has been provisioned you will notice the configuration file has changed. This will be the rendered template with all of the variables filled in.

Using the Template – User Interface
In this section I will cover the API that are required to use the template API. I am going to assume you have seen my earlier blogs for a detailed description of using the PnP API.
I have already created a project and uploaded the configuration file. This was covered in an earlier blog Network Automation with Plug and Play (PnP) – Part 2
Templates require two new API "/template" and "/template-config" as shown below:
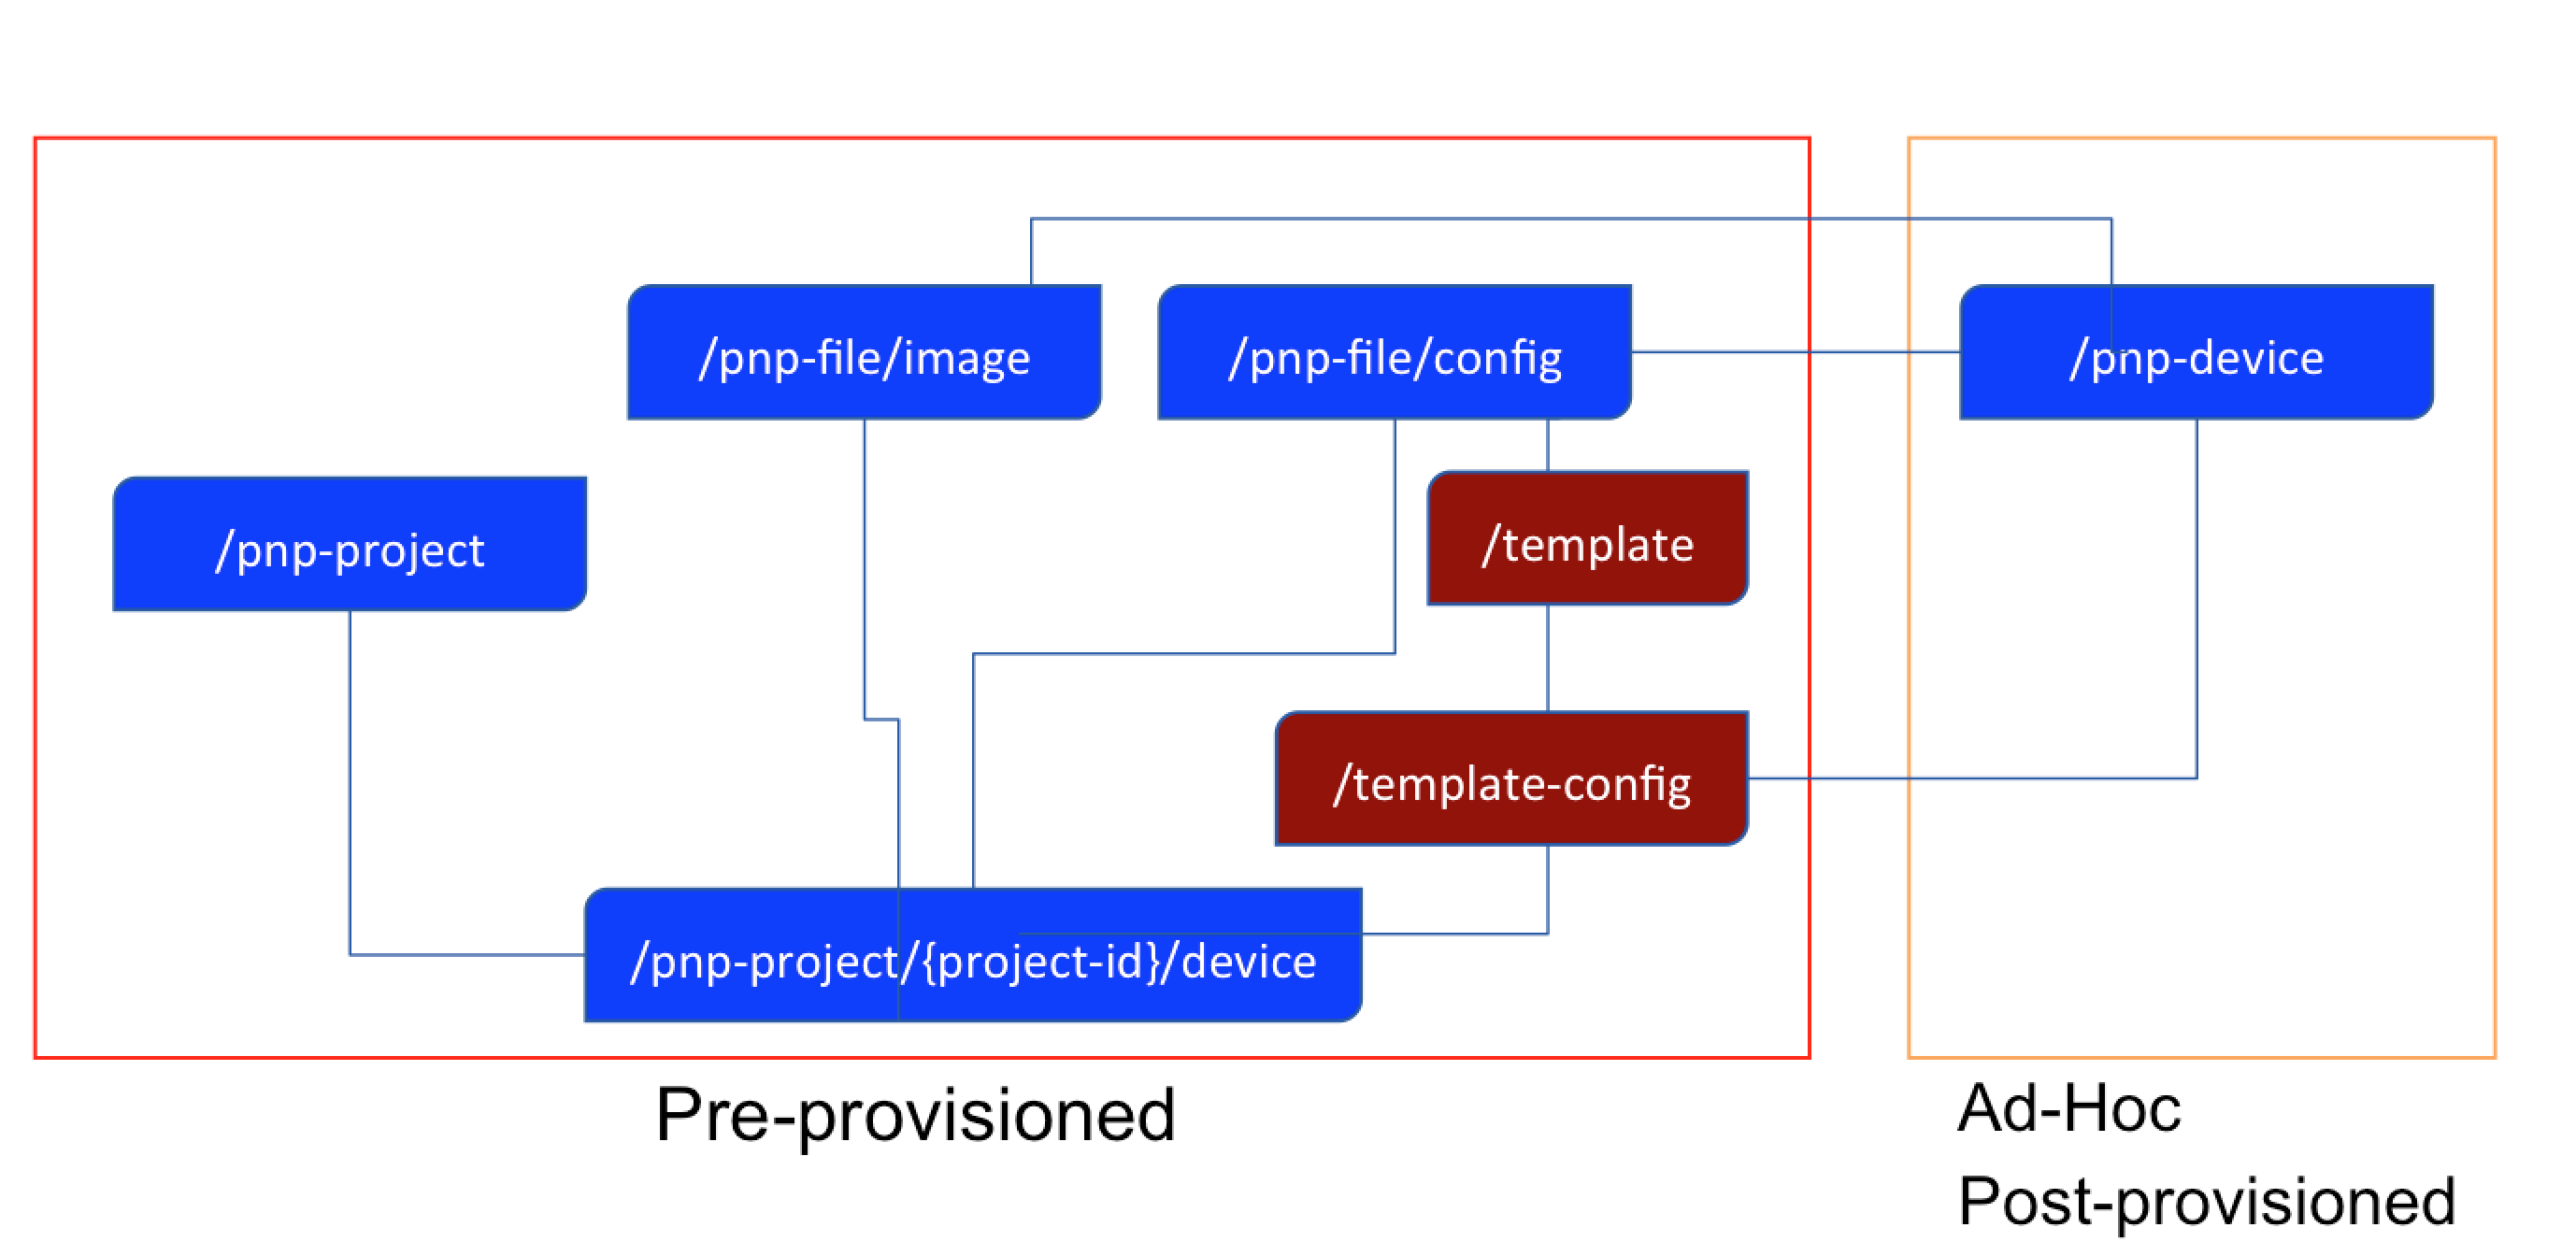
Here is the API call to get the "id" for the template file "3650-dhcp-template.txt".
|
https://adam-iwan/api/v1/pnp-file/config?name=3650-dhcp-template.txt GET
{
"nameSpace": "config",
"name": "3650-dhcp-template.txt",
"downloadPath": "/file/e8682c6f-e9f7-425b-a8a7-08f37ee2bb2d",
"fileSize": "281",
"fileFormat": "text/plain",
"md5Checksum": "4a733185281e17e15228d5636c921308",
"sha1Checksum": "0bccd2be238ed74e283c198af1ed7b4291717ce3",
"id": "e8682c6f-e9f7-425b-a8a7-08f37ee2bb2d"
},
|
Configuration files that are templates will have an entry in template table. I need to find the template UUID from the fileId (e8682c6f-e9f7-425b-a8a7-08f37ee2bb2d).
The next step is to create a configuration file from the template. I use the UUID of the template (d1fd02d0-c9cf-4fad-b706-1332a891ca18) obtained above.
|
https://adam-iwan/api/v1/template-config POST
[{"templateId":"d1fd02d0-c9cf-4fad-b706-1332a891ca18", "configProperty":{"hostname":"stack-template"}}]
Because this is an asynchronous operation, a task will be returned.
{
"response": {
"taskId": "8a82c03f-b746-41e6-b7b1-23be1c552ebe",
"url": "/api/v1/task/8a82c03f-b746-41e6-b7b1-23be1c552ebe"
},
"version": "1.0"
}
|
I need to poll the status of the task (8a82c03f-b746-41e6-b7b1-23be1c552ebe") and get the UUID of the rendered template (13c6b9cf-f91c-429d-8489-46d81263d1a2)
|
https://adam-iwan/api/v1/task/8a82c03f-b746-41e6-b7b1-23be1c552ebe GET
{
"response": {
"startTime": 1477824534405,
"endTime": 1477824534424,
"version": 1477824534405,
"progress": "{\"message\":\"Successfully added the Ztd Template Config\",\"id\":\"13c6b9cf-f91c-429d-8489-46d81263d1a2\"}",
"serviceType": "Ztd Service",
"isError": false,
"rootId": "8a82c03f-b746-41e6-b7b1-23be1c552ebe",
"id": "8a82c03f-b746-41e6-b7b1-23be1c552ebe"
},
"version": "1.0"
}
|
I have successfully created a new template with the variable hostname":"stack-template"
In order to create a rule in the project (named "template), I also need the UUID of the project.
|
https://adam-iwan/api/v1/pnp-project?siteName=template GET
{
"state": "PRE_PROVISIONED",
"siteName": "template",
"tftpServer": "",
"tftpPath": "",
"deviceCount": 0,
"pendingDeviceCount": 0,
"provisionedBy": "admin",
"provisionedOn": "2016-10-29 02:35:26",
"id": "d168aa1a-bf61-46c9-b5d6-7ae4e27c48c8"
}
|
I can now create a rule in my project using the configuration template i created earlier. The items in red, are specifically for a stack deployment.
Again, get the task body to see the task was successful. This also returns the UUID of the newly created rule.
|
https://adam-iwan/api/v1/task/9ba76c24-4db1-44f4-a9bd-e3f8b6507e33 GET
{
"response": {
"startTime": 1477824968481,
"endTime": 1477824968527,
"version": 1477824968481,
"progress": "{\"message\":\"Success creating new site device(rule)\",\"ruleId\":\"234f2700-62b2-4721-8780-a6ccb79900e0\"}",
"serviceType": "Ztd Service",
"isError": false,
"rootId": "9ba76c24-4db1-44f4-a9bd-e3f8b6507e33",
"id": "9ba76c24-4db1-44f4-a9bd-e3f8b6507e33"
},
"version": "1.0"
}
|
The User Interface shows the rule has been defined successfully.

This can be also be verified through an API call: NOTE: the "templateConfigId": and the ruleID which matches that returned by the task above (234f2700-62b2-4721-8780-a6ccb79900e0)
|
https://adam-iwan/api/v1/pnp-project/d168aa1a-bf61-46c9-b5d6-7ae4e27c48c8/device GET
{
"response": [
{
"hostName": "switch",
"platformId": "WS-C3650-48FQ",
"serialNumber": "FDO1735Q0G5",
"site": "template",
"templateConfigId": "13c6b9cf-f91c-429d-8489-46d81263d1a2",
"pkiEnabled": false,
"sudiRequired": false,
"apCount": "0",
"isMobilityController": "false",
"memberCount": 2,
"licenseLevel": "ipservices",
"eulaAccepted": true,
"state": "PENDING",
"stateDisplay": "Pending",
"authStatus": {
"type": "Unknown",
"status": "None",
"errorMessage": null,
"timestamp": 1477824995539,
"certInfo": null
},
"aliases": [],
"id": "234f2700-62b2-4721-8780-a6ccb79900e0"
}
],
"version": "1.0"
|
Summary
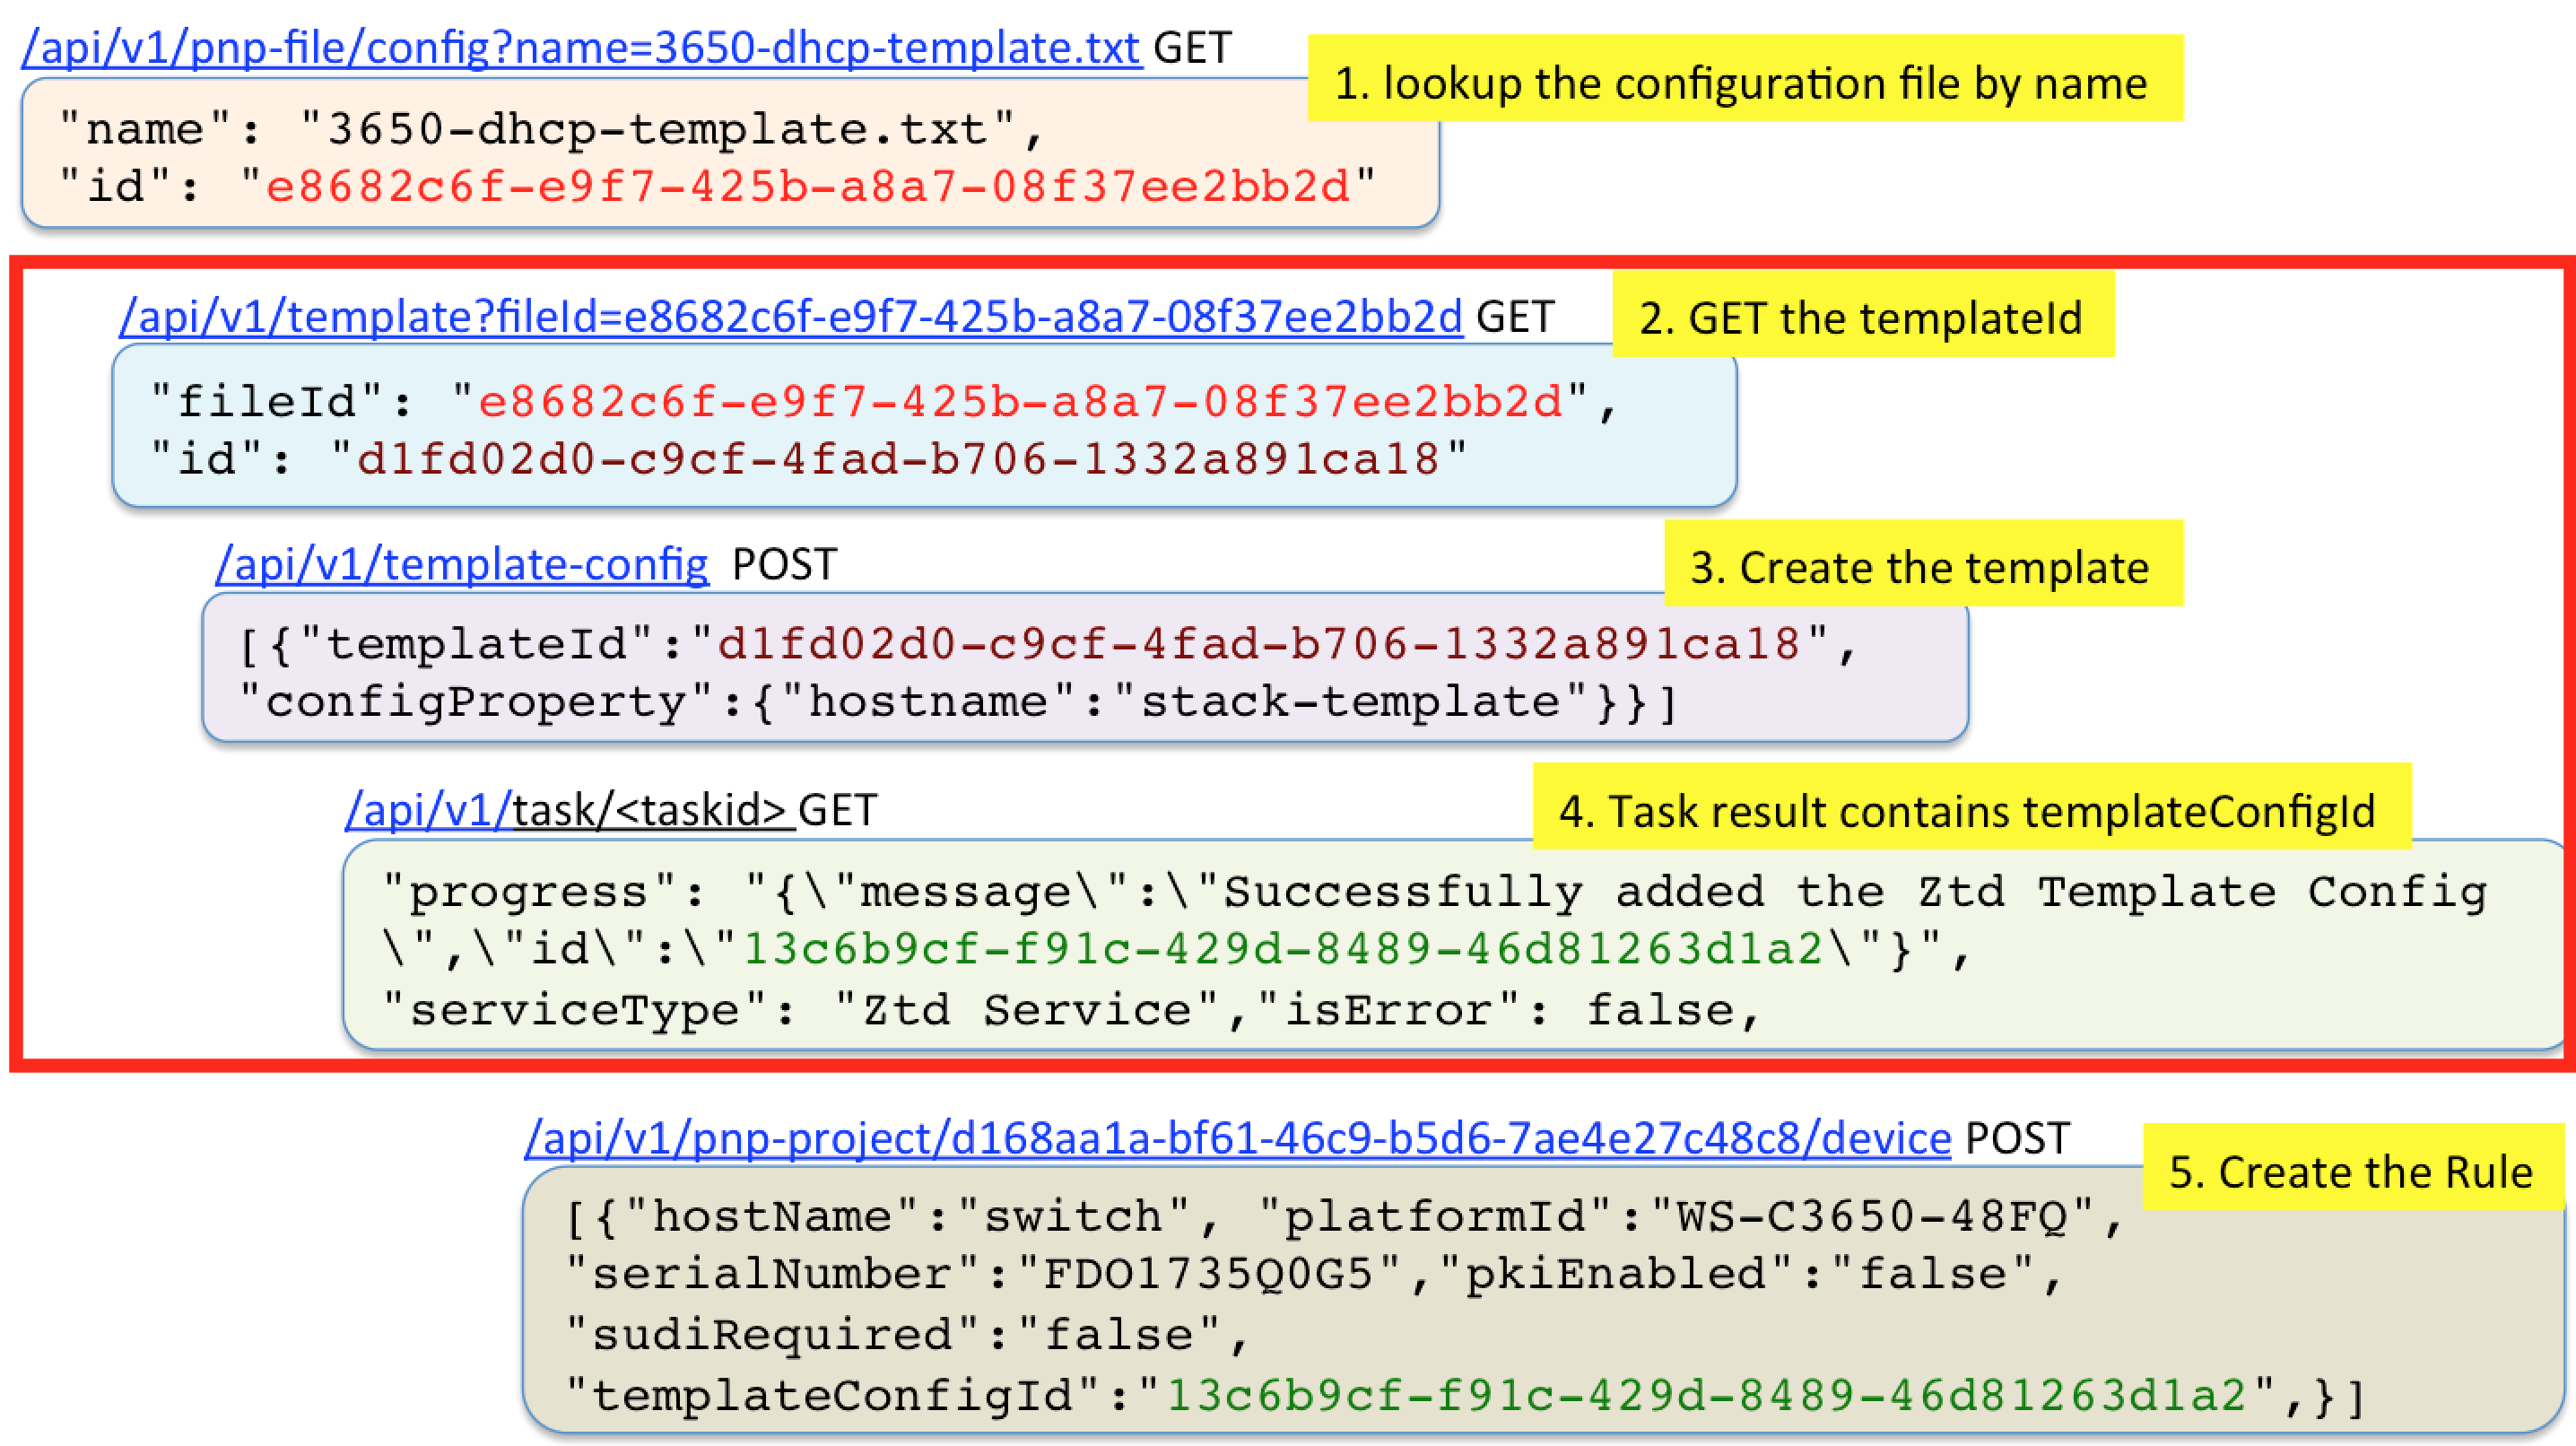
Here is a summary of the API calls above. NOTE the section in RED is the only difference compared to a standard configuration file.
What Next?
This blog covered configuration templates for PnP, native in APIC-EM. My next blog will cover some of the new EasyQoS API.
In the meantime, if you would like to learn more about this, you could come hang out with us in The Cisco Devnet DNA Community. We’ll have a continuous stream of blogs like this and you can ask questions and we’ll get you answers. In addition, we have a Github repository where you can get examples related to PnP.
Thanks for reading,
@adamradford123
