- Cisco Community
- Technology and Support
- DevNet
- DevNet Networking
- Networking Blogs
- Network Automation with Plug and Play (PnP) – Part 6
- Subscribe to RSS Feed
- Mark as New
- Mark as Read
- Bookmark
- Subscribe
- Printer Friendly Page
- Report Inappropriate Content
Continuing the story-- Stacking
This blog covers another advanced PnP use case: Stacking. Stacking can be used with any of the earlier examples, here it is with an earlier advanced use case (from blog 5): Etherchannel + trunk + Non Vlan 1 for management (NV1) + Non vlan1 native vlan.
For all of these examples I am using a 3650 switch running 3.6.5 code, but you could use versions of 16.3.1 and 3.7.4 (For other platforms such 2960x please see release notes for details. Not all 2960 support stacking).
Make sure you do not hit any keys on the console while the switch is booting, as this can interrupt the PnP process.
Setup DHCP server
The first thing needed is a mechanism for the switch to discover the controller. In our examples we are going to use DHCP, but you could also use DNS etc. as covered in earlier blogs. Here is a sample configuration for an IOS switch. The controller IP address is 10.10.10.140. Note also the use of the "5A1D" in the option 43 string. The "D" displays debug messages for PnP on the console of the PnP switch.
ip dhcp pool ZTD-switches
network 10.10.14.0 255.255.255.0
default-router 10.10.14.1
option 43 ascii "5A1D;B2;K4;I10.10.10.140;J80"
remember
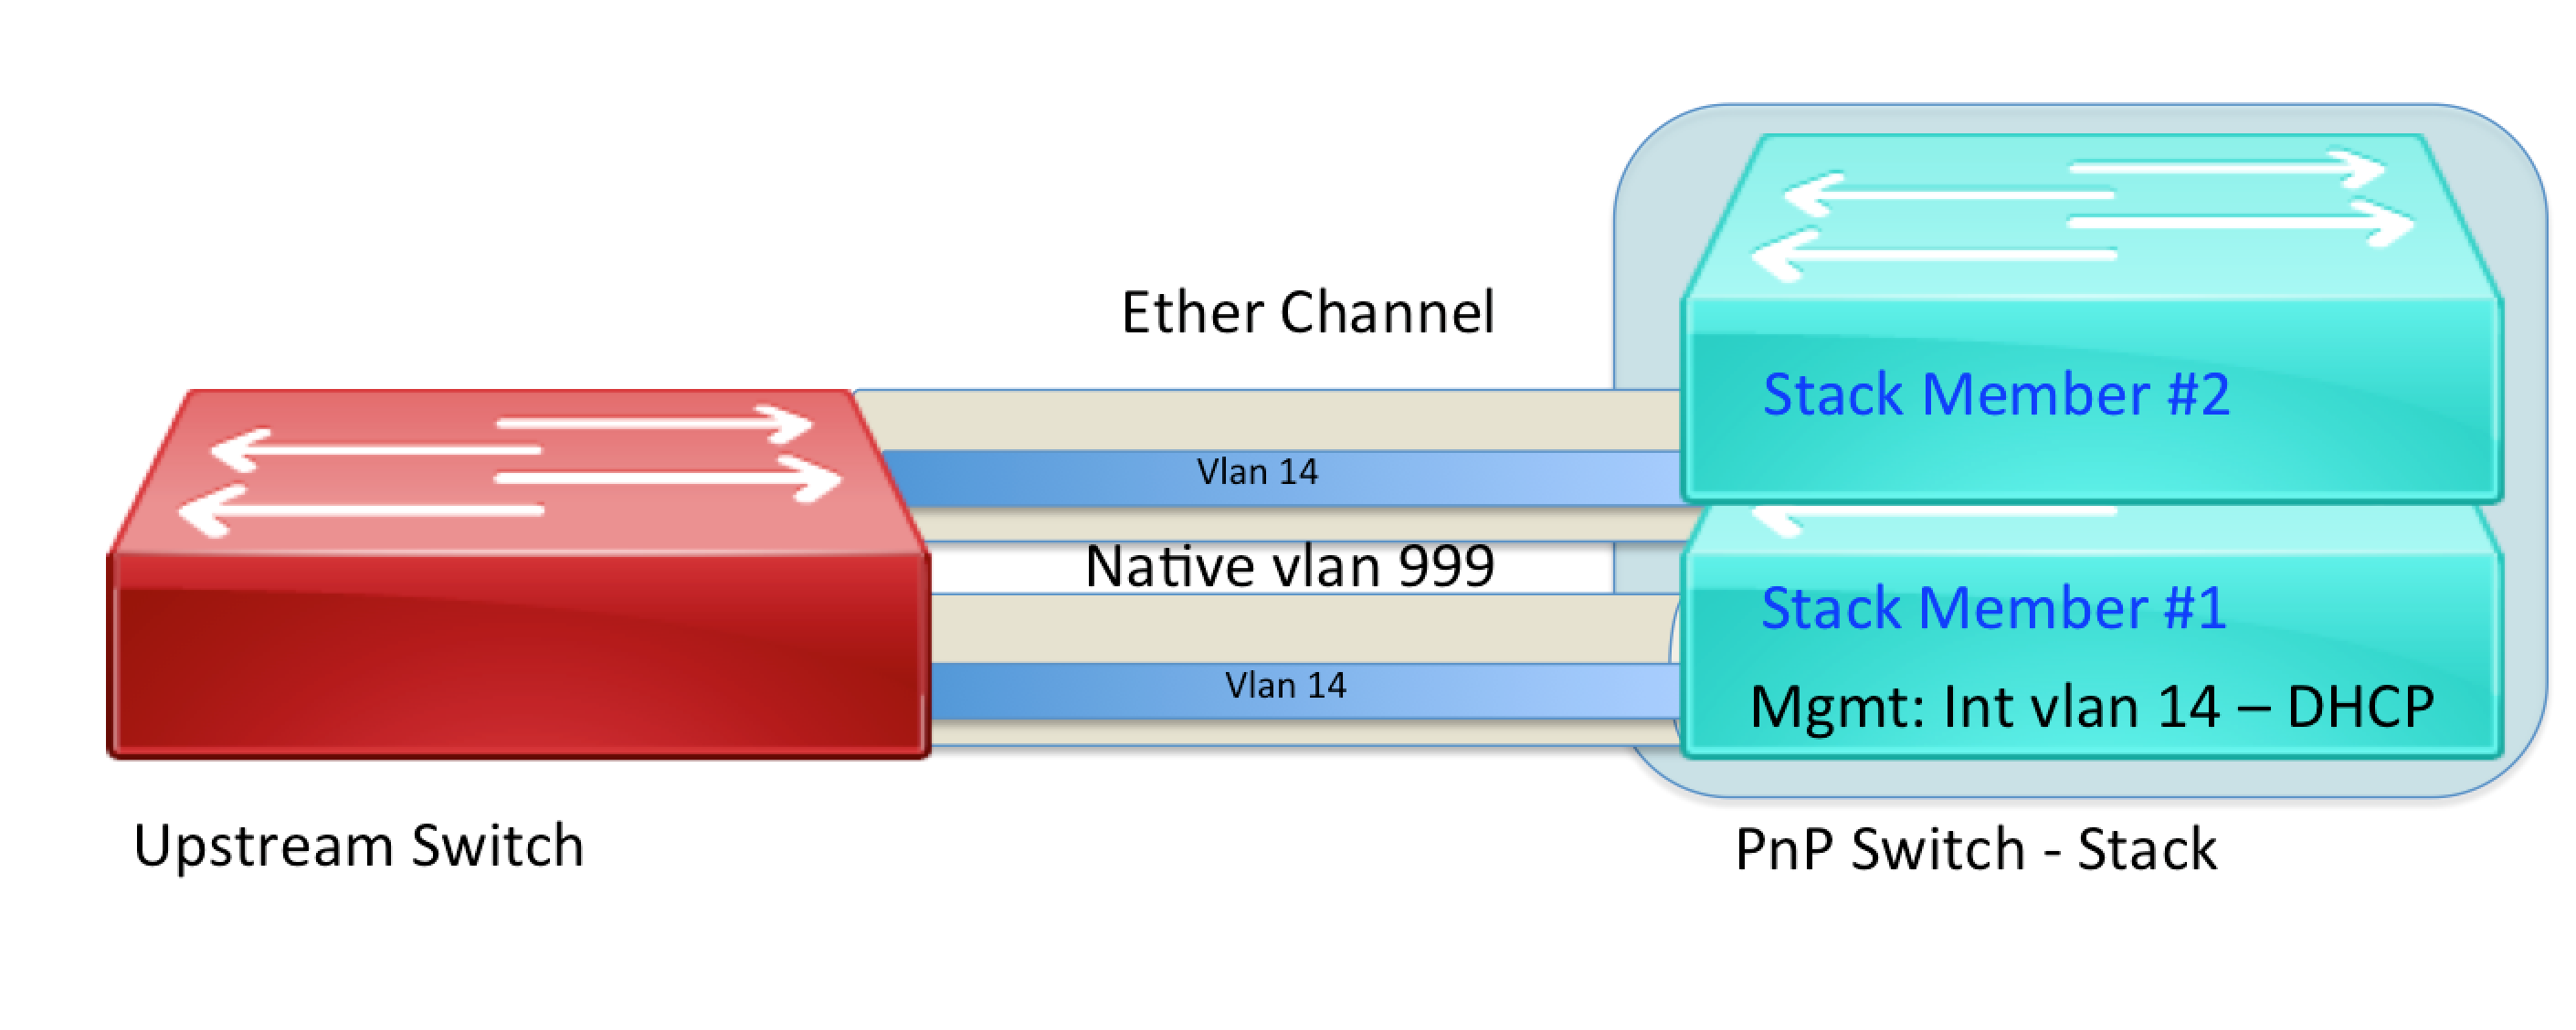
Stacking + EtherChannel + NV1 for management + NV1 Native
The switches are going to be connected by two links bound together in an ether-channel.

First a bit about stacking.
Stacking is a way of combining switches together in a unified system using a special "stackwise" port at the back of the device. In this example I am using 3650 switches. Each switch is referred to as a "member". There are three types of members:
- Active/Master: This switch "runs" the stack. It holds the running configuration. There is only ever one active switch. It is elected and can be influenced using priority. By default lowest MAC address is master.
- Standby: backup master switch. Again, there is only ever one backup switch. It takes over if the master fails.
- Member: not a master or a standby.
The default election process is to use the lowest Mac address.
You can have up to 9 switches in a stack. See the stacking configuration guide for more information about stacking.
Switch Configurations
The upstream switch needs to have an ether channel configured. To avoid issues when the PnP switch first comes up, the "no port-channel standalone-disable" command is required. If this is left out the channel will be disabled as it has not been configured on the PnP switch at boot up.
In addition the native VLAN has been set to 999.
The "pnp startup-vlan 14" command is required to create a new management VLAN on the PnP switch. By default VLAN 1 would be used.
pnp startup-vlan 14
interface Port-channel1
switchport trunk native vlan 999
switchport mode dynamic desirable
no port-channel standalone-disable
interface GigabitEthernet1/0/5
description PNP switch 3650->g1/0/1
switchport mode dynamic desirable
switchport trunk native vlan 999
channel-protocol lacp
channel-group 1 mode passive
interface GigabitEthernet1/0/6
description 2nd link to 3650 etherchannel test
switchport trunk native vlan 999
switchport mode dynamic desirable
channel-protocol lacp
channel-group 1 mode passive
The configuration of the PnP switch includes the EtherChannel. It also has native VLAN of 999.
We also need to create VLAN 999 on the switch. In this case, due to the version of IOS involved (3.6.5), it cannot be created from PnP configuration. We are using a "trick" self-destructing EEM script. The script creates VLAN 999, and then removes itself. NOTE: If using 16.3.1 code, this would not be required.
hostname 3650-dhcp
enable password xxx
!
username xxx password 0 xxx
!
ip http server
ip http secure-server
snmp-server community xxx RO
interface Port-channel1
switchport mode dynamic desirable
switchport trunk native vlan 999
no port-channel standalone-disable
!
int range g1/0/1,g1/0/3
switchport mode dynamic desirable
switchport trunk native vlan 999
channel-protocol lacp
channel-group 1 mode active
!
!
line con 0
line vty 0 4
login local
transport input ssh telnet
line vty 5 15
login local
transport input ssh telnet
!
!need this to create vlan 999 on IOS versions that do not do it automatically – self destructing EEM script
event manager applet POST_PNP
event timer countdown time 30
action 1.0 cli command "enable"
action 1.1 cli command "config t"
action 1.2 cli command "vlan 999"
action 2.0 cli command "exit"
action 2.1 cli command "no event manager applet POST_PNP"
action 2.2 cli command "end"
action 2.3 cli command "exit
end
As the switch boots up, the console shows two switches listed, which indicates a stack will be formed. In this case switch #1 has the serial number FDO1732Q00B and switch #2 has serial number FDO1735Q0G5
Switch #1 has a lower mac address than #2, so is elected master.
0K bytes of at webui:.
Base Ethernet MAC Address : 6c:41:6a:0d:e7:80
Motherboard Assembly Number : 73-15776-03
Motherboard Serial Number : FDO1731142C
Model Revision Number : A0
Motherboard Revision Number : A0
Model Number : WS-C3650-48PQ
System Serial Number : FDO1732Q00B
Switch 02
---------
Switch uptime : 6 minutes
Base Ethernet MAC Address : c0:67:af:ed:bd:80
Motherboard Assembly Number : 73-15125-05
Motherboard Serial Number : FDO17340LEC
Model Revision Number : A0
Motherboard Revision Number : A0
Model Number : WS-C3650-48PD
System Serial Number : FDO1735Q0G5
If the switch contacts the controller without a PnP rule being present, the master serial number would appear in unclaimed devices.
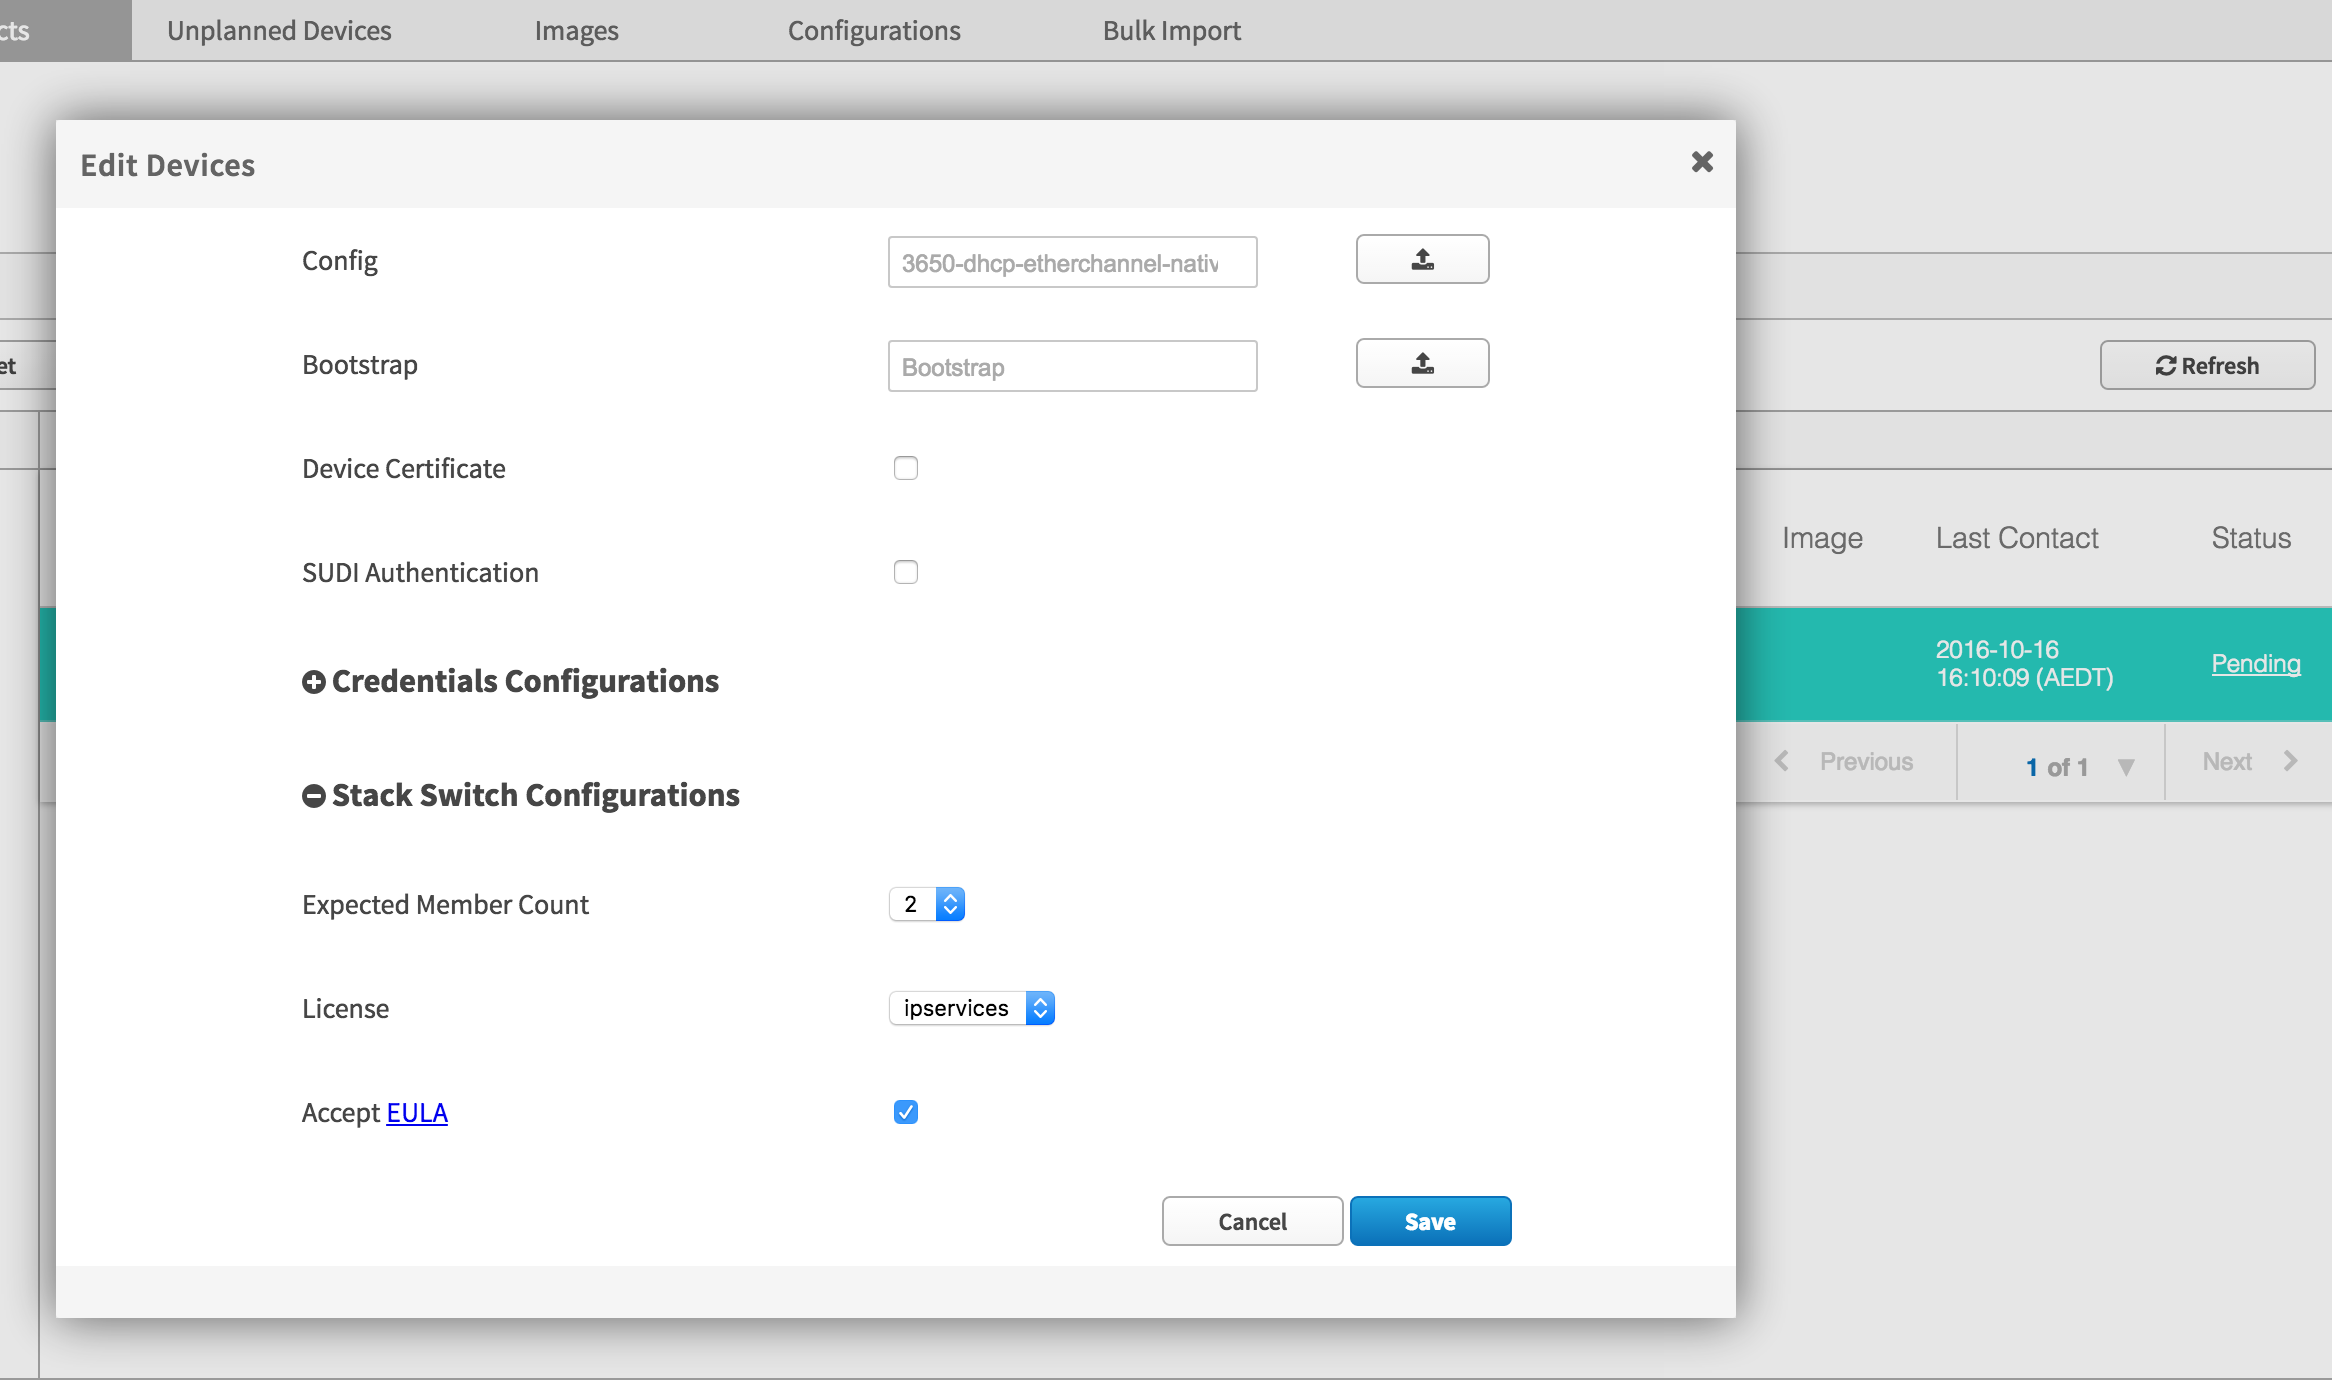
The PnP process will recognise either serial number in a rule. To prove this, I am going to create a PnP rule that matches the backup switch (#2) FDO1735Q0G5.
I also need to indicate the number of stack members, the licence for the stack (all members need to have the same license) and accept the EULA (licence agreement).

Here is the rule. Notice that it is using the serial number of what will be the backup switch. I could have also included an image to upgrade the stack. In that case, the new image would be downloaded, the stack rebooted, then the configuration downloaded.

At this point, the PnP process is going to proceed identically to the single switch scenario.
"pnp startup-vlan 14" will use CDP to create VLAN 14 on the stack, get it to use DHCP to get an IP Address, and put all active interfaces in VLAN 14.
The DHCP option 43 attribute will indicate the controller to connect to. A rule has been defined in advance, so the PnP process will kick off automatically.
The configuration will be downloaded, and the EEM script will create VLAN 999, before removing itself.
The running configuration, certificates and licences will also be synced to the standby.
I wrote a little script to monitor the steps (from the PnP status API) and record the times taken (in seconds). It takes 11mins to reboot the stack (706 seconds) and another 7 minutes to deploy the device (including a certificate).
$ python ./watch_provision.py FDO1735Q0G5
Watching unclaimed for serial:FDO1735Q0G5
16:39:33: Duration (0) Pending
16:51:19: Duration (706) Getting Device Info
16:51:27: Duration (714) Establishing Secure Channel
16:51:41: Duration (728) Getting Device Info
16:51:54: Duration (741) Clearing Certificate Bundle
16:51:59: Duration (746) Getting Device Info
16:54:45: Duration (913) Waiting for Resource
16:55:48: Duration (975) Deploying Device Certificate
16:55:52: Duration (980) Deploying Config
16:58:57: Duration (1164) Provisioned
16:58:59: Completed (1164):
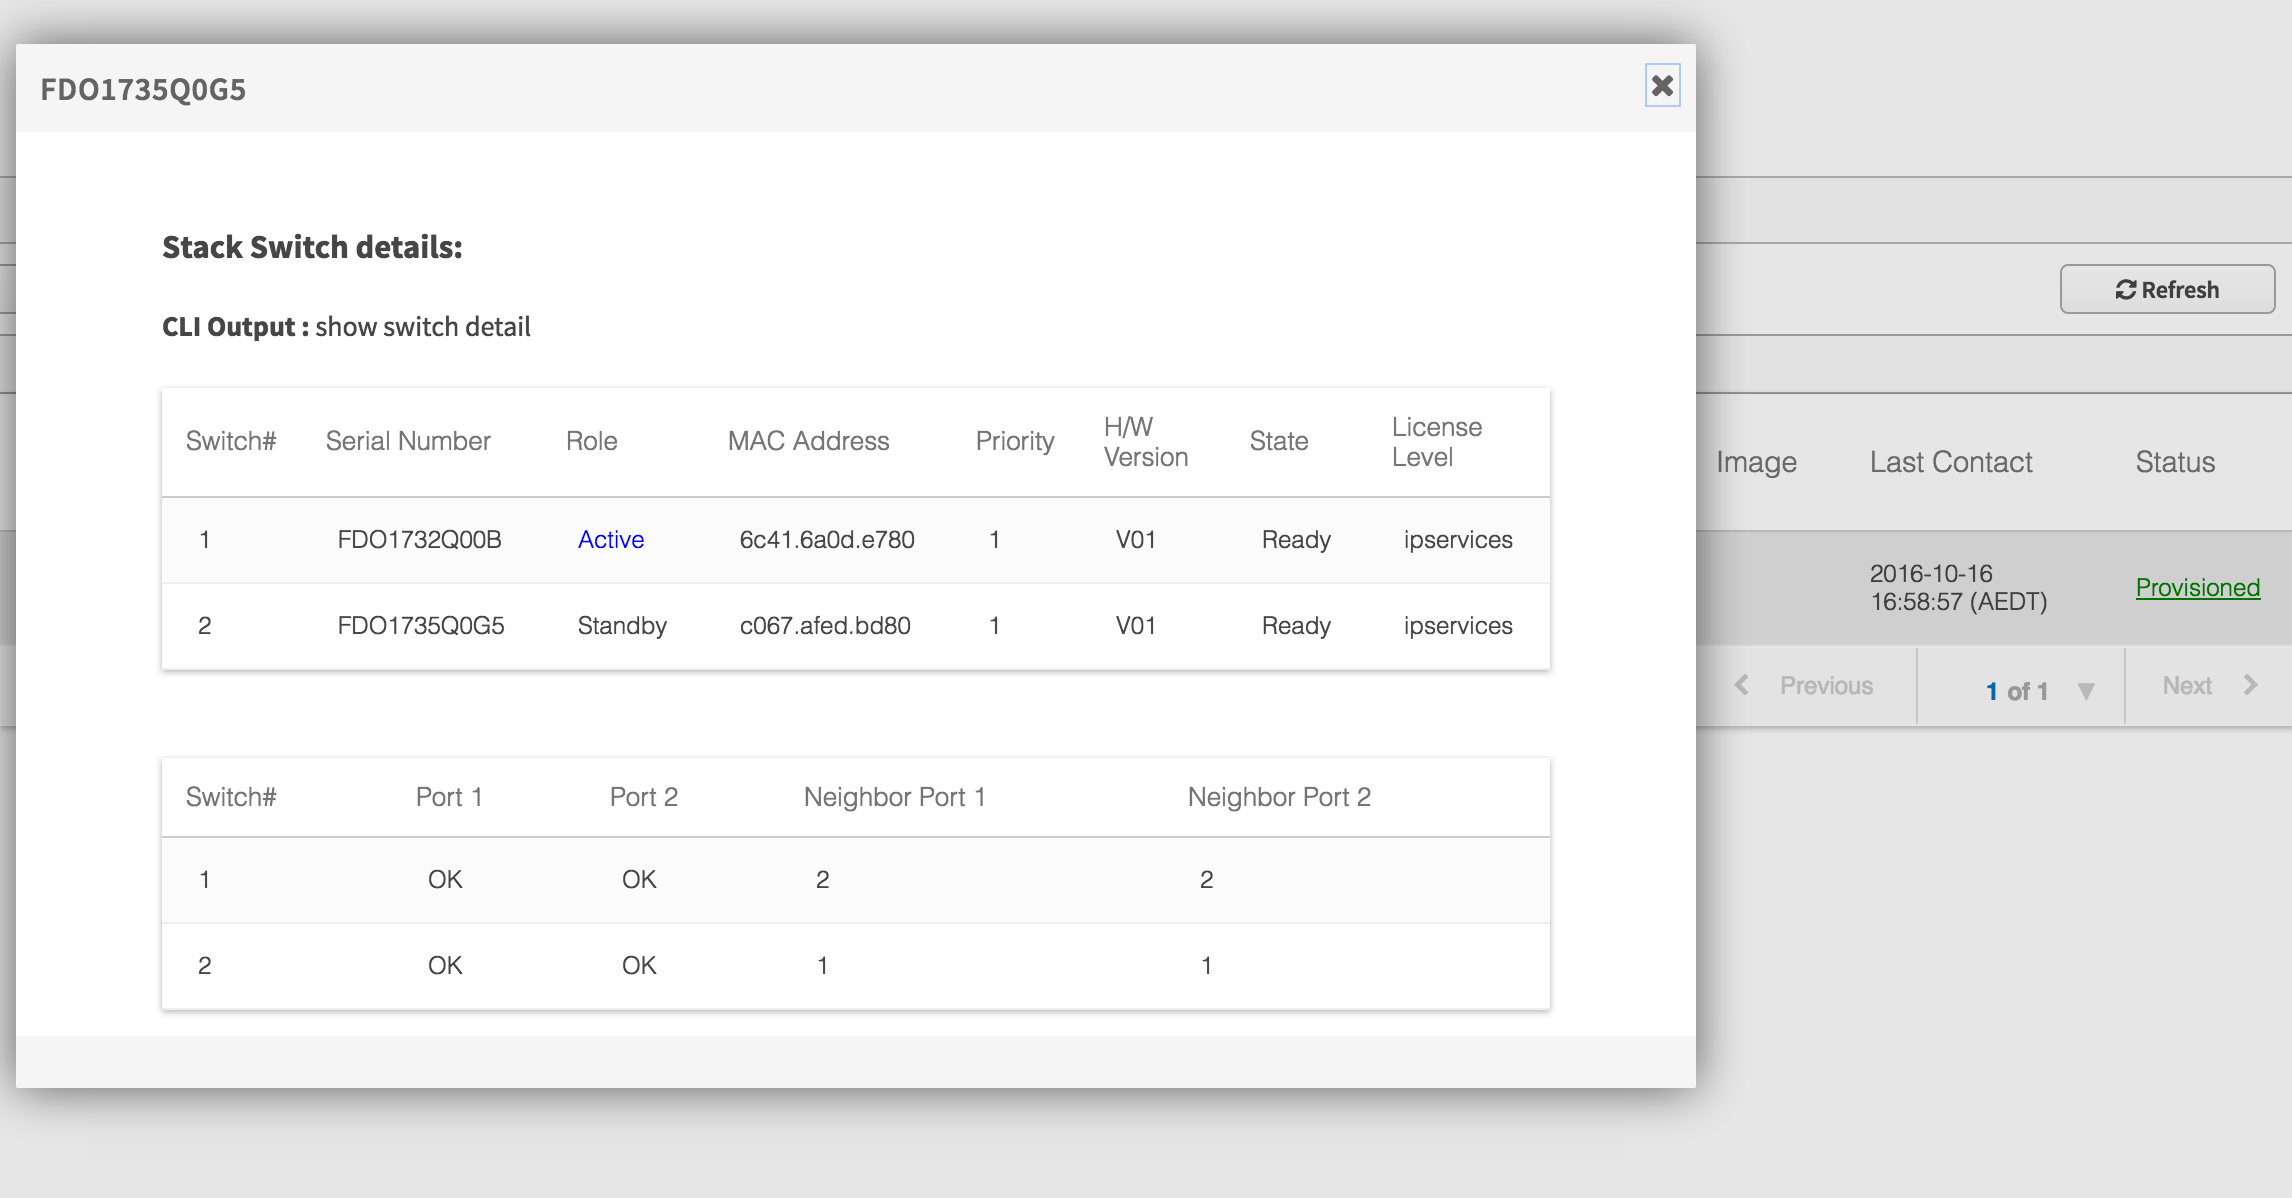
Taking a look at the PnP application on the controller, it shows the stack has been provisioned correctly.

Clicking on the stacking link (in red box), the controller knows both switches that are part of the stack. If I had a larger stack, all members would be shown.

As in the single switch mode, you can see the status of the ether-channel. Both ports are active and a part of the ether-channel
3650-dhcp# show int port-channel 1 etherchannel
Port-channel1 (Primary aggregator)
Age of the Port-channel = 0d:00h:04m:53s
Logical slot/port = 12/1 Number of ports = 2
HotStandBy port = null
Port state = Port-channel Ag-Inuse
Protocol = LACP
Port security = Disabled
Standalone = Enabled (independent mode)
Ports in the Port-channel:
Index Load Port EC state No of bits
------+------+------+------------------+-----------
0 00 Gi1/0/1 Active 0
0 00 Gi1/0/3 Active 0
Time since last port bundled: 0d:00h:04m:49s Gi1/0/3
This also shows VLAN999 is now the native VLAN
3650-dhcp#show int port-channel 1 trunk
Port Mode Encapsulation Status Native vlan
Po1 desirable 802.1q trunking 999
Port Vlans allowed on trunk
Po1 1-4094
Port Vlans allowed and active in management domain
Po1 1,14,999
Port Vlans in spanning tree forwarding state and not pruned
Po1 1,14,999
Practical Tips
Member Number
The stack interfaces are based on the member number. For example member number 1, will have interfaces gig1/0/1-48 and member #2 will be gig2/0/1-48 etc. If the switches are physically stacked in a different order to the logical member numbers, this can be confusing. The member number can be overwritten, but a magic EEM script is required to do this. You can delay the boot time of the switches by 20sec to get the to join the stack in the order you want (top to bottom).
Clean Up Tips
If you are testing in a lab, you are likely to be reusing switches for your testing. A switch is only ever "out of the box" on the first occasion, so you will need to reset it back to defaults. Most people are familiar with the "wr er; reload" sequence that erases the configuration and reloads the device.
There are also a couple of other things needed to remove other state information stored outside the configuration file. This is not usually required, but do this if you are having issues with testing.
# remove the certificates on active and standby
delete /force nvram:*.cer
delete /force stby-nvram:*.cer
# remove vlan data based from active and standby
delete /force flash-1:vlan.dat
delete /force flash-2:vlan.dat
# remove certificates from memory. NOTE: you will not be able to SSH after this
conf t
crypto key zeroize
yes
end
Need spare flash for upgrading software.
It is important to check there is enough spare flash if upgrading. Make sure you check both the active and standby. You can reference the master as "flash-1:" and the standby as "flash-2:". Here is an example of a failed upgrade (and full flash) on the standby.
Switch#dir flash-2:
Directory of flash-2:/
15490 -rw- 1236 Jul 2 2016 12:08:52 +00:00 packages.conf.00-
15497 -rw- 676 Oct 15 2016 04:57:08 +00:00 vlan.dat
15493 -rw- 1236 Jul 2 2016 04:39:03 +00:00 packages.conf.01-
15495 -rw- 1244 Jul 2 2016 04:19:23 +00:00 packages.conf.02-
15492 -rw- 8042 Oct 14 2016 07:35:49 +00:00 pnp-reset-config.cfg
30979 -rw- 83297376 Jul 2 2016 12:08:47 +00:00 cat3k_caa-base.SPA.03.06.05E.pkg
30980 -rw- 4012732 Jul 2 2016 12:08:47 +00:00 cat3k_caa-drivers.SPA.03.06.05E.pkg
15502 -rw- 10838 Jun 25 2016 09:10:07 +00:00 pre-qos-initial
15496 -rw- 1236 Oct 14 2016 07:49:50 +00:00 packages.conf
15506 -rw- 2097152 Oct 15 2016 05:12:22 +00:00 nvram_config
30984 -rw- 111260480 Jul 2 2016 12:08:48 +00:00 cat3k_caa-wcm.SPA.10.2.150.0.pkg
46468 drwx 4096 Nov 27 2015 07:36:17 +00:00 onep
69697 drwx 4096 Oct 11 2015 07:00:57 +00:00 vman_fdb
30981 -rw- 33786860 Jul 2 2016 12:08:47 +00:00 cat3k_caa-infra.SPA.03.06.05E.pkg
30982 -rw- 43048256 Jul 2 2016 12:08:47 +00:00 cat3k_caa-iosd-universalk9.SPA.152-2.E5.pkg
30983 -rw- 28343180 Jul 2 2016 12:08:47 +00:00 cat3k_caa-platform.SPA.03.06.05E.pkg
15491 -rw- 303753780 Sep 8 2016 19:13:33 +00:00 cat3k_caa-universalk9.SPA.03.06.05.E.152-2.E5.bin
15494 -rw- 328157104 Oct 14 2016 07:47:28 +00:00 cat3k_caa-universalk9.SPA.03.07.04.E.152-3.E4.bin
46467 drwx 4096 Oct 11 2015 07:00:57 +00:00 virtual-instance
77441 drwx 4096 Oct 15 2016 04:56:02 +00:00 dc_profile_dir
77443 drwx 4096 Oct 11 2015 07:02:23 +00:00 wnweb_store
30978 -rw- 81992100 Oct 14 2016 07:49:47 +00:00 cat3k_caa-base.SPA.03.07.04E.pkg
15498 -rw- 82665136 Jul 2 2016 04:19:18 +00:00 cat3k_caa-base.SPA.03.06.04.E.pkg
30985 -rw- 5667516 Oct 14 2016 07:49:47 +00:00 cat3k_caa-drivers.SPA.03.07.04E.pkg
15499 -rw- 4913852 Jul 2 2016 04:19:18 +00:00 cat3k_caa-drivers.SPA.03.06.04.E.pkg
15501 -rw- 33784816 Jul 2 2016 04:19:18 +00:00 cat3k_caa-infra.SPA.03.06.04.E.pkg
15503 -rw- 43021636 Jul 2 2016 04:19:18 +00:00 cat3k_caa-iosd-universalk9.SPA.152-2.E4.pkg
15504 -rw- 27417488 Jul 2 2016 04:19:18 +00:00 cat3k_caa-platform.SPA.03.06.04.E.pkg
15505 -rw- 111180608 Jul 2 2016 04:19:19 +00:00 cat3k_caa-wcm.SPA.10.2.140.0.pkg
30986 -rw- 36656136 Oct 14 2016 07:49:47 +00:00 cat3k_caa-infra.SPA.03.07.04E.pkg
30987 -rw- 46349632 Oct 14 2016 07:49:47 +00:00 cat3k_caa-iosd-universalk9.SPA.152-3.E4.pkg
30988 -rw- 28904332 Oct 14 2016 07:49:47 +00:00 cat3k_caa-platform.SPA.03.07.04E.pkg
30989 -rw- 128582464 Oct 14 2016 07:49:48 +00:00 cat3k_caa-wcm.SPA.10.3.141.0.pkg
15500 -rw- 48214016 Oct 15 2016 05:12:05 +00:00 cat3k_caa-universalk9.SPA.03.07.02.E.152-3.E2.bin
1622147072 bytes total (0 bytes free)
This can be resolved with the "software clean" command.
What Next?
This blog covered an advanced deployment models for network plug and play. Other blogs in the series have covered simpler deployment models and the API and how to automate the creation, upload of configuration files as well as the automation of rules. In future I will cover some of new enhancements coming in the 1.3 release, including configuration templates, native in APIC-EM.
In the meantime, if you would like to learn more about this, you could come hang out with us in The Cisco Devnet DNA Community. We’ll have a continuous stream of blogs like this and you can ask questions and we’ll get you answers. In addition, we have a Github repository where you can get examples related to PnP.
Thanks for reading,
You must be a registered user to add a comment. If you've already registered, sign in. Otherwise, register and sign in.
Find answers to your questions by entering keywords or phrases in the Search bar above. New here? Use these resources to familiarize yourself with the community: