Introduction
The OSPFv3 neighbor adjacency is formed by sending and receiving the hello packet to the neighbor router. To identify the neighbors, OSPFv3 uses router-id. The protocol has to be enabled on per-link basis. This document discuss about the common issues that occurs when forming neighbor adjacency and how to troubleshoot them.
Prerequisite
It is assumed that the reader has an understanding of IPv6 and OSPF routing protocol.
Background Information
The three routers (R1and R2 ) in the network diagram are connected via serial interfaces communicate with each other using OSPFv3.The routers are configured with loopbacks and OSPFv3 is advertised on each interface using the command ipv6 ospf <process id> area <area id>.
Topology Diagram

Configuration
Please see attached files Router R1and Router R2
Note: All configurations are tested on Cisco 7200 Router running IOS 15.0(1)M5 software.
Troubleshooting Steps
Step1. Area ID
Symptom Error Message:%OSPFv3-4-AREA_MISMATCH: Received packet with incorrect area from FE80::C801:5FF:FEF8:0, Serial1/0, area 0.0.0.0, packet area 0.0.0.1
Verify that the Area ID is configured correctly by command show ipv6 ospf interface brief

Note: As seen from the output, the interface serial1/0 which is connecting to the router R2 is configured in area 0, however Router R2 (packet area 0.0.0.1) as indicated by the error message is configured to be in area 1.
Step2. Connectivity to the Remote Network
- Ping the neighbor by command ping ipv6 X:X:X:X::X
- Verify that ospf neighbor is listed in the neighbor table by using the command show ipv6 ospf neighbor detail.
- Check whether the routes are learnt via the neighbor by using the command show ipv6 route ospf.
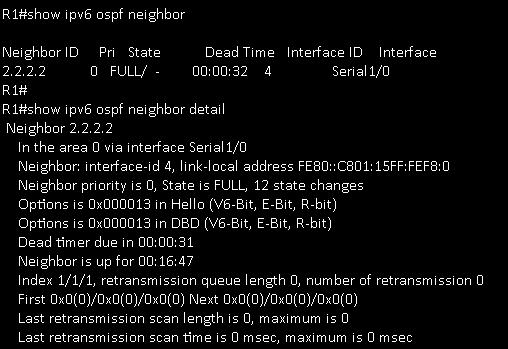
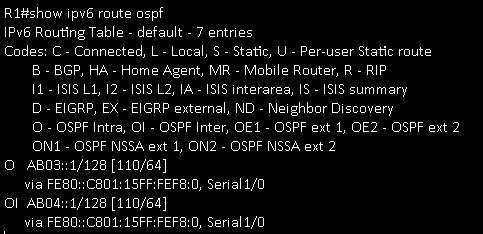
Note: In this scenario, the loopback addresses AB03::1/128 and AB04::1/128 are learnt using link-local address FE80::C801:15FF:FEF8:0 via serial1/0 using OSPFv3.
Step3. OSPFv3 Timers
Symptom Error Message:%OSPFv3-5-ADJCHG: Process 1, Nbr 2.2.2.2 on Serial1/0 from FULL to DOWN, Neighbor Down: Dead timer expired
Check OSPFv3 timers. Note that the dead interval on an interface must be at least four times the hello interval. You can check the OSPFv3 timers on an interface by using the command show ipv6 ospf <process id> <area id> interface
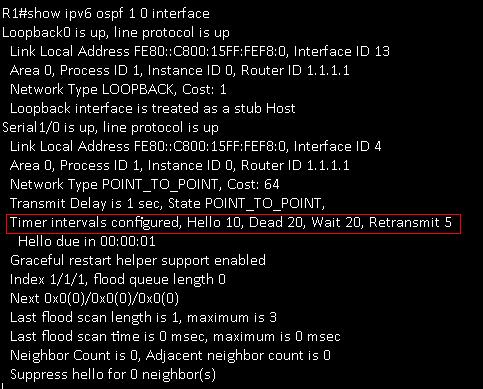
Note: In the above output, the dead interval is wrongly configured as 20 seconds. You can change the value of hello/dead interval by using the command
ipv6 ospf hello-interval<1-65535>Seconds and ipv6 ospf dead-interval<1-65535>Seconds.
Step4. Authentication
Check for authentication being used on the OSPFv3 process.The authentication type has to be the same between neighbors. For example, in the case of MD5, the passwords and key should be the same.Also check whether the authentication is enabled on all routers within the area.You can use the command show ipv6 ospf <process id> to check whether authentication is enabled in OSPFv3.
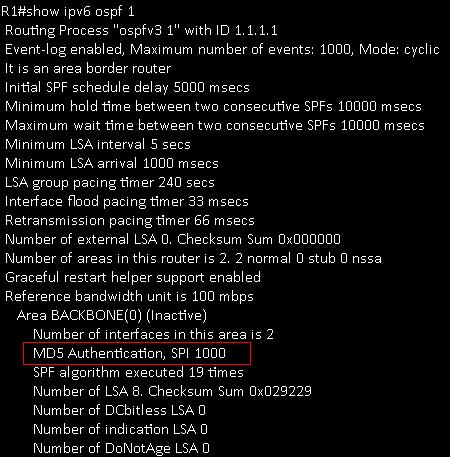
Note: In the above output, the OSPFv3 uses MD5 authentication.
Step5. Network Type
Check the OSPFv3 network type by using the command show ipv6 ospf. The interfaces should be configured of the same network type.
You can use the command show ipv6 ospf interface
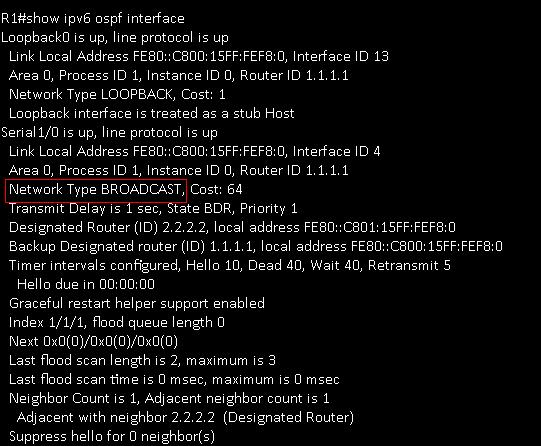
Note: In this example, changed the network type of router R1 from the from the default POINT_To_POINT to Broadcast in serial1/0. You can change the network type by using the command ipv6 ospf network
Step6. Access-List/Routing policy
Check whether an ACL or routing policy is blocking OSPFv3.
Step7. Run Debug Command
Make use of various debug commands. Some of the debug commands are listed below :
debug ipv6 ospf adj displays OSPFv3 adjacency events such as DR selection, SPF calculation
debug ipv6 ospf hello displays hello packet information
debug ipv6 ospf packets displays information on every ospfv3 packet received
debug ipv6 ospf flood displays flooding information
References
Implementing OSPFv3
Cisco IOS IPv6 Command References
Sample Configuration for OSPFv3