- Cisco Community
- Technology and Support
- Security
- Security Knowledge Base
- VPN inline Posture using iPEP ISE and Cisco ASA
- Subscribe to RSS Feed
- Mark as New
- Mark as Read
- Bookmark
- Subscribe
- Printer Friendly Page
- Report Inappropriate Content
- Subscribe to RSS Feed
- Mark as New
- Mark as Read
- Bookmark
- Subscribe
- Printer Friendly Page
- Report Inappropriate Content
05-14-2012 03:50 AM - edited 02-21-2020 09:58 PM
- Introduction
- Inline PEP Client Authorization Flow
- Topology
- ASA Configuration
- ISE Configuration
- Basic Configuration
- Deployment Mode Configuration
- Filters Configuration
- Radius Configuration
- Static Routes
- Logging
- Authentication and Posture Configuration
- Posture Profiles Configuration
- Unknown dACL
- Unknown Profile
- Compliant dACL
- Compliant Profile
- Authorization Configuration
- Result
Introduction
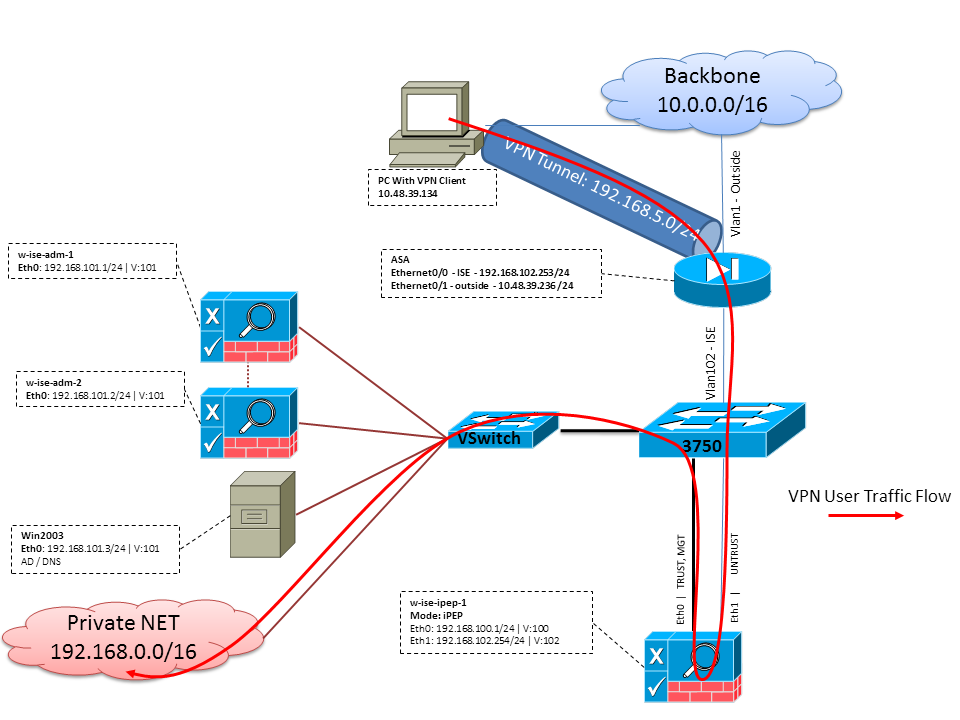
In this Document we will see how to setup inline posture with an ASA and an ISE. Versions used are 8.2(4) for the ASA and 1.1.0.665 for the ISE.
The ISE provide a lot of AAA Services (Posture, Profiling, Authentication etc). While some Network Devices (NAD) supports Radius Change Of Authorization (CoA) that allows to dynamically change the authorization profile of an end device based on its Posture or Profiling result, some other NADs like the ASA doesn't support (Yet) this feature. This means that we need an ISE running in Inline Posture Enforcement mode (iPEP) to dynamically change the network access policy of an end device.
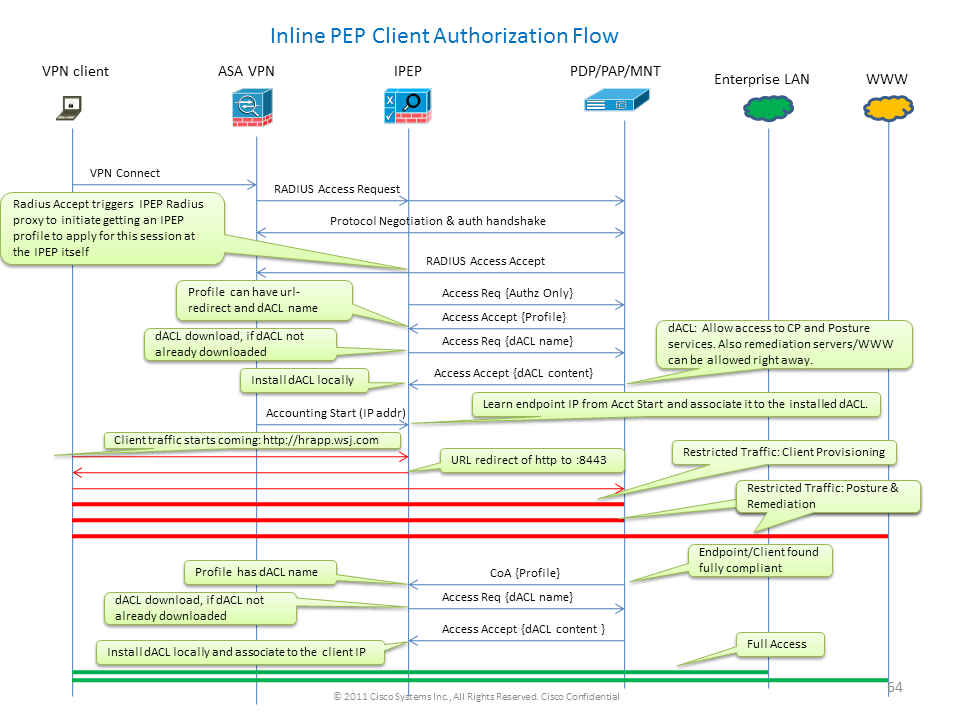
The base principle is that all user traffic will go thru the iPEP ISE, and this box will also act as a Radius Proxy, meaning the general steps are the followings:
-VPN User logs in
-ASA Sends the request to the iPEP ISE
-the iPEP ISE rewrite the request (it adds some Cisco AV-PAIR attributes to indicate this is iPEP Auth) and sends the request to the Policy ISE
-the Policy ISE replies back to the iPEP which will forward to the NAD
-If the user is authenticated, the NAD HAS TOsend an accounting-start request (see CSCtz84826). This will trigger the session initiation on the iPEP. At this stage basically, the user is redirected for posture. Additionally, we need to enable interim-accounting-update for tunnel established from the WEBVPN Portal, as the ISE Expect to have the attribute framed-ip-address in the radius accounting, but when connecting to the portal, the VPN IP Address of the client is not yet known, as the tunnel is not established. This will ensure that the ASA will send interim updates, like when the tunnel will be established.
-The user goes through the posture assessment, and then the policy ISE will update the session via CoA on the iPEP based on the Posture Result.
Inline PEP Client Authorization Flow
Topology
ASA Configuration
The ASA Configuration is simple IPSEC Remote VPN, therefore I won't go through it in details:
!
interface Ethernet0/0
nameif ISE
security-level 50
ip address 192.168.102.253 255.255.255.0
!
interface Ethernet0/1
nameif outside
security-level 0
ip address 10.48.39.236 255.255.255.0
!
access-list split extended permit ip 192.168.0.0 255.255.0.0 any
!
aaa-server ISE protocol radius
interim-accounting-update !Mandatory if tunnel established from WEBVPN Portal
aaa-server ISE (ISE) host 192.168.102.254! this is the iPEP IP
key cisco
crypto ipsec transform-set TS1 esp-aes esp-sha-hmac
crypto ipsec security-association lifetime seconds 28800
crypto ipsec security-association lifetime kilobytes 4608000
crypto dynamic-map DMAP1 10 set transform-set TS1
crypto dynamic-map DMAP1 10 set reverse-route
crypto map CM1 10 ipsec-isakmp dynamic DMAP1
crypto map CM1 interface outside
crypto isakmp enable outside
crypto isakmp policy 1
authentication pre-share
encryption aes
hash sha
group 2
lifetime 86400
!
ip local pool VPN 192.168.5.1-192.168.5.100
!
group-policy DfltGrpPolicy attributes
dns-server value 192.168.101.3 ! The VPN User needs to be able to resolve the CN from the ISE HTTPS Certificate (which is sent in the radius response)
vpn-tunnel-protocol IPSec svc webvpn
split-tunnel-policy tunnelspecified
split-tunnel-network-list value split
address-pools value VPN
!
tunnel-group cisco general-attributes
address-pool VPN
authentication-server-group ISE
accounting-server-group ISE ! Doesn't work without this (see introduction)
!
tunnel-group cisco ipsec-attributes
pre-shared-key cisco
!
route outside 0.0.0.0 0.0.0.0 10.48.39.5 1
route ISE 192.168.0.0 255.255.0.0 192.168.102.254 1 !We need to make sure the traffic to the local subnets are going through the inline ISE
!
ISE Configuration
iPEP Configuration
The first thing to do is to add an ISE as an iPEP Node. You can find additional info about the process here:
http://www.cisco.com/en/US/docs/security/ise/1.1/user_guide/ise_ipep_deploy.html#wp1110248.
Here's basically what you have to configure in the various tab (the screenshots below are illustrating this):
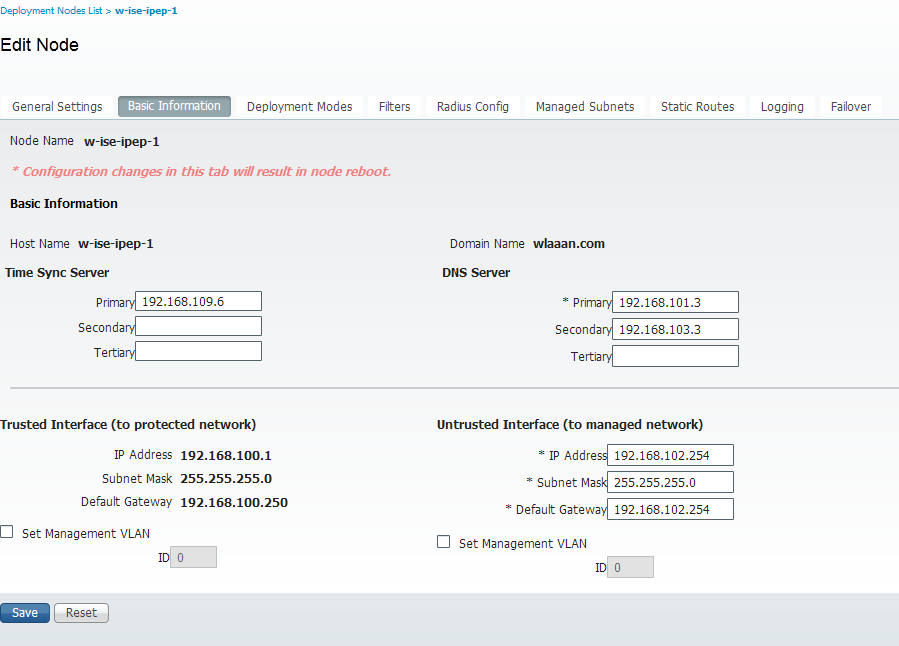
-Configure untrusted IP & Global IP settings (in our case, untrusted IP is 192.168.102.254)
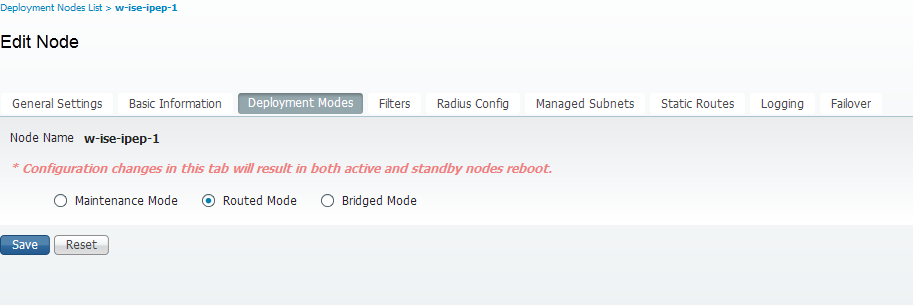
-Deployement will be routed mode
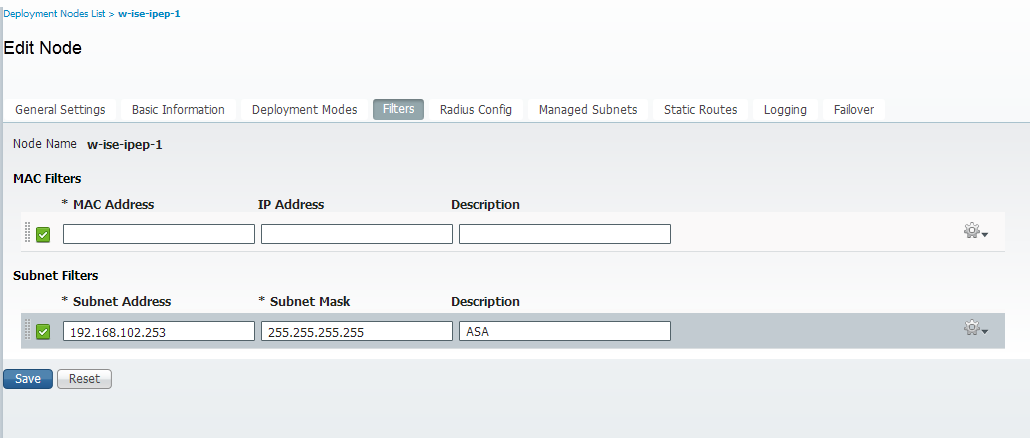
-Put a static Filter for the ASA to be allowed to go through the iPEP box (otherwise Connectivity to/from the ISE thru iPEP box will be dropped)
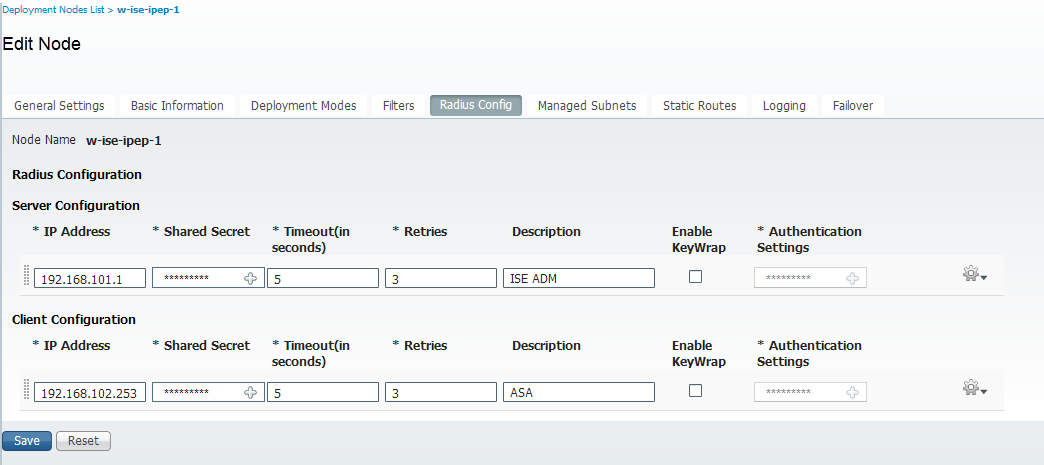
-Configure our Policy ISE as Radius server and our ASA as radius client
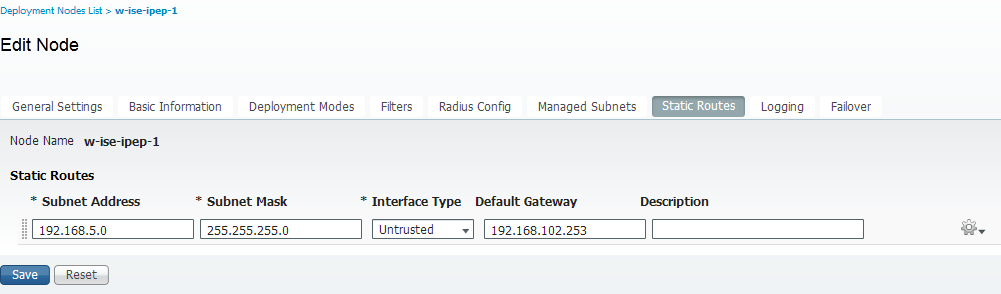
-Add a route to the VPN Subnet pointing to the ASA
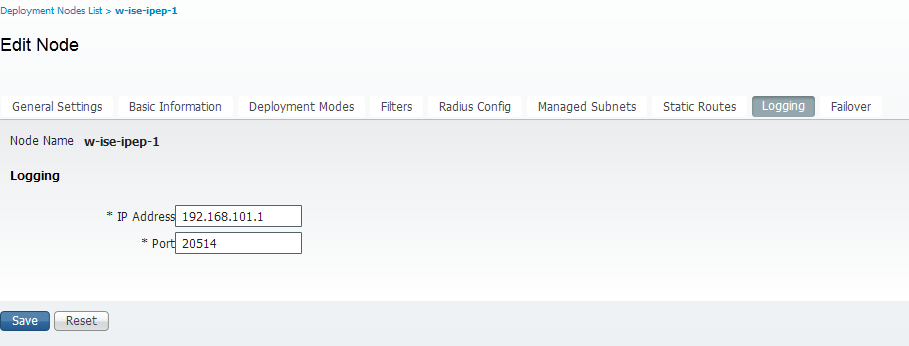
-Set the Monitoring ISE as the Logging Host (port 20514 by default, in our case the policy ISE is doing monitoring too)
Basic Configuration
Deployment Mode Configuration
Filters Configuration
Radius Configuration
Static Routes
Logging
Authentication and Posture Configuration
There's is 3 posture states:
- Unknown: Posture is not yet made
- Compliant: Posture is made and the system is Compliant
- Non-Compliant: Posture is made, but the system failed at least one check
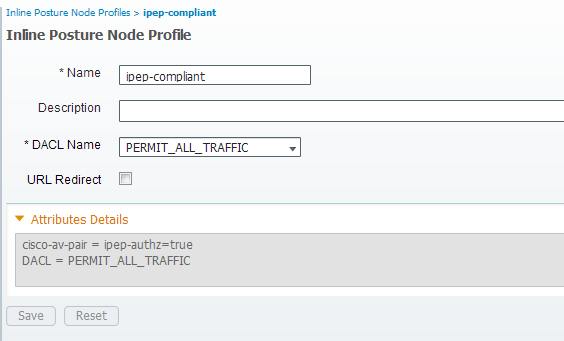
So now we have to create the authorization profiles (which will be Inline Authorization Profiles: This will add the ipep-authz=true attribute in the Cisco AV-Pair) that will be used for the differents case.
Commonly, the Unknown profile returns the redirect url (posture discovery) which will forward the traffic of the user to the ISE and will ask to install the NAC Agent. If the NAC Agent is already installed, this will allow its HTTP Discovery request to be forwarded to the ISE.
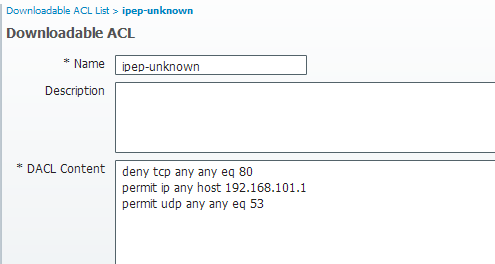
In this profile, we put an ACL that allows HTTP Traffic to the ISE and DNS at least.
The Compliant and Non compliant profiles usually returns a Downloadable ACL to grant network access based on the user profile. (Non compliant profile can allow the users to access a web server to download an Antivirus for example, or grant limited network access).
In our example, I will only create the unknown and compliant profile, and I will check for the presence of notepad.exe as requirements.
Posture Profiles Configuration
The first thing to do is to create the Downloadable ACLs and profiles:
I will have the following (Note: This is not mandatory to have the dACL name matching the profile name)
- Compliant
- ACL: ipep-unknown
- Authorization Profile: ipep-unknown
- Non Compliant
- ACL: ipep-non-compliant
- Authorization Profile: ipep-non-compliant
See the screenshots below:
Unknown dACL
Unknown Profile

Compliant dACL

Compliant Profile
Authorization Configuration
Now that we have our profile, we need to match the Radius Request coming from our iPEP and apply to them the right profiles. I have defined my iPEP ISEs with a special device type that I will use in my Authorization rules:
NADs

Authorization

Note: if the agent is not installed on the machine, you may define Client Provisionning rules. Ok, now we're all set, let's go testing!
Result
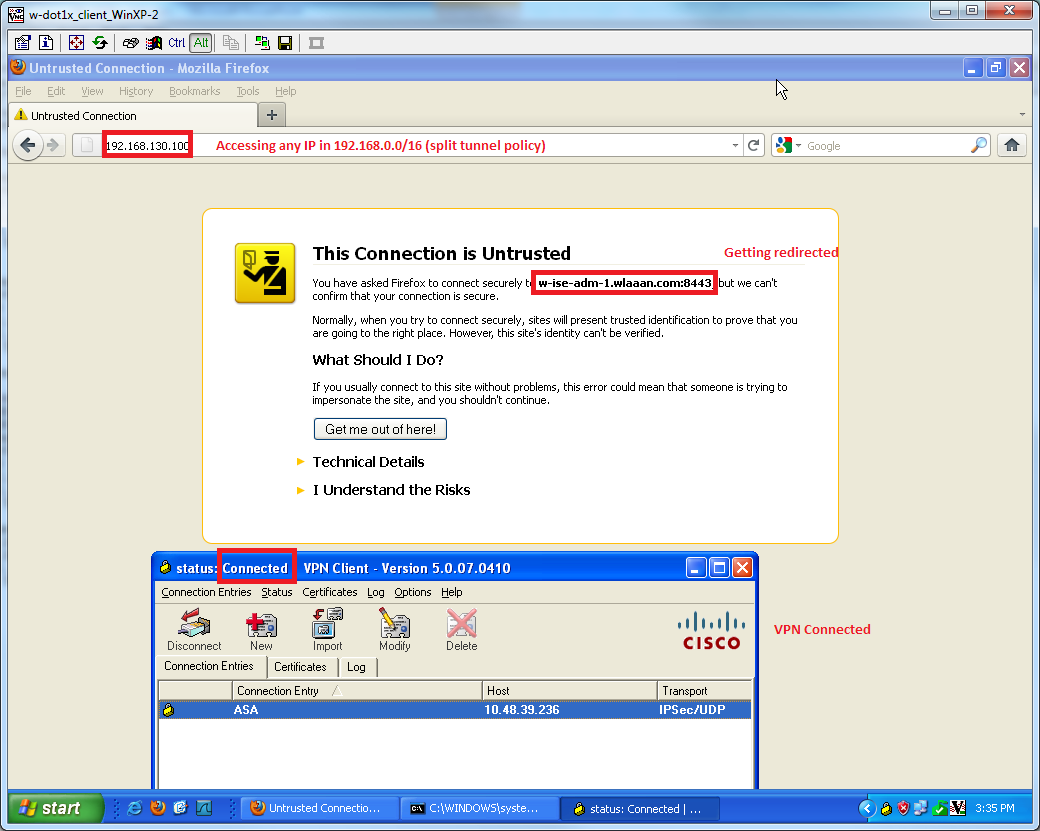
And i'm now prompted to install the agent (as I have client proviosionning already set):

Some output at this stage:
ciscoasa# show vpn-sessiondb remote
Session Type: IPsec
Username : cisco Index : 26
Assigned IP : 192.168.5.2 Public IP : 10.48.39.134
Protocol : IKE IPsec
License : IPsec
Encryption : AES128 Hashing : SHA1
Bytes Tx : 143862 Bytes Rx : 30628
Group Policy : DfltGrpPolicy Tunnel Group : cisco
Login Time : 13:43:55 UTC Mon May 14 2012
Duration : 0h:09m:37s
Inactivity : 0h:00m:00s
NAC Result : Unknown
VLAN Mapping : N/A VLAN : none
And from the iPEP
w-ise-ipep-1/admin# show pep table session
Current Sessions (IP, MAC(if available), Profile ID, VLAN (if any)):
192.168.5.2 00:00:00:00:00:00 2 0
w-ise-ipep-1/admin# show pep table accesslist normal
#ACSACL#-IP-ipep-unknown-4fb10ac2:
deny tcp any host 192.168.101.1 eq 80
deny tcp any host 192.168.101.1 eq 443
permit ip any host 192.168.101.1
permit udp any any eq 53
Once I download and install the agent:
The agent should automatically detects the ISE and runs the posture assessment (assuming you have the posture rules defined already, which is another subject). In my case I have succeeded the posture, and I can see the following:
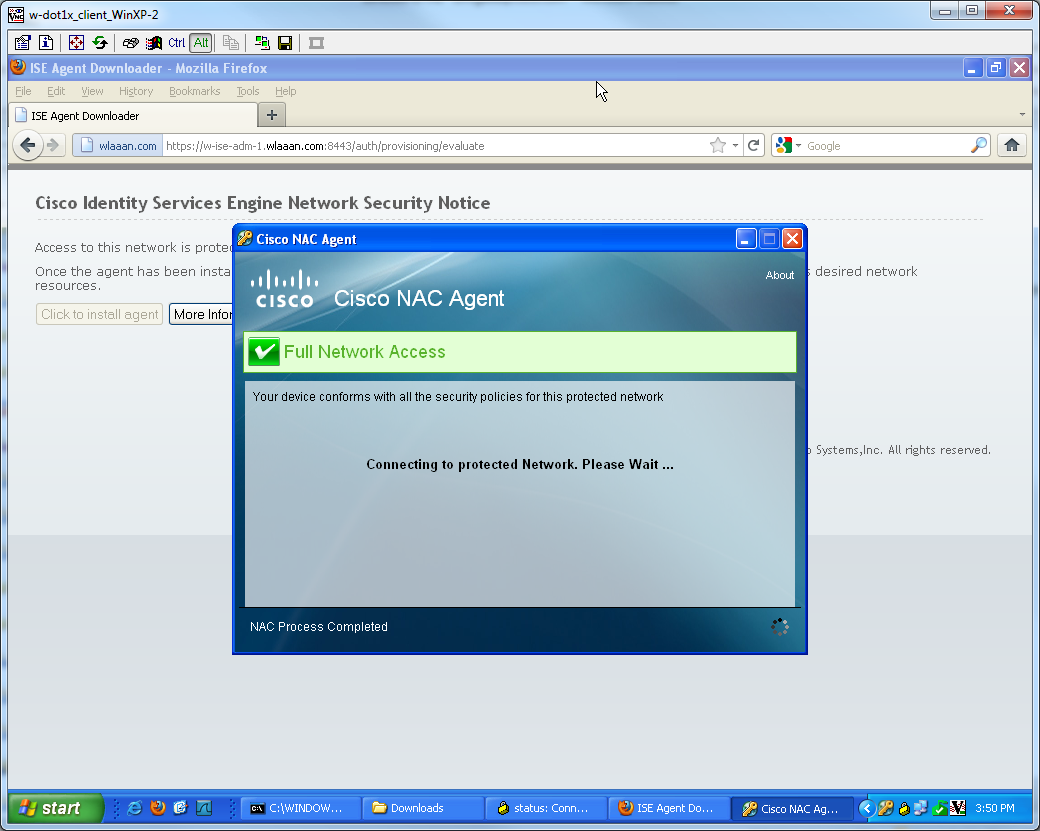

Note: There's in fact 2 authetications in the screenshot above, but since the iPEP box caches the ACLs, it is not downloaded every time.
And now on the iPEP:
w-ise-ipep-1/admin# show pep table session
Current Sessions (IP, MAC(if available), Profile ID, VLAN (if any)):
192.168.5.2 00:00:00:00:00:00 3 0
w-ise-ipep-1/admin# show pep table accesslist normal
#ACSACL#-IP-PERMIT_ALL_TRAFFIC-4f57e406:
permit ip any any
#ACSACL#-IP-ipep-unknown-4fb10ac2:
deny tcp any host 192.168.101.1 eq 80
deny tcp any host 192.168.101.1 eq 443
permit ip any host 192.168.101.1
permit udp any any eq 53
w-ise-ipep-1/admin#
Find answers to your questions by entering keywords or phrases in the Search bar above. New here? Use these resources to familiarize yourself with the community: