- Cisco Community
- Technology and Support
- Security
- Security Knowledge Base
- Cisco Security Manager - Integration with ACS
- Subscribe to RSS Feed
- Mark as New
- Mark as Read
- Bookmark
- Subscribe
- Printer Friendly Page
- Report Inappropriate Content
- Subscribe to RSS Feed
- Mark as New
- Mark as Read
- Bookmark
- Subscribe
- Printer Friendly Page
- Report Inappropriate Content
03-12-2011 04:32 AM - edited 08-23-2017 11:08 PM
- Devices and SWs used
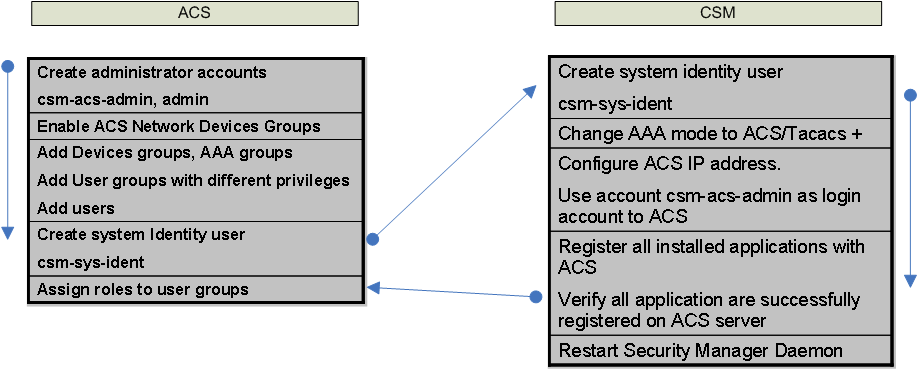
- CSM integration with ACS flowchart
- Pre-work
- CSM integration with ACS – Step by Step Example
- Verify the integration
- F.A.Q.
- References
This document is aiming at providing a step by step example on how integrate Cisco Security Manger with ACS.
In very complex enterprise scenario there is the need to have more granular control on authentication and authorization for a given user.
Without ACS there are several fixed user roles defined in CS-Manager and Common Services. These roles are applied over all devices in CS-Manager, meaning that we cannot specify a user to be network administrator for a set of devices (for example Routers) and read-only user for other devices (for example Firewall). This might be inconvenient for large organization where for example you have the NOC that should address the routing part and SOC that should address the firewall part.
When integrating with ACS, we can customize these roles and create our own new roles. In addition using the ACS network device group function, we are able to apply each role to a subset of the managed devices. A single user or group of users can have different roles managing multiple different network device groups
Devices and SWs used
- CSM v4.0
- ACS v4.2
- ASA 5510 v8.2.3
CSM integration with ACS flowchart
In order to integrate the CSM with the ACS we will use this flow chart:
Pre-work
Before starting, make sure you have taken a backup of your DB when not in integration mode.
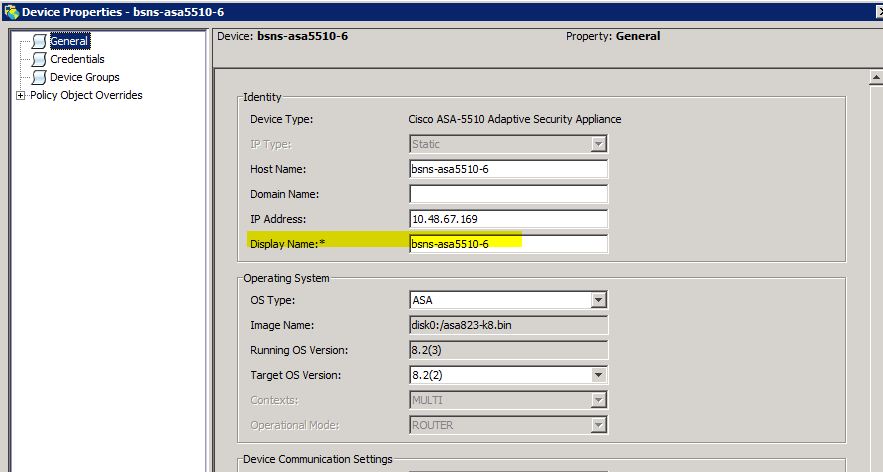
Also, if you are integrating with ACS but you have already devices imported in CSM, make sure you take note of the display name of the devices.
The display name can be found by:
- right click on the device
- select Device Properties
- select General
CSM integration with ACS – Step by Step Example
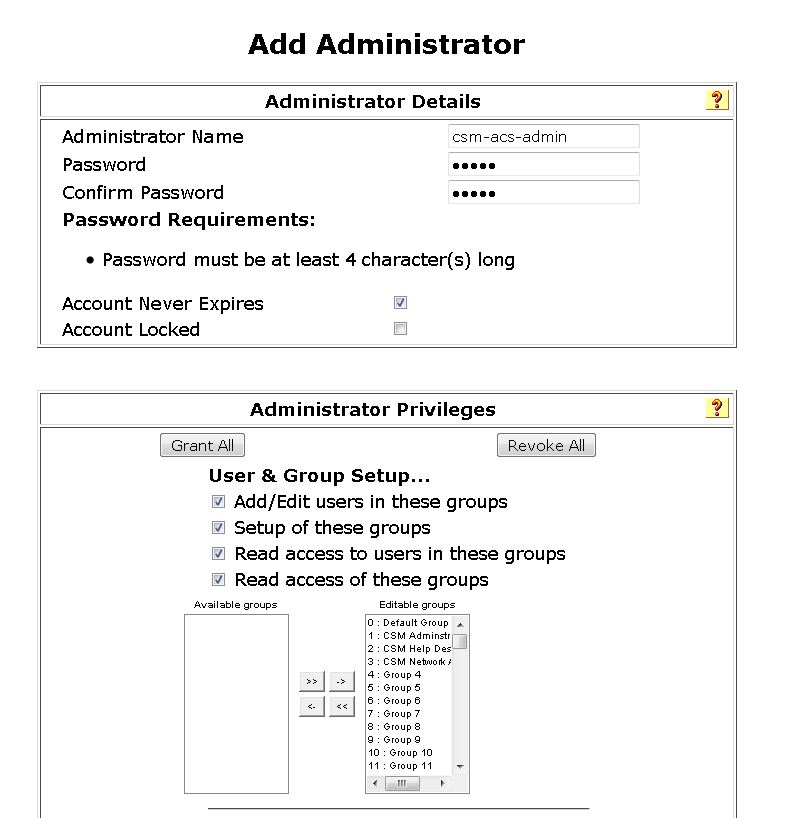
1- Configure admin account
We need to have one user with full administration privileges in ACS that will be used by CSM "csm-acs-admin"
This user will be used by CS to access the ACS.
1. In ACS click on Administration Control -> Add Administrator
2. Enter a user name of csm-acs-admin with a password of cisco123
3. Click Grant All
4. Wait until done!
5. Be sure to click submit
 jhjkhkhk
2- Enable NDG
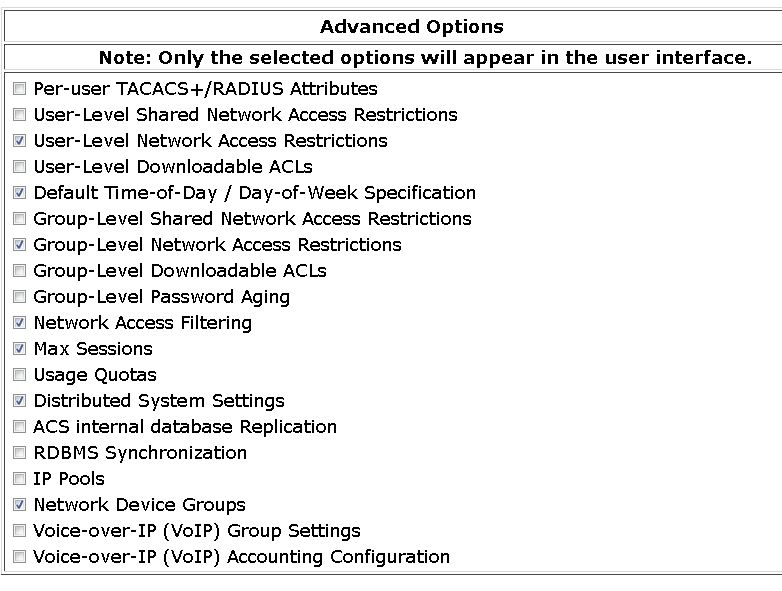
Let’s make sure we have Network Device Groups enabled
1. Click on Interface Configuration
2. Click on Advanced Options
3. Check the box enabling ACS Network Device Groups (NDG)
4. Be sure to submit the change
 .
.
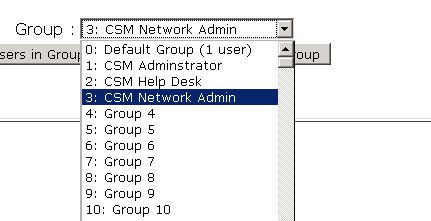
3- Rename users groups
Go to Group Setup
1. Select 1: Group 1
2. Click on Rename Group
3. Name it CSM Administrator
4. Continue by renaming groups 2 and 3 CSM Help Desk for group 2, CSM Network Admin for group 3
5. Note that these groups are arbitrary, and very flexible to the user role in any particular organization
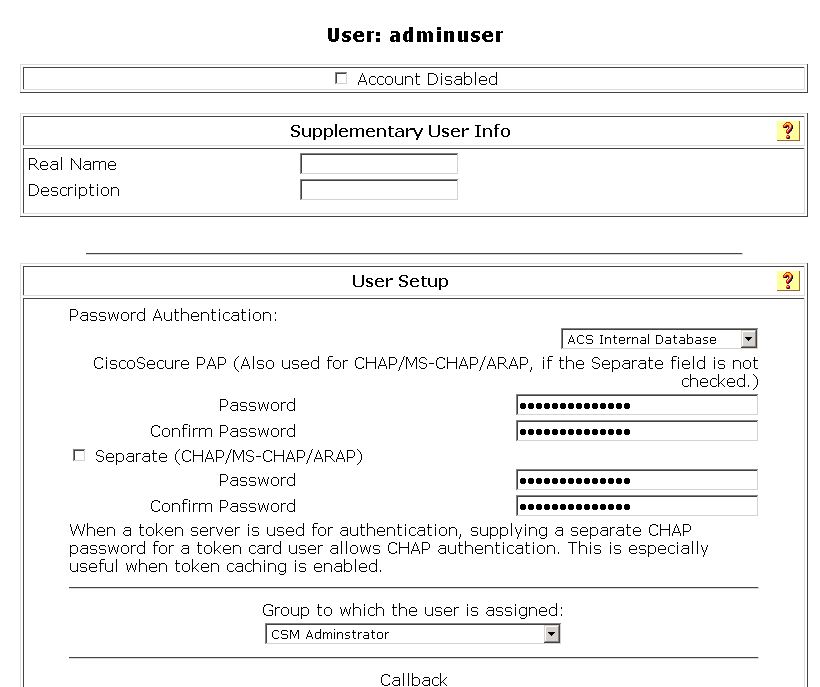
4- Create users
1. Go to User Setup
2. Type in the user name adminuser Select Add/Edit
3. For “adminuser” password authentication, use cisco123
4. Assign “adminuser” the user group CSM Administrator
5. Create "helpdesk" and assign him to the CSM Helpdesk user group
6. Create "netadmin" and assign to CSM Network Admin group
Note: There are many additional settings in ACS, such as disabling an account after some number of failed attempts which are not covered in this document
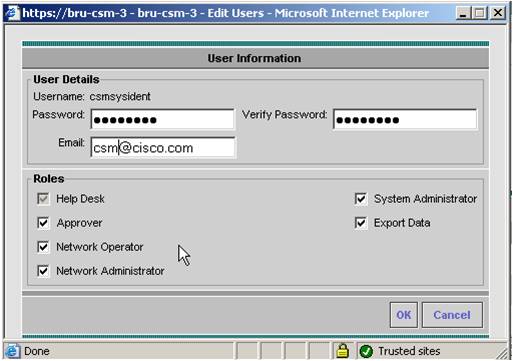
CS-Manager inter-process communications uses a special system identity user – csmsysident
This user is used for example when a device is added in the CS-Manager GUI to communicate in the back end to the Device Credential Repository
1. In ACS go to User Setup
2. Enter user name "csmsysident"
3. Set the password to cisco123
4. Set the user group to CSM Administrator
5. Be sure to click submit
Eventually you should have the following users in the user list:

5 - Add devices to the NDG
Now we need to create logical groups for devices, this could be type of device, geography, organization, etc.
1. Go to Network Configuration
2. Click on Add Entry Select
3. Create the group named IOS Devices, leave key blank (it is important to leave it blank as in ACS we have key inheritance)
4. Click submit
5. Create additional device groups for CSM Servers, ASA Devices, Headquarters and Remote
Note: ACS has “flat” network device groups meaning that a device can only be in one group, and there is no groups within groups. In the above grouping an ASA device in Headquarters location can be in ASA Group or Headquarters group, but not both. As you have seen, this is different from the CSM grouping and hierarchy for both devices and policy.
In this example I have created two groups, one for CSM Servers and one for FW devices where I will put my ASA.

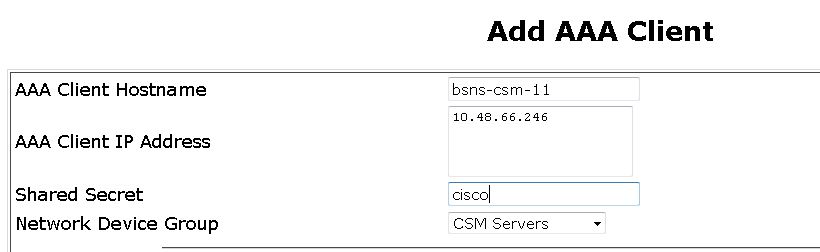
First thing to do once the new groups are created is to add the CSM Server to the CSM Servers group
The CS-Manager server will be authenticating and authorizing users using TACACS+ using the ACS server
As a result it is very important that ACS be configured properly to know which server is ACS by hostname and IP address
1. Click on the CSM Sever Network Device Group that you just created
2. Click on Add Entry and Enter the hostname of your CSM server
3. Enter the IP address of your server
4. Shared key of cisco123
5. Put it in the CSM Servers NDG
6. Authenticate using TACACS+
.
Now we need to add the devices into each of the NDGs we created in ACS
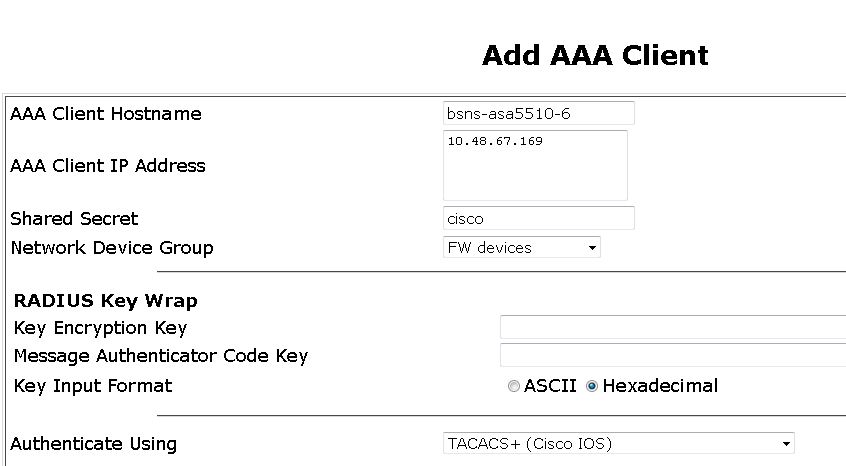
1. Go to Network Configuration
2. Click on ASA Devices
3. Click on Add Entry
4. Critical – type in the exact “Display Name” used in CSM for the ACS Host Name
5. Type in bsns-asa5510-6 – or whatever your display name is…
6. Type in the IP address
7. Use the shared secret cisco
8. Click submit and apply
Notes: The CS-Manager Display Name is what matches the ACS Host Name the IP address is not used here. The IP address is significant when devices us ACS to authenticate users connecting via SSH, SSL. One such user is the credentials used by CS-Manager to configure a device.

Note: When adding multi context ASA or IPS with different Virtual Sensor, each of them needs to be added to ACS as well. As usual, you need to use the display name. By default you will have the following:
FW
System-context
System-context_admin
System-context_context
IPS
Sensor-name
Sensor-name_vs0
6 - Configure local and identity user in CS
We are now ready to start the configuration on CS.
Close CS-Manager Client if opened
1. Connect to CS-Manager server http://server_IP_address:1741
2. Log in
3. Click on Server Administration
4. Click on Server -> Security
5. Click on Single Server Management->Local User Setup
6. Add the local user csmsysident with all roles selected
7. Note: this is temporarily going to authenticate locally before the integration with ACS
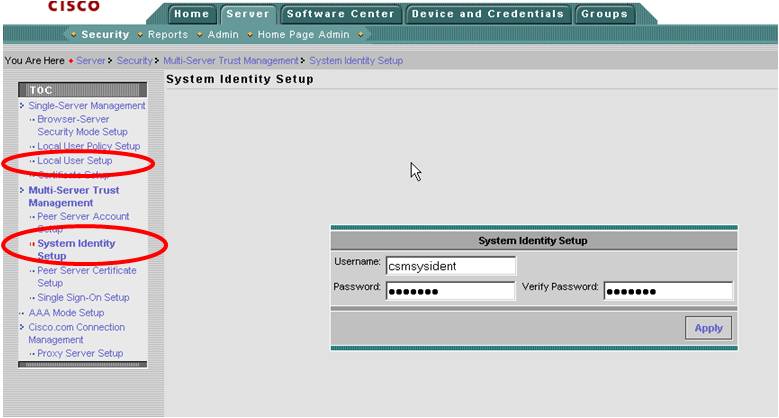
8. Click on Multi-Server Trust Management -> System Identity Setup
9. Change the user to csmsysident and password to cisco123
Enter csm@cisco.com for Email address. Be sure to click OK to apply
Note: While the default system identity user is “admin” it is not advisable to use admin, particularly for remote authentication. This user has unique permissions, so another administrative user should be used.
Note: In some version of CS you might have problem with special charatcter (ex -,/,@ etc...) try to avoid using these chars for the identity user
 .
.
 .
.
7 - Setup AAA mode in CS
Now we are going to setup the AAA mode to be ACS
1. Click on AAA Mode Setup
2. Click on ACS radio button to select ACS
3. Enter the IP address of the ACS server
4. Enter the ACS administrative account we created earlier – csm-acs-admin with the password cisco123
5. Enter the shared key cisco123
6. Click the checkbox “Register all installed applications with ACS”
7. Click Ok in the warning, this is our first integration, components are not yet registered
8. Be sure to click Apply
Note: when ticking the check box in 6, this will reset all the roles you have defined in CSM in the shared profile. If you have any pre-defined role (for example from a previous CSM – ACS integration these will be deleted)
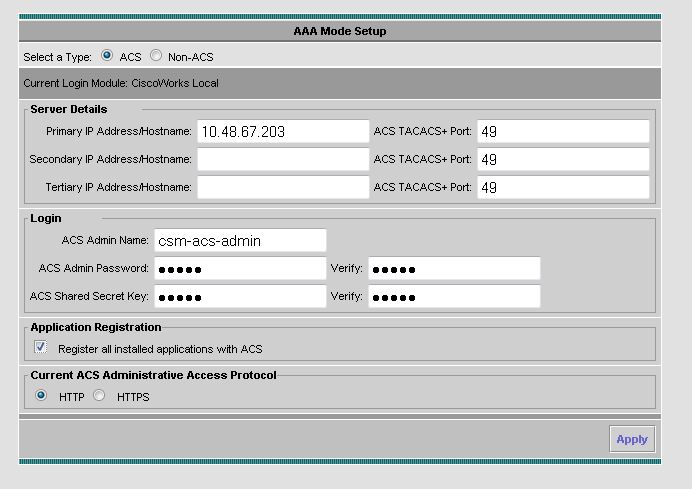
Note: Remember to use csm-acs-admin or whatever user you configured to access the ACS. Common mistake is to use the system identity use here.
8 - Register CS application to ACS
At this point you will receive a strange message complaining that System Identity User is not configured properly. This is normal and it is due to the fact that we still did not complete the integration on ACS side. Proceed by clicking on Apply

What is basically happening at this point is that CS is sending different XML files to ACS containing the descriptor for all the application installed (for example CSM, AUS, MCP, RME etc…) and for each of them the predefined roles and corresponding access policies.
Once the transfer is finished, you will see a message that all the applications are registered correctly.
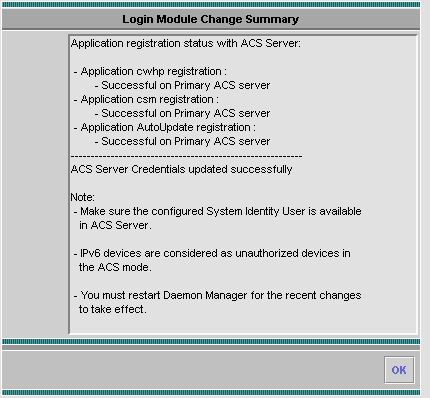
Remember to restart the Daemon Manager as indicated in the pop-up window.
8 - Verify registration in ACS
We can now come back to ACS and finish the integration.
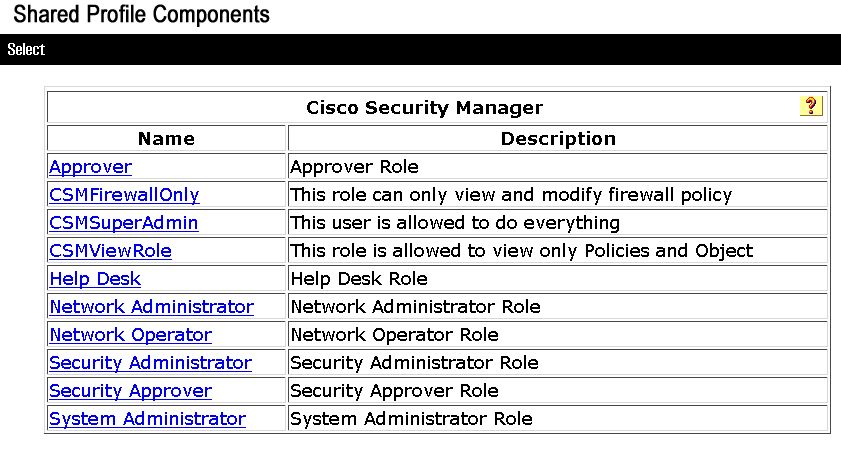
To make sure all the XML files are passed correctly and so the applications have been registered in ACS, open “Shared Profile” and make sure that you have something similar to this:

If you see all the applications (CSM, CiscoWorks, AUS, etc…) it probably means that they are registered correctly.
9 - Create custom roles
The customizable roles have now been loaded onto the ACS server through our registration to ACS from the CS-Manager server. Let’s go ahead now and make custom roles and assign them to our user groups in ACS.
1. Go back to your ACS interface click on Shared Profile Components
2. Click on Cisco Security Manager
3. Click on add
4. Create a new role called CSMSuperAdmin
5. Select all checkboxes
6. Submit
7. Create a second custom role named CustomViewRole
8. Select View Policies and Objects only
9. Submit
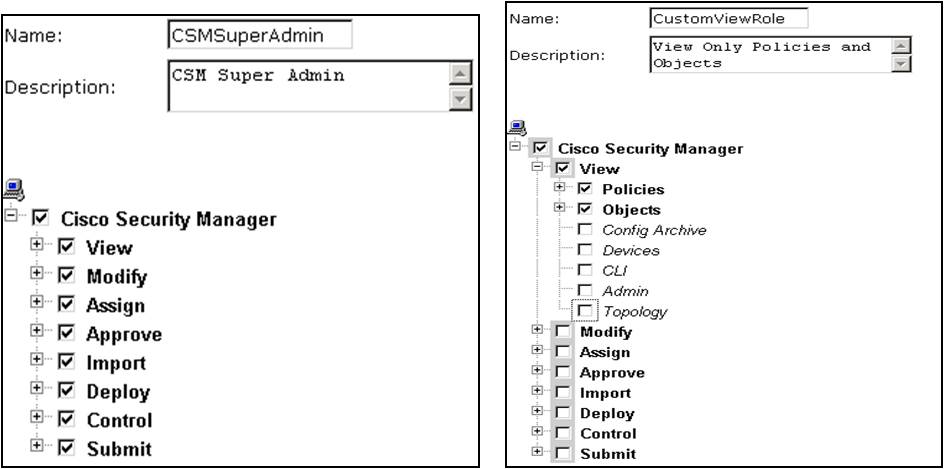
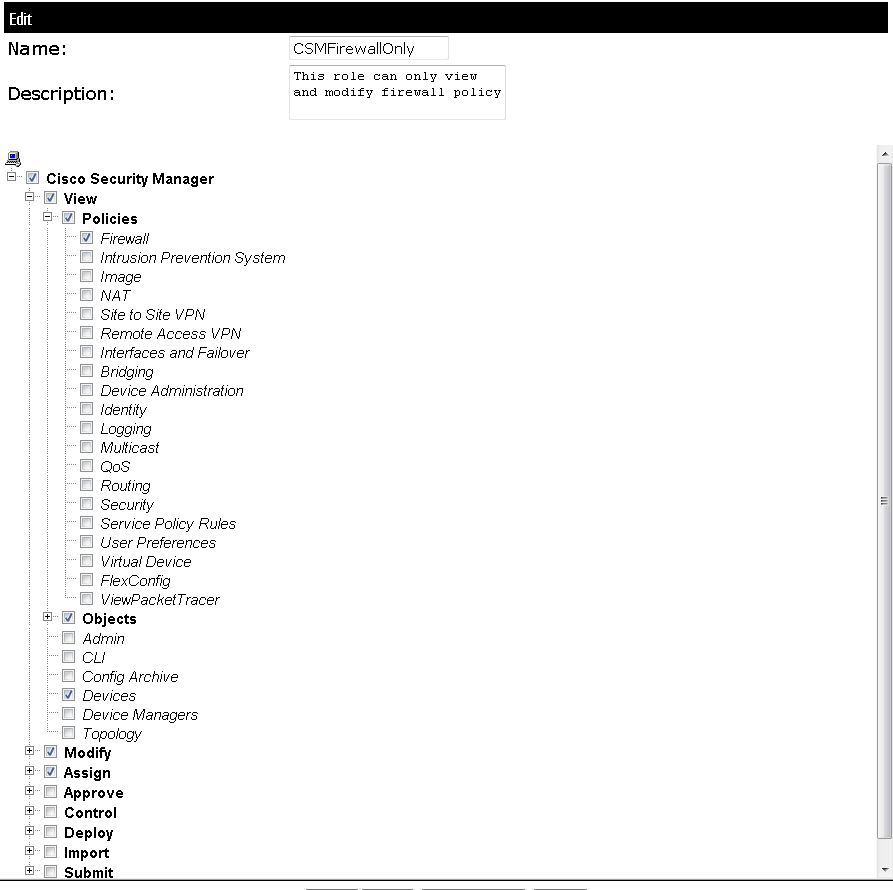
You can also try different other options (here is the power of ACS integration). For example you could try to create a role called CSMFWonly that can View and Modify only FW policies
Eventually, you should see something like this:
10 - Assign role to user groups
We are ready to assign our built-in or custom ACS roles for CSM to the user groups we created earlier.
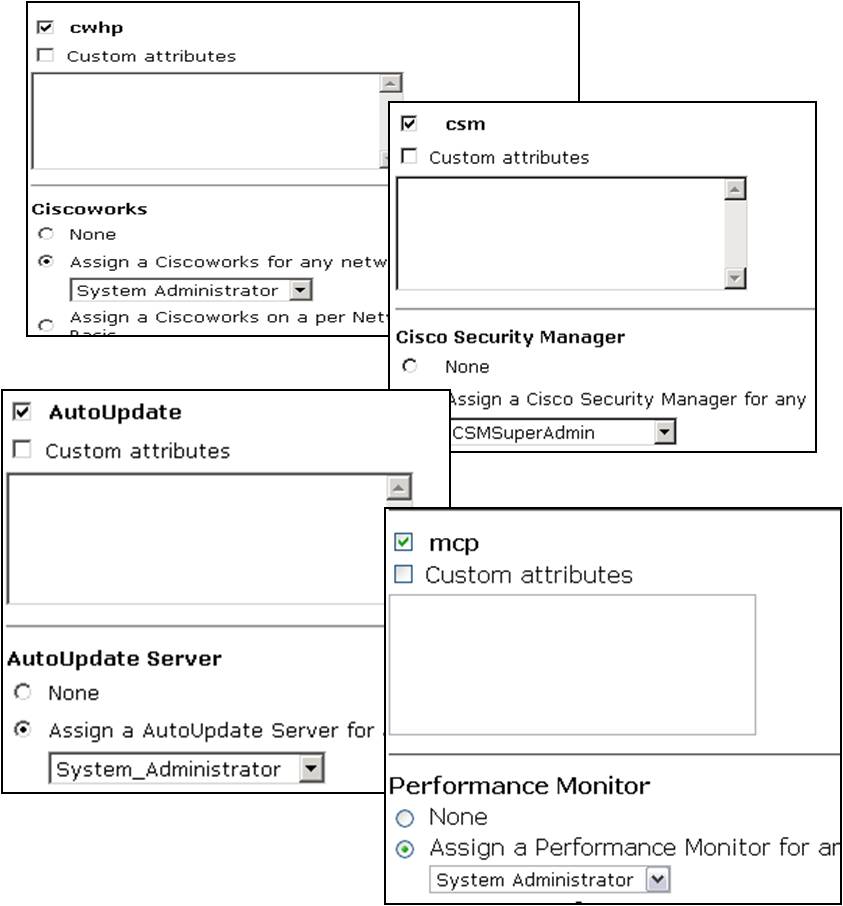
1. In ACS go to Group Setup
2. Select CSM Administrator group 1
3. Click Edit Settings
4. Scroll down until you find the checkbox for cwhp and check it. In the same area select the radio button for Assign a CiscoWorks for any network device and use the pull-down menu to choose System Administrator
5. Scroll down until you find the csm checkbox and check it. Assign the CSMSuperAdmin role for all devices in Cisco Security Manager Shared Service
6. Repeat for AutoUpdate and MCP assigning System Administrator role for All Devices (click Submit+Restart)
Any user assign to this group should now have full privileges over CiscoWorks Common Services, IPSMC, AUS and CSM .
 .
.
Now for example we can assign to the user group CSM Network Adminstaror the role of CSMFWonly when accessing FW devices. This way, all the users in that group will inherit these privilege (in this case only the user "netadmin" is belonging to that group)

Verify the integration
We are now ready to verify the integration.
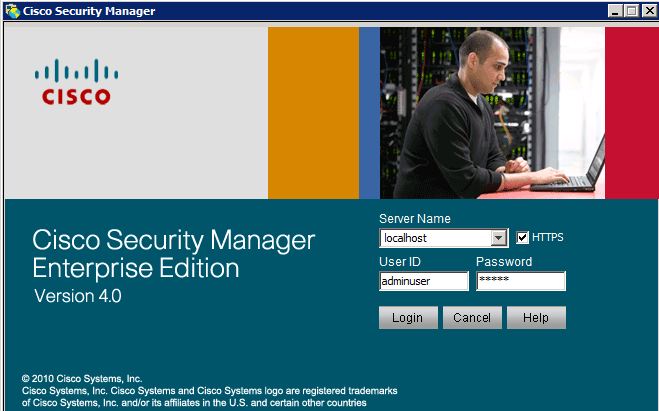
Let’s open the CSM client and login as “adminuser”. Since this user is in the CSM Adminstrator group in ACS, we expect this user to be able to do everything
 .
.
Once you login, play a bit around to make sure you have full privilege access.
Also make sure that you have access to all the device you had it in CSM before the integration
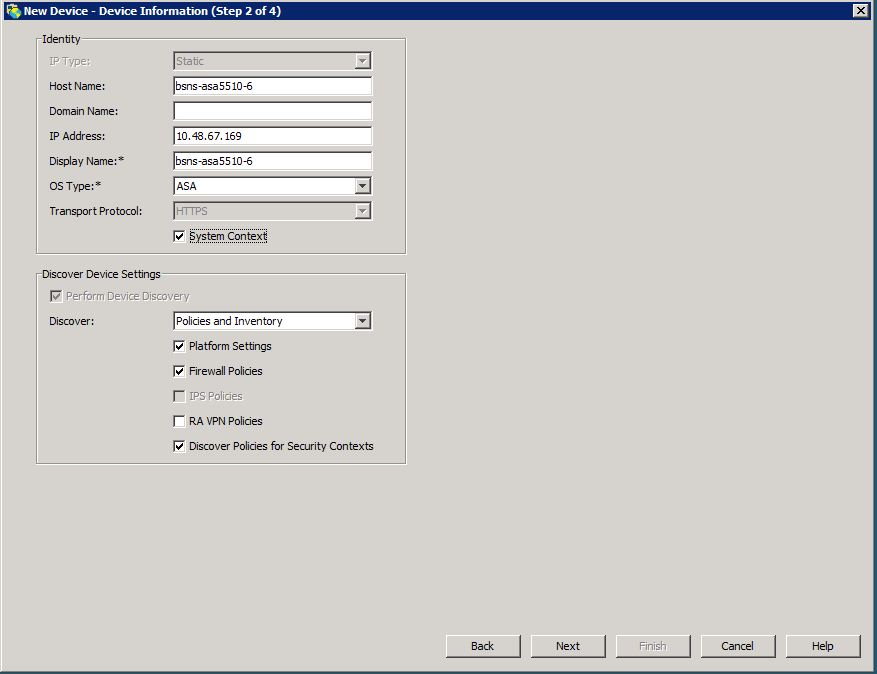
If everything looks good, let’s try to add one device.
1. In the Device Centric View (DCV) click on the plus sign
2. Click add device from Network (you can chose other methods)
3. Configure the information as in the figure below
4. Make sure that the display name is EXACTLY the same as appearing in the ACS AAA client hostname
 .
.
We can now try to check if the new roles we have defined in ACS works. Let’s close the client and reopen it. This time login with the user “netadmin”.
As you probably remember, this user is in CSM Network Adminstrator group and we configured this group with limited access. We assigned the role of CSMFWonly that should be able to see and modify only fw features:

Once we login in CSM, let’s try to add an access-list. You will see that this action should be permitted
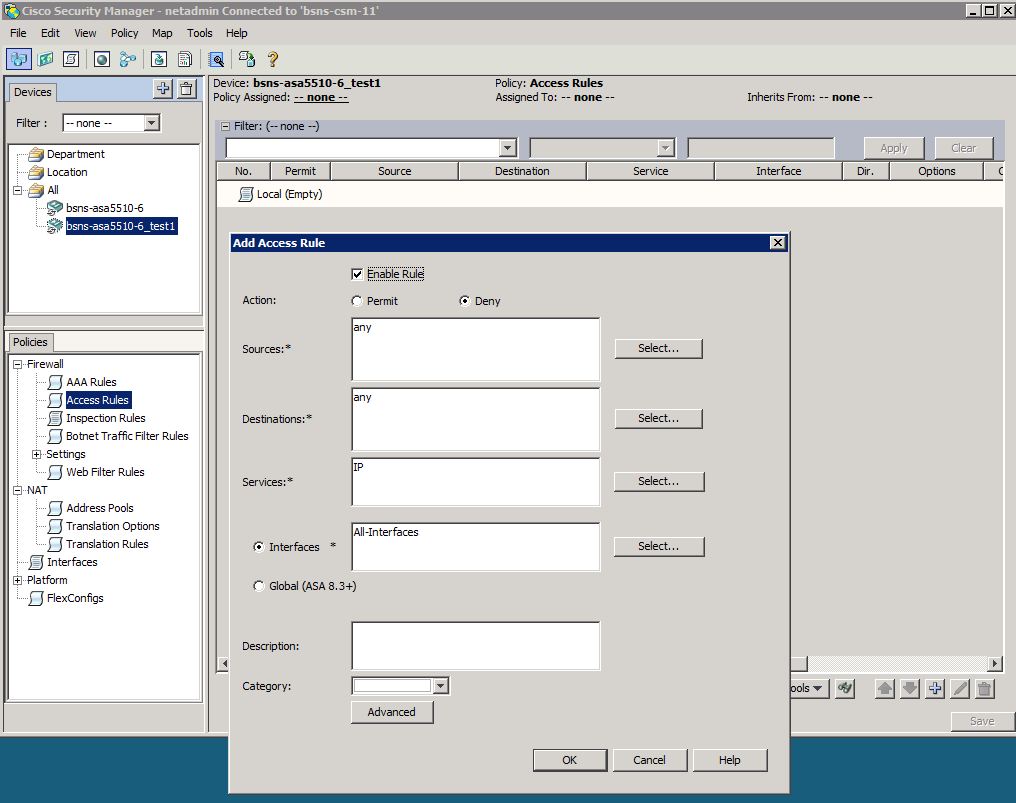
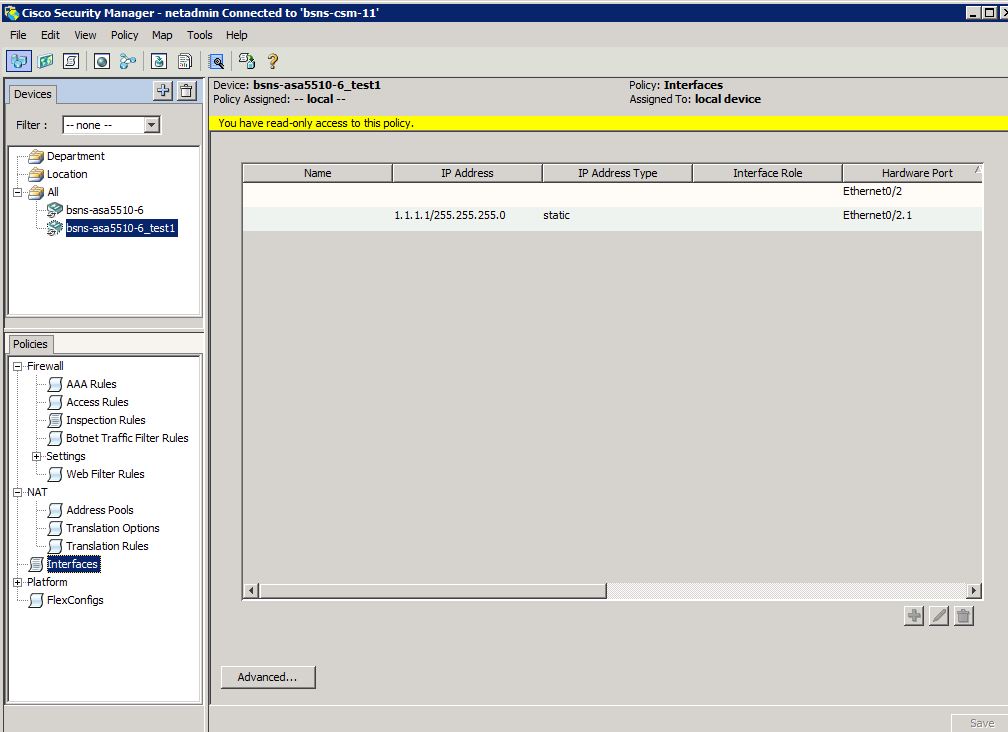
However if you try to visualize the NAT rules, you will have an authorization deny
Same goes if you try for example to View the interfaces.
Let’s try to change that and allow the netadmin user to view the interfaces but not modify them.
We go back to ACS
1. Click on Shared profile -> Cisco Security Manager
2. Edit the CSMFWonly role
3. Expand the View options and under Policies, select interface

Close the CSM client and login again as “netadmin”. Now click on Interface and you will be able to see the interface but only read-only privilege
 c
c
F.A.Q.
Q: After integrating with ACS I am not able to see some of my devices
A:This is most likely due to the fact that they are not correctly added in ACS or not added at all. Please check that the device is added in ACS and that the AAA client hostname is exactly the same as the CSM display name.
Q: Which ACS is suppored by CSM
A: We try to dynamically add support to the most recent version of ACS.
Please consult the CSM release notes
http://www.cisco.com/en/US/products/ps6498/prod_release_notes_list.html
Q: Is ACS 5.x supported
A: At the moment it is not supported
Q: After I start the registration of application, CS is warning that the System Identity user is not configured properly.
A: This is normal, you can click on apply and continue the integration.
Q: I cannot access anymore CSM or CS after the integration, what can I do?
A: There is a script you need to execute. This will break the integration and bring you back in local authentication.
1) Stop Daemon Manager (DOS Prompt):
net stop crmdmgtd
2) set NMSROOT=c:\progra~1\cscopx
NOTE NMSROOT can be different and depends on where the CSM was installed
3) Execute the following script
%NMSRROOT%\CSCOpx\bin\perl %NMSROOT%\CSCOpx\binResetLoginModule.pl
4) restart the Daemon Manager
net start crmdmgtd

Q: In the shared profile I do not see any new application defined or I see only part of them
A: This might be due to the fact CS is not able to pass the XML file with the application definition. Usually this is because there is a firewall in the middle blocking the communication between the CS and ACS or because teh ACS has less then 100 ports open.
References
http://www.cisco.com/en/US/products/ps6498/products_configuration_example09186a00808eada8.shtml
http://www.cisco.com/en/US/products/ps6498/products_configuration_example09186a00808eada8.shtml
Find answers to your questions by entering keywords or phrases in the Search bar above. New here? Use these resources to familiarize yourself with the community: