- Cisco Community
- Technology and Support
- Security
- Security Knowledge Base
- Configuration example : central web-authentication with a Wireless LAN Controller and Identity Servi...
- Subscribe to RSS Feed
- Mark as New
- Mark as Read
- Bookmark
- Subscribe
- Printer Friendly Page
- Report Inappropriate Content
- Subscribe to RSS Feed
- Mark as New
- Mark as Read
- Bookmark
- Subscribe
- Printer Friendly Page
- Report Inappropriate Content
04-04-2012 11:37 AM - edited 02-21-2020 09:58 PM
*NOTE, this is still a draft version of the document![]()
Introduction
what is central web-authentication?
Solution
This documents describe how to configure central web authentication with wireless clients connected to lightweight access points with the help of Identity Services Engine (ISE). It considers you already read the config example with switches (
https://supportforums.cisco.com/docs/DOC-18325)
as it will mostly underline the differences between the wireless and wired Central Web Authentication.
The concept of central web-authentication is opposed to "local web-authentication" which is the usual web-authentication on the WLC itself. In that system, the SSID is configured for layer3 security "web authentication".
Central web-authentication offers the possibility to have a central device acting as web portal (here the ISE) and the major difference compared to the usual local web authentication is that it is shifted to layer 2 along with mac authentication. The concept also differs in the way that it's the radius server (ISE here) returning special attributes indicating to the WLC that a web redirection has to happen. Globally, if the mac address of the client station is not known by the radius server (but other criterias can also be used), the server returns redirection attributes and the WLC authorizes the station (via mac filtering) but places an access-list to redirect the web traffic to the portal. Once the user logged in on the guest portal, it is possible via CoA (Change of Authorization) to tell the WLC to reauthetnicate the user so that a new layer 2 authentication occurs. The ISE can then remember it was a webauth user and apply layer 2 attributes (like dynamic vlan assignement) to the user. An activeX component can also force the client PC to refresh its ip address.
We will see more in details in the example how things look like.
Prerequisites
Requirements
Cisco recommends that you have knowledge of the following topics :
-Identity Services Engine (ISE)
-WLC configuration
Components used
ISE 1.0.4
5508 WLC running 7.2.103 (7.2 is the minimum version required)
How to configure it
On the ISE
Step 1. Create the authorization profile
1. Click on the "Policy" menu.
2. Click on "Policy Elements" submenu.
3. Click on "Results"
4. Expand "authorization" and then click on "Authorization profile"
5. Create a new authorization profile for central webauth by clicking the "Add" button.
6. In the "name" field, enter a name for the profile. Here we chose "CentralWebauth"
7. Make sure that the access type is "Access Accept"
8. Enable the "Central Web Authentication" checkbox. In the corresponding ACL field, enter the name of the ACL on the switch that will define which traffic will be redirected. In this example, we called it "redirect". Leave the "Redirect" field to "default"
The Redirect attribute allows to define if the ISE will se the default web portal or a custom web portal that the ISE admin created.
For example, our "redirect" ACL here will trigger a redirection upon HTTP or HTTPS traffic from the client to anywhere. We will see that ACL defined later on, on the WLC.

Step 2. Create an authentication rule
We now need to use this authorization profile
1. Click on "Authentication", still under the "Policy" menu.
The following screenshot is just an example of how to configure the authentication policy rules. Here, we configured a MAB rule that will trigger when Mac Authentication Bypass is detected (or mac filtering on the WLC).

2. Name your authentication rule. Here we named it "MAB".
3. Select the "+" icon in the condition field right to the name. Select "Compound condition" and then select "Wired_MAB".
4. Click on the arrow next to "and ..." to expand the rule further.
5. Click on the + icon in the identity store field and select "Internal endpoints". Below you will have 3 comboboxes. Select "continue" for the line "if user not found".
This means that even if a device is not known by its mac address it still has a chance to be authenticated (through webauth). Dot1x clients can still authenticate with their credentials and are not concerned by what we are configuring now.

Step 3. Create an authorization rule
If you now go to the authorization policy, there are several rules to configure. When the PC is plugged in, it will go through MAB and we assume that the MAC is not known so we return the webauth and ACL attributes. This is the "MAC not known rule" in the sceenshot hereafter.
1. Create a new rule and give it a name, like "MAC not known" in our example.
2. Click on the "+" icon in the condition field. Chose to create a new condition.
3. Expand the "expression" combobox.
4. Chose "Session" and expand it, click on "PostureStatus" after that.
5. Select operator "Equals".
6. Select "Unknown" in the right field.
7. Back to the general authorization page, Select "CentralWebauth" (our profile from step 1) in the field right to the word "then".
This basically means that the "user" or the mac to be precise was not known but since we configured ISE to continue nonetheless, it continues. We return the CentralWebauth Authorization profile that we configured earlier.
Unknown users will now be presented with the login page. But once they enter their credentials and submit, they will come again for an authentication request on the ISE, so we need an extra rule.
When the user logs in, he will hit the "IS-a-GUEST" rule. We have to define the condition so that it is met when the user is a guest user. Here for the example we chose "If UseridentityGroup equals Guest". We assume that all our guests belong to this group. We simply permit access.
8.Click on the "actions" button at the end of the "MAC not known" rule and chose to "insert a new rule above". It's important that the "IS-a-GUEST" rule is before in the order.
9. Give it a name (here "IS-a-GUEST")
10. Select a condition that will match your guest users. In this scenario we chose "InternalUser:IdentityGroup Equals Guest" because all guest users will be bound to that group called "Guest" (it can be any other group you configured in your sponsor settings).
11. Select "Permit Access" in the result box, right to "then".

When the user is authorized on the login page, ISE will restart a layer 2 authentication on the switchport and a new MAB will happen. This time, the difference is that an invisible flag is set for ISE to remember that it was a guest-authenticated user. This is the "2nd AUTH" rule, the condition is Network Access:UseCase Equals GuestFlow. This condition is met when the user just authenticated via webauth and the switchport is set again for a new MAB. The difference is that now we can assign any attributes we like. Here we assign a profile "vlan90" so that the user will be assign the vlan 90 in his 2nd MAB authentication.
12. Click on the "Actions" button at the end of your "IS-a-GUEST" rule and select "Insert new rule above"
13. Enter "2nd AUTH" in the name field.
14. In the condition field, click on the "+" icon and select to create a new condition. Select "Network Access" and click on "UseCase".
15. Select "Equals" as the operator
16. Select "GuestFlow" as the right operand.
17. Back in the authorization page, select a result for your rule by clicking on the "+" icon in the box at the right of "then". Here we assign a profile called "vlan90" that was pre-configured and not shown in this document. You can simply select a "Permit Access" or create a custom profile to return the vlan or attributes that you like.
Step 4 (optional) Enable the ip renewal
The last point is that if you assign a vlan, you will need the client PC to renew its ip address. This can be achieved by the guest portal for windows clients. If you didn't set a vlan for the "2nd AUTH" rule earlier, you don't need to follow this part.
1. Click on "Administration" menu
2. Click on "Guest Management"
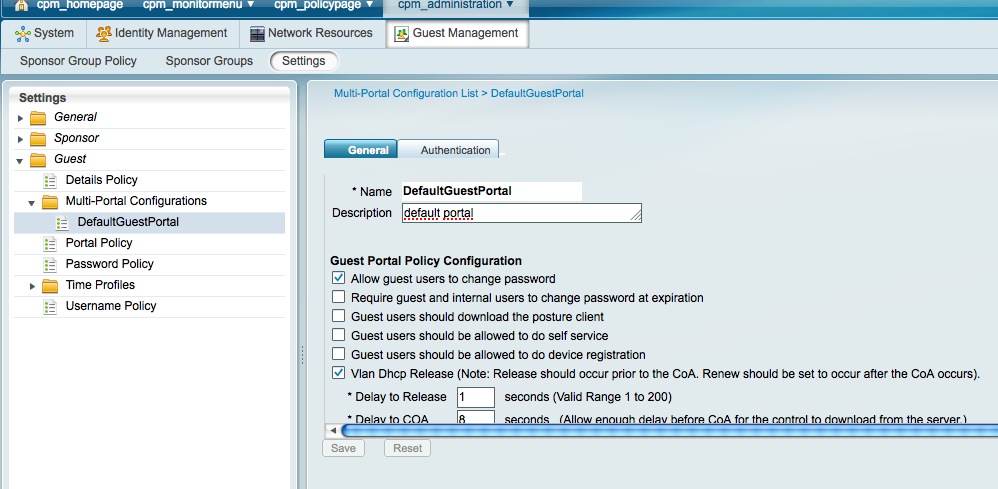
3. Click on "Settings"
4.Expand "Guest". Expand "Mult-Portal Configuration"
5. Click on "DefaultGuestPortal" or the name of a custom portal you may have created
6. Enable "Vlan DHCP Release". This only works for Windows clients.
On the WLC
In this paragraph, we will only show extracts of the switch configuration in order to comment it.
Let's start with the SSID configuration. You need to select open security with mac filtering. No layer 2 and no layer 3 security.
You could select WPA/WPA2 with Pre-shared key but 802.1x will not work (because you cannot negotiate an encryption key without an eap mechanism for the guests):

You also need to setup the ISE as radius server for the SSID.

Then in the advanced settings, you should enable NAC Radius state.

Under Security -> Access lists, we also need to configure an access-list called "redirect" since it's what the ISE will return in our case.

Note that contrary to switches, the redirection will here happen on a "deny", so we need to deny http to have a redirection.
HTTPS redirection is not supported at this stage.
When the user is not authenticated yet, the "Show authentication session int <interface num>" will give :
01-SW3750-access#show auth sess int gi1/0/12
Interface: GigabitEthernet1/0/12
MAC Address: 0050.5600.0003
IP Address: 192.168.100.13
User-Name: 00-50-56-00-00-03
Status: Authz Success
Domain: DATA
Security Policy: Should Secure
Security Status: Unsecure
Oper host mode: single-host
Oper control dir: both
Authorized By: Authentication Server
Vlan Group: N/A
URL Redirect ACL: redirect
URL Redirect: https://w-ise-adm-1.wlaaan.com:8443/guestportal/gateway?
sessionId=C0A865FE00000006EC31A48B&action=cwa
Session timeout: N/A
Idle timeout: N/A
Common Session ID: C0A865FE00000006EC31A48B
Acct Session ID: 0x0000000B
Handle: 0x95000006
Runnable methods list:
Method State
mab Authc Success
So we can see that despite the mab authentication being a success, the redirect ACL is placed since the mac was not known by ISE
Final result
The client PC plugs in, does MAB. The MAC address is not known, so ISE pushes back to the switch the redirection attributes.
The user tries to go to any website and is redirected.


When the authentication of the login page is successful, the ISE through Change Of Authorization bounces the switchport which starts again a layer 2 MAB authentication.
However, the ISE knows that it's a former webauth client and authorizes the client based on the webauth credentials although this is a layer 2 authentication happening. This is the "new" side of things thanks to CWA.

If we look on the authentication logs of ISE, we can see first (at the bottom), the MAB authentication. Although unknown the mac address was authenticated and profiled and the web auth attributes were returned.
Then an authentication happened with the username, this is the user typing his credentials in the web auth login page.
Then immediately a new layer 2 authentication is done with the username as credentials, this is precisely the authentication where you can return attributes like dynamic vlan.

Related Informaiton
Integration of ISE (Identity Services Engine) with Cisco WLC (Wireless LAN Controller)
Find answers to your questions by entering keywords or phrases in the Search bar above. New here? Use these resources to familiarize yourself with the community: