- Cisco Community
- Technology and Support
- Security
- Security Knowledge Base
- IP Phone VPN basic configuration example
- Subscribe to RSS Feed
- Mark as New
- Mark as Read
- Bookmark
- Subscribe
- Printer Friendly Page
- Report Inappropriate Content
- Subscribe to RSS Feed
- Mark as New
- Mark as Read
- Bookmark
- Subscribe
- Printer Friendly Page
- Report Inappropriate Content
on 12-16-2011 01:25 PM
Software used on this example:
> CUCM version: 8.6.2.20000-2
>ASA 5505: 8.4(2) with correct license:
ciscoasa# show version | i AnyConnect for Cisco VPN Phone
AnyConnect for Cisco VPN Phone : Enabled perpetual
ciscoasa#
> CP-7945G with firmware SCCP45.9-2-1S
Topology:

Setup the ASA for basic connectivity:
ASA starting with no configuration at all.
Assign IP address to outside interface:
interface Vlan1
nameif outside
security-level 100
ip address 172.16.1.1 255.255.255.0
Assign IP address to inside interface:
interface Vlan210
nameif inside
security-level 100
ip address 192.168.210.28 255.255.255.0
Configure same-security-traffic permit inter-interface to allowed the ASA to transmit traffic between interfaces with the same security-level (This depends on what the customer has already configured for connectivity):
ciscoasa(config)# same-security-traffic permit inter-interface
Configure static route (lab purpose only):
ciscoasa(config)# route inside 0.0.0.0 0.0.0.0 192.168.210.1 1
Assign vlan to inside interface (This depends on what the customer has already configured):
interface Ethernet0/0
switchport access vlan 210
ciscoasa#ping 192.168.210.1
Type escape sequence to abort.
Sending 5, 100-byte ICMP Echos to 192.168.210.1, timeout is 2 seconds:
!!!!!
Success rate is 100 percent (5/5), round-trip min/avg/max = 1/1/1 ms
ciscoasa#
This is for lab only purposes, the ASA should not provide IP addresses for outside devices, the local device at user’s home should do so (DSL modem, etc).
DHCP server commands:
dhcpd address 172.16.1.10-172.16.1.20 outside
dhcpd enable outside
Generate self-signed certificate:
ciscoasa# configure terminal
ciscoasa(config)#crypto key generate rsa label 172.16.1.1 modulus 1024
WARNING: You have a RSA keypair already defined named 172.16.1.1.
Do you really want to replace them? [yes/no]: yes
Keypair generation process begin. Please wait...
ciscoasa(config)#
Create trustpoint and associate keypair to generated self-signed certificate:
ciscoasa(config)# crypto ca trustpoint 172.16.1.1
ciscoasa(config-ca-trustpoint)# enrollment self
ciscoasa(config-ca-trustpoint)# fqdn none
ciscoasa(config-ca-trustpoint)# subject-name CN=172.16.1.1
ciscoasa(config-ca-trustpoint)# keypair 172.16.1.1
ciscoasa(config)# crypto ca enroll 172.16.1.1
% The fully-qualified domain name will not be included in the certificate
% Include the device serial number in the subject name? [yes/no]: no
Generate Self-Signed Certificate? [yes/no]: yes
ciscoasa(config)#
Export self-signed certificate:
ciscoasa(config)# crypto ca export 172.16.1.1 identity-certificate
The PEM encoded identity certificate follows:
-----BEGIN CERTIFICATE-----
MIIBoTCCAQqgAwIBAgIERWHqTjANBgkqhkiG9w0BAQUFADAVMRMwEQYDVQQDEwox
NzIuMTYuMS4xMB4XDTExMTIxNTIxNTI1NloXDTIxMTIxMjIxNTI1NlowFTETMBEG
A1UEAxMKMTcyLjE2LjEuMTCBnzANBgkqhkiG9w0BAQEFAAOBjQAwgYkCgYEAucQR
mun/QT1U1BVSTXIjAaim/vFndn7XcTQVmKNHMD2TcRPiymlW6dxkDmsKSdRxWF6x
FmExUsfqEQd2Flja/5Klyu1gWGlBvfrYnnYgEbxx/UG4UXAWNV1miKKf1gA49YsO
LLaHdMMmYJ553UD/RfevoTpefCkSFfr68Si6gsECAwEAATANBgkqhkiG9w0BAQUF
AAOBgQA/YwIxDLSS51a1o94sqGv3nRJAHu/YttugX89rfyO7tSZIBP1rRuAgEsGy
9lQ7LIWBWzUeV6uBmcnSBntlSjAWnHHZzG2xwZo3ef7hES09SRXcYj3RJ4zTlqa+
8nA+FB03DS2iJAZnToDj7zmtYT8QLwjoCa2oHN2dNqVfQgu3yg==
-----END CERTIFICATE-----
ciscoasa(config)#
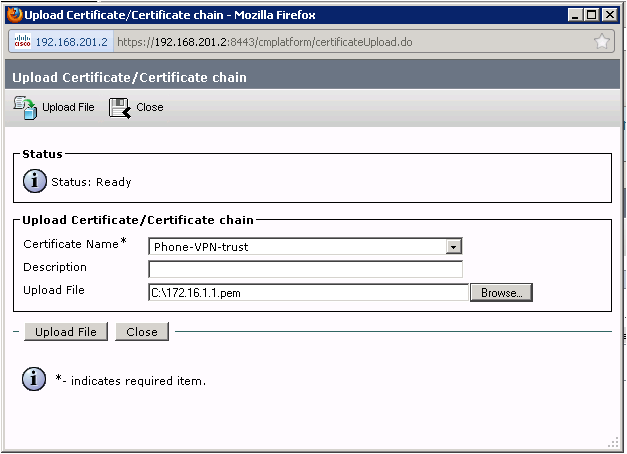
Copy the text from the terminal and save it as a .pem file and upload it to the Certificate Management part of the CUCM. Copy also the “BEGIN CERTIFICATE” and “END CERTIFICATE” lines.
ASA Certificate Upload :
Upload ASA self-signed certificate to CUCM:
Go to Cisco Unified Operating System Administration > Security > Certificate Management > Upload Certificate/Certificate Chain
Download CUCM Certificates:
Download CUCM certificates and save them:
The certificates will be the CallManager.pem, the CAPF.pem and the Cisco_Manufaturing_CA.pem.
Upload CUCM Certificates to the ASA:
Create trustpoints for the CUCM certificates (do the same for the CAPF.pem and the Cisco_Manufaturing_CA.pem):
ciscoasa(config)# crypto ca trustpoint CallManager.pem
ciscoasa(config-ca-trustpoint)# enrollment terminal
ciscoasa(config)# crypto ca authenticate CallManager.pem
Enter the base 64 encoded CA certificate.
End with the word "quit" on a line by itself
-----BEGIN CERTIFICATE-----
MIICpjCCAg+gAwIBAgIQYyQY70T0dDs3IQh7VRYTxDANBgkqhkiG9w0BAQUFADBl
MQswCQYDVQQGEwJDUjEOMAwGA1UEChMFQ2lzY28xDDAKBgNVBAsTA1RBQzESMBAG
A1UEAxMJQ1VDTVB1Yjg2MRAwDgYDVQQIEwdIZXJlZGlhMRIwEAYDVQQHEwlMYSBB
dXJvcmEwHhcNMTExMjAxMTgwOTA2WhcNMTYxMTI5MTgwOTA1WjBlMQswCQYDVQQG
EwJDUjEOMAwGA1UEChMFQ2lzY28xDDAKBgNVBAsTA1RBQzESMBAGA1UEAxMJQ1VD
TVB1Yjg2MRAwDgYDVQQIEwdIZXJlZGlhMRIwEAYDVQQHEwlMYSBBdXJvcmEwgZ8w
DQYJKoZIhvcNAQEBBQADgY0AMIGJAoGBALKlH5iExWLCmsQOPnuMQK7qmCXIWMnh
3JVY2QSb75z9xGj1gxwJAxWxHt9tQOEku4hHrx7NuVZdRP9bWU+9w3bhADW0HT4W
4rboSNYLY0qscIQvgQiIV5tNfg1GMQFaKVZkL3zFpa8P9COUlTgyR5/pwh/Ha4iF
Bmwa9TrZvBPdAgMBAAGjVzBVMAsGA1UdDwQEAwICvDAnBgNVHSUEIDAeBggrBgEF
BQcDAQYIKwYBBQUHAwIGCCsGAQUFBwMFMB0GA1UdDgQWBBQ9Mkdnt3GDvmY6YcM1
z1dMHnEOzjANBgkqhkiG9w0BAQUFAAOBgQCUME1u3sRgEQLbRQUL4EgSwHUGxj6b
9lJUINzeBd6C0XIJQu/wjXD0HUjumGB2rzpinSWfkUtiUh7P8eKOszFZLNmy4qGo
iIty/dhUyh478C4DLHKZPPzfSR/f5YHYhHcZnwEdelwHL8q90tNevy0/6oOJfyPy
aFhHw/mLDT1HCQ==
-----END CERTIFICATE-----
quit
INFO: Certificate has the following attributes:
Fingerprint: 568123ea 9723a59d aa6e1857 32cd4950
Do you accept this certificate? [yes/no]: yes
Trustpoint CA certificate accepted.
% Certificate successfully imported
ciscoasa(config)#
ASA WebVPN configuration:
Create DHCP pool for devices launching VPN connections:
ip local pool Webvpn_POOL 192.168.210.10-192.168.210.20 mask 255.255.255.0
Associate trust-point to outside interface:
ssl trust-point 172.16.1.1 outside
Enable WebVPN feature:
webvpn
enable outside
enable inside
anyconnect-essentials
anyconnect image disk0:/anyconnect-win-2.5.3055-k9.pkg 1
anyconnect enable
Create Group-Policy:
group-policy GroupPhoneWebvpn internal
group-policy GroupPhoneWebvpn attributes
banner none
vpn-simultaneous-logins 10
vpn-idle-timeout none
vpn-session-timeout none
vpn-tunnel-protocol ikev1 ssl-client ssl-clientless
default-domain value asa.cisco.com
address-pools value Webvpn_POOL
webvpn
anyconnect ssl dtls enable
anyconnect keep-installer installed
anyconnect ssl keepalive 120
anyconnect ssl rekey time 4
anyconnect ssl rekey method new-tunnel
anyconnect dpd-interval client none
anyconnect dpd-interval gateway 300
anyconnect ssl compression deflate
anyconnect ask none default webvpn
Create user name and password for authentication aaa local:
username cisco password 12345
username cisco attributes
vpn-group-policy GroupPhoneWebvpn
service-type remote-access
Create user name and password for authentication certificate plus password:
username CP-7945G-SEP00235E1868AF password 12345
username CP-7945G-SEP00235E1868AF attributes
vpn-group-policy GroupPhoneWebvpn
service-type remote-access
Create Tunnel-Group for authentication aaa local:
tunnel-group VPNphone type remote-access
tunnel-group VPNphone general-attributes
address-pool Webvpn_POOL
default-group-policy GroupPhoneWebvpn
tunnel-group VPNphone webvpn-attributes
group-url https://172.16.1.1/VPNphone enable
Create Tunnel-Group for authentication certificate plus password:
tunnel-group CertPassTunnelGroup type remote-access
tunnel-group CertPassTunnelGroup general-attributes
authorization-server-group LOCAL
default-group-policy GroupPhoneWebvpn
username-from-certificate CN
tunnel-group CertPassTunnelGroup webvpn-attributes
authentication aaa certificate
pre-fill-username ssl-client
group-url https://172.16.1.1/CertPass enable
Create Tunnel-Group for certificate only authentication:
tunnel-group CertOnlyTunnelGroup type remote-access
tunnel-group CertOnlyTunnelGroup general-attributes
default-group-policy GroupPhoneWebvpn
tunnel-group CertOnlyTunnelGroup webvpn-attributes
authentication certificate
group-url https://172.16.1.1/CertOnly enable
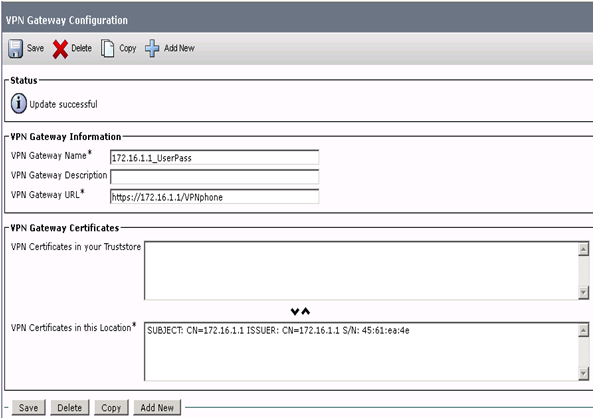
Configure the VPN Gateways:
Add VPN Gateway for Username and Password authentication:
Go to Advanced Features> VPN > VPN Gateway
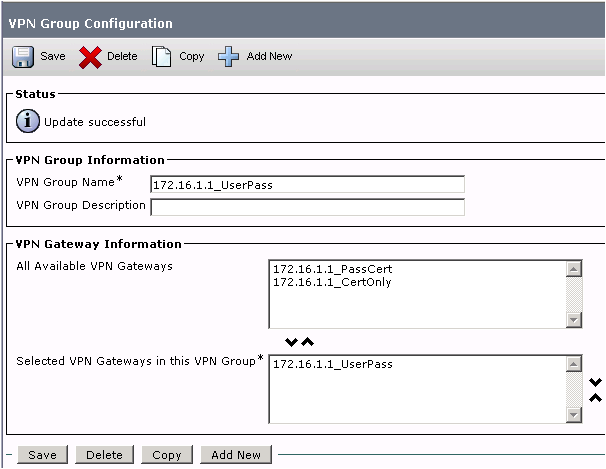
Create a VPN Group using the VPN Gateways:
Add VPN Group and associate the previously created VPN gateway to it:
Go to Advanced Features > VPN > VPN Group
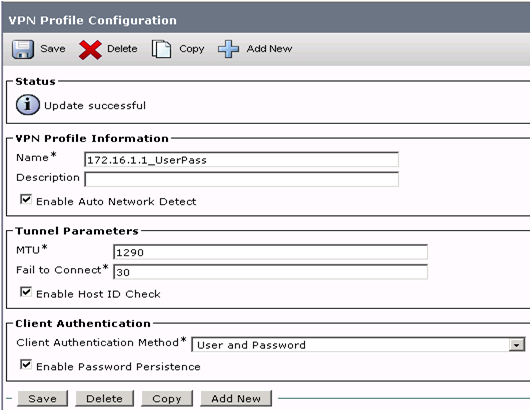
Create a VPN Profile:
Go to Advanced Features > VPN > VPN Profile
Auto detection:
If enabled, the VPN client will only be able to run if it detects that it is out of the corporate network.
Enable Host ID Check:
If enabled, the VPN gateway's certificate's subjectAltName or CN must match the URL that the VPN Client has connected to.
Enable Password Persistence:
If enabled, a user's password will be saved in the phone until a failed login or a user clears it.
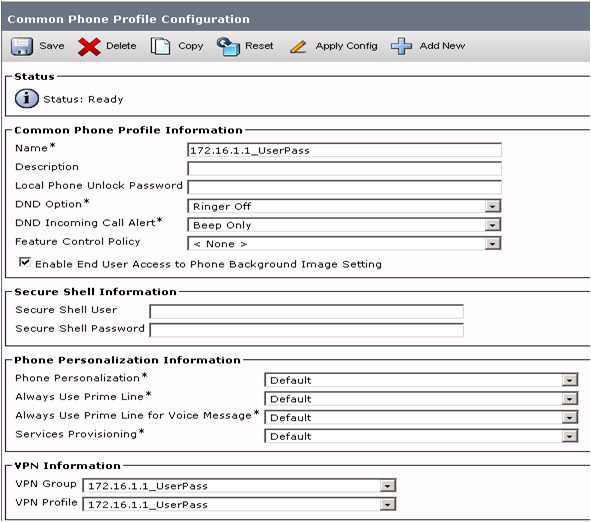
Assign a VPN Group and Profile in the Phone Common Profile:
Associate VPN Group and Profile to the Phone Common Profile:
Go to Device > Device Settings > Common Phone Profile
Assign Phone Common Profile to IP Phone:
Associate Phone Common Profile to IP Phone:
Go to Device > Phone

Related information:
Useful links:
http://www.cisco.com/en/US/docs/voice_ip_comm/cucm/security/8_5_1/secugd/secuvpn.html
http://www.cisco.com/en/US/products/ps6120/products_configuration_example09186a008071c428.shtml
http://www.cisco.com/en/US/products/ps6120/products_configuration_example09186a00808efbd2.shtml
- Mark as Read
- Mark as New
- Bookmark
- Permalink
- Report Inappropriate Content
Good document meneses, but I think we should specify that when selecting "certificate" as client authentication method, 3 certificates from the callmanager shoulld be uploaded into the ASA.
•![]() CallManager - Authenticating the Cisco UCM during TLS handshake (Only required for mixed-mode clusters)
CallManager - Authenticating the Cisco UCM during TLS handshake (Only required for mixed-mode clusters)
•![]() Cisco_Manufacturing_CA - Authenticating IP phones with a Manufacturer Installed Certificate (MIC).
Cisco_Manufacturing_CA - Authenticating IP phones with a Manufacturer Installed Certificate (MIC).
•![]() CAPF - Authenticating IP phones with an LSC.
CAPF - Authenticating IP phones with an LSC.
if not, users will get "authetiction failed", when selecting phone VPN feature.
- Mark as Read
- Mark as New
- Bookmark
- Permalink
- Report Inappropriate Content
Hi, When I am using cisco VOIP phone hard phone over the internet and using built in VPN client, does it make use of QOS?
Find answers to your questions by entering keywords or phrases in the Search bar above. New here? Use these resources to familiarize yourself with the community: