- Cisco Community
- Technology and Support
- Security
- Security Knowledge Base
- Policy Provisioning and Operation in SDA
- Subscribe to RSS Feed
- Mark as New
- Mark as Read
- Bookmark
- Subscribe
- Printer Friendly Page
- Report Inappropriate Content
- Subscribe to RSS Feed
- Mark as New
- Mark as Read
- Bookmark
- Subscribe
- Printer Friendly Page
- Report Inappropriate Content
10-22-2018 09:49 AM - edited 12-18-2018 02:54 AM
Version 2.0
Jonothan Eaves
Technical Marketing Engineer, Cisco Systems, Inc.
- Introduction
- About This Guide
- What is Covered
- What is not Covered
- Define
- Design
- Deploy
- Adding Contracts
- Adding Policies
- Operate
- ISE TrustSec Policy Matrix Views
- Manual Refresh of Policy
- ISE 2.4 Verify Deploy
Introduction
About This Guide
This guide is intended to provide technical guidance to design, deploy and operate policy functions within Software Defined Access (SDA) with focus on the Cisco Identity Services Engine (ISE) policy component. The first half of the document focuses on the planning and design activities, the other half covers specifics of configurations and operations. There are four major sections in this document. The initial, define part talks about defining the problem area. Next, in the design section, you will see design considerations to be taken into account. Third, in the deploy part, the various configuration and best practice guidance will be provided. Lastly, in the operate section, you will learn how to manage a policy deployment with Cisco DNA Center and Cisco ISE. Before you begin, be sure you have the SDA environment setup and operational including connectivity between Cisco DNA Center and ISE.
Figure 1: Define, Design, Deploy, Operate
What is Covered
Policy design considerations are covered along with adding contracts and policies in Cisco DNA Center. Once added in Cisco DNA Center we see what effect that has on ISE and ultimately what effect it has on network devices. Removing policies and contracts is a topic of conversation too.
What is not Covered
The document focuses on policy. It does not cover Cisco DNA Center or ISE install or integration, and neither does it cover any aspect of SDA setup. It is assumed that the whole SDA environment is operational.
Endpoint on-boarding is not covered, that is being covered in another document in this series.
Define
Security policy in SDA is group-based. Policy is based on groups of entities as opposed to creating IPACLs for each individual endpoint or location. Each group is defined by a Scalable Group Tag (SGT). Security policy is disassociated from the local constructs such as VLAN, Subnet and IP address and is based on group names which is meaningful to the customer and is relevant globally.
Endpoints are classified into groups either dynamically or statically. When users connect to the network, the fabric edge devices communicate with ISE and an SGT is assigned by ISE by using configured conditions. ISE learns a large amount of context which can be used within these conditions.
Once endpoints and users are classified into groups then the security policy can be defined. The policy can be defined from one group to another, between two groups or between members of the same group. The contract used within the policy is either a pure permit, a pure deny, or a list of Scalable Group Access Control Entries (SGACE's) for granular traffic control.
Cisco DNA Center uses SSH to establish a trust relationship with ISE. It also uses RestAPI to configure the contracts and policies into ISE. ISE pxGrid information bus is used by Cisco DNA Center to retrieve context information like the SGT's available.
Figure 2: Communication Between Cisco DNA Center and ISE

Design
Within Software Defined Access (SDA), policy is orchestrated by Cisco Digital Network Architecture Center (Cisco DNA Center).
Currently, Cisco DNA Center pushes contracts and policies to Cisco Identity Services Engine (ISE) where they are downloaded when needed to network devices.
Design Considerations
1) ISE supports the 'log' keyword at the end of each SGACE for generating syslog messages for hits. However, Cisco DNA Center does not currently provide the option of using this keyword.
2) During the initial Cisco DNA Center and Cisco ISE integration, scalable groups and policies that are present in Cisco ISE are propagated to Cisco DNA Center and placed in the default virtual network. Cisco DNA Center does not support access control policies with logging as an action, therefore, Cisco ISE does not propagate any such policies to Cisco DNA Center.
After the initial integration you cannot pull other policies or SGACLs from ISE and neither can you export any policies or SGACLs from ISE and import them into Cisco DNA Center.
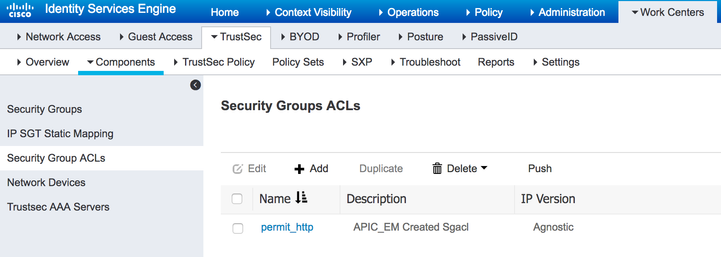
3) When contracts are being built, Cisco DNA Center uses the protocol/port as destination criteria only. Cisco DNA Center does not provide the option to configure the protocol/port as a source. For example, when 'permit http' contract is added via Cisco DNA Center, the resulting SGACL provisioned into ISE is "permit tcp dst eq 80". There is no option in Cisco DNA Center currently to set src rather than dst.
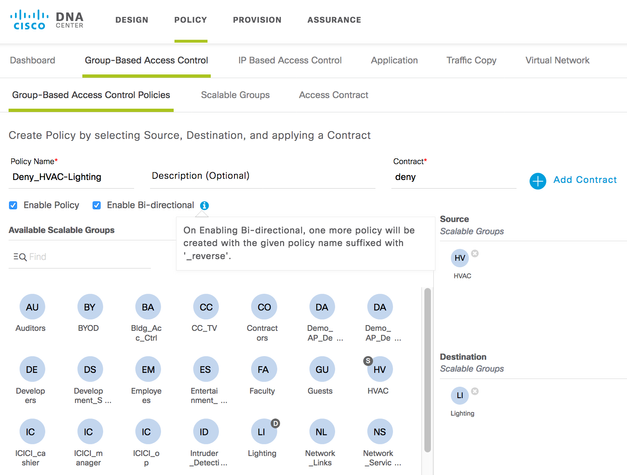
4) One function that Cisco DNA Center includes that ISE does not have is the ability to create bi-directional policies. In ISE two policies need to be added to cover this use-case but in Cisco DNA Center there is an option to 'Enable Bi-directional', the information shown below:
Figure 3: Enabling Bi-directional Policies
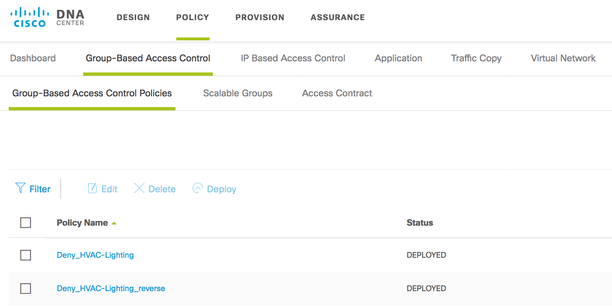
The resulting policies in Cisco DNA Center are shown here:
Figure 4: Displaying Policies in Cisco DNA Center

5) Another function that Cisco DNA Center offers is to add multiple source SGTs and multiple destination SGTs within a single policy. As far as ISE is concerned though, it is just provisioned as multiple different policies. For example, in Cisco DNA Center you can add a policy with 1 source SGT and 2 destination SGTs:
Figure 6: Adding policies in Cisco DNA Center With Multiple SGT's
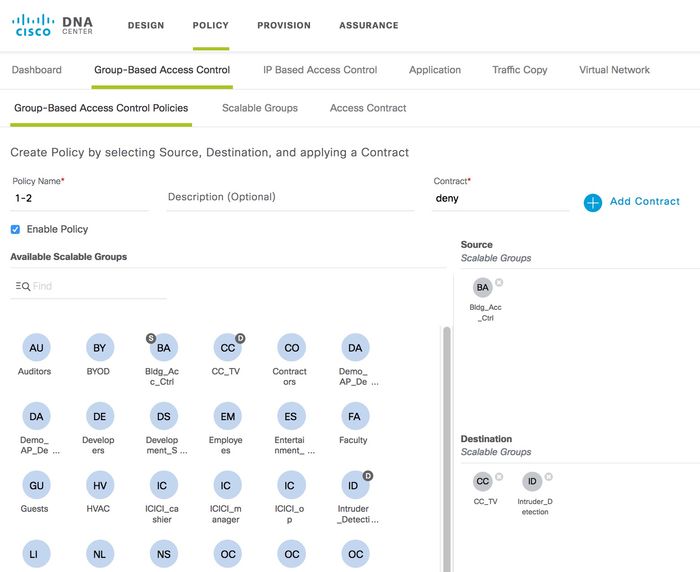
The 2 resulting policies provisioned in ISE are as follows:
Figure 7: Resulting Policies in ISE

To summarize, if you added 10 Source Group Tags and 10 Destination Group Tags into one policy entry in Cisco DNA Center, that would equate to 100 policies in ISE. As far as network devices are concerned, that would be 100 entries out of the maximum allowable SGT/DGT entries that would be consumed if a network device needed to download them all.
There is actually a positive impact on the SGACL/SGACE consumption with multiple source SGTs and multiple destination SGTs within a single policy. That is because only one entry is provisioned into network devices and it is shared for multiple policies.
6) ISE can implement multiple TrustSec policy matrices. However, if multiple matrices are enabled in ISE within SDA, Cisco DNA Center will be unable to provision the policy functions. Cisco DNA Center will report the following:
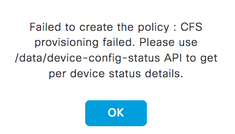
The reason is that ISE has no API's to support multi-matrices at this point in time.
7) This document is covering policy configuration and management within SDA. As such it is appropriate to describe a best practice for assigning SGT's to network devices themselves as well as to endpoints and users. Traffic sourced from and to the CPU of network devices is assigned what is called a Device SGT. By default, this is the 'Unknown' SGT 0. It is best practice to assign the TrustSec_Devices (SGT 2) to network devices instead of 'Unknown' so that is is easy to add policies for communication from/to network devices. This is particularly important when a default deny policy is in use.
The best way to assign TrustSec_Devices SGT 2 to devices is via the ISE 'Network Device Authorization' table. This cannot currently be orchestrated by Cisco DNA Center. Within ISE, navigate to Work Centers > TrustSec > TrustSec Policy > Network Device Authorization and within a freshly installed ISE it will be seen that 'Unkown' SGT 0 is set by default:
Figure 9: Default setting for Network Device Authorization in ISE:
Select 'Edit' from the right hand side of the rule and change the Unknown SGT to TrustSec_Devices and press 'Done' and then 'Save' at the bottom of the screen:
Figure 10: Setting TrustSec_Devices SGT 2 in the ISE Network Device Authorization Table:
If there is a requirement to assign different SGT's to different network devices (perhaps for geographical reasons for example), then that is possible by adding multiple rules within the table.
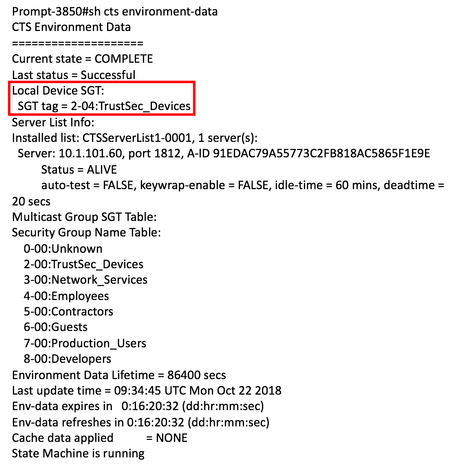
Now, when devices first communicate with ISE, TrustSec_Devices SGT 2 will be assigned and downloaded to network devices within the environment-data. On a network device, check the device SGT within the environment-data using the following command:
Figure 11: TrustSec_Devices SGT 2 Downloaded to Devices in the Environment-Data:
If you are deploying a network utilizing a default deny policy, then it would be straight forward to add the following policies to permit traffic from/to network devices and allow network device access from unclassified endpoints if desired:
From TrustSec_Devices SGT 2 -> TrustSec_Devices SGT 2, permit ip
From TrustSec_Devices SGT 2 -> Unknown SGT 0, permit ip
From Unknown SGT 0 -> TrustSec_Devices SGT 2, permit ip
8) SDA is designed around the concept of using Macro-segmentation using Virtual Networks and Micro-segmentation using SGT's. Whether you keep the SGT's within the DEFAULT_VN or assign them to user defined VN's has no bearing on the process of adding Contracts and Policies or on the operation of policy download from ISE to network devices. Adding VN's and assigning SGT's to VN's can be accomplished within Cisco DNA Center at: Policy > Virtual Network; this is the only mention of VN's within the context of this document.
Deploy
Adding Contracts
Contracts are added within Cisco DNA Center using the Policy App. Navigate to Policy > Group-Based Access Control > Access Contract
Figure 12: Cisco DNA Center Contracts

The default contracts of deny and permit can be used within policies but more granular contracts can be utilized. To add a more granular contract, select 'Add Contract' from the top right hand corner of the GUI:
Figure 13: Add a Contract
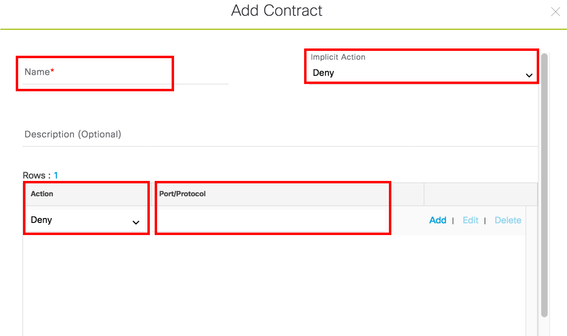
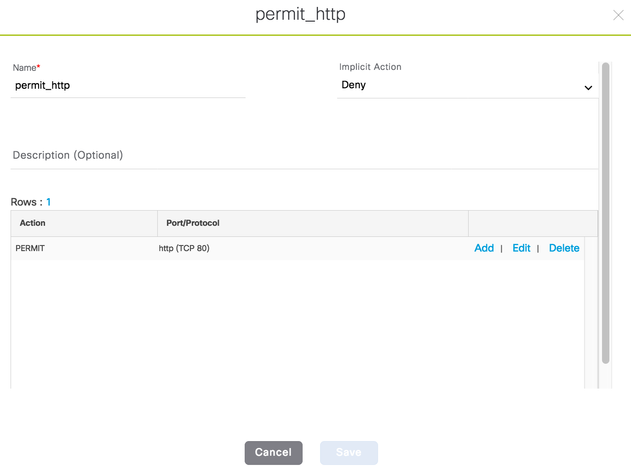
Enter a name for the contract and the implicit action (Deny or Permit).
For row 1 of the actual Access Control Entry (ACE), choose the action (Deny or Permit) and click in the Port/Protocol window to display a list of protocols to choose from; start typing the protocol name of interest for a filtered list.
As an example:
Figure 14: Details When Adding a Contract
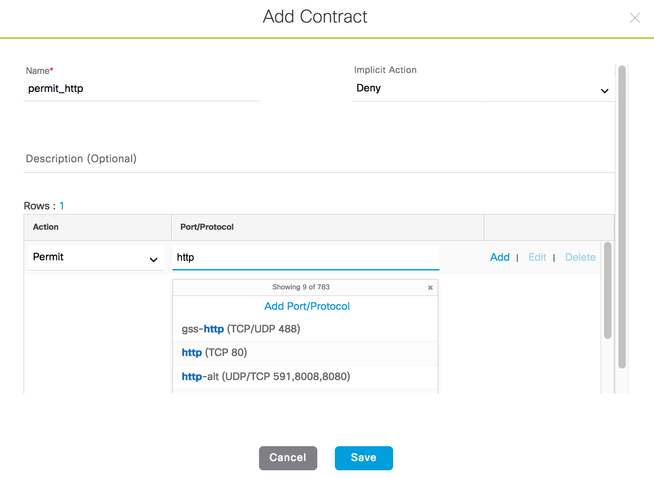
Optionally select 'Add' to add further rows to the ACE list. Click 'Save'.

Note: When a Contract is added into Cisco DNA Center, it is not immediately pushed into ISE.
A contract is only pushed into ISE when a policy is added utilizing that contract.
Adding Policies

Click on 'Add Policy' on the right hand side of the screen.
Enter a policy name and click on 'Add Contract' to select the contract created above. Then drag the source SGT for the policy from the 'Available Scalable Groups' section to the 'Source Scalable Groups' section as depicted below. Additionally, drag the destination SGT for the policy from the 'Available Scalable Groups' section to the 'Destination Scalable Groups' section:
Figure 18: Creating a Group-Based Policy
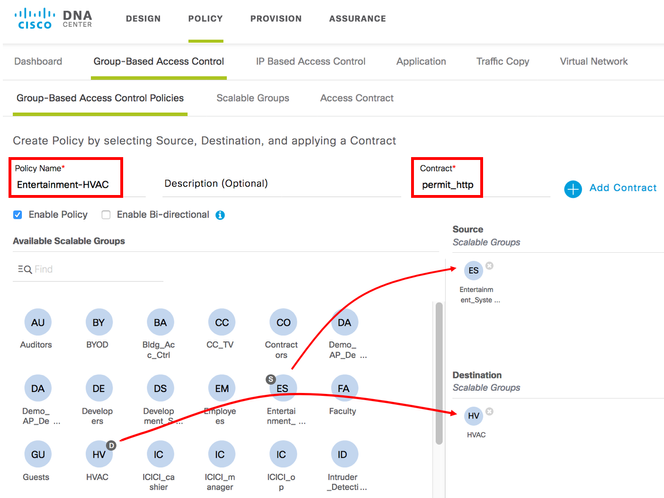
Click on 'Save.
And the Policy can be seen by navigating to Work Centers > TrustSec > TrustSec Policy > Egress Policy > Matrix (hover mouse over the plus icon as shown to display a pop-up of the SGACL):
Figure 20: Policy on ISE Showing the Assigned SGACL
When Cisco DNA Center provisions the policy into ISE, ISE sends a RADIUS CoA to the network devices informing them of the policy change for the destination SGT:
Figure 21: CoA Sent from ISE to Network Devices
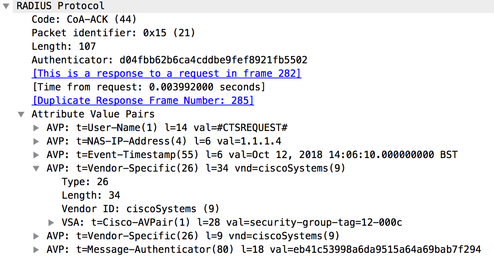
Note: the policy added was from SGT 21 to 18 so ISE informs the network
devices that they need to request policy destined for SGT 18 [Shown as
12 hex in the trace] if the network device needs it i.e. if the network
device contains at least 1 IP:SGT mapping for SGT 18. Remember that
network devices only download policy for SGT's that they need to protect.
Operate
ISE TrustSec Policy Matrix Views
The TrustSec policy matrix on ISE is a great tool for visualizing network wide policy. However there are flexible options to help in focusing on certain aspects of policy or if preference is to list policy in a table format.
On ISE, navigate to TrustSec Work Centers > TrustSec > TrustSec Policy > Egress Policy > Source Tree:
Figure 22: Policy Source Tree on ISE
 This shows the policies in a tree view based on the source SGT. The figure above shows the Entertainment_Systems source SGT expanded to show the details.
On ISE, navigate to TrustSec Work Centers > TrustSec > TrustSec Policy > Egress Policy > Destination Tree:
Figure 23: Policy Destination Tree on ISE
This shows the policies in a tree view based on the destination SGT. The figure above shows the HVAC destination SGT expanded to show the details.
Other matrix views are also possible using the 'View' drop down option at the top of the matrix:
Figure 24: Policy Matrix Views on ISE
The default view is 'Full with SGACL names' but you can choose to display 'Full without SGACL names' to fit more on the screen at the same time. The 'condensed' options are to just display SGT's with policies defined and to omit the other rows and columns.
The 'Show' box seen in the above figure allows custom views to be created to only display certain source and destination SGT's. This allows different parts of the policy matrix to be displayed perhaps for geographical or political reasons for example.
Manual Refresh of Policy
cts refresh environment-data
cts refresh policy
ISE 2.4 Verify Deploy
The 'verify deploy' function is also available on the SGT and SGACL pages.
The results of the 'verify deploy' are currently sent to the Alarms list which can be viewed in the main ISE dashboard or in the TrustSec Dashboard found at Work Centers > TrustSec > Overview > Dashboard.
An example event is displayed below:
Figure 26: Example Event From 'Verify Deploy'
Find answers to your questions by entering keywords or phrases in the Search bar above. New here? Use these resources to familiarize yourself with the community:


