- Cisco Community
- Technology and Support
- Security
- Security Knowledge Base
- Settings to Enable Remote Access VPN Using Cisco AnyConnect Secure Mobility Client (1)
- Subscribe to RSS Feed
- Mark as New
- Mark as Read
- Bookmark
- Subscribe
- Printer Friendly Page
- Report Inappropriate Content
- Subscribe to RSS Feed
- Mark as New
- Mark as Read
- Bookmark
- Subscribe
- Printer Friendly Page
- Report Inappropriate Content
07-24-2014 10:34 AM - edited 08-29-2017 02:29 PM
Introduction
Let me introduce you the ASA setting method for terminating SSL-VPN access from Cisco AnyConnect Secure Mobility Client
in this document. Ultimately, I want to introduce more advanced content like using certificates,
but first, let me start with the most basic configuration in the following settings:
Protocol: SSL-VPN
ASA server certificate: Self-signed
User authentication: AAA (LOCAL)
The platform used this time is ASA5512. The software versions are as follows:
ASA Version: 9.0(3)
ASDM Version: 7.1(4)
Cisco AnyConnect Secure Mobility Client: 3.1.04072
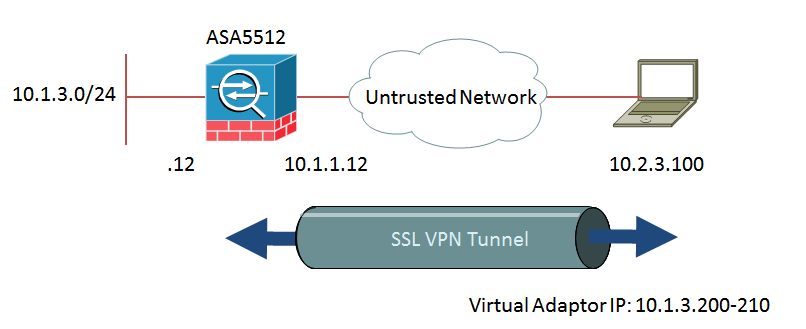
This is the network diagram of Remote Access VPN that you can establish by this configuration example.
Before introducing this configuration example, please check the file attachment named 20131018-initial.conf.
These are the preliminary settings of the device. Basically, I have configured the following settings required for ASDM access: HTTP server settings, IP address settings, and
username settings used for the ASDM login.
Issuing Self-Signed Certificate
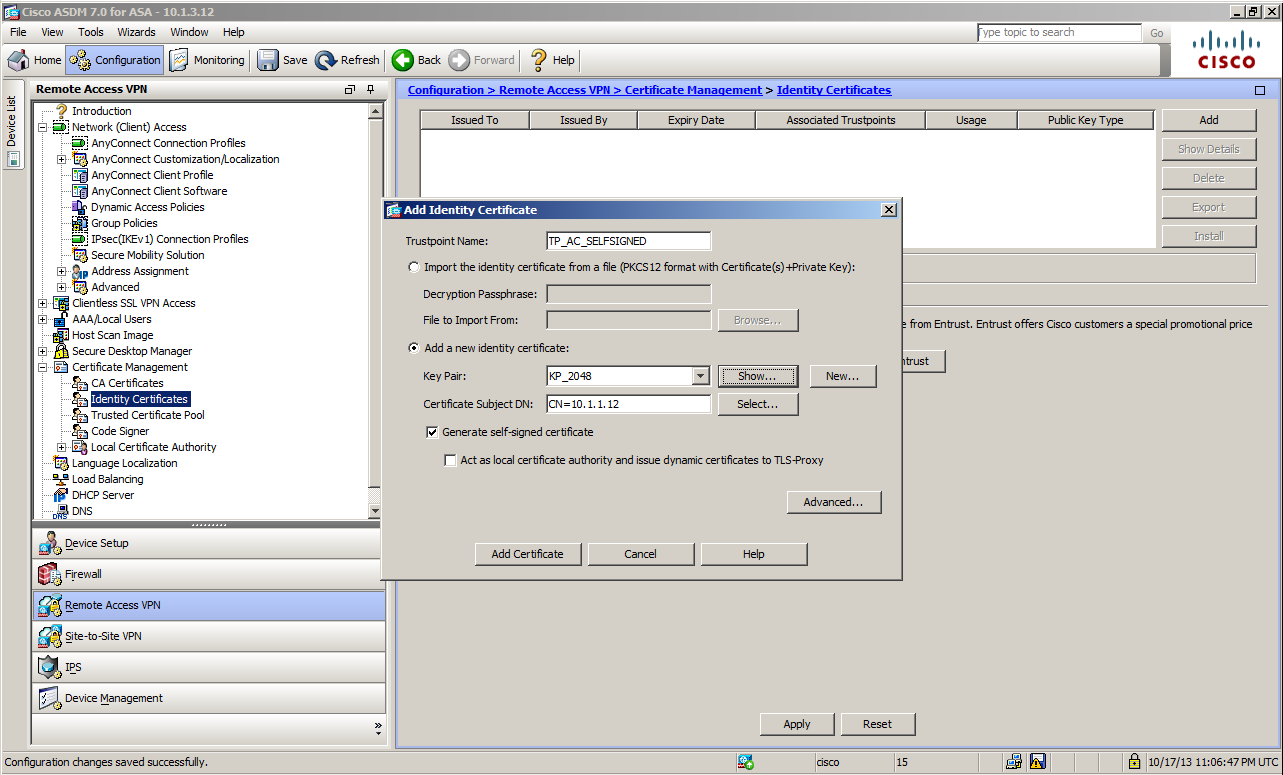
Now, let's get started with the detailed settings. ASA creates a certificate to present to the client as a server certificate.
Go to Configuration > Remote Access VPN > Certificate Management > Identity Certificate
on ASDM and click Add.
This time, you will create a self-signed certificate for ASA itself, so add a check to
add a new identity certificate:
To create an RSA key pair manually, go to Key Pair and click New.
* You can set the key length as small as 512 bytes, but it would be safer to avoid a key length of less than 1024 bytes because of this KB.
http://support.microsoft.com/kb/2661254/ja
For the Subject DN field, be sure to set the host name and the IP address for CN (Common Name) to allow the client access to ASA.
In this example, the client uses the IP address to reach ASA without going through DNS or NAT.
So, I have configured
CN=10.1.1.12
This is the ASDM screen example.
Configuring and Uploading Cisco AnyConnect Secure Mobility Client Image
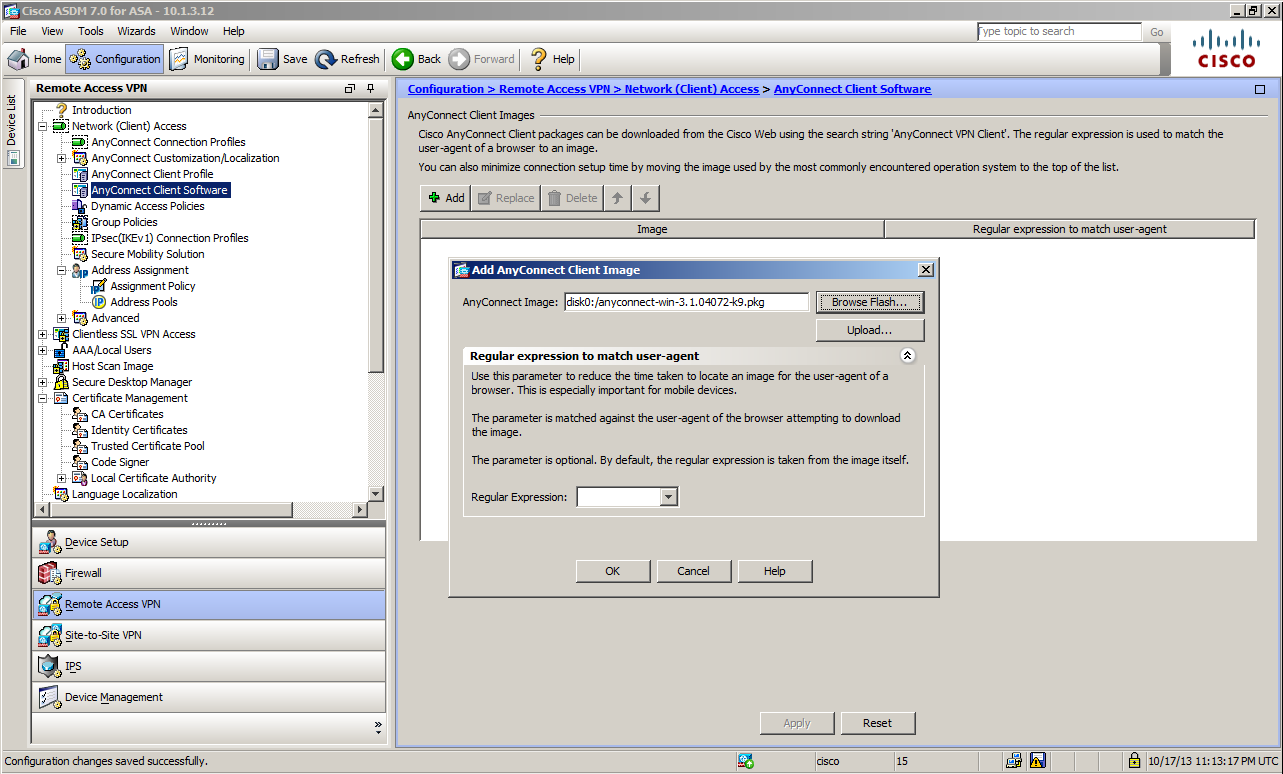
Next, we will configure the AnyConnect image used on ASA. To configure this setting, the AnyConnect
package file must exist on ASA in advance. As mentioned earlier, we will use anyconnect-win-3.1.04072-k9.pkg this time.
To configure AnyConnect image, go to
Configuration > Remote Access VPN > Network (Client) Access > AnyConnect Client Software.
Defining Local Address Pool
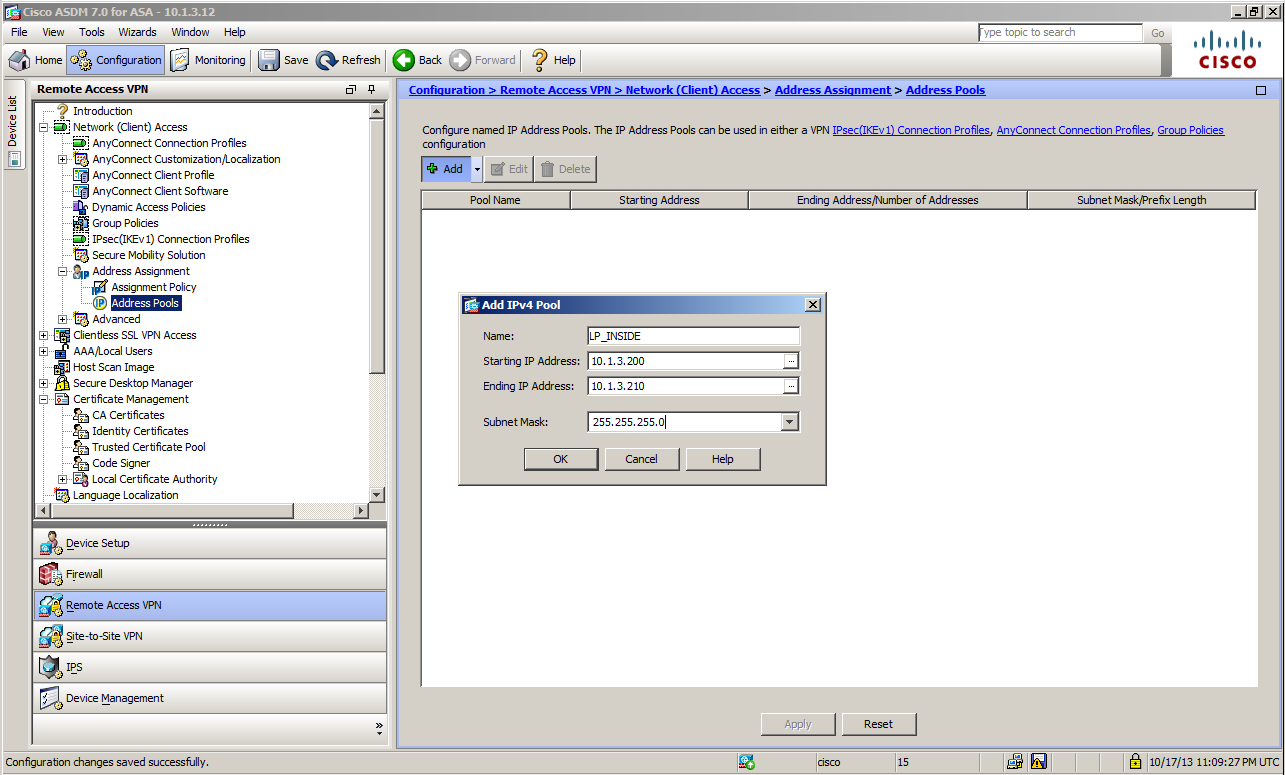
Next, we will define the pool of IP addresses dispensed to the client during the connection via AnyConnect.
To configure Local Address Pool, go to
Configuration > Remote Access VPN > Network (Client) Access > Address Assignment > Address Pools
on ASDM.
In this example, the fourth octet 200 - 210 will be dispensed to the client from the same range as the inside subnet of ASA.
So, the settings are as shown in the screen below.
The Local Address Pool defined here can be configured by the Group Policy of various Connection Profiles (tunnel-group).
If the Pool configured for tunnel-group and the Group Policy are different, the one configured to the Group Policy of narrower range takes precedence. * This concept applies for the other items as well.
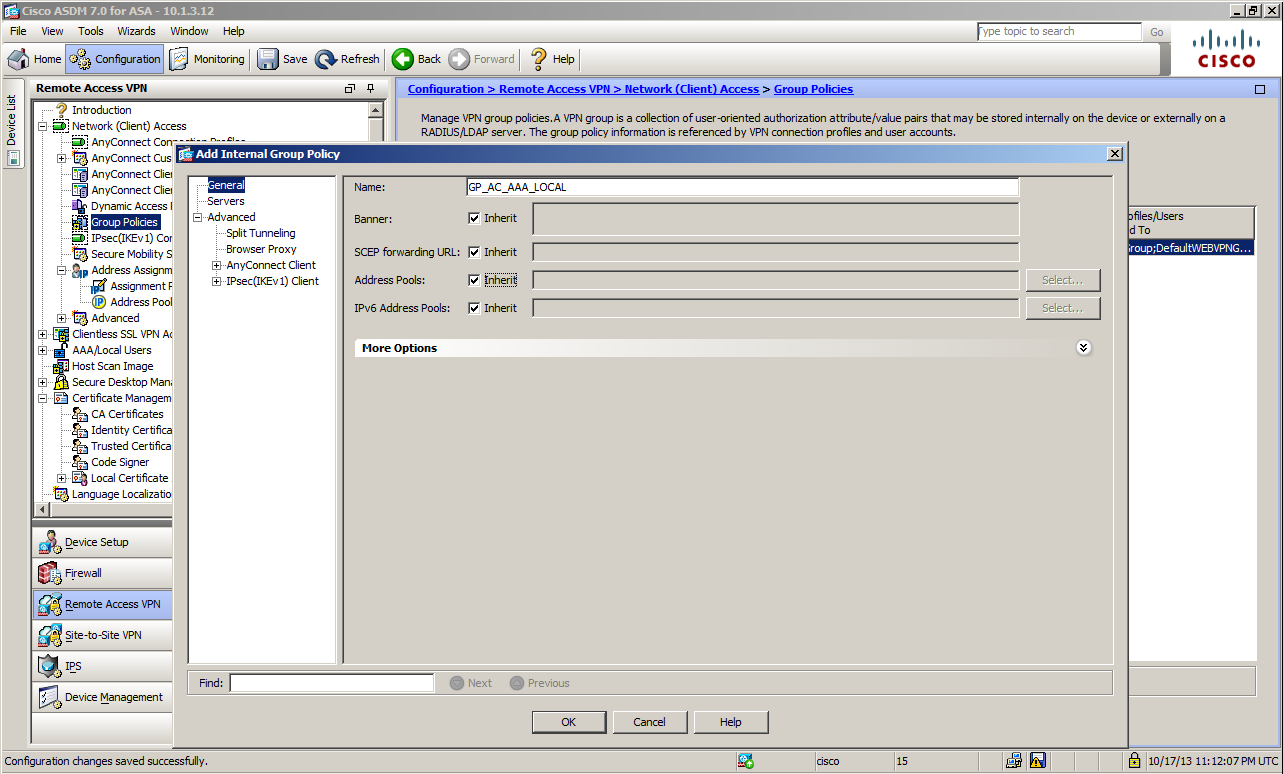
Defining Group Policy
Here, we will define the policy applicable to each group when establishing a connection from AnyConnect.
The Group Policy can be defined as the settings used for assigning different policies for terminal users in the same Tunnel Group according to the group to which each belongs. You can use it by editing the default DfltGrpPolicy,
but you are encouraged to add a new policy under this procedure.
The Group Policy named GP_AC_AAA_LOCAL has been created in the below example.
Selecting ID Certificate Used for AnyConnect Connection
Configure the self-signed certificate created at Step 1 to be used as a server certificate for the AnyConnect connection.

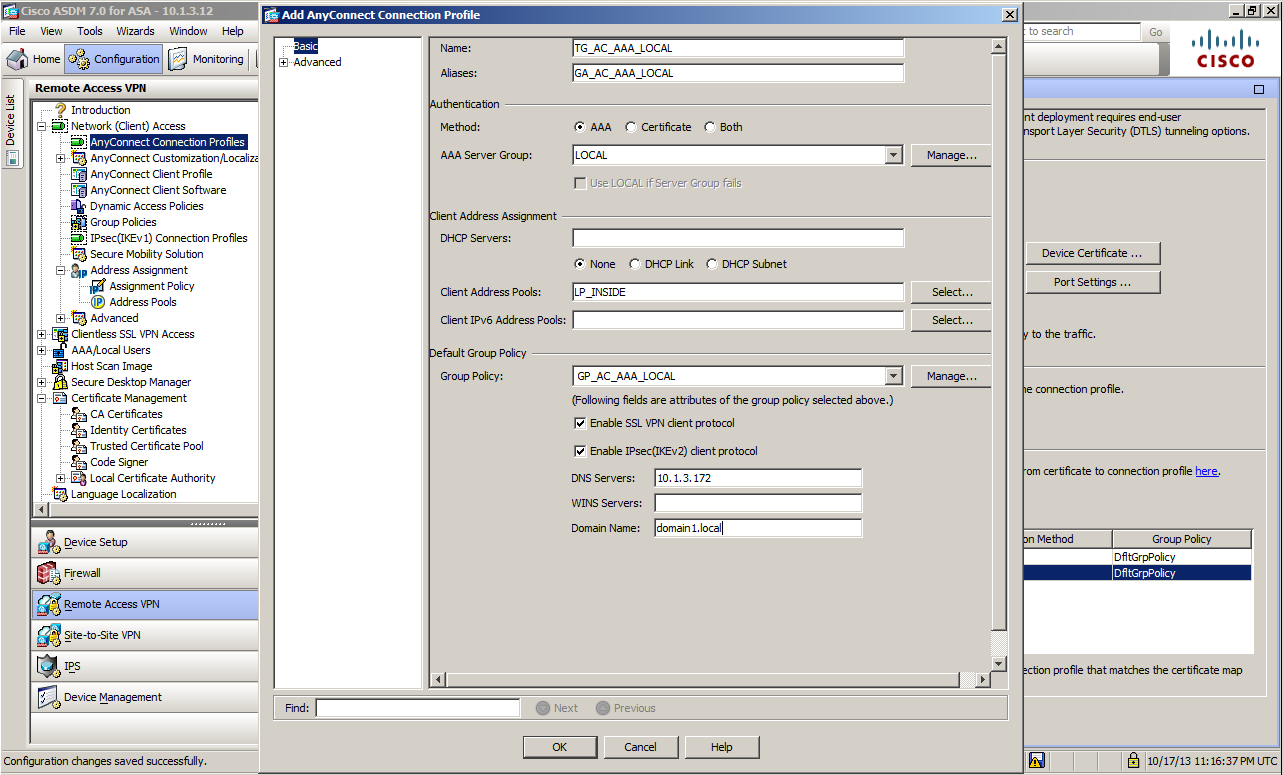
Defining Connection Profile (Tunnel Group)
We will define Tunnel-Group used for terminating VPN from AnyConnect.
Tunnel-Group is the configuration item where you define policies applicable to the connection itself, such as which connection protocol or which authentication method used.
You will configure the authentication method in the Authentication field. But this time, we have configured the ASA settings itself (LOCAL) as the user database using AAA (method of using user name and password). With LOCAL specified, the authentication executes by the username command or the user information created by "Configuration > Remote Access VPN > AAA/Local Users > Local Users".
For Client Address Pools:, you will set the Pool that has a definition of the IP address dispensed to the client after being connected. This time, we will select LP_INSIDE defined at Step 3.
For Default Group Policy, specify the Group Policy applied as default when no exception is set to the subsequent processing. The Group Policy defined at Step 4 named GP_AC_AAA_LOCAL is selected. In addition to the method introduced here, you can select Group-Policy by the VPN Policy settings of Local User. If the policy is different for Tunnel Group and Local User VPN Policy, the value of Local User takes precedence.
Besides the above settings, you can also set the DNS server address or domain name used by the client after the connection has been established.
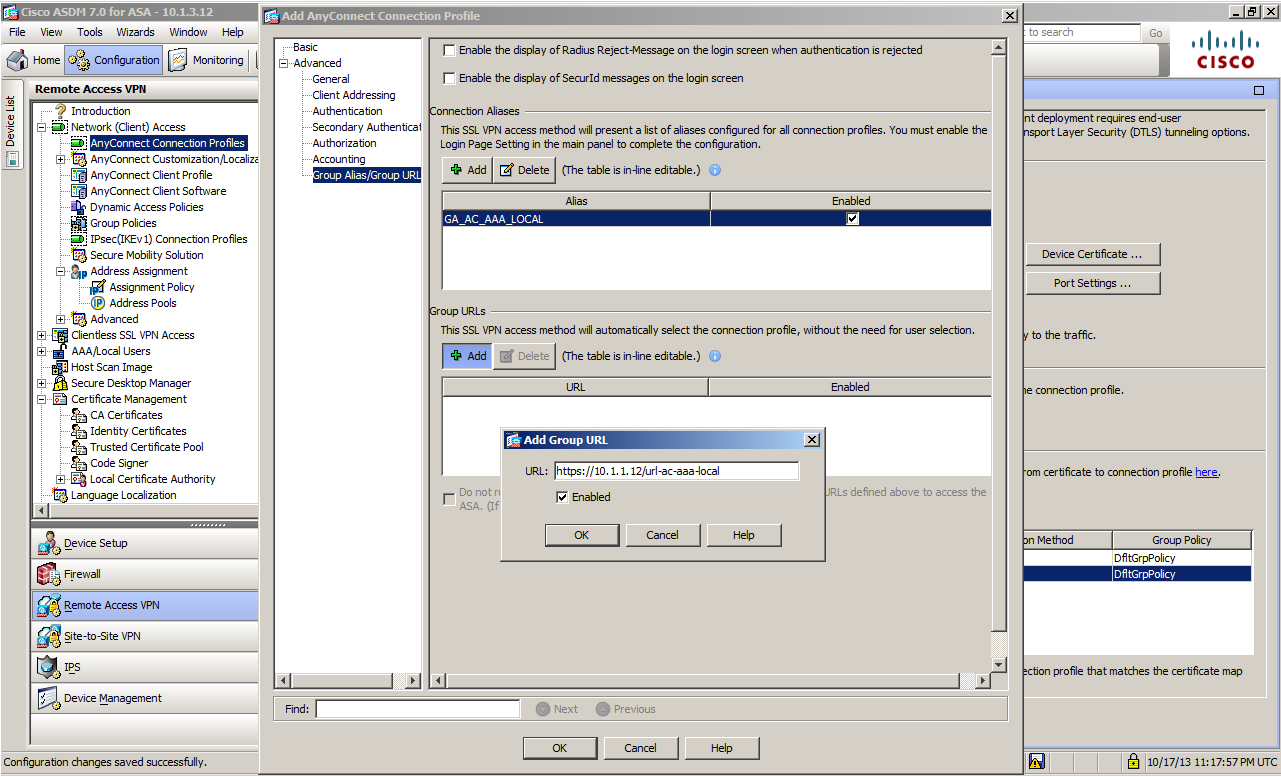
Group URL Settings
You can configure items other than the Step 6 item for the Tunnel Group. Considering convenience when connecting via AnyConnect, the typical operation would distribute AnyConnect Client Profile from ASA and select the Profile used by the client side while being connected. In that case, configuring the Group URL to the Tunnel Group allows you to change the Tunnel Group to connect by selecting a different Profile. It would be safer to configure this setting considering scalability. * If you use a certificate for client authentication, you can configure the Tunnel Group to connect in a different way (Certificate Map) instead of the Group URL, but I will not discuss this further here. In addition, the following method is also possible as a totally different approach. Configure Group Alias when you define the Tunnel Group. Go to
Configuration > Remote Access VPN > Network (Client) Access > AnyConnect Connection Profiles
and add a check to allow a user to select a connection profile, identified by its alias, on the login page. Otherwise, Default WebVPNGroup will be the connection profile.
With this setting configured, a pop-up will appear so that a connected user will select a Tunnel Group to use.
In the following example, the Tunnel Group called TG_AC_AAA_LOCAL is set to https://10.1.1.12/url-ac-aaa-local, which is the Group URL. With this setting, when you specify the address to connect as 10.1.1.12/url-ac-aaa-local for both the browser-based and client-based access, the Tunnel Group TG_AC_AAA_LOCAL will be applied automatically.
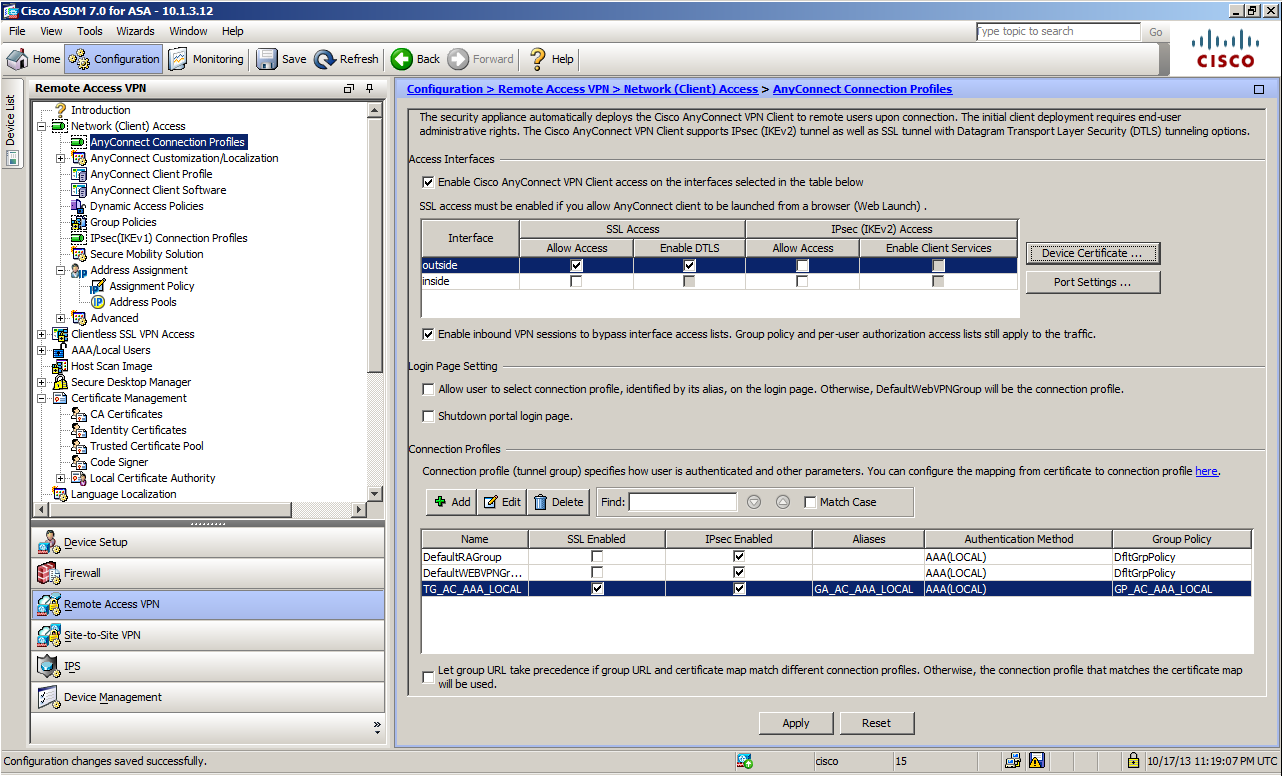
AnyConnect Connection Profile Setup Screen
This is an example of the Connection Profile set-up screen after completing Steps 5 through 7.
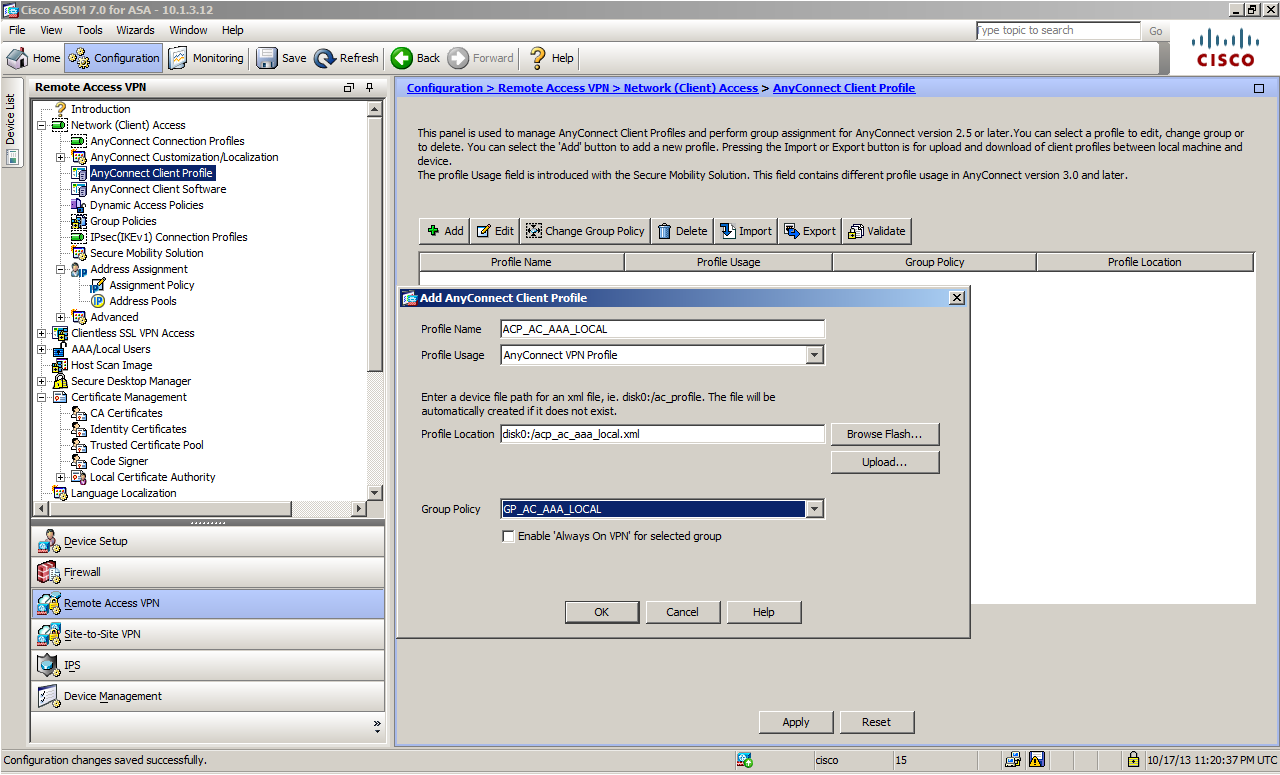
Creating AnyConnect Client Profile
We will create a Client Profile to be distributed to the client once the connection has been established and will be used to control the behavior and connection.
You can associate the Client Profile for each Group Policy. When establishing a VPN connection with the corresponding Group Policy applied, the profile will be distributed to the client automatically. The profile can be selected the next time that the connection is established.
First, select a Client Profile name and an associated Group Policy to create a file.
This time, I named this file as ACP_AC_AAA_LOCAL and pegged this to the Group Policy called GP_AC_AAA_LOCAL.
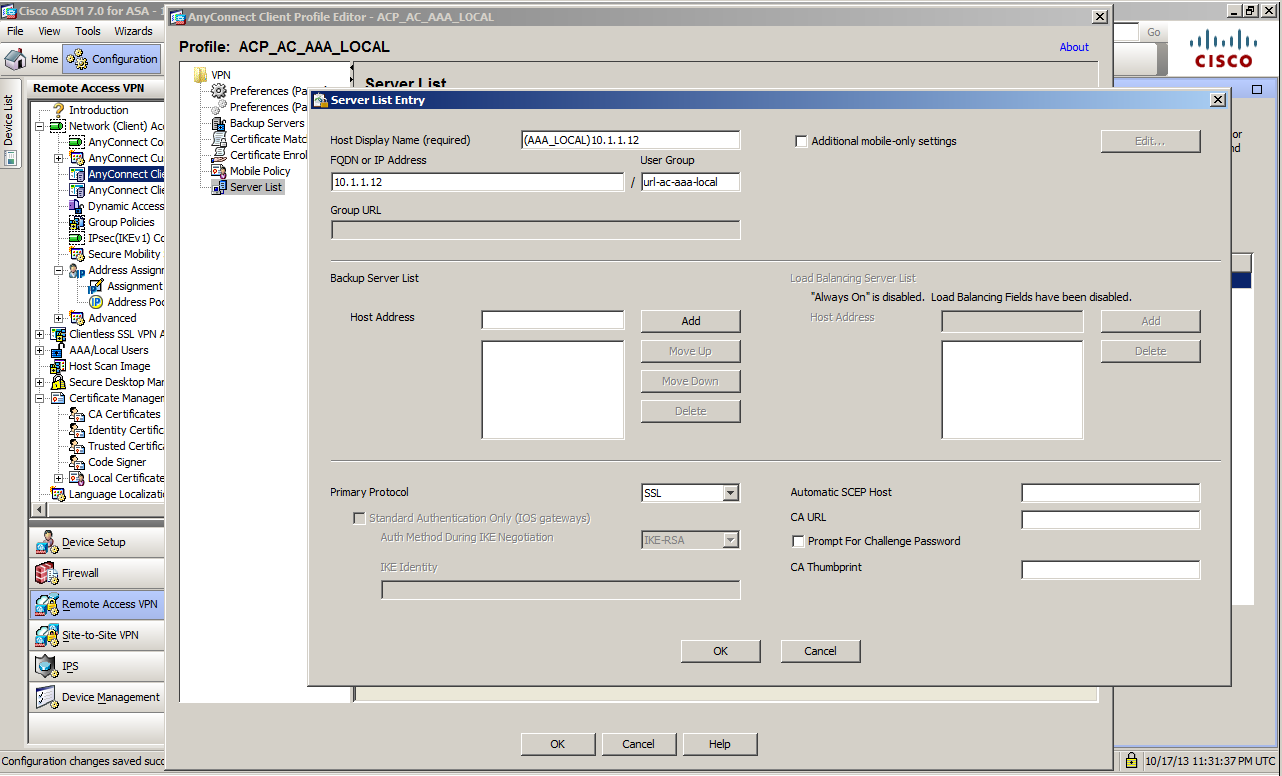
Client Profile Settings
After creating a Client File, configure its content. There are various parameters to control the client behaviors, but the Server List is the mandatory information to configure. This is the field where you set the ASA address used as the destination address with the corresponding profile selected on the client side.
The screenshot below is the server list setting screen on ASDM.
Host Display Name (required) is the information displayed as the destination name on the client.
I set this field to the name (AAA_LOCAL)10.1.1.12.You can use arbitrary character strings for this field.
For the FQDN or IP Address field, describe information of the destination ASA to connect with the above mentioned destination name selected on the client. In this example, I have configured the IP address 10.1.1.12 and url-ac-aaa-local that was configured as the Group URL. This field must be the network description.
The protocol used for the connection here is SSL, but if you will be using protocols as IPSec/IKEv2, you can change it in the Primary Protocol settings here.
You have now completed the ASA settings. All you need to do from here on is establish a connection from the client side.
Web Deploy/Web Launch
With AnyConnect, you can distribute the client software to the terminal with no client installed by browser-based access.
In addition, you can also have the terminal with the client installed start a VPN connection automatically by browser-based access.
This is the screen capture on the client side using Web Deploy when distributing the software to the terminal with no client installed.
First, access the Group URL configured at the Tunnel Group settings using a browser.

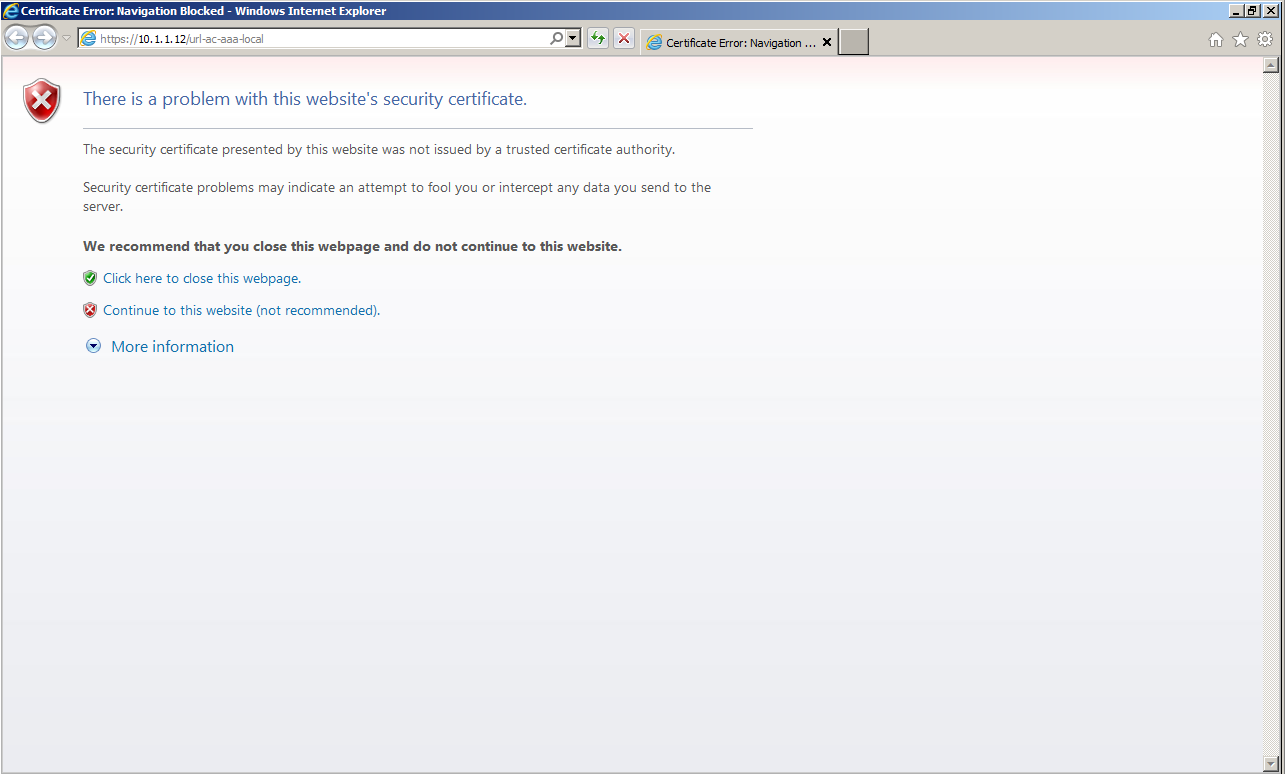
A warning screen appeared here because the certificate that ASA uses as a server certificate is self-signed and not trusted on the client.
Trust it for now and select Continue to this website.
Then, a login page to ASA appears. You should be able to confirm that a certificate error has occurred if you look at the box to the right of the URL bar. To trust this certificate from ASA hereinafter, click "Certificate Error" here and proceed to View Certificate. Click Install Certificate to add this certificate to the Trusted Root Certification Authorities store.
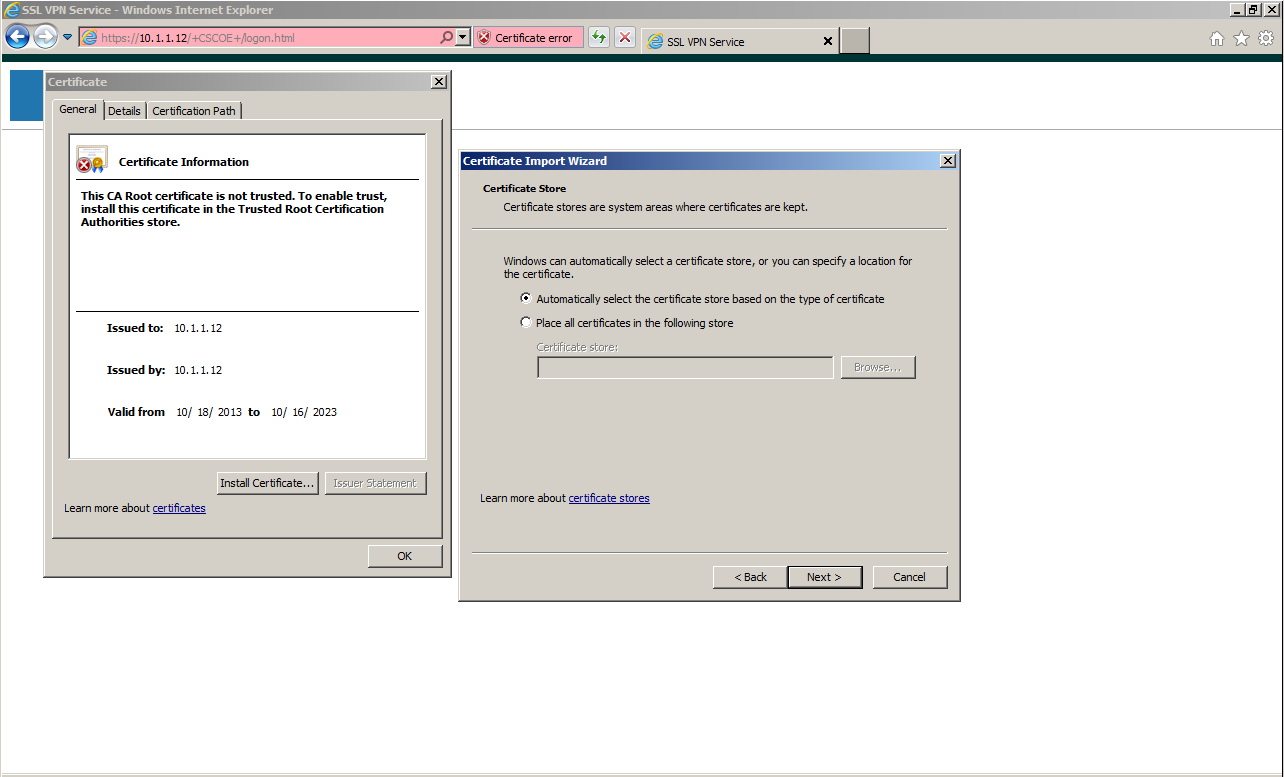
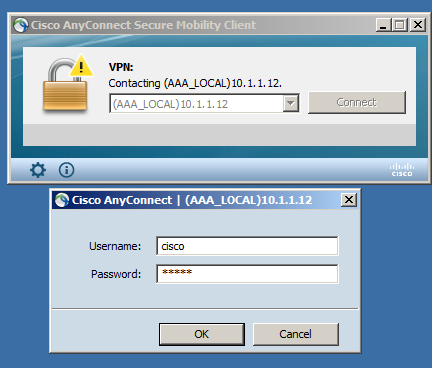
After adding the certificate, enter the user name and password to log in.
Once you are successfully logged in, ActiveX Control from ASA will be transmitted. A prompt message to enable the execution on the browser side appears. Click Allow.

Then, the installation starts automatically.
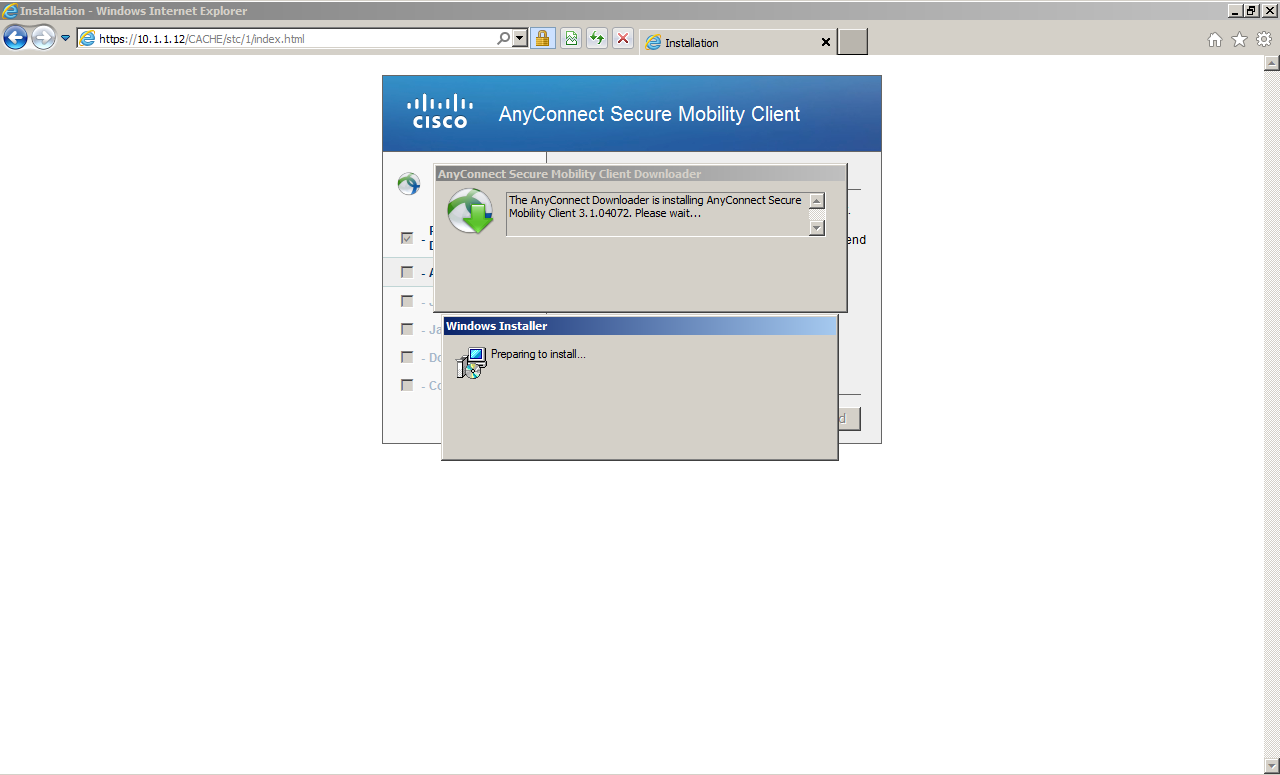
Once the installation completes, the VPN connection will be established automatically.
Pre-Deploy Procedure
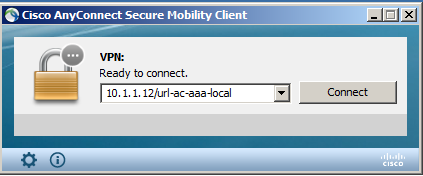
If the client software was installed in advance, you can specify the Tunnel Group to connect by entering an address with the Group URL in the text box where you specify the destination and clicking Connect.
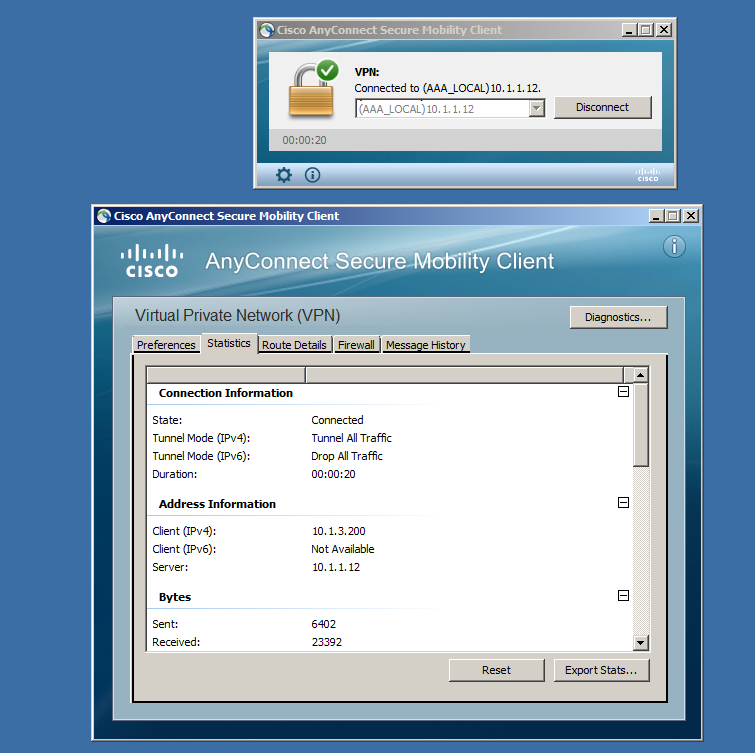
Once you have been connected successfully, the Client Profile will be automatically distributed. Next time, the connection to the corresponding ASA will be established just by selecting the Profile.
The screen output when the connection has been established
This is the ASA configuration after completing all the settings explained here. Click the link to view the attachment.
Related Information
Original Document: https://supportforums.cisco.com/ja/document/11936906
Author: Michio Arai
Posted on October 18, 2013
Find answers to your questions by entering keywords or phrases in the Search bar above. New here? Use these resources to familiarize yourself with the community: