- Cisco Community
- Technology and Support
- Security
- Security Knowledge Base
- Threat-Centric NAC Service: Integrate Cisco ISE with Tenable SC
- Subscribe to RSS Feed
- Mark as New
- Mark as Read
- Bookmark
- Subscribe
- Printer Friendly Page
- Report Inappropriate Content
- Subscribe to RSS Feed
- Mark as New
- Mark as Read
- Bookmark
- Subscribe
- Printer Friendly Page
- Report Inappropriate Content
07-10-2024 02:20 AM - edited 10-01-2024 03:13 AM
- Introduction
- Flow
- Case Study:
- Case1-When ISE has no endpoint vulnerability information:
- Case2-Endpoint reconnects to network and Cisco ISE has vulnerability info
- Case3-Vulnerability info present in Cisco ISE is beyond configured hours:
- Case4-Reassessment of vulnerability info:
- Components Used
- Tenable SC Configuration
- Admin Configuration
- Scan Policy Configuration
- Cisco ISE Configuration
- Enabling Threat Centric NAC Service
- Configuring Tenable Vendor Instance
- Configuring Policies
- Validation
Introduction
Cisco Identity Services Engine (ISE) is aligned with Zero Trust. Cisco Zero Trust is a comprehensive approach for securing access across your users, devices, applications, and environment. Cisco Zero Trust involves 3 solutions called Workforce, Workplace and Workloads. Workplace is about giving right privileges/access to the users and devices connecting to the network over wired, wireless, VPN and/or 5G. Workforce is about providing right level of access privileges to the users and/or devices accessing your protected applications. Workloads is to apply policies and have audit for securing your on-prem or cloud applications. Cisco ISE is aligned with Workplace-Cisco Zero Trust solution where users and devices gets right privileges/access when they connect to the network. Cisco ISE provides intent-based policy and compliance solution on top of AAA. Cisco ISE can be integrated with Threat Centric NAC vendors such as Cisco Secure Endpoint (formerly AMP), Qualys, Nexpose and Tenable to assess vulnerabilities and/or threats associated with the endpoint connecting to your network and give secure access according to the policy definitions. As a Security/Network administrator, you can check for compliance of an endpoint and continuously verify the trust of an endpoint based on vulnerabilities and threats associated to give the proper privileges to the network whenever they connect.
Tenable Security Center integrated with Nessus Scanner can scan the endpoint for vulnerabilities and returns the CVSS score of the endpoint back to Cisco Identity Services Engine (ISE). As an Administrator, you can write policies in Cisco Identity Services Engine (ISE) based on the base/temporal CVSS score returned by the Tenable Security Center so that endpoints get differentiated privileges based on the policies defined. For eg., You can write Authorization Policy to deny the access to the endpoints when the endpoints have CVSS score more than 8. You can also continuously validate the Threats and Vulnerabilities associated with the endpoint using the Tenable Security Center integration via TC-NAC service.
Flow
When endpoints connect to the network for the first time, Cisco Identity Services Engine (ISE) does not have a visibility to endpoint vulnerabilities assessed from Tenable SC. As per Cisco Zero Trust comprehensive approach, for providing differentiated privileges based on the vulnerabilities associated to the endpoint, Cisco ISE needs to request the Tenable Security Center for assessing the vulnerabilities of the endpoints connecting to the network. Once Tenable SC scans(using Nessus Scanner) the endpoint based on the policies, Cisco ISE gets the vulnerability information from Tenable SC and updates the endpoint with vulnerability info (Plugin-ID, Vulnerability Title, Base & Temporal CVSS Score, CVEIDs). As and when vulnerability information gets updated, Cisco ISE issues CoA to give differentiated privileges based on the policies written. Below cases are possible throughout the endpoint life cycle.
Case Study:
Case1-When ISE has no endpoint vulnerability information:
When an endpoint connects to the network newly, Cisco ISE requests Tenable Security Center to scan the endpoint for vulnerability info. Cisco ISE gets the vulnerability information from Tenable SC when Nessus Scanner completes the scanning of an endpoint. Upon receiving latest information about the endpoint, Cisco ISE stores the info into it's cache, updates the endpoint and issues CoA to give different privileges based on the policies configured.
Case2-Endpoint reconnects to network and Cisco ISE has vulnerability info
When the same endpoint reconnects to the network and if Cisco ISE has vulnerability information about the endpoint, Cisco ISE gives access to endpoint based on the Base/Temporal CVSS Score (Threat.Tenable-CVSS_Base_Score/Threat.Tenable-CVSS_Temporal_Score conditions) configured under policies
Case3-Vulnerability info present in Cisco ISE is beyond configured hours:
As an administrator you can force Tenable SC to scan the endpoint to get the latest vulnerability info if the last scan result is more than X hours (say 48 hours). When the same endpoint reconnects to the network and if Cisco ISE has last vulnerability scan result’s timestamp which is more than configured interval time under authorization profile, then cisco ISE requests Tenable SC to scan the endpoint again to get the latest vulnerability info.
Below is the example of authorization profile
Case4-Reassessment of vulnerability info:
You can configure Cisco ISE to let the Tenable SC to scan the endpoint periodically (for every X hours) to get the latest vulnerability information periodically.
Below is the example of Authorization profile
Components Used
- Cisco ISE 3.4
- Tenable SC 6.1 or 6.2
- Nessus Scanner 10.6.2
- Windows 11 client
NOTE: Tenable SC 6.3 and beyond version requires you to change the SCAN_DEFAULT_SCAN_TIMEOUT to make the integration work. This is the workaround possible at this point of time. We are also planning to come up with enhancements in later ISE releases to make this integration more smoother. Please refer to https://community.tenable.com/s/question/0D5Ki000002qysQKAQ/please-modify-inactivity-timeout-getting-this-error-when-doing-network-scan-on-tenable-sc?language=en_US
Tenable SC Configuration
Considering you have installed Tenable SC 6.1 or 6.2 along with Nessus Scanner. Below section shows you very basic configuration for reference only. Please refer to https://docs.tenable.com/security-center/Content/GettingStartedWorkflow.htm for more details. Here is the lab setup at high-level.
Admin Configuration
- Integrate Nessus Scanner to Tenable Security Center
- Make sure the Security Center Feed, Active Plugins, Passive Plugins and Event Plugins are up to date.
- Scan zones are areas of your network that you want to target in an active scan, associating an IP address or range of IP addresses with one or more scanners in your deployment. You must create scan zones in order to run active scans in Tenable Security Center. You can make use of Default Scan Zone below
- Repositories are databases within Tenable Security Center that contain vulnerability data. You can share Repositories with users and organizations based on admin-defined assets. Repositories provide scalable and configurable data storage. Configured Repositories below to for client’s subnet. “BLR” Repository is being used in this example where the client’s vulnerability information is present.
- An organization is a set of distinct users and groups and the resources (for example, scanners, repositories, and LDAP servers) they have available to them. Configured Organizations below and associated Nessus Scanners to it.
- Configure Security Manager user with which Cisco ISE can be integrated with Tenable SC. *You can’t make use of admin credentials for the integration purpose.
Scan Policy Configuration
- Login to Tenable SC using security manager credentials, navigate to Scans > Policies and create a policy below using basic scan template. Please refer to https://docs.tenable.com/security-center/Content/Top_Configure.htm for more details. This document makes use of "BasicScan_Latest" at the time of configuring Cisco ISE Tenable adaptor configuration in later section.
Cisco ISE Configuration
Considering you have already deployed a Tenable Security Center and Nessus Scanner in your enterprise to scan and provide vulnerability information to Cisco ISE, this section will give you details on how to integrate Cisco Identity Services Engine with Tenable Security Center.
Enabling Threat Centric NAC Service
- In order to enable Threat Centric NAC service, you must have Premier licenses available. Ensure that your ISE deployment has required premier licenses available. For eg., if x no. of endpoints (Sessions) are supposed to be going through the vulnerability assessment, then you must have those many number of premier licenses which includes all features along with compliance. Refer to https://cs.co/ise-licensing for more information.
- Login to ISE admin portal with super admin privileges
- In order to enable Threat Centric NAC service, you must have Premier license available. Ensure that your ISE deployment has required premier licenses available.
- Navigate to Administration > System > Deployment > <ISE PSN Node> and enable “Enable Threat Centric NAC Service” check box
NOTE: You can enable Threat Centric NAC Service on one single PSN in your ISE Deployment.
- Wait for few minutes for the ISE to bring up the Threat Centric NAC service. You can check the service status by login to CLI of PSN node where Threat Centric NAC Service is enabled and executing command “show application status ise”. Make sure the “TC-NAC MongoDB Container”, “TC-NAC core Engine Container”, “VA Database” or “VA Service” is in running state
Configuring Tenable Vendor Instance
- Navigate to Administration > Threat Centric NAC > Third Party Vendors and click ADD. Select “Tenable Security Center : VA” as the vendor and provide Instance Name (eg., Tenable) for ISE Policy reference.
NOTE: You can configure multiple "Tenable Security Center : VA" if you have multiple Tenable Security centers.
- Save the configuration and wait for few seconds for ISE to bring up separate container service. After few seconds, the status of configured “Tenable : VA” will show up as “Ready to Configure”
- Fill in the below details
- Tenable Security Center Host – Hostname provided here must be resolved by Cisco ISE and you must import the certificate of Tenable Security Center into Cisco ISE Trusted Certificates to have a secure communication between ISE and Tenable Security Center Host.
- Tenable Security Center port – Tenable Security Center port number. By default it is 443.
- Username/Password – Security Manager (not the admin)credentials for connecting to Tenable Security Center host.
- HTTP Proxy/port – Provide HTTP Proxy IP/hostname and Port number if Tenable Security Center can be contacted via Proxy Server. Leave it blank if Cisco ISE is able to communicate with Tenable Security Center directly.
- Click Next, select the Repository and Scan Policy drop down, leave the rest of the settings as default and click on Next
- Leave the default configuration as is and click on Next to review and save the configuration. ISE will try to connect to Tenable Security Center server.
- Make sure Tenable SC adapter configured above was showing active and connected status as shown below
Configuring Policies
- (optional)Navigate to Administration > Identity Management > Identities > Users, click on Add to configure an internal user. Provide Details like username and password and submit the configuration. You can also make use of other identity sources users to authenticate the user. This document makes use of Active directory user for authentication purpose in validation section
- Navigate to Work Centers > Network Access > Network Resources > Network Devices, click on ADD to configure Network Access device. Provide details such as name, IP address of WLC (in this example) and shared secret.
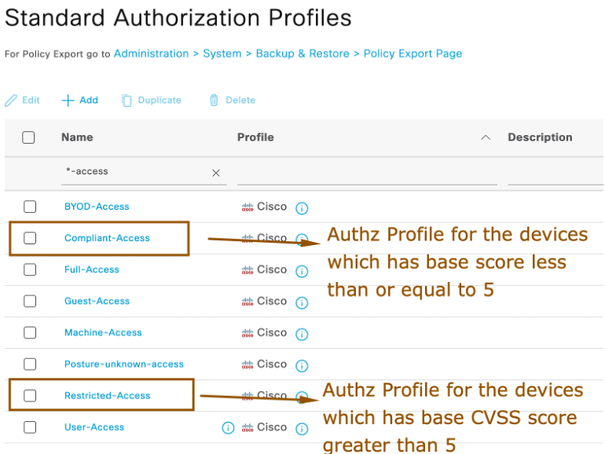
Similarly, you can configure all your NADs from which users/devices connecting to network. - In order to give differentiated privileges for devices based on their vulnerabilities, you should create authorization profiles first. In this guide, my intention is to provide 3 differentiated accesses based on Base CVSS score. Of course, you can also take Temporal CVSS Score into consideration while building the policies
- Initial access for the devices where vulnerabilities are not known to Cisco ISE.
- Corporate/Compliant access, if the device’s CVSS Base Score is less than 5
- Restricted Access if the device’s CVSS Base score is greater than or equal to 5
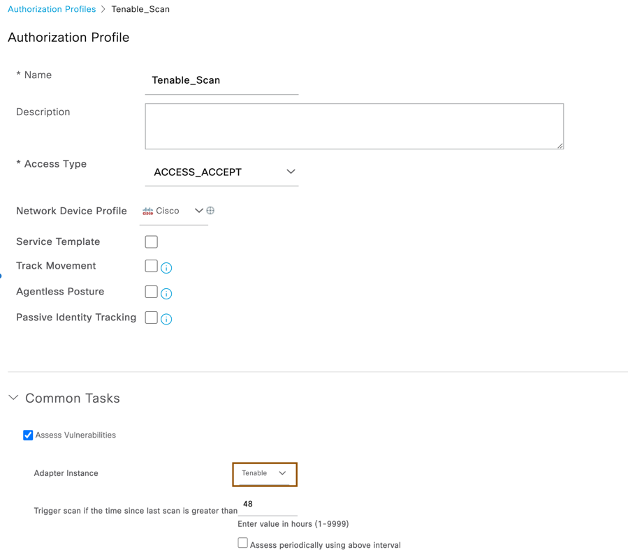
- First, let’s create Initial access where ISE requests Tenable to scan the endpoint for vulnerabilities (case1 above). Navigate to Policy > Policy Elements > Results > Authorization > Authorization Profile and click on Add. Provide Name of the authorization profile “Tenable_Scan”, and enable Assess Vulnerabilities under common tasks by selecting Tenable (name of the Tenable Security Center VA server given earlier) as the adaptor instance.
NOTE: You can enforce different ACLs or dACLs or VLANs based on your need to give initial access to endpoints connecting to network where ISE doesn’t have visibility to endpoint’s vulnerability info. Leave the default values as is and save the Authorization Profile. - Create two more Authorization profiles called Compliant-Access and Restricted-Access for the endpoint’s for which base CVSS score is less than 5 and is greater than or equal to 5 respectively.
- Now that you have created Authorization profiles, let’s create authorization policies. Navigate to Policy > Policy sets > Default policy set(you can also create a new Policy Sets). Leave the authentication policies as is and configure one authorization policy for assessing vulnerabilities of successful dot1x users’ devices by Tenable and select authorization profile “Tenable_Scan”
NOTE: Optionally, you can also enforce Security Group=Unknown. - Create one more authorization policy for the devices whose base CVSS score is less than 5 as shown below.
NOTE: Optionally, you can enforce SGT=TrustedDevices - For the devices whose base CVSS score greater than or equal to 5, let’s create a Global Exception authorization policy. Go to “Authorization Policy - Global Exceptions” section under Default Policy set, configure one authorization policy for devices having base vulnerability score greater than or equal to 5 (say) to give restricted/deny/ISE blackhole page.
NOTE: it is advised to create global exception policies as it is going to be common for all policy sets and better way to give restricted access for all vulnerable endpoints coming onto your network irrespective of Policy sets they match.
Validation
- Authenticate the device using the user credentials created in earlier section or authenticate the user with AD credentials(if AD is already integrated with cisco ISE)
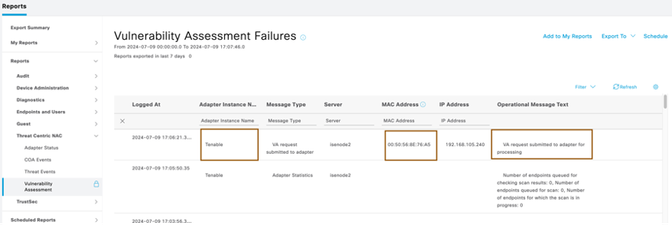
- Ensure ISE submitted the authenticated session of endpoint for vulnerability assessment to Tenable Security Center by going to Operation > Reports > Reports > Threat Centric NAC > Vulnerability Assessment
- Login to your Tenable Security Center Dashboard using Security Manager and look for the active scans.
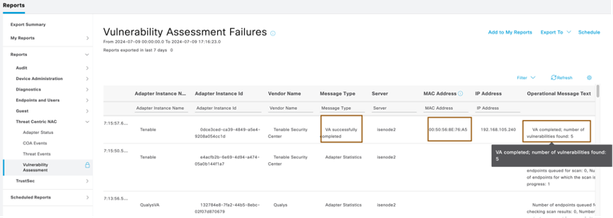
- Wait for few minutes in order to let the Tenable SC to complete the scanning of endpoint. The time taken for the scanner to complete the scanning the endpoint is completely relied on the Tenable Policy definition and your deployment topology.
- Come back Cisco ISE and run the report Operation > Reports > Reports > Threat Centric NAC > Vulnerability Assessment. You can filter out the events based on the MAC address or IP Address or Adapter Instance Name.
- Run the Threat Events report under Operations > Reports > Reports > Threat Centric NAC to see the threat events of the endpoint.
- Run COA report under Operations > Reports > Reports > Threat Centric NAC to see whether Cisco ISE issued COA once upon receiving the vulnerability info from Tenable SC. Since the endpoint base CVSS score is 5 in this example, it should match with global exception policy. (or)
- You can also see the CoA event from Operations > Threat-Centric NAC Live Logs (or)
- You can also see this from live logs
- To look at the vulnerability info retrieved from the Tenable SC, navigate to Context Visibility > Endpoints > Vulnerable Dashboard.
- Click MAC Address from list and navigate Vulnerabilities section to see all the vulnerabilities identified by Tenable SC.
- Optionally, you can periodically scan the endpoint under Compliant-Access or Restricted-Access authorization profile created earlier to assess the vulnerabilities periodically in order to give differentiated access based on the latest scans.
- Optionally, you can also make use of DataConnect feature in order to get the config and operational data out of Cisco ISE by connecting your ODBC clients to Cisco ISE database. You can refer to https://developer.cisco.com/docs/dataconnect for more details.
Find answers to your questions by entering keywords or phrases in the Search bar above. New here? Use these resources to familiarize yourself with the community:


