- Cisco Community
- Technology and Support
- Security
- Security Knowledge Base
- Upgrading to Identity Services Engine 2.1 in a Distributed Environment
- Subscribe to RSS Feed
- Mark as New
- Mark as Read
- Bookmark
- Subscribe
- Printer Friendly Page
- Report Inappropriate Content
- Subscribe to RSS Feed
- Mark as New
- Mark as Read
- Bookmark
- Subscribe
- Printer Friendly Page
- Report Inappropriate Content
01-25-2017 01:53 PM - edited 07-27-2018 05:06 AM
This document was created in an effort to have a single guide to follow for upgrading ISE from 1.3 or 1.4 to version 2.1
- Preparation
- Create Repository and Copy the Upgrade Bundle
- Backup Configuration and Operational Data from the ISE Primary Administration Node
- Back Up System Logs from the Primary Administration Node
- Export Certificates and Private Keys
- Backup and Restore of Cisco ISE CA Certificates and Keys
- Obtain Active Directory and Internal Administrator Account Credentials
- Activate MDM Vendor Before Upgrade
- Record Profiler Configuration
- Upgrading
- Upgrading a Distributed Deployment
- Before You Begin
- Complete flow of a Successful Node Upgrade
- Verifying the Upgrade Process
- Items to Check after Upgrade (Gotchas)
- Browser Cache
- Active Directory
- Certificate Backups
- Certificate Root Chain
- Network Access Devices
- RSA SecurID
- Posture Updates
- SNMP
- Profiler Feed Service
- Native Supplicant Profile
- FIPS Compliance
- System Settings
- Alarms
- Reports
- Upgrade Failures
- Configuration and Data Upgrade Errors
- Upgrade Fails During Binary Install
Preparation
Create Repository and Copy the Upgrade Bundle
Create a repository to obtain backups and copy the upgrade bundle. We recommend that you use FTP for better performance and reliability. Do not use repositories that are located across slow WAN links.
For upgrade, you can copy the upgrade bundle to the Cisco ISE node's local disk using the following command:
copy ftp://<ipaddress>ise-upgradebundle-1.3.x-and-1.4.x-to-2.1.0.474.x86_64.tar.gz disk:/
For example,
copy ftp://10.1.100.6ise-upgradebundle-1.3.x-and-1.4.x-to-2.1.0.474.x86_64.tar.gz disk:/
Note that there is not a space between the IP address and the file name. The only spaces in the command are shown here:
ftp://10.1.100.6ise-upgradebundle-1.3.x-and-1.4.x-to-2.1.0.474.x86_64.tar.gz
Having the upgrade bundle in the local disk saves time during upgrade. The application upgrade prepare command copies the upgrade bundle to the local disk and extracts it.
Backup Configuration and Operational Data from the ISE Primary Administration Node
Obtain a backup of the Cisco ISE configuration and operational data from the Command Line Interface (CLI) or the GUI.
The CLI command is:
backup backup-name repository repository-name {ise-config | ise-operational} encryption-key {hash | plain} encryption-keyname
Back Up System Logs from the Primary Administration Node
Obtain a backup of the system logs from the Primary Administration Node from the Command Line Interface (CLI). The CLI command is:
backup-logs backup-name repository repository-name encryption-key { hash | plain} encryption-key name
Export Certificates and Private Keys
We recommend that you export:
- All local certificates along with their private keys to a secure location - from all the nodes in your deployment!. Record the certificate configuration (what service the certificate was used for).
- All certificates from the Trusted Certificates Store of the Primary Administration Node. Record the certificate configuration (what service the certificate was used for).
Backup and Restore of Cisco ISE CA Certificates and Keys
You must back up the Cisco ISE CA certificates and keys securely. The Cisco ISE configuration backup does not include the CA certificates and keys. Instead, you should use the Command Line Interface (CLI) to export the CA certificates and keys to a repository and to import them. The application configure ise command now includes export and import options to backup and restore CA certificates and keys.
The following certificates from the Trusted Certificates Store are restored on the Secondary Administration Node:
- Cisco ISE Root CA certificate
- Cisco ISE Sub CA certificate
- Cisco ISE Endpoint RA certificate
- Cisco ISE OCSP Responder certificate
You must backup and restore Cisco ISE CA certificates and keys when you:
- Have a Secondary Administration Node in the deployment
- Replace the entire Cisco ISE CA root chain
- Configure Cisco ISE root CA to act as a subordinate CA of an external PKI
- Upgrade from Release 1.2 to a later release
- Restore data from a configuration backup. In this case, you must first regenerate the Cisco ISE CA root chain and then backup and restore the ISE CA certificates and keys.
Export Cisco ISE CA Certificates and Keys
You must export the CA certificates and keys from the PAN to import them on the Secondary Administration Node. This option enables the Secondary Administration Node to issue and manage certificates for endpoints when the PAN is down and you promote the Secondary Administration Node to be the PAN.
Ensure that you have created a repository to store the CA certificates and keys.
- Enter application configure ise command from the Cisco ISE CLI.
- Enter 7 to export the certificates and keys.
- Enter the repository name.
- Enter an encryption key.
A success message appears with the list of certificates that were exported, along with the subject, issuer, and serial number.
Example:
The following 4 CA key pairs were exported to repository 'sftp' at 'ise_ca_key_pairs_of_ise-vm1':
Subject:CN=Cisco ISE Self-Signed CA of ise-vm1
Issuer:CN=Cisco ISE Self-Signed CA of ise-vm1
Serial#:0x621867df-568341cd-944cc77f-c9820765
Subject:CN=Cisco ISE Endpoint CA of ise-vm1
Issuer:CN=Cisco ISE Self-Signed CA of ise-vm1
Serial#:0x7027269d-d80a406d-831d5c26-f5e105fa
Subject:CN=Cisco ISE Endpoint RA of ise-vm1
Issuer:CN=Cisco ISE Endpoint CA of ise-vm1
Serial#:0x1a65ec14-4f284da7-9532f0a0-8ae0e5c2
Subject:CN=Cisco ISE OCSP Responder Certificate of ise-vm1
Issuer:CN=Cisco ISE Self-Signed CA of ise-vm1
Serial#:0x6f6d4097-21f74c4d-8832ba95-4c320fb1
ISE CA keys export completed successfully
Import Cisco ISE CA Certificates and Keys
After you register the Secondary Administration Node, you must export the CA certificates and keys from the PAN and import them in to the Secondary Administration Node.
- Enter application configure ise command from the Cisco ISE CLI.
- Enter 8 to import the CA certificates and keys.
- Enter the repository name.
- Enter the name of the file that you want to import.
- Enter the encryption key to decrypt the file.
A success message appears.
Example:
The following 4 CA key pairs were imported:
Subject:CN=Cisco ISE Self-Signed CA of ise-vm1
Issuer:CN=Cisco ISE Self-Signed CA of ise-vm1
Serial#:0x621867df-568341cd-944cc77f-c9820765
Subject:CN=Cisco ISE Endpoint CA of ise-vm1
Issuer:CN=Cisco ISE Self-Signed CA of ise-vm1
Serial#:0x7027269d-d80a406d-831d5c26-f5e105fa
Subject:CN=Cisco ISE Endpoint RA of ise-vm1
Issuer:CN=Cisco ISE Endpoint CA of ise-vm1
Serial#:0x1a65ec14-4f284da7-9532f0a0-8ae0e5c2
Subject:CN=Cisco ISE OCSP Responder Certificate of ise-vm1
Issuer:CN=Cisco ISE Self-Signed CA of ise-vm1
Serial#:0x6f6d4097-21f74c4d-8832ba95-4c320fb1
Stopping ISE Certificate Authority Service...
Starting ISE Certificate Authority Service...
ISE CA keys import completed successfully
Obtain Active Directory and Internal Administrator Account Credentials
If you use Active Directory as your external identity source, ensure that you have the Active Directory credentials and a valid internal administrator account credentials on hand. After upgrade, you might lose Active Directory connections. If this happens, you need the ISE internal administrator account to log in to the Admin portal and Active Directory credentials to rejoin Cisco ISE with Active Directory.
Activate MDM Vendor Before Upgrade
If you use the MDM feature, then before upgrade, ensure that the MDM vendor status is active.
Otherwise, the existing authorization profiles for MDM redirect are not updated with the MDM vendor details. After upgrade, you must manually update these profiles with an active vendor and the users will go through the onboarding flow again.
Record Profiler Configuration
If you use the Profiler service, ensure that you record the profiler configuration for each of your Policy Service nodes from the Admin portal (Administration > System > Deployment > <node> > Profiling Configuration). You can make a note of the configuration or obtain screen shots.
Upgrading
Upgrading a Distributed Deployment
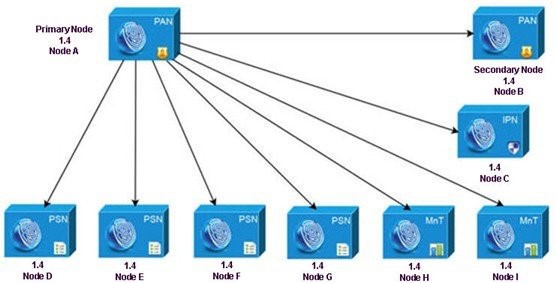
You must first upgrade the Secondary Administration Node to the new release. For example, if you have a deployment setup as shown in the following figure, with one Primary Administration Node (node A), one Secondary Administration Node (node B), one Inline Posture Node (IPN) (node C), and four Policy Service Nodes (PSNs) (node D, node E, node F, and node G), one Primary Monitoring Node (node H), and one Secondary Monitoring Node (node I), you can proceed with the following upgrade procedure.
Note:
Do not manually deregister the node before an upgrade.
Use the application upgrade prepare and application upgrade proceed commands to upgrade to the new release. The upgrade process deregisters the node automatically and moves it to the new deployment. If you manually deregister the node before an upgrade, ensure that you have the license file for the Primary Administration Node before beginning the upgrade process. If you do not have the file on hand (if your license was installed by a Cisco partner vendor, for example), contact the Cisco Technical Assistance Center for assistance.
To upgrade your deployment with minimum possible downtime while providing maximum resiliency and ability to roll back, the upgrade order should be as follows:
- Secondary Administration Node (the Primary Administration Node at this point remains at the previous version and can be used for rollback, if upgrade fails.
- Primary Monitoring Node
- Policy Service Nodes. At this point, verify if the upgrade is successful and also run the network tests to ensure that the new deployment functions as expected. See Verifying the Upgrade Process for more information. If the upgrade is successful, proceed to upgrade the following nodes:
- Secondary Monitoring Node
- Primary Administration Node. Re-run the upgrade verification and network tests after you upgrade the Primary Administration Node.
Before You Begin
If you do not have a Secondary Administration Node in the deployment, configure a Policy Service Node to be the Secondary Administration Node before beginning the upgrade process.
Ensure that you have read and complied with the instructions given in Preparing for the Upgrade.
When you upgrade a complete Cisco ISE deployment, Domain Name System (DNS) server resolution (both forward and reverse lookups) is mandatory; otherwise, the upgrade fails.
Step 1 Secondary Administration Node
Upgrade the Secondary Administration Node (node B) from the CLI.
The upgrade process automatically deregisters node B from the deployment and upgrades it. Node B becomes the primary node of the new deployment when it restarts. Because each deployment requires at least one Monitoring node, the upgrade process enables the Monitoring persona on node B even if it was not enabled on this node in the old deployment. If the Policy Service persona was enabled on node B in the old deployment, this configuration is retained after upgrading to the new deployment.
Step 2 Primary Monitoring Node
Upgrade one of your Monitoring nodes (node H) to the new deployment.
We recommend that you upgrade your Primary Monitoring Node before the Secondary Monitoring Node (this is not possible if your Primary Administration Node in the old deployment functions as your Secondary Monitoring Node as well). Your primary Monitoring node starts to collect the logs from the new deployment and you can view the details from the Primary Administration Node dashboard.
If you have only one Monitoring node in your old deployment, before you upgrade it, ensure that you enable the Monitoring persona on node A, which is the Primary Administration Node in the old deployment. Node persona changes result in a Cisco ISE application restart. Wait for node A to come up before you proceed. Upgrading the Monitoring node to the new deployment takes longer than the other nodes because operational data has to be moved to the new deployment.
If node B, the Primary Administration Node in the new deployment, did not have the Monitoring persona enabled in the old deployment, disable the Monitoring persona on it. Node persona changes result in a Cisco ISE application restart. Wait for the Primary Administration Node to come up before you proceed.
Step 3 Policy Service Nodes
Upgrade the Policy Service Nodes (nodes D, E, F, and G) next.
You can upgrade several PSNs in parallel, but if you upgrade all the PSNs concurrently, your network will experience a downtime.
If your PSN is part of a node group cluster, you must deregister the PSN from the PAN, upgrade it as a standalone node, and register it with the PAN in the new deployment.
After the upgrade, the PSNs are registered with the primary node of the new deployment (node B), and the data from the primary node (node B) is replicated to all the PSNs. The PSNs retain their personas, node group information, and profiling probe configurations.
Step 4 Inline Posture Node (IPN)
Deregister the IPN node (node C) from the Primary Administration Node.
Note: Cisco ISE 2.0 and later does not support IPN nodes!
Step 5 Secondary Monitoring Node
If you have a second Monitoring node (node I) in your old deployment, you must do the following:
- Enable the Monitoring persona on node A, which is the primary node in your old deployment.
A deployment requires at least one Monitoring node. Before you upgrade the second Monitoring node from the old deployment, enable this persona on the primary node itself. Node persona changes result in a Cisco ISE application restart. Wait for the primary ISE node to come up again. - Upgrade the Secondary Monitoring Node (node I) from the old deployment to the new deployment.
Except for the Primary Administration Node (node A), you must have upgraded all the other nodes to the new deployment.
Step 6 Primary Administration Node
Finally, upgrade the Primary Administration Node (node A).
This node is upgraded and added to the new deployment as a Secondary Administration Node. You can promote the Secondary Administration Node (node A) to be the primary node in the new deployment.
After the upgrade is complete, if the Monitoring nodes that were upgraded contain old logs, ensure that you run the application configure ise command and choose 5 (Refresh Database Statistics) on the Monitoring nodes.
Complete flow of a Successful Node Upgrade
Here is an example CLI transcript of a successful secondary Administration node upgrade.
Step 1 Create a repository on the local disk.
For example, you can create a repository called "upgrade."
ise/admin# conf t
Enter configuration commands, one per line.End with CNTL/Z.
ise/admin(config)# repository upgrade
ise/admin(config-Repository)# url disk:
% Warning: Repositories configured from CLI cannot be used from the ISE web UI and are not replicated to other ISE nodes.
If this repository is not created in the ISE web UI, it will be deleted when ISE services restart.
ise/admin(config-Repository)# exit
ise/admin(config)# exit
Step 2 Prepare the Node for Upgrade
From the Cisco ISE command line interface (CLI), enter application upgrade prepare command.
This command copies the upgrade bundle to the local repository "upgrade" that you created in the previous step and lists the MD5 and SHA256 checksum.
ise/admin# application upgrade prepare ise-upgradebundle-1.3.x-and-1.4.x-to-2.1.0.474.x86_64.tar.gz upgrade
Getting bundle to local machine...
md5: 35a159416afd0900c9da7b3dc6c72043
sha256: e3358ca424d977af67f8bb2bb3574b3e559ce9578d2f36c44cd8ba9e6dddfefd
% Please confirm above crypto hash matches what is posted on Cisco download site.
% Continue? Y/N [Y] ? y
Enter Y to continue.
The upgrade package is extracted. The following message appears.
Getting bundle to local machine...
md5: 35a159416afd0900c9da7b3dc6c72043
sha256: e3358ca424d977af67f8bb2bb3574b3e559ce9578d2f36c44cd8ba9e6dddfefd
% Please confirm above crypto hash matches what is posted on Cisco download site.
% Continue? Y/N [Y] ? y
Step 3 Proceed with Upgrade
From the Cisco ISE CLI, enter the application upgrade proceed command:
ise/admin# application upgrade proceed
Initiating Application Upgrade...
% Warning: Do not use Ctrl-C or close this terminal window until upgrade completes.
-Checking VM for minimum hardware requirements
STEP 1: Stopping ISE application...
STEP 2: Verifying files in bundle...
-Internal hash verification passed for bundle
STEP 3: Validating data before upgrade...
STEP 4: De-registering node from current deployment.
STEP 5: Taking backup of the configuration data...
STEP 6: Running ISE configuration DB schema upgrade...
- Running db sanity check to fix index corruption, if any...
ISE Database schema upgrade completed.
STEP 7: Running ISE configuration data upgrade...
- Data upgrade step 1/12, CertReqMgmtBootstrapService(1.4.0.0)... Done in 2 seconds.
- Data upgrade step 2/12, NSFUpgradeService(1.4.0.110)... Done in 0 seconds.
- Data upgrade step 3/12, NSFUpgradeService(1.4.0.119)... Done in 0 seconds.
- Data upgrade step 4/12, NSFUpgradeService(1.4.0.125)... Done in 0 seconds.
- Data upgrade step 5/12, NSFUpgradeService(1.4.0.157)... Done in 0 seconds.
- Data upgrade step 6/12, GuestAccessUpgradeService(1.4.0.157)... Done in 27 seconds.
- Data upgrade step 7/12, NSFUpgradeService(1.4.0.164)... Done in 1 seconds.
- Data upgrade step 8/12, MDMPartnerUpgradeService(1.4.0.166)... Done in 0 seconds.
- Data upgrade step 9/12, MDMPartnerUpgradeService(1.4.0.167)... Done in 44 seconds.
- Data upgrade step 10/12, ProfilerUpgradeService(1.4.0.175)... ..............Done in 878 seconds.
- Data upgrade step 11/12, CertMgmtUpgradeService(1.4.0.217)... Done in 6 seconds.
- Data upgrade step 12/12, GuestAccessUpgradeService(1.4.0.244)... Done in 17 seconds.
STEP 8: Running ISE configuration data upgrade for node specific data...
STEP 9: Making this node PRIMARY of the new deployment. When other nodes are upgraded it will be added to this deployment.
STEP 10: Running ISE M&T DB upgrade...
ISE Database Mnt schema upgrade completed.
Gathering Config schema(CEPM) stats .....
Gathering Operational schema(MNT) stats ....
Stopping ISE Database processes...
% NOTICE: Upgrading ADEOS. Appliance will be rebooted after upgrade completes successfully.
% This application Install or Upgrade requires reboot, rebooting now...
PSN Upgrade Messages
Here is an example CLI transcript of a successful PSN node upgrade:
ise/admin# application upgrade ise-upgradebundle-1.3.x-and-1.4.x-to-2.1.0.474.x86_64.tar.gz sftp
Save the current ADE-OS running configuration? (yes/no) [yes] ?
Please enter yes or no
Save the current ADE-OS running configuration? (yes/no) [yes] ?
Generating configuration...
Saved the ADE-OS running configuration to startup successfully
Getting bundle to local machine...
md5: 35a159416afd0900c9da7b3dc6c72043
sha256: 8b3b43057067b0995ecabf5673c69565c0d0dfa790dfe58d1e998aa9f8c7427a
% Please confirm above crypto hash matches what is posted on Cisco download site.
% Continue? Y/N [Y] ? y
Unbundling Application Package...
Initiating Application Upgrade...
% Warning: Do not use Ctrl-C or close this terminal window until upgrade completes.
-Checking VM for minimum hardware requirements
STEP 1: Stopping ISE application...
STEP 2: Verifying files in bundle...
-Internal hash verification passed for bundle
STEP 3: Validating data before upgrade...
STEP 4: De-registering node from current deployment.
STEP 5: Taking backup of the configuration data...
STEP 6: Registering this node to primary of new deployment...
STEP 7: Downloading configuration data from primary of new deployment...
STEP 8: Importing configuration data...
STEP 9: Running ISE configuration data upgrade for node specific data...
STEP 10: Running ISE M&T DB upgrade...
ISE Database Mnt schema upgrade completed.
No gather stats needed as this is not PAP or MNT node
% NOTICE: Upgrading ADEOS. Appliance will be rebooted after upgrade completes successfully.
% This application Install or Upgrade requires reboot, rebooting now...
Verifying the Upgrade Process
To verify if an upgrade is successful, do one of the following:
- Check the ade.log file for the upgrade process. To display the ade.log file, enter the following command from the Cisco ISE CLI:
show logging system ade/ADE.log
- Enter the show version command to verify the build version.
- Enter the show application status ise command to verify that all the services are running.
We recommend that you run some network tests to ensure that the deployment functions as expected and that users are able to authenticate and access resources on your network.
If upgrade fails because of configuration database issues, the changes are rolled back automatically.
Items to Check after Upgrade (Gotchas)
After upgrading your deployment, you will want to verify the tasks below to ensure proper functionality of the ISE.
Browser Cache
Ensure that you clear the browser cache, close the browser, and open a new browser session before you access the Cisco ISE Admin portal. Supported browsers are:
- Mozilla Firefox version 39 and later
- Google Chrome version 43 and later
- Microsoft Internet Explorer 9.x, 10.x and 11.x
If you are using Internet Explorer 10.x, enable TLS 1.1 and TLS 1.2, and disable SSL 3.0 and TLS 1.0 (Internet Options > Advanced).
Adobe Flash Player 11.1.0.0 or above must be installed on the system running your client browser.
The minimum required screen resolution to view the Cisco ISE Admin portal and for a better user experience is 1280 x 800 pixels.
Active Directory
Join all Cisco ISE nodes with Active Directory again, if you use Active Directory as your external identity source and the connection to Active Directory is lost. After rejoining, perform the external identity source call flows to ensure the connection.
- After upgrade, if you log in to the Cisco ISE user interface using an Active Directory administrator account, your login fails because Active Directory join is lost during upgrade. You must use the internal administrator account to log in to Cisco ISE and join Active Directory with it.
- If you had enabled certificate-based authentication for administrative access to Cisco ISE (Administration > Admin Access) before upgrade and used Active Directory as your identity source, after upgrade, you will not be able to launch the ISE login page because Active Directory join is lost during upgrade. If you run in to this issue, from the Cisco ISE CLI, start the ISE application in safe mode using the following command:
application start ise safe
- Log in to the Cisco ISE user interface using the internal administrator account. If you do not remember your password or if your administrator account is locked, see the Cisco Identify Services Engine Hardware Installation Guide, Release 2.0 - Post-Installation and Maintenance Tasks [Cis…1 for information on how to reset an administrator password.
- Join Cisco ISE with Active Directory
Certificate Backups
Obtain a backup of the Cisco ISE CA certificates and keys from the Primary Administration Node and restore it on the Secondary Administration Node. This ensures that the Secondary Administration Node can function as the root CA or subordinate CA of an external PKI in case of a PAN failure and you promote the Secondary Administration Node to be the Primary Administration Node.
Certificate Root Chain
After you upgrade a distributed deployment, the Primary Administration Node's root CA certificates are not added to the Trusted Certificates store when both of the following conditions are met:
Secondary Administration Node (Primary Administration Node in the old deployment) is promoted to be the Primary Administration Node in the new deployment
- Session services are disabled on the Secondary Administration Node
This might result in authentication failures with the following errors:
- Unknown CA in chain during a BYOD flow
- OCSP unknown error during a BYOD flow
You can see these messages when you click the More Details link from the Live Logs page for failed authentications.
As a workaround, after you upgrade your deployment and you promote the Secondary Administration Node to become the Primary Administration Node in the new deployment, generate a new ISE Root CA certificate chain from the Admin portal (choose Administration > Certificates > Certificate Signing Requests > Replace ISE Root CA certificate chain).
Network Access Devices
To view the network device profiles, from the Admin portal, choose Administration > Network Resources > Network Device Profiles.
To apply a network device profile to a NAD:
- Choose Administration > Network Resources > Network Devices.
- Edit the NAD and select the appropriate profile.
You can easily apply network device profiles to many NADs at a time by exporting the list of NADs, adding the profiles, and then reimporting the NADs.
Cisco ISE, Release 2.x introduces support for some non-Cisco Network Access Devices (NADs). If you deployed non-Cisco NADs prior to Release 2.x and created policy rules or RADIUS dictionaries to use them, these will continue to work as usual. ISE 2.x offers several predefined network device profiles that can be applied to non-Cisco devices to support a variety of features such as MAB, dot1x, Change Of Authorization (CoA), and URL redirection to enable flows such as Guest, Posture, and so on. See ISE Third-Party NAD Profiles and Configs for more information.
RSA SecurID
Reset the RSA node secret if you use RSA SecurID server as your external identity source.
Posture Updates
Perform a posture update from the Primary Administration Node after upgrade if you have enabled the Posture service.
SNMP
If you had manually configured the Originating Policy Services Node value under SNMP settings, this configuration is lost during upgrade. You must reconfigure this value.
Profiler Feed Service
Update the profiler feed service after upgrade to ensure that the most up-to-date OUIs are installed.
From the Cisco ISE Admin portal:
- Choose Administration > FeedService > Profiler. Ensure that the profiler feed service is enabled.
- Click Update Now.
Native Supplicant Profile
Check the native supplicant profile that is used in the client provisioning policy and ensure that the wireless SSID is correct. For iOS devices, if the network that you are trying to connect is hidden, check the Enable if target network is hidden check box in the iOS Settings area.
FIPS Compliance
Cisco ISE, Release 2.1 supports the following FIPS-compliant ciphers. TLS versions 1.0, 1.1, and 1.2 are supported.
- For EAP-TLS, PEAP, EAP-FAST, EAP-TTLS:
- DHE_RSA_WITH_AES_256_SHA256
- DHE_RSA_WITH_AES_128_SHA256
- RSA_WITH_AES_256_SHA256
- RSA_WITH_AES_128_SHA256
- DHE_RSA_WITH_AES_256_SHA
- DHE_RSA_WITH_AES_128_SHA
- RSA_WITH_AES_256_SHA
- RSA_WITH_AES_128_SHA
- For EAP-FAST Anonymous Provisioning:
- ADH_WITH_AES_128_SHA
Cisco ISE, Release 2.1 does not support non-FIPS compliant ciphers. The following ciphers are not supported:
- RSA_DES_192_CBC3_SHA
- EDH_RSA_DES_192_CBC3_SHA
- EDH_DSS_DES_192_CBC3_SHA
- RSA_RC4_128_SHA
- RSA_RC4_128_MD5
- EDH_RSA_DES_64_CBC_SHA
- EDH_DSS_DES_64_CBC_SHA
- RSA_RC4_128_SHA
If you have legacy devices that use these deprecated ciphers, contact the Cisco Technical Assistance Center for support.
System Settings
Reconfigure e-mail settings, favorite reports, and data purge settings.
Alarms
Check the threshold and/or filters for specific alarms that you need. All the alarms are enabled by default after an upgrade.
Reports
Customize reports based on your needs. If you had customized the reports in the old deployment, the upgrade process overwrites the changes that you made.
The upgrade software performs some validations. If upgrade fails, follow the instructions provided on screen to recover and successfully upgrade to Release 2.1.
Upgrade Failures
At times, upgrade fails because of not following the order in which the nodes have to be upgraded, such as upgrading the secondary Administration node first. If you encounter this error, you can upgrade the deployment again following the order of upgrade specified in this document.
In rare cases, you might have to reimage, perform a fresh install, and restore data. So it is important that you have a backup of Cisco ISE configuration and monitoring data before you start the upgrade. It is important that you back up the configuration and monitoring data even though we automatically try to roll back the changes in case of configuration database failures.
_____________________________________________________________________________________
Upgrade failures that happen because of issues in the monitoring database are not rolled back automatically. You have to manually reimage your system, install Cisco ISE, Release 2.1, and restore the configuration and monitoring data on it.
_____________________________________________________________________________________
Configuration and Data Upgrade Errors
This section describes some of the known upgrade errors and what you must do to recover from them.
During upgrade, the configuration database schema and data upgrade failures are rolled back automatically. Your system returns to the last known good state. If this is encountered, the following message appears on the console and in the logs:
% Warning: The node has been reverted back to its pre-upgrade state.
error: %post(CSCOcpm-os-1.4.0-205.i386) scriptlet failed, exit status 1
% Application upgrade failed. Please check logs for more details or contact Cisco Technical Assistance Center for support.
If you need to remediate an upgrade failure to get the node back to the original state, the following message appears on the console. Check the logs for more information.
% Warning: Do the following steps to revert node to its pre-upgrade state."
error: %post(CSCOcpm-os-1.4.0-205.i386) scriptlet failed, exit status 1
% Application upgrade failed. Please check logs for more details or contact Cisco Technical Assistance Center for support.
If there are any validation errors, which is not an actual upgrade failure, the following message appears. For example, you might see this error if you attempt to upgrade a PSN before the secondary PAN is upgraded or if the system does not meet the specified requirements. The system returns to the last known good state. If you encounter this error, ensure that you perform the upgrade as described in this document.
STEP 1: Stopping ISE application...
% Warning: Cannot upgrade this node until the standby PAP node is upgraded and running. If standbyPAP is already upgraded
and reachable ensure that this node is in SYNC from current Primary UI.
Starting application after rollback...
% Warning: The node has been reverted back to its pre-upgrade state.
error: %post(CSCOcpm-os-1.4.0-205.i386) scriptlet failed, exit status 1
% Application upgrade failed. Please check logs for more details or contact Cisco Technical Assistance Center for support.
If the ADE-OS or application binary upgrade fails, the following message appears when you run the show application status ise command from the CLI following a reboot. You should reimage and restore the configuration and operational backups.
% WARNING: An Identity Services Engine upgrade had failed. Please consult logs. You have to reimage and restore to previous version.
For any other types of failures (including cancellation of the upgrade, disconnection of the console session, power failure, and so on), you must reimage and restore the configuration and operational backup depending on the personas enabled on the node originally.
The term, reimage, refers to a fresh installation of Cisco ISE. For Monitoring database upgrade (schema + data) errors, you must reimage and restore the configuration and operational backups. Before you reimage, ensure that you generate a support bundle by running the backup-logs CLI command and place the support bundle in a remote repository in order to help ascertain the cause of failure. You must reimage to the old or new version based on the node personas:
- Secondary Administration Node—Reimage to the old version and restore the configuration and operational backup.
- Monitoring Nodes—If the nodes are deregistered from the existing deployment, reimage to the new version, register with the new deployment, and enable the Monitoring persona.
- All Other Nodes—If there are upgrade failures on the other nodes, the system usually returns to the last known good state. If the system does not roll back to the old version, you can reimage to the new version, register with the new deployment, and enable the personas as done in the old deployment.
In case of upgrade failures, before you try to upgrade again:
- Analyze the logs. Check the support bundle for errors.
- Identify and resolve the problem by submitting the support bundle that you generated to the Cisco Technical Assistance Center (TAC).
You can view the progress of the upgrade by logging in via SSH and using the show application status ise command. The following message appears: % NOTICE: Identity Services Engine upgrade is in progress...
Upgrade Fails During Binary Install
An application binary upgrade occurs after the database upgrade. If a binary upgrade failure happens, the following message appears on the console and ADE.log:
% Application install/upgrade failed with system removing the corrupted install
Solution: Before you attempt any roll back or recovery, generate a support bundle by using the backup-logs command and place the support bundle in a remote repository.
To roll back, reimage the Cisco ISE appliance by using the previous ISO image and restore the data from the backup file. You need a new upgrade bundle each time you retry an upgrade.
- Analyze the logs. Check the support bundle for errors.
- Identify and resolve the problem by submitting the support bundle that you generated to the Cisco Technical Assistance Center (TAC).
Find answers to your questions by entering keywords or phrases in the Search bar above. New here? Use these resources to familiarize yourself with the community: