Turn on suggestions
Auto-suggest helps you quickly narrow down your search results by suggesting possible matches as you type.
Showing results for
- Cisco Community
- Technology and Support
- Service Providers
- Service Providers Knowledge Base
- Procedures to change the management IP into private address for CDS-IS devices
Options
- Subscribe to RSS Feed
- Mark as New
- Mark as Read
- Bookmark
- Subscribe
- Printer Friendly Page
- Report Inappropriate Content
730
Views
0
Helpful
0
Comments
Options
- Subscribe to RSS Feed
- Mark as New
- Mark as Read
- Bookmark
- Subscribe
- Printer Friendly Page
- Report Inappropriate Content
on 10-31-2014 05:56 AM
Please note that this operation will impact all the client’s streaming request, the clients will not be able to view the streaming programs, so we strongly recommend to apply the changes during a maintenance window when there is no clients request.
1, Release/un-assign the Service Engines from all the delivery services
From the CDSM GUI, go to Services—>Service Definition, select the delivery service then click on ‘Assign Service Engines’, then click on the individual SE’s:

Note: If the delivery service had the Device Group assigned instead, then you should click on Assign Device Groups, and click the device group that you want to un-assign.
2, De-register the SE from CMS
1) Go to the SE CLI, run the de-register command:
| SE#cms deregister force |
2) Remove the original CDSM ip address from the configuration
| SE(config)#no cdsm ip X.X.X.X |
3) Verify the CMS status, it should have the following information if the de-registration is successful:
SE#show cms info This node has not yet been configured |
Also after several minutes on the CDSM, the SR/SE’s should not be there any more.
3, De-register the SR from CMS, please follow the same procedures as listed in step 2 above.
1) Go to the SR CLI, run the de-register command:
| SR#cms deregister force |
2) Remove the original CDSM ip address from the configuration
| SR(config)#no cdsm ip X.X.X.X |
3) Verify the CMS status, it should have the following information if the de-registration is successful:
SR#show cms info This node has not yet been configured |
4, Change the management ip address of CDSM
Go to the CDSM CLI and change it, please note that the default gateway might also need to be changed if the new/old address are not using the same gateway.
5, For all the devices including CDSM, SR and SE, add an ip route entry to point to the new private address
| CDE(config)#ip route x.x.x.x y.y.y.y z.z.z.z |
6, Change the management ip address on SR and register it to the CDSM with new management ip address
1) Change the management:
Please change the management interface ip address only. It should be the interface with non-primary ip address.
2) Register the SR to CDSM:
SR(config)#cdsm ip X.X.X.X (this is the new CDSM ip address) SR(config)#cms enable |
3) Verify the registration information:
SR#sh cms info CDN information : Model = CDE205 Node Id = 1529 Device Mode = sr Current Active CDSM = None (Please ensure this device is activated and the primary CDSM is reachable) Registered with CDSM = 10.66.89.80 Status = Offline Time of last config-sync = Thu Nov 21 00:11:01 2013 |
Please note that the status now is offline
4)Activate the SR from CDSM GUI
Please make sure you have the following configuration items selected before you click on SUBMIT:
— Select the location you would assign this SR to
— Tick Activate box
— Select work type: normally SR&Proximity Engine
— Select the validated Coverage Zone File
— Tick/untick “Use SR’s primary IP address for management communication”
Note: if the SR is having 2 different IP address, 1 for primary and 1 for management, you need to un-check this option and type a separate management Communication IP address.
With the above options selected please click on Submit, you can run ’show cms info’ from the SR CLI and it will show as online. At the same time you need to wait for about 5 minutes before you can see the SR showing as online from CDSM GUI.

7, Change the management ip address on SE and register it to the CDSM with new management ip address. Please follow the same procedures as listed above in step 5 for the SE IP address change and registration.
1) Change the management:
Please change the management interface ip address only. It should be the interface with non-primary ip address.
2) Register the SE to CDSM:
SE(config)#cdsm ip X.X.X.X (this is the new CDSM ip address) SE(config)#cms enable Checking EMDB service... Registering this node as Service Engine... Node successfully registered with id CeConfig_1577 Registration complete. CMS service is starting, please wait... Network configuration is ready. Starting CMS service Database upgrade is not required. Please preserve running configuration using 'copy running-config startup-config'. Otherwise management service will not be started on reload and node will be shown 'offline' in CDSM UI. management services enabled |
3) Verify the registration information:
SR#sh cms info CDN information : Model = CDE250-2S6 Node Id = 1577 Device Mode = se Current Active CDSM = None (Please ensure this device is activated and the primary CDSM is reachable) Registered with CDSM = 10.66.89.80 Status = Offline Time of last config-sync = Thu Nov 21 00:05:22 2013 CMS services information : Service cms_se is running |
Please note that the status now is Offline
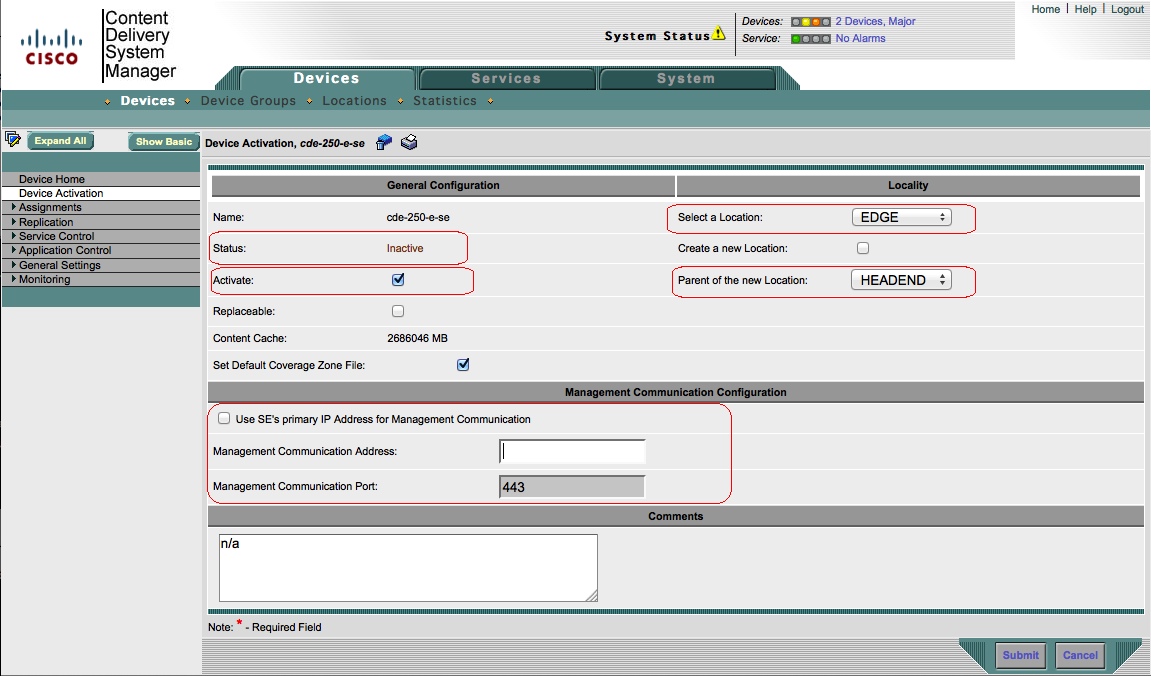
4) Activate the SE
Please make sure you have the following configuration items selected before you click on SUBMIT:
— Select the location you would assign this SE to
— Selecte the parent of the new location if there is any
— Tick Activate box
— Tick/untick “Use SE’s primary IP address for management communication”
Note: if the SE is having 2 different IP address, 1 for primary and 1 for management, you need to un-check this option and type a separate management Communication IP address.
8, Assign the Service Engines back to the delivery services
From the CDSM GUI, go to Services—>Delivery Service, click the delivery services you need to assign the SE and then click on Assign Service Engines, please make sure you select 1 of the SE’s and Assign it as Content Acquirer.

9, Verification: after all the devices are showing as online from the CDSM GUI, please try to play the streaming programs from a client to verify the delivery service is working or not.
If you run into any issue and need immediate assistance from Cisco please feel free to call Cisco TAC from one of the numbers at: http://www.cisco.com/en/US/support/tsd_cisco_worldwide_contacts.html#numbers
or open a service request to engage the TAC team to help you.
Labels:
Getting Started
Find answers to your questions by entering keywords or phrases in the Search bar above. New here? Use these resources to familiarize yourself with the community:
Customers Also Viewed These Support Documents