- Cisco Community
- Technology and Support
- DevNet
- DevNet Services
- Services Discussions
- Cisco PSIRT openVuln API oauth2 Token "Not Authorized"
- Subscribe to RSS Feed
- Mark Topic as New
- Mark Topic as Read
- Float this Topic for Current User
- Bookmark
- Subscribe
- Mute
- Printer Friendly Page
- Mark as New
- Bookmark
- Subscribe
- Mute
- Subscribe to RSS Feed
- Permalink
- Report Inappropriate Content
08-01-2017 12:05 PM
Greetings,
I am currently attempting to gain access to the PSIRT openVuln API and am following along with the "Getting Started" directions. So far, I have registered an application for "Cisco PSIRT openVuln API" using my CCO ID with the Grant Type: "Client Credentials". My application has a Status of "active" and I have a corresponding Client ID and Client Secret.
I am currently having issues with getting a valid access_token (step 3) and would like to know if I am using the correct methodology.
Via Postman:
My GET request is: https://api.cisco.com/security/advisories/cvrf/all (as specified in the API)
Under the "Authorization" tab, I have set my Type to "OAuth 2.0" and clicked "Get New Access Token"
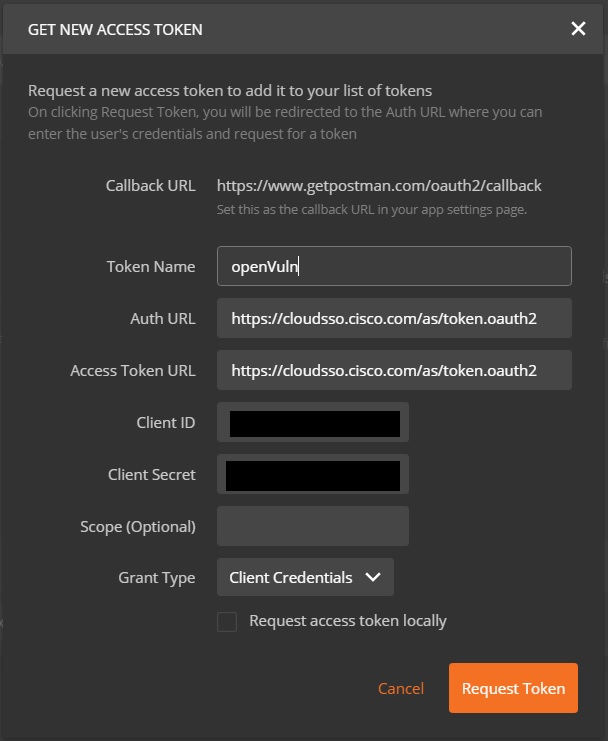
- My Access Token Parameters are as follows
- Token Name: PSIRT token
- Auth URL: https://cloudsso.cisco.com/as/token.oauth2
- AccessToken URL: https://cloudsso.cisco.com/as/token.oauth2
- Client ID: <client_id>
- Client Secret: <client_secret>
- Grant Type: Client Credentials
- I then hit "Use Token"
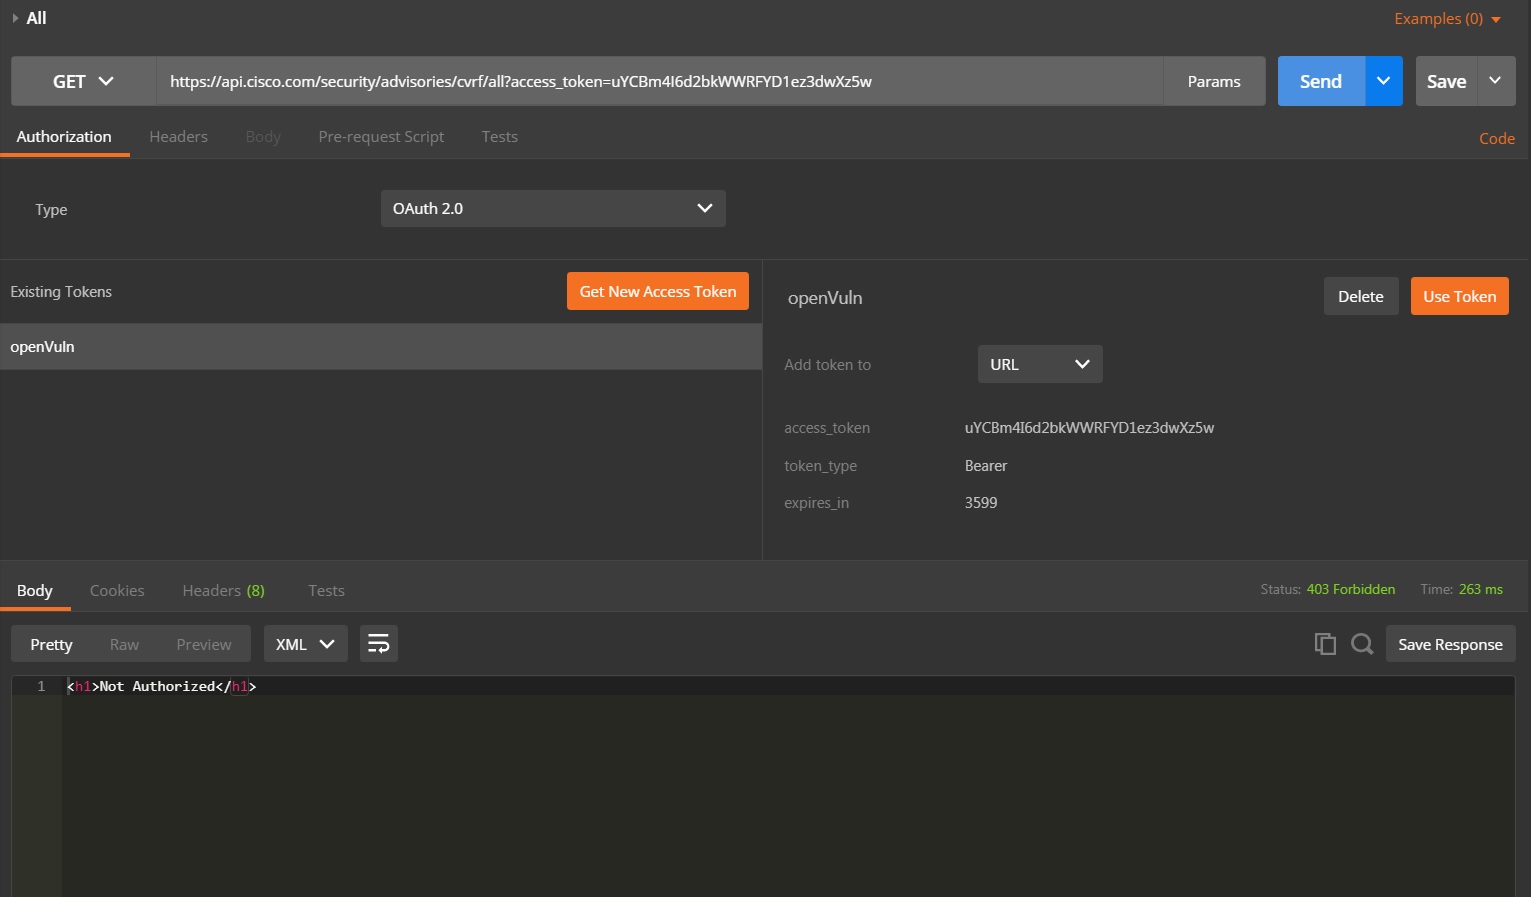
When I send the request I get back:
<h1>Not Authorized</h1>
I have also gone through the Curl walk-through posted by Omar, however this also did not work even when running it in Postman as recommended by Bradley here.
my command: curl -s -k -H "Content-Type: application/x-www-form-urlencoded" -X POST -d "client_id=<client_id>" -d "client_secret=<client_secret>" -d "grant_type=client_credentials" https://cloudsso.cisco.com/as/token.oauth2
(I get no response from this)
Am I using the wrong URLs or even going about this in an entirely wrong manner?
Thank you for your time.
Solved! Go to Solution.
Accepted Solutions
- Mark as New
- Bookmark
- Subscribe
- Mute
- Subscribe to RSS Feed
- Permalink
- Report Inappropriate Content
08-16-2017 08:10 AM
UPDATE: SOLVED
With the help of Cisco's Jason Smith, I was able to issue a valid request via both Postman and Curl. The missing piece was to take the access_token (as produced via Omar's method) as well as the token_type and set them as an 'Authorization' header field as well as providing an 'Accept' header.
More explicitly:
Postman:
1. Get access_token following the steps Omar laid out.
2. Do not click 'Use Token' instead go to the 'Headers' Tab in Postman and set the following:
Key: Authorization Value: Bearer <access_token>
Key: Accept Value: application/json
3. Hit 'Send' and watch the magic happen ![]()
Curl:
The issue I was having with getting the token had to do with my proxy settings. Ensure you are first doing:
$ export https_proxy=<https_host>:<port>
Then you can issue your access token request:
$ curl -s -k -H "Content-Type: application/x-www-form-urlencoded" -X POST -d "client_id=<client_id>" -d "client_secret=<client_secret>" -d "grant_type=client_credentials" https://cloudsso.cisco.com/as/token.oauth2
Then when you get the response, you should have an access token and a token type so using these do:
$ curl -X GET -s -k -H "Accept: application/json" -H "Authorization: <token_type> <access_token>" https://api.cisco.com/security/advisories/cvrf/all
Thank you again to Jason Smith for this solution!
- Mark as New
- Bookmark
- Subscribe
- Mute
- Subscribe to RSS Feed
- Permalink
- Report Inappropriate Content
08-01-2017 01:10 PM
Hi Lukas,
The following are my settings in Postman:
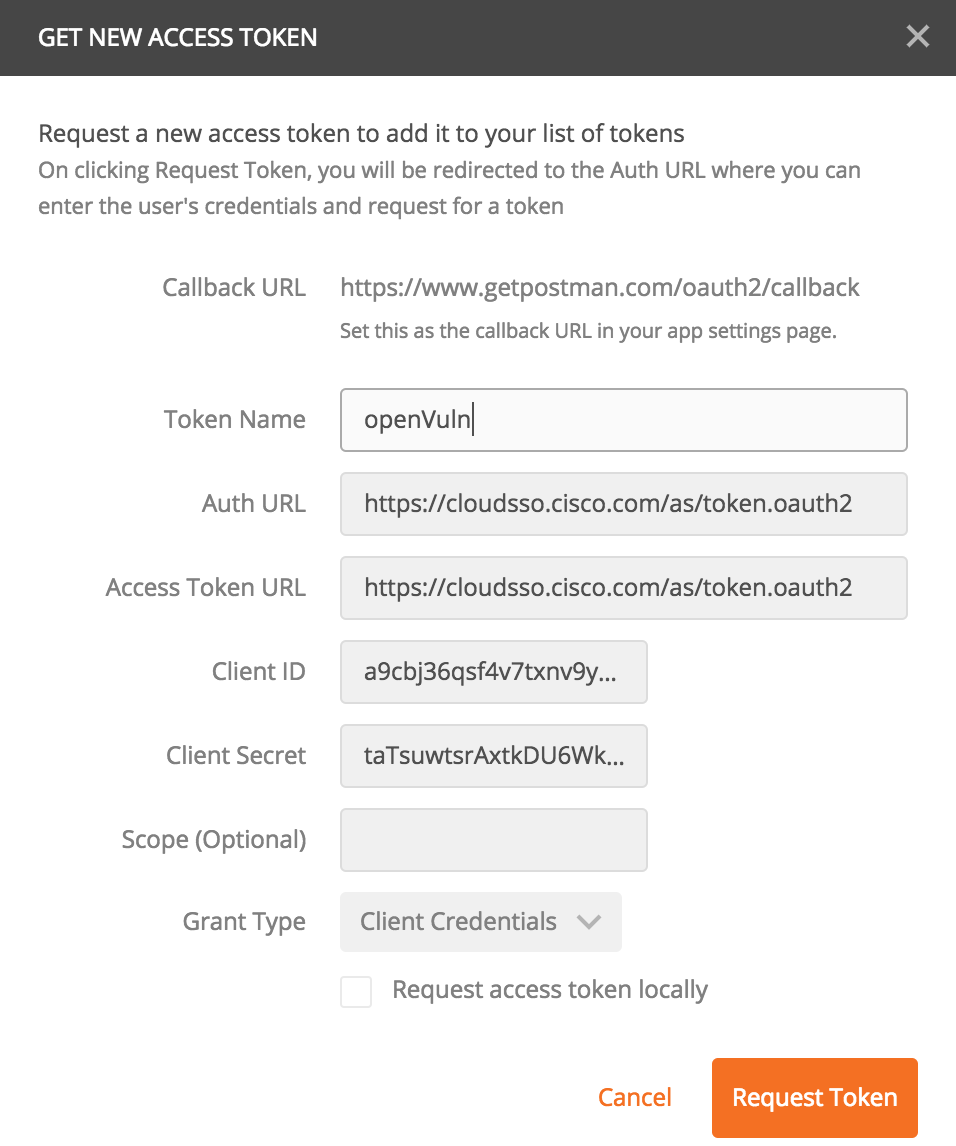
Then you should see the new token, as shown below:
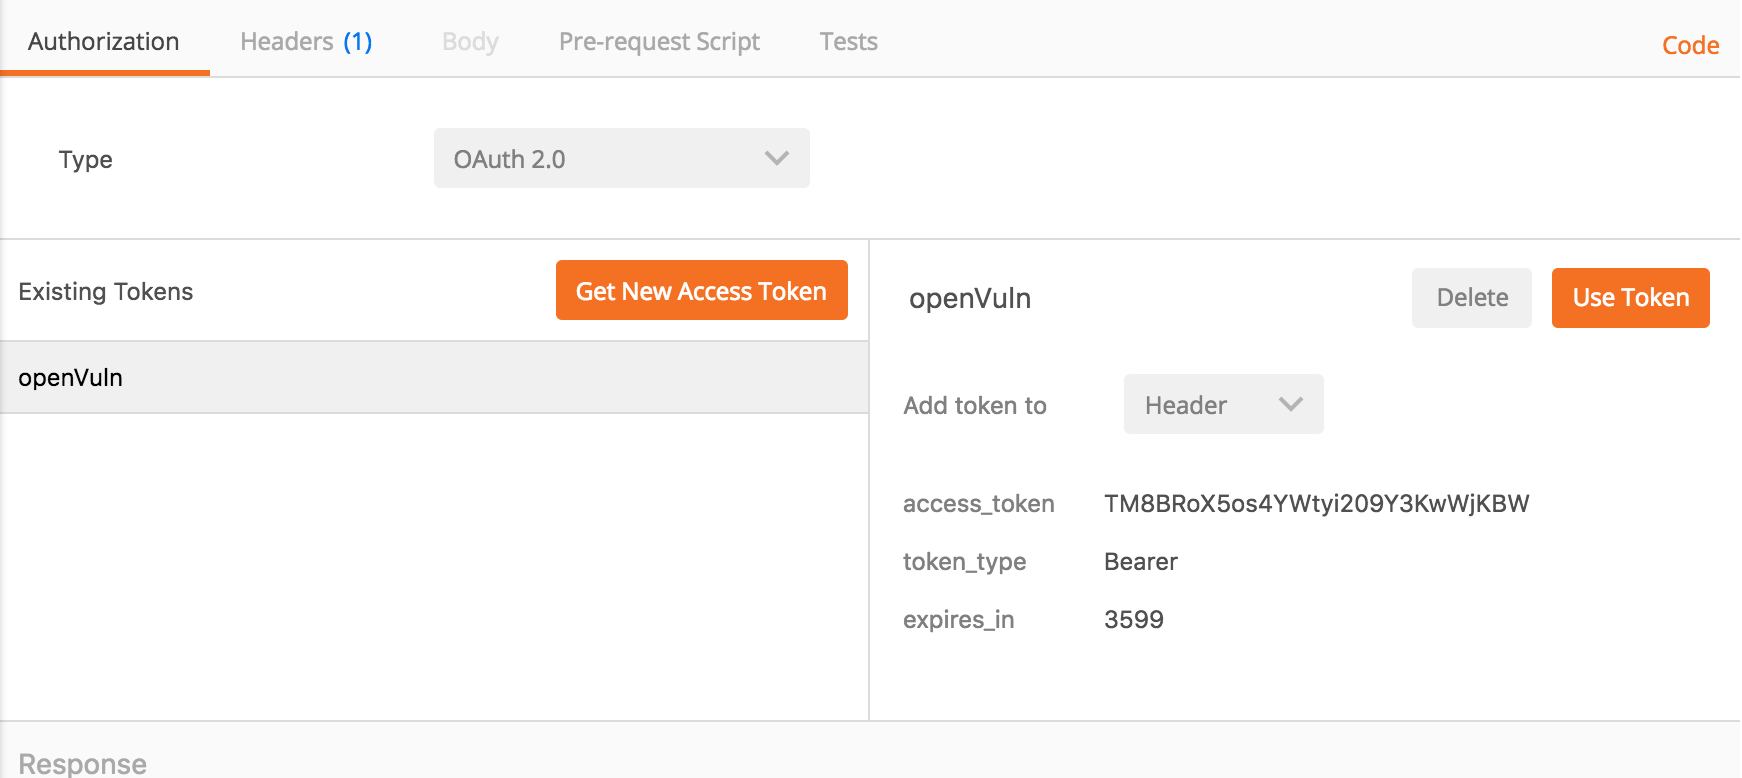
I have the sample curl and others at:
https://github.com/CiscoPSIRT/openVulnAPI/tree/master/example_code
It does seem that you have the correct URL. If this doest not work, try to register "another application" and try the new client credentials. Please let me know if you don't get it to work and glad to help you more.
Cheers,
Omar
- Mark as New
- Bookmark
- Subscribe
- Mute
- Subscribe to RSS Feed
- Permalink
- Report Inappropriate Content
08-01-2017 02:06 PM
Hi Omar,
Thank you for your prompt and informative response! Unfortunately, my issue persists. I went ahead and registered "another application" and documented the procedure I followed below:
Registering Application:
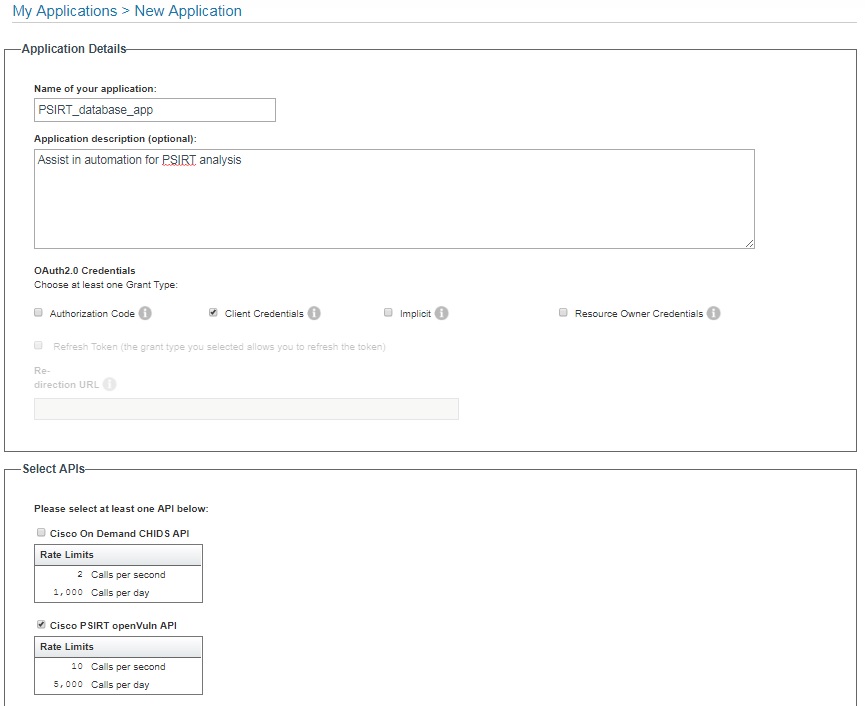
Validating Existence:
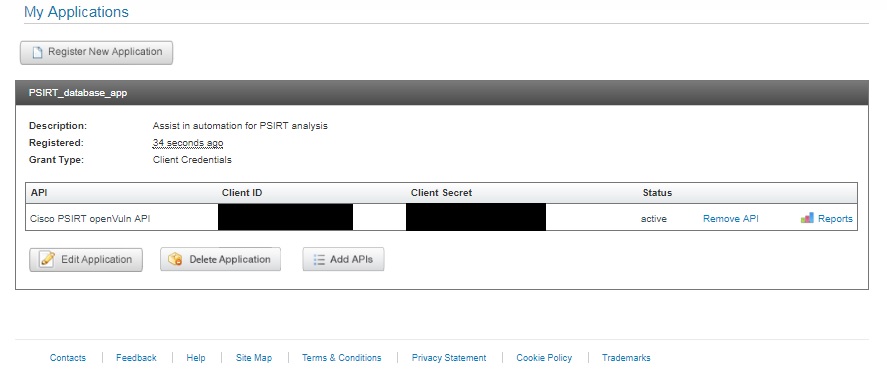
Postman Access Token Settings:
Postman Execution/Response:
I additionally looked at your Git and followed the Curl example and received no response:

I would greatly appreciate any more help you are able to offer! Please let me know if you need any additional information.
Thank you for your time.
Best,
Lukas
- Mark as New
- Bookmark
- Subscribe
- Mute
- Subscribe to RSS Feed
- Permalink
- Report Inappropriate Content
08-16-2017 08:10 AM
UPDATE: SOLVED
With the help of Cisco's Jason Smith, I was able to issue a valid request via both Postman and Curl. The missing piece was to take the access_token (as produced via Omar's method) as well as the token_type and set them as an 'Authorization' header field as well as providing an 'Accept' header.
More explicitly:
Postman:
1. Get access_token following the steps Omar laid out.
2. Do not click 'Use Token' instead go to the 'Headers' Tab in Postman and set the following:
Key: Authorization Value: Bearer <access_token>
Key: Accept Value: application/json
3. Hit 'Send' and watch the magic happen ![]()
Curl:
The issue I was having with getting the token had to do with my proxy settings. Ensure you are first doing:
$ export https_proxy=<https_host>:<port>
Then you can issue your access token request:
$ curl -s -k -H "Content-Type: application/x-www-form-urlencoded" -X POST -d "client_id=<client_id>" -d "client_secret=<client_secret>" -d "grant_type=client_credentials" https://cloudsso.cisco.com/as/token.oauth2
Then when you get the response, you should have an access token and a token type so using these do:
$ curl -X GET -s -k -H "Accept: application/json" -H "Authorization: <token_type> <access_token>" https://api.cisco.com/security/advisories/cvrf/all
Thank you again to Jason Smith for this solution!
- Mark as New
- Bookmark
- Subscribe
- Mute
- Subscribe to RSS Feed
- Permalink
- Report Inappropriate Content
02-17-2021 12:26 PM
I deleted previously created applications and re-created it and was able to get token. thanks folks!
- Mark as New
- Bookmark
- Subscribe
- Mute
- Subscribe to RSS Feed
- Permalink
- Report Inappropriate Content
01-17-2023 04:45 AM
I have done the above steps, getting the token, but still getting the error not authorized
- Mark as New
- Bookmark
- Subscribe
- Mute
- Subscribe to RSS Feed
- Permalink
- Report Inappropriate Content
05-17-2024 08:20 AM - edited 05-17-2024 08:20 AM
just as a hint for guys coming 7 years late like me - the URL has been changed
https://id.cisco.com/oauth2/default/v1/token
and
https://apix.cisco.com/security/advisories/v2 for advisories
- Mark as New
- Bookmark
- Subscribe
- Mute
- Subscribe to RSS Feed
- Permalink
- Report Inappropriate Content
10-05-2020 06:53 AM
I did followed the process but there is no option edit the postman header values and error persist.
Discover and save your favorite ideas. Come back to expert answers, step-by-step guides, recent topics, and more.
New here? Get started with these tips. How to use Community New member guide


