Did you know? It takes over 500 screens to install just the prerequisites and SQL server for a complete System Center Installation. Here is a prerequisite list from Microsoft;

Microsoft's PowerShell Deployment Toolkit (PDT) solves exactly this. It installs all of the dependencies and brings up System Center in a fully automated fashion. But one thing that I constantly struggled with, was finding good documentation on how-to use this tool online. Hence my blog... I will summarize all the steps I took to get this tool to install the System Center components in my lab environment.
Requirements
Step 1: Plan your Data Center environment
Some things to think about;
Do you already have an AD, DNS etc that you would like to leverage for this setup? Would you need VMs to be created from scratch? Also keep in mind about user accounts, their security principals etc..
Step 2: Editing Variable.xml
Change the values of "SourcePath" and "Download" to reflect where you have downloaded PDT and wherever you want all the dependency files to be installed.
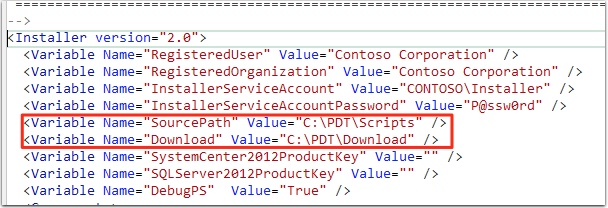
Misc: You might want to change the Domain name (Contoso) and default passwords that comes with this script, unless you want to name yours after Microsoft's fictional company name. =)
Step 3: Download dependencies (Downloader.ps1)
After editing the Variable.xml, run the Downloader.ps1 script. The script specifies a start time and starts to grab ALL of the files required for your deployment. Note that there are few files you might have to download manually and keep it handy;
- Windows Server 2012 R2
- Windows Server 2012 (Only if System Center Service Manager is required)
- System Center R2 Virtual Machine Manager
- System Center R2 Orchestrator
- System Center R2 Operations Manager
Once you run the Downloader.ps1 script, a screen like the one below appears;
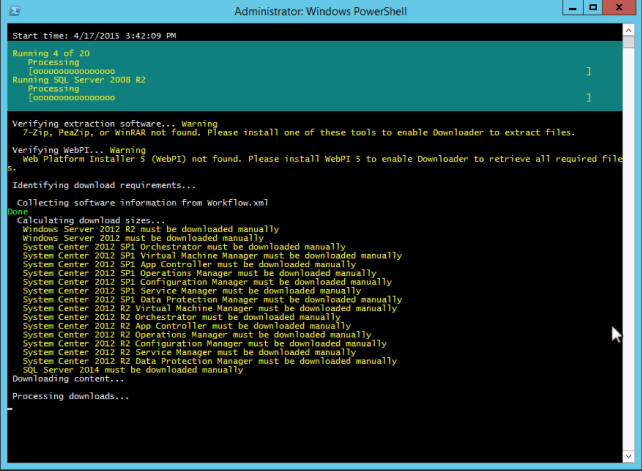
Lots of files will get downloaded and this could take couple of hours (or more!), so grab a bite while the script grabs all the bits. =)
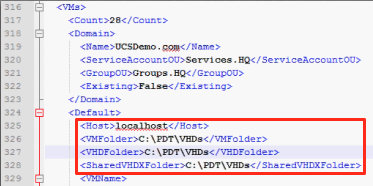
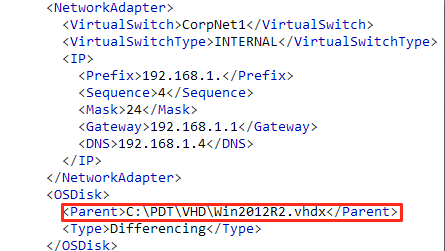
Step 4: Create VMs
If you decide to create VMs from scratch in your environment, modify the Variable.xml to reflect the location of WindowsServer2012 R2 vhd file in your local machine. Also modify the XML file to point to your Hyper-v machine ("localhost" in my example). All of the VMs will be created on this Hyper-v environment.
VMCreator.ps1 creates all of the VMs (including AD / DNS), creates a virtual internal network (CorpNet1 from the above example) and waits for all of the VM creation to complete. This script also turns on the AD machine first, waits for the other VMs to come up, runs a registry service from inside of the AD VM and registers all of the created VMs to its AD in an automated fashion.
Step 5: Install all the System Center components
Final step is to run the Installer script, which installs all of the System Center components inside the respective VMs. This script also does a final check for all of the dependencies before the actual installation. So if you need to just verify for the dependencies, use -DeploymentOnly option while running the script. Once the script gets past verifying dependencies stage, it takes about 3 hours-ish to install and bring up the System Center components. Note that Microsoft color codes go like this - Yellow is warning, Green is success, White is in progress, Red is error. See a sample of successful installation below;

If you got to this point and everything looked green in your console, System Center is installed successfully in your environment. You should be celebrating! =)
Also at this point, you are only one step away from managing and monitoring your UCS hardware from inside of your newly created System Center Environment. Grab the UCS / IMC Management Packs (Free!) for System Center from the UCSIntegrations subspace to do so...
To summarize, here's what I really like about PDT;
- Installs all of the System Center dependencies and completely abstract it from the end user. So we can get to be dumb (only slightly!) =)
- The VMCreator script helps with all of the VM creations from scratch. You can get to start with a clean slate!
- Great tool for building demo / lab environments from scratch. Esp. when you dont have Microsoft 101 components like AD, MSSQL, appropriate user accounts, security principals etc.
- When it worked, it installed ALL of the System Center components in under 3 hours for me!
- Extensible - can be modified for one's own deployment scenario.
- Re-runnable. Best feature ever! Believe me, you'd want to validate and re-validate a bunch of times until all of the dependencies are installed and validated. It does not break whatever was already working.
Cons;
- No rock solid documentation from Microsoft around this (Yet!). You are kind of on your own way.
- No innate support for SCCM Installation (Yet!). I installed this one manually.
So go ahead and give this a shot.. Good luck! =)
