- Cisco Community
- Technology and Support
- Collaboration
- Collaboration Knowledge Base
- How to add IPv6 Addresses of Cisco Unity Connection 8.5 & Later
- Subscribe to RSS Feed
- Mark as New
- Mark as Read
- Bookmark
- Subscribe
- Printer Friendly Page
- Report Inappropriate Content
- Subscribe to RSS Feed
- Mark as New
- Mark as Read
- Bookmark
- Subscribe
- Printer Friendly Page
- Report Inappropriate Content
06-21-2012 04:14 AM - edited 03-12-2019 09:48 AM
- Introduction
- Configuration
- 1)CUCM SIP Trunk with the Cisco Unity Connection IPv6 Destination Address
- 2) IPv6 address and addressing mode for CUCM Phone System Integrations in Cisco Unity Connection Administration
- Related Links
Introduction
This document describes the steps on how to change the IPV6 addresses of Cisco Unity Connection 8.5 and later.
In Cisco Unity Connection 8.5 and later, you can enable and configure Internet Protocol Version 6 (IPv6) for use with Cisco Unified Communications Manager phone system integrations via SCCP or SIP. IPv6 is disabled by default.
Make sure about the considerations when deploying IPv6 for Cisco Unified CM integrations:
•![]() IPv6 is supported in Cisco Unified CM release 7.1(2) and later.
IPv6 is supported in Cisco Unified CM release 7.1(2) and later.
•![]() The CTL file required for security features (authentication and encryption) between Connection and Cisco Unified CM for SCCP integrations uses IPv4 addressing. Therefore, in order to use authentication and encryption with SCCP secure ports, you must retain the IPv4 address or host name for the Cisco Unified CM server(s) on the port group in Connection.
The CTL file required for security features (authentication and encryption) between Connection and Cisco Unified CM for SCCP integrations uses IPv4 addressing. Therefore, in order to use authentication and encryption with SCCP secure ports, you must retain the IPv4 address or host name for the Cisco Unified CM server(s) on the port group in Connection.
•![]() Some versions of Cisco Adaptive Security Appliance (ASA) do not support application inspection for IPv6 traffic for Unified Communications application servers and endpoints. Cisco recommends not using IPv6 for Unified Communications if you are using a Cisco ASA version that does not provide this support. See the documentation for your version of Cisco ASA to determine whether application inspection is supported in your deployment.
Some versions of Cisco Adaptive Security Appliance (ASA) do not support application inspection for IPv6 traffic for Unified Communications application servers and endpoints. Cisco recommends not using IPv6 for Unified Communications if you are using a Cisco ASA version that does not provide this support. See the documentation for your version of Cisco ASA to determine whether application inspection is supported in your deployment.
Note:-
Do not enable IPv6 during business hours. The server must be restarted for changes to take effect.
Configuration
1)CUCM SIP Trunk with the Cisco Unity Connection IPv6 Destination Address
Follow the below steps to configure a CUCM SIP Trunk with the Cisco Unity Connection IPv6 Destination Address
Step 1 ![]() Sign in to Cisco Unified CM Administration.
Sign in to Cisco Unified CM Administration.
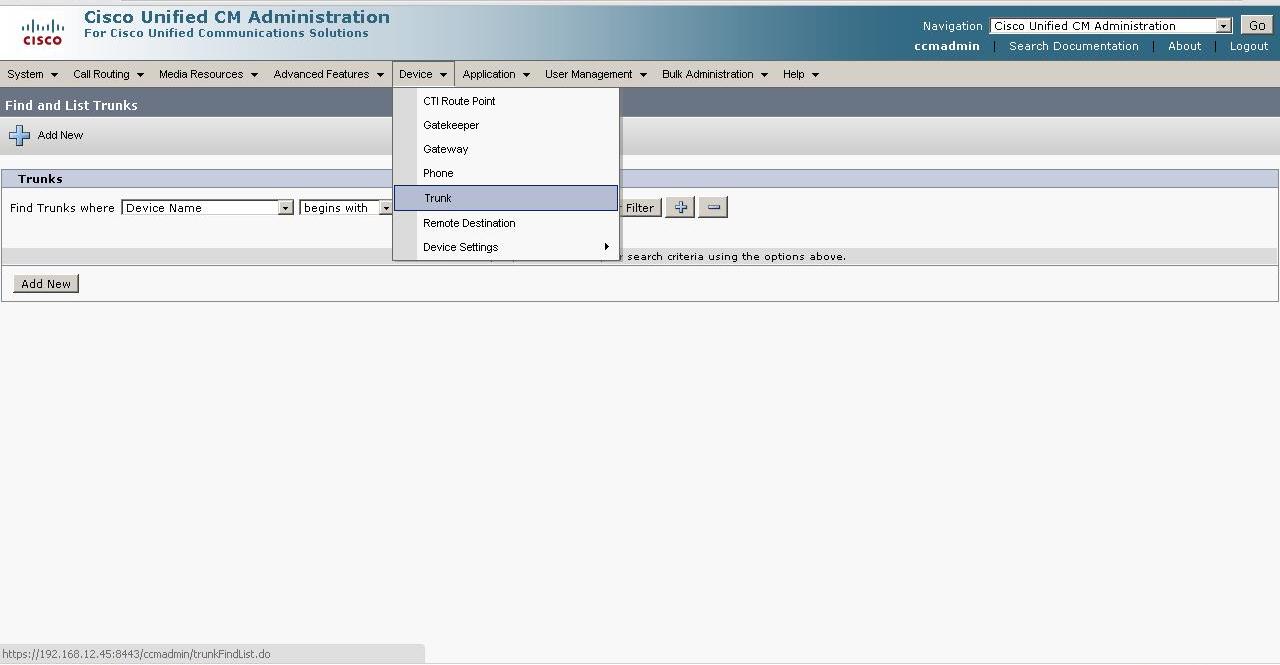
Step 2 ![]() On the Device menu, select Trunk.
On the Device menu, select Trunk.
Step 3 ![]() Find the trunk corresponding to the Connection server, and select the name of the trunk.
Find the trunk corresponding to the Connection server, and select the name of the trunk.
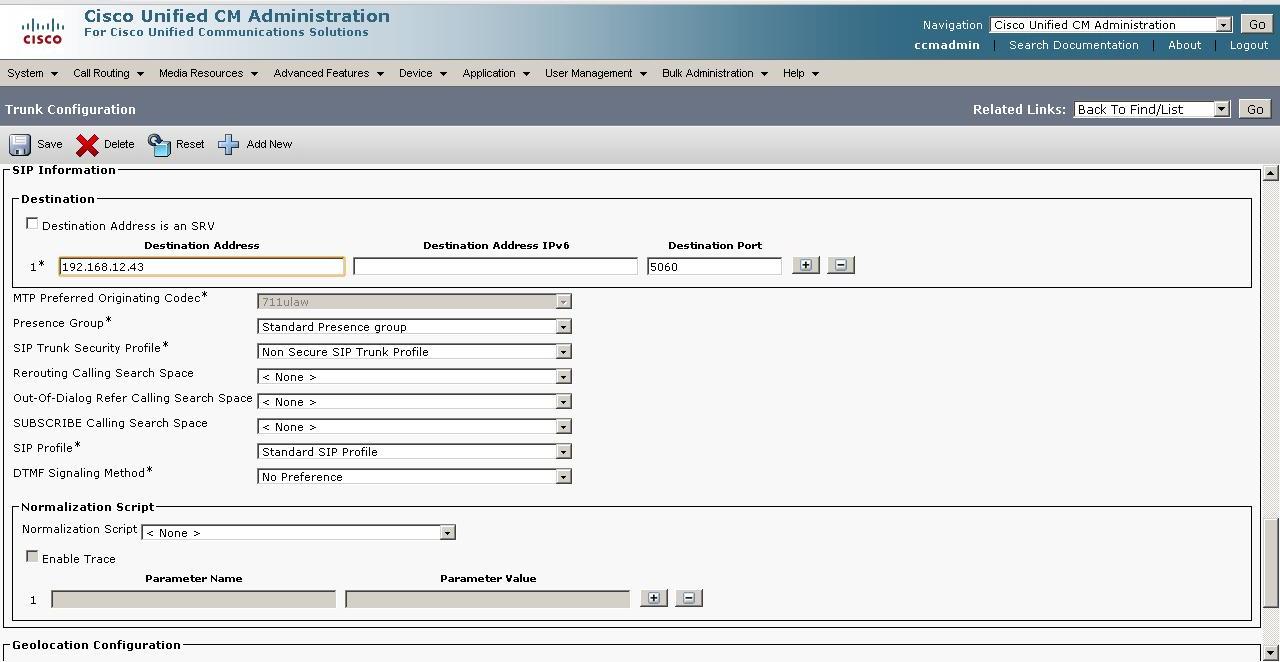
Step 4 ![]() On the Trunk Configuration page, change the value of the Destination Address IPv6 field to the new IPv6 address.
On the Trunk Configuration page, change the value of the Destination Address IPv6 field to the new IPv6 address.
Step 5 ![]() Select Save to save the change.
Select Save to save the change.
Step 6 ![]() Select Reset to reset the trunk.
Select Reset to reset the trunk.
2) IPv6 address and addressing mode for CUCM Phone System Integrations in Cisco Unity Connection Administration
Follow the below steps to configure the IPv6 address and addressing mode for CUCM Phone System Integrations in Cisco Unity Connection Administration:-
Step 1 ![]() Sign in to Cisco Unity Connection Administration.
Sign in to Cisco Unity Connection Administration.
Step 2 ![]() Expand System Settings, then select General Configuration.
Expand System Settings, then select General Configuration.
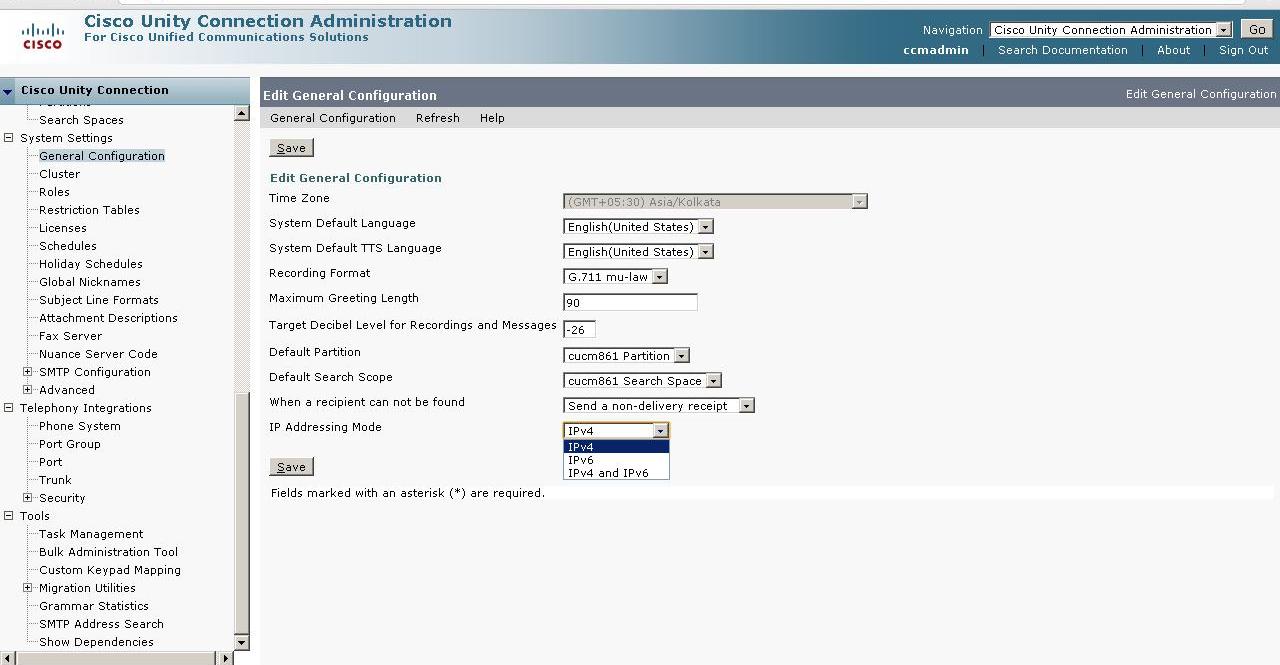
Step 3 ![]() On the Edit General Configuration page, for IP Addressing Mode, select the option from the list to control where Connection listens for incoming traffic:
On the Edit General Configuration page, for IP Addressing Mode, select the option from the list to control where Connection listens for incoming traffic:
•![]() IPv4
IPv4
•![]() IPv6
IPv6
•![]() IPv4 and IPv6
IPv4 and IPv6
Step 4 ![]() Select Save.
Select Save.
Step 5 ![]() Optionally, to enable the Connection server to contact the Cisco Unified Communications Manager server via an IPv6 address or host name, do the following substeps:
Optionally, to enable the Connection server to contact the Cisco Unified Communications Manager server via an IPv6 address or host name, do the following substeps:
a. ![]() Expand Telephony Integrations, then select Port Group.
Expand Telephony Integrations, then select Port Group.
b. ![]() On the Search Port Groups page, select the display name of the port group that you want to modify.
On the Search Port Groups page, select the display name of the port group that you want to modify.
Note ![]() :- If the port group that you want to modify does not appear in the search results table, set the applicable parameters in the search fields at the top of the page, and then select Find.
:- If the port group that you want to modify does not appear in the search results table, set the applicable parameters in the search fields at the top of the page, and then select Find.
.
c. ![]() On the Port Group Basics page, on the Edit menu, select Servers.
On the Port Group Basics page, on the Edit menu, select Servers.
d. ![]() On the Edit Servers page, in the Cisco Unified Communications Manager Servers table, enter a value for the IPv6 Address or Host Name for each Cisco Unified CM server that the port group connects to. Do the same for the servers in the TFTP Server table.
On the Edit Servers page, in the Cisco Unified Communications Manager Servers table, enter a value for the IPv6 Address or Host Name for each Cisco Unified CM server that the port group connects to. Do the same for the servers in the TFTP Server table.
Note:- If you are using authentication and encryption with SCCP secure ports, you must also retain the IPv4 address or host name for each Cisco Unified CM server and TFTP server.
e. ![]() Select Save.
Select Save.
f. ![]() Repeat substep a. through substep e. for each additional port group for which you want to configure an IPv6 address or host name.
Repeat substep a. through substep e. for each additional port group for which you want to configure an IPv6 address or host name.
Step 6 ![]() If you selected the IPv4 and IPv6 option in step 3, do the following substeps to configure the call control signalling and/or media addressing mode settings for the Cisco Unified CM integration:
If you selected the IPv4 and IPv6 option in step 3, do the following substeps to configure the call control signalling and/or media addressing mode settings for the Cisco Unified CM integration:
a. ![]() Expand Telephony Integrations, then select Port Group.
Expand Telephony Integrations, then select Port Group.
b. ![]() On the Search Port Groups page, select the display name of the port group that you want to modify.
On the Search Port Groups page, select the display name of the port group that you want to modify.
Note:- ![]() If the port group that you want to modify does not appear in the search results table, set the applicable parameters in search fields at the top of the page, and then select Find.
If the port group that you want to modify does not appear in the search results table, set the applicable parameters in search fields at the top of the page, and then select Find.
c. ![]() On the Port Group Basics page, on the Edit menu, select Servers.
On the Port Group Basics page, on the Edit menu, select Servers.
d. ![]() In the IPv6 Addressing Mode section, select either the IPv4 option or the IPv6 option for the applicable settings:-
In the IPv6 Addressing Mode section, select either the IPv4 option or the IPv6 option for the applicable settings:-
•![]() Preference for Signaling (applicable to both SCCP integrations and SIP integrations)—This setting determines the call control signaling preference when registering with Cisco Unified CM via SCCP or when initiating SIP requests.
Preference for Signaling (applicable to both SCCP integrations and SIP integrations)—This setting determines the call control signaling preference when registering with Cisco Unified CM via SCCP or when initiating SIP requests.
•![]() Preference for Media (applicable only to SIP integrations)—This setting determines the preferred addressing mode for media events when communicating with dual-stack (IPv4 and IPv6) devices.
Preference for Media (applicable only to SIP integrations)—This setting determines the preferred addressing mode for media events when communicating with dual-stack (IPv4 and IPv6) devices.
e. ![]() Select Save.
Select Save.
Related Links
Find answers to your questions by entering keywords or phrases in the Search bar above. New here? Use these resources to familiarize yourself with the community: