Introduction
This blog is a quick note how to setup NSO PnP server with a physical ISR device to demonstrate ZTP.
Following is summary of the demo:
- Restart ISR with an empty config
- ISR obtains IP address by DHCP option 43
- ISR connects to NSO via PnP
- NSO configures ISR with day 0 config through PnP
- NSO adds device, fetches SSH key and does sync-from
Note, this document covers day 0 config only (not day 1 by using reactive FASTMAP).
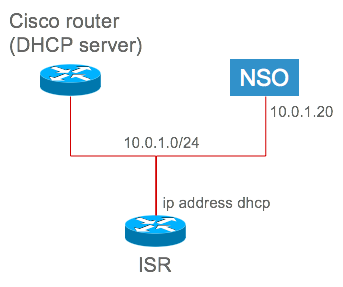
Topology
Tested with NSO 4.4.2.1 and cisco-pnp-project-1.9.0.
Get a serial number
NSO identifies each device by its serial number.
Because of that, you must know a serial number by "show version" command.
In following case, serial number is FGL27131376.
|
ISR891#show ver
Cisco IOS Software, C800 Software (C800-UNIVERSALK9-M), Version 15.6(3)M1, RELEASE SOFTWARE (fc2)
Technical Support: http://www.cisco.com/techsupport
Copyright (c) 1986-2016 by Cisco Systems, Inc.
Compiled Fri 02-Dec-16 15:28 by prod_rel_team
(snip)
-------------------------------------------------
Device# PID SN
-------------------------------------------------
*1 C891FJ-K9 FGL27131376
|
Configurations
A Cisco router, act as DHCP server, has following configuration.
|
ip dhcp excluded-address 10.0.1.1 10.0.1.100
!
ip dhcp pool nso
network 10.0.1.0 255.255.255.0
domain-name cisco.com
option 43 ascii 5A1N;K4;B2;I10.0.1.20;J9191
|
Option 43 string means following.
5A1N;K4;B2;I10.0.1.20;J9191
5 - DHCP sub-option. PnP is five.
A - Active, means client must connect to PnP server. This must be Active.
1 - Version 1
N - Debug off
; - delimiter
K4 - Use HTTP
B2 - Use IPv4
I10.0.1.20 - IP address of PnP server. NSO IP address.
J9191 - NSO port
NSO must have at least Cisco NED and PnP package.
To install PnP on NSO, download ncs-4.4.2.2-cisco-pnp-project-1.9.0.tar.gz from CCO.
It contains following files.
- doc
- init_data
- packages
- project-meta-data.xml
Under packages directory, find ncs-4.4.2.2-cisco-pnp-1.9.0.tar.gz and untar the file to your packages directory.
After doing "packages reload" on NSO, configure follwiing PnP configurations.
|
admin@ncs# show running-config pnp
pnp server ip-address 10.0.1.20
pnp server port 9191
pnp server use-ssl false
pnp logging serial all
!
pnp map FGL27131376
device-name ISR891
username cisco
password $8$nV2GkQf9XvBPbsPhasJWVjWxYxiU1gF1KCFKzec/bvU=
sec-password $8$tfJCjJhVLzayEVr+U3Ee1AxWtaAeX6a9N0EtgU4vWYs=
device-type cli
ned-id cisco-ios
port 22
day0-file ISR891.txt
cfg-properties variable HOSTNAME
value ISR891
|
Following is output of ISR891.txt under packages/cisco-pnp/cfg directory.
|
hostname $HOSTNAME
!
enable password cisco
ip domain name cisco.com
!
username cisco password 0 cisco
!
ip ssh version 2
!
line vty 0 4
login local
transport input all
!
crypto key generate rsa modulus 2048
|
Don't forget the last line which is necessary to generate an SSH key.
Let's do the demo
Now, all you need to do is erase all config in ISR and reboot.
|
ISR891#write erase
Erasing the nvram filesystem will remove all configuration files! Continue? [confirm]
[OK]
Erase of nvram: complete
SIR891#reload
System configuration has been modified. Save? [yes/no]: (no)
Proceed with reload? [confirm]
|
If everything goes well, device is configured, added to NSO and synced as follows.
|
admin@ncs# show pnp list
SERIAL IP ADDRESS CONFIGURED ADDED SYNCED LAST CONTACT
-------------------------------------------------------------------------
FGL27131376 10.0.1.131 true true true 2017-09-01 02:04:55
admin@ncs# show devices list
NAME ADDRESS DESCRIPTION NED ID ADMIN STATE
-------------------------------------------------------
ISR891 10.0.1.131 - cisco-ios unlocked
admin@ncs#
|
")
")
