Introduction
A virtual SAN (VSAN) is a logical grouping of ports in a single switch or across multiple switches that function like a single fabric. A VSAN is isolated from other VSANs in terms of traffic, security, and fabric services. Multiple VSANs can be defined on a physical switch. Each VSAN will require it own domain_ID. VSANs are numbered from 1 through 4094. VSAN 1 and VSAN 4094 are predefined and have very specific roles. The user-specified VSAN range is from 2 through 4093. VSAN 1 is the default VSAN that contains all ports by default. VSAN 1 is used as a management VSAN. VSAN 4094 is the isolated VSAN into which all orphaned ports are assigned. Devices that are part of VSAN 4094 cannot communicate with each other.
Cisco Data Center Network Manager (DCNM) is a management system for the Cisco Unified Fabric. It enables you to provision, monitor, and troubleshoot the data center network infrastructure. Cisco DCNM streamlines the provisioning for the unified fabric and monitors the SAN and LAN components.
VSAN
A VSAN has the following additional features:
- Multiple VSANs can share the same physical topology.
- The same Fibre Channel IDs (FC IDs) can be assigned to a host in another VSAN, thus increasing VSAN scalability.
- Every instance of a VSAN runs all required protocols such as FSPF, domain manager, and zoning.
- Fabric-related configurations in one VSAN do not affect the associated traffic in another VSAN.
- Events causing traffic disruptions in one VSAN are contained within that VSAN and are not propagated to other VSANs.
Creating a VSAN and Adding Interfaces
Follow this procedure to create a VSAN from DCNM-SAN and add an interface to it.
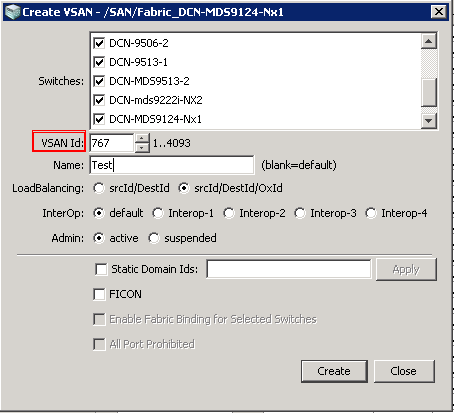
Step 1. On the toolbar, click the Create VSAN icon.

Step 2. Select the switch(es) for the VSAN.
Step 3. Enter the VSAN id in VSAN ID dialog box . In this example VSAN 767 is being created.

Step 4. Enter a name for the VSAN. If nothing is entered, then default name of VSAN767 is assigned to the VSAN.
Step 5. If the VSAN is to be attached to a third-party switch, select the appropriate Interop Mode. It is recommended to specify a static Domain ID for each switch for a VSAN at the time of the creation.
Step 6. Click Create to create VSAN 767 on the selected switches.
Assign interfaces to a VSAN using Fabric Manager
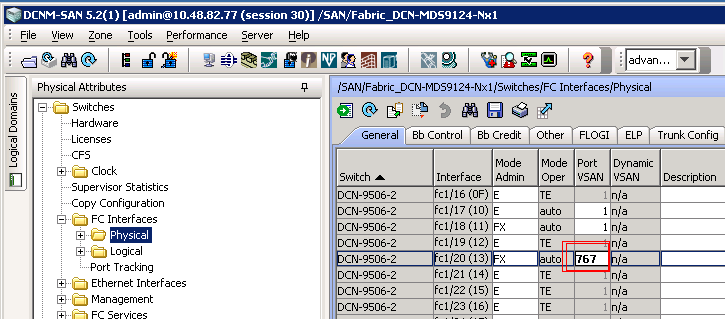
Step 1. In the Physical Attributes pane, expand Switches > Interfaces> FC Physical.
Step 2. Modify the Port VSAN field for the switch interface to be moved to the specified VSAN.

Step 3. If the port has the Admin Status down, enable it by changing the value to up in the status Admin Field.

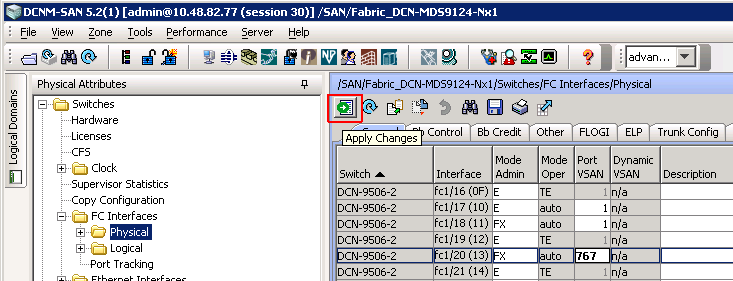
Step 4. Click Apply Changes.

Step 5. Click Yes to move the port to the new VSAN.
Modifying VSAN attributes
This section describes how to modify the attributes of a VSAN using DCNM-SAN.
Step 1. Select a fabric in the Logical Domains pane.
Step 2. Expand the VSAN to be modified.
Step 3. Choose VSAN Attributes.

Step 4. Make changes to the desired fields.
Step 5. Click Apply Changes.

Related Information
Cisco DCNM Fundamentals Guide
Fabric Configuration Guide, Cisco DCNM for SAN