- Cisco Community
- Technology and Support
- Security
- Network Access Control
- Re: Support Information button in place of link?
- Subscribe to RSS Feed
- Mark Topic as New
- Mark Topic as Read
- Float this Topic for Current User
- Bookmark
- Subscribe
- Mute
- Printer Friendly Page
- Mark as New
- Bookmark
- Subscribe
- Mute
- Subscribe to RSS Feed
- Permalink
- Report Inappropriate Content
04-08-2016 02:17 PM
I have a customer that is using a hotspot portal as a message for blacklist devices. It basically tells them that their device has been blacklisted and to call support at xxx-xxx-xxxx to fix the issue. The reason we are using the hotspot as a message and not the blacklist portal is because the blacklist portal does NOT give the option to include a link to the support information.
This link is helpful for when the user calls support as it contains the MAC address, IP Address, etc of said device.
My question is this: Can we convert the Support Information link to a button? A button would make is easier to 'activate' on a mobile device.
Thank you for your help.
Charles Moreton
Solved! Go to Solution.
- Labels:
-
Identity Services Engine (ISE)
Accepted Solutions
- Mark as New
- Bookmark
- Subscribe
- Mute
- Subscribe to RSS Feed
- Permalink
- Report Inappropriate Content
04-11-2016 05:50 AM
Here is what I did to customize the Hotspot Portal for use as a Blacklist Message:
Duplicate the default Hotspot Portal and give it a meaningful name (in this case Blacklist Message Hotspot)
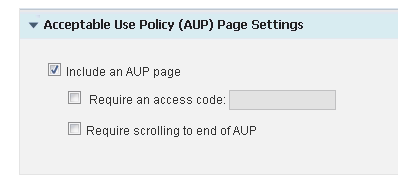
Require an AUP (No no require an Access Code)
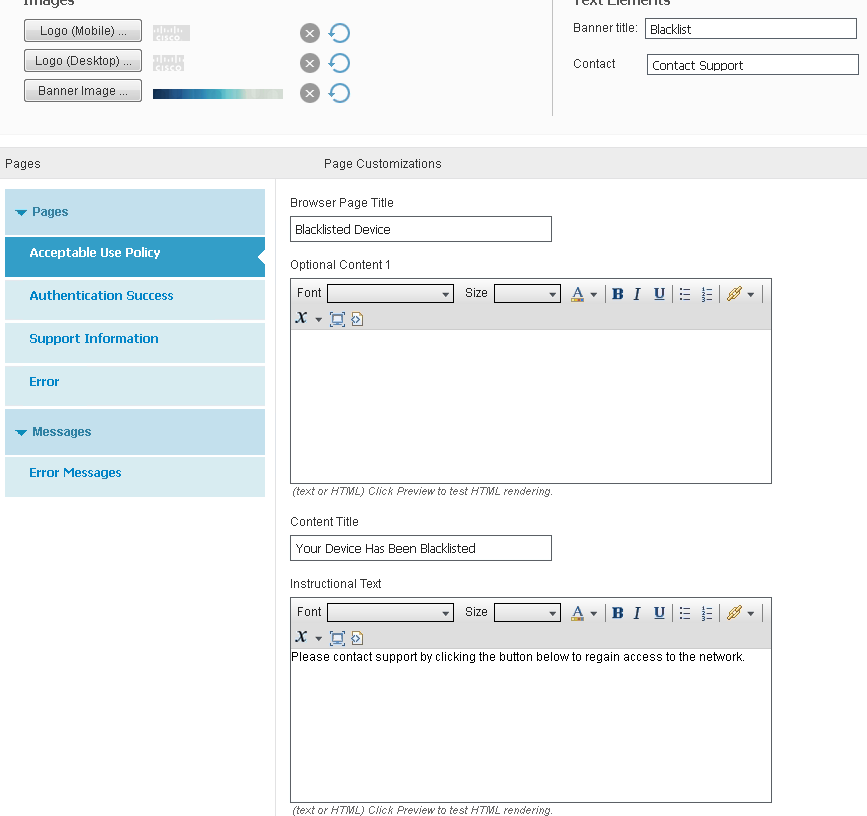
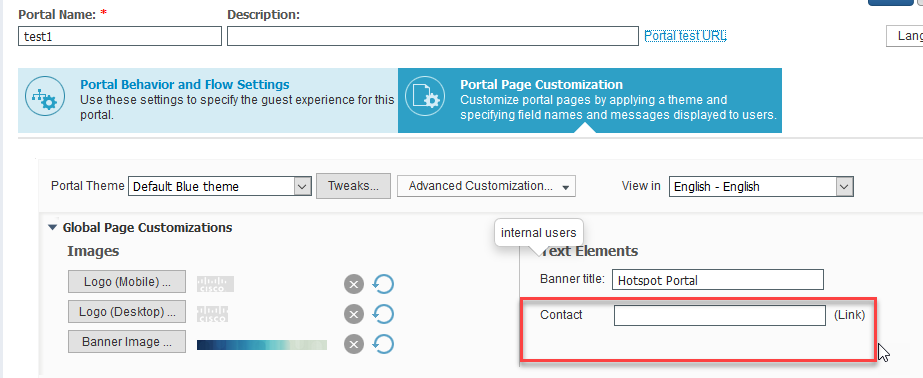
I went to the Portal Page Customization and changed the Banner Title, Browser Page Title, Content Title, and Instructional Text
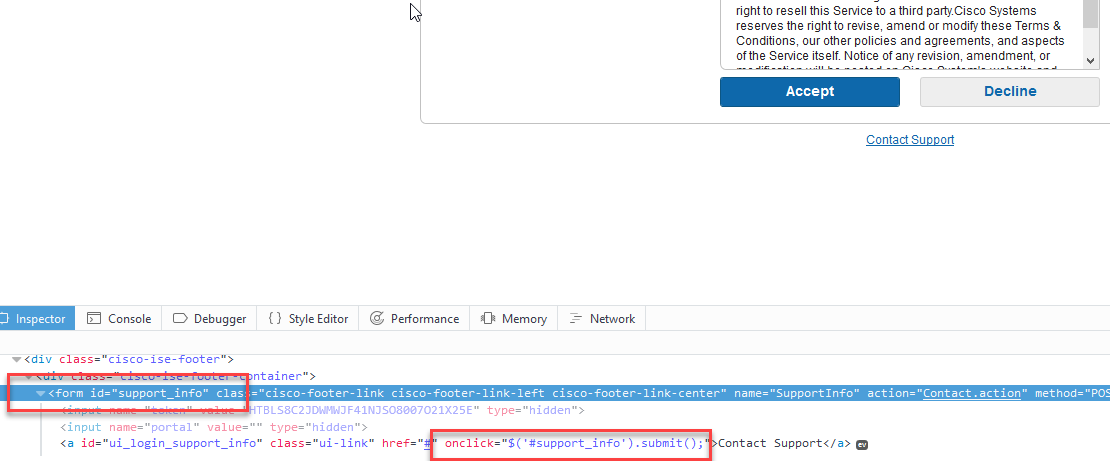
I then moved to the Optional Content 2 box, clicked the HTML/Text toggle button (outlined below) and pasted in the button code.
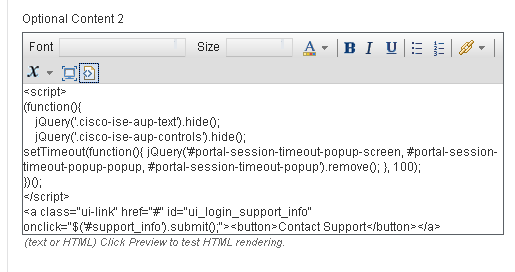
In the above screenshot, this script hides the AUP text and Accept/Decline Buttons:
<script>
(function(){
jQuery('.cisco-ise-aup-text').hide();
jQuery('.cisco-ise-aup-controls').hide();
setTimeout(function(){ jQuery('#portal-session-timeout-popup-screen, #portal-session-timeout-popup-popup, #portal-session-timeout-popup').remove(); }, 100);
})();
</script>
and this creates the Support Information Button:
<a class="ui-link" href="#" id="ui_login_support_info" onclick="$('#support_info').submit();"><button>Contact Support</button></a>
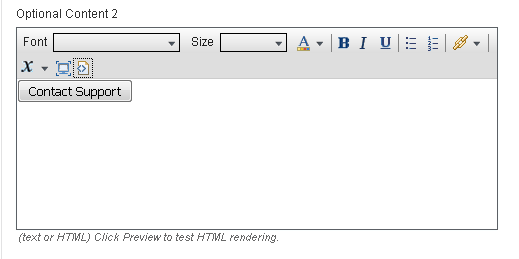
Remember to toggle the HTML/Text button back to text for this to work. This is how the Optional Content 2 box will look when you do
The mobile view is perfect. I have tested this on iOS and Android Devices
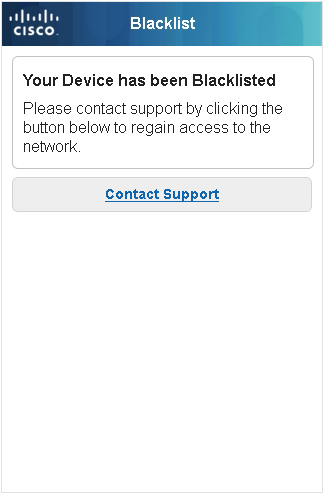
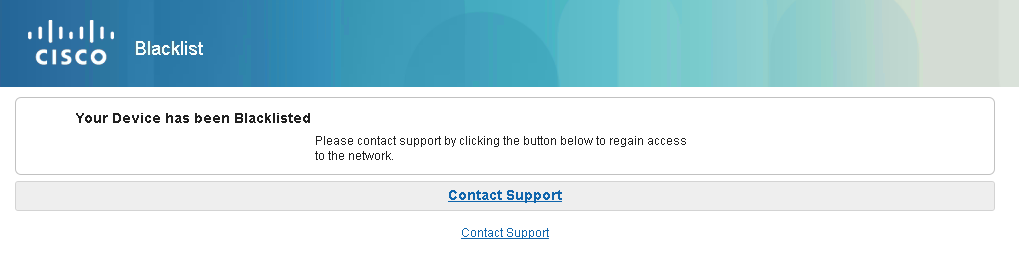
The Desktop browser view does show the link at the bottom of the page, but still serves the purpose nicely.
Then create an Authorization Profile with a Web Redirection to this new Hotspot Portal.
Lastly, Crate an Authorization Rule using the Blacklist Endpoint Identity Group with the AuthZ Profile above as the Permissions.
Thanks again, jakunst
Charles Moreton
- Mark as New
- Bookmark
- Subscribe
- Mute
- Subscribe to RSS Feed
- Permalink
- Report Inappropriate Content
04-11-2016 05:50 AM
Here is what I did to customize the Hotspot Portal for use as a Blacklist Message:
Duplicate the default Hotspot Portal and give it a meaningful name (in this case Blacklist Message Hotspot)
Require an AUP (No no require an Access Code)
I went to the Portal Page Customization and changed the Banner Title, Browser Page Title, Content Title, and Instructional Text
I then moved to the Optional Content 2 box, clicked the HTML/Text toggle button (outlined below) and pasted in the button code.
In the above screenshot, this script hides the AUP text and Accept/Decline Buttons:
<script>
(function(){
jQuery('.cisco-ise-aup-text').hide();
jQuery('.cisco-ise-aup-controls').hide();
setTimeout(function(){ jQuery('#portal-session-timeout-popup-screen, #portal-session-timeout-popup-popup, #portal-session-timeout-popup').remove(); }, 100);
})();
</script>
and this creates the Support Information Button:
<a class="ui-link" href="#" id="ui_login_support_info" onclick="$('#support_info').submit();"><button>Contact Support</button></a>
Remember to toggle the HTML/Text button back to text for this to work. This is how the Optional Content 2 box will look when you do
The mobile view is perfect. I have tested this on iOS and Android Devices
The Desktop browser view does show the link at the bottom of the page, but still serves the purpose nicely.
Then create an Authorization Profile with a Web Redirection to this new Hotspot Portal.
Lastly, Crate an Authorization Rule using the Blacklist Endpoint Identity Group with the AuthZ Profile above as the Permissions.
Thanks again, jakunst
Charles Moreton
")
")
- Mark as New
- Bookmark
- Subscribe
- Mute
- Subscribe to RSS Feed
- Permalink
- Report Inappropriate Content
07-13-2016 07:34 AM
I was able to use the script to change the Support Button into a link to an external page as well, here is the code for anyone that would like to use it
<a class="ui-link" href="http://www.cisco.com" id="Remediate" onclick="jQuery('http://www.cisco.com').submit();"><button>Clean this machine</button></a>
I would also recommend replacing any $ with jQuery
Developers said that it performs and works better
- Mark as New
- Bookmark
- Subscribe
- Mute
- Subscribe to RSS Feed
- Permalink
- Report Inappropriate Content
06-12-2017 10:02 AM
Hi,
First of all, thank you for this excellent post.
I just wanted to contribute with an issue I found on ISE 2.1 patch 1 in regards to this. It took me a while to figure this out, so I thought I might save someone else's time
Apparently, if you clear the Contact Information text box on the page customisation settings, the form named #support_info will not be generated by ISE, and as such the support button will not pop up the support page.
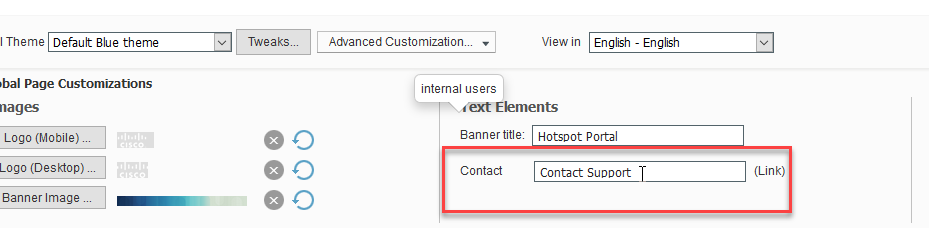
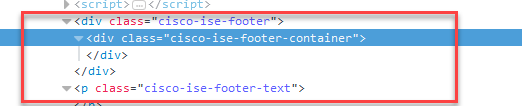
we see that the footer is populated
but without contact info
the div footer is not populated with the form.
So, if you're thinking about doing some advanced customisation and you don't know why the support page stopped working, take a look at the contact text box.
Hope this helps someone...
Gustavo Novais
- Mark as New
- Bookmark
- Subscribe
- Mute
- Subscribe to RSS Feed
- Permalink
- Report Inappropriate Content
06-12-2017 10:04 AM
Replace the text with 5 spaces.
- Mark as New
- Bookmark
- Subscribe
- Mute
- Subscribe to RSS Feed
- Permalink
- Report Inappropriate Content
06-12-2017 11:37 AM
Yes, that was the workaround I used. Even with one space only it worked.
Sorry if it wasn't clear on my post.
G
- Mark as New
- Bookmark
- Subscribe
- Mute
- Subscribe to RSS Feed
- Permalink
- Report Inappropriate Content
11-05-2019 01:58 PM
I am running ISE 2.4 and the script mentioned below does not seem to be hiding AUP text, Accept and Decline buttons:
<script>
(function(){
jQuery('.cisco-ise-aup-text').hide();
jQuery('.cisco-ise-aup-controls').hide();
setTimeout(function(){ jQuery('#portal-session-timeout-popup-screen, #portal-session-timeout-popup-popup, #portal-session-timeout-popup').remove(); }, 100);
})();
Can you tell me if there is an updated script that runs with ISE 2.4 and latest patch.
- Mark as New
- Bookmark
- Subscribe
- Mute
- Subscribe to RSS Feed
- Permalink
- Report Inappropriate Content
11-05-2019 02:00 PM
Please ignore my previous post. The solution is working, It just took some time to do rendering.
- Mark as New
- Bookmark
- Subscribe
- Mute
- Subscribe to RSS Feed
- Permalink
- Report Inappropriate Content
02-21-2025 02:44 AM
Has anyone tried this with ISE 3.4 yet. I tried it. It hides the AUP but not the accept and decline button. Anyone has an idea why the script is not hiding that and what to change to hide it? Will appreciate your help.
- Mark as New
- Bookmark
- Subscribe
- Mute
- Subscribe to RSS Feed
- Permalink
- Report Inappropriate Content
07-17-2016 12:21 PM
With this, I ran into an issue that the endpoint gets the auth success page on the 2nd and subsequent access of this portal. It seems better to skip AUP altogether and to customize the auth success page instead.
- Mark as New
- Bookmark
- Subscribe
- Mute
- Subscribe to RSS Feed
- Permalink
- Report Inappropriate Content
07-18-2016 09:15 AM
Not sure how that works, won't the device be put into the endpoint group associated with that portal then?
- Mark as New
- Bookmark
- Subscribe
- Mute
- Subscribe to RSS Feed
- Permalink
- Report Inappropriate Content
07-18-2016 09:32 AM
It might be due to CSCux99204 present in the setup I am testing.
Discover and save your favorite ideas. Come back to expert answers, step-by-step guides, recent topics, and more.
New here? Get started with these tips. How to use Community New member guide