- Cisco Community
- Technology and Support
- Security
- Network Security
- Re: Cisco FTD DHCP relay on FMC
- Subscribe to RSS Feed
- Mark Topic as New
- Mark Topic as Read
- Float this Topic for Current User
- Bookmark
- Subscribe
- Mute
- Printer Friendly Page
- Mark as New
- Bookmark
- Subscribe
- Mute
- Subscribe to RSS Feed
- Permalink
- Report Inappropriate Content
01-04-2019 04:17 PM - edited 02-21-2020 08:37 AM
Hello all,
I'm currently stuck with an issue with DHCP relay not working on cisco FTD over site-to-site VPN and hoping you can assist.
I have a setup which looks like this.
LAN---->FTD1 --->VPN-->>FTD2-->CORE--> DHCP subnet.
FTD1 is configured for DHCP relay and is also the GW for the LAN. I have DHCP listening on FTD1 on the LAN and the relay gong out my WAN interface. My no nat is working and I have wide open rules for the access policy. However, the firewall drops the packet per packet tracer. I'm thinking that my issue is because when the firewall repackages the DHCP broadcast to unicast using the LAN interface. I know that the ASA didn't allow traffic through it, to another interface. Is that the issue i'm experiencing here.
Phase: 3
Type: ACCESS-LIST
Subtype:
Result: DROP
Config:
Implicit Rule
Additional Information:
Forward Flow based lookup yields rule:
in id=0x2b587aaf44c0, priority=501, domain=permit, deny=true
hits=25, user_data=0x7, cs_id=0x0, reverse, flags=0x0, protocol=0
src ip/id=10.0.82.1, mask=255.255.255.255, port=0, tag=any
dst ip/id=0.0.0.0, mask=0.0.0.0, port=0, tag=any, dscp=0x0
input_ifc=v448, output_ifc=any
Solved! Go to Solution.
Accepted Solutions
- Mark as New
- Bookmark
- Subscribe
- Mute
- Subscribe to RSS Feed
- Permalink
- Report Inappropriate Content
01-05-2019 08:09 AM
I already have the relay configured. But I do not have the set route checked as the DHCP gives out the default gw
- Mark as New
- Bookmark
- Subscribe
- Mute
- Subscribe to RSS Feed
- Permalink
- Report Inappropriate Content
01-05-2019 02:45 AM
Hi,
Try configuring DHCP relay agent and external DHCP server and see.
Configure the DHCP Relay Agent
Navigate toDevices > Device Management, click the edit button of the FTD appliance. Navigate toDHCP > DHCP Relay option. Click the Add button.
Interface: Specify the interface from the drop-down list where interface listens for the client request. DHCP client should connect directly to this interface for IP address request.
Enable DHCP Relay: Enable the checkbox to enable the DHCP relay service.
Set Route: Enable the check box to set the interface IP address as the default gateway.
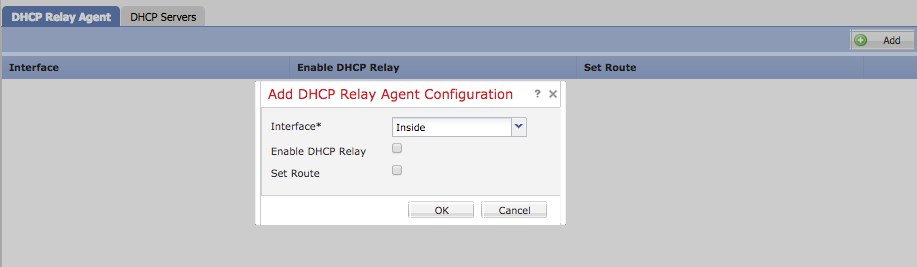
Click the OK button to save the DHCP relay agent configuration.
Configure External DHCP Server
You need to specify the IP address of external DHCP server where client request is forwarded.
To specify the DHCP server, navigate to DHCP Server and click Add .
Server: Specify the IP address of DHCP server. Either you can select the network object from the drop-down list or click the plus (+) icon and create a network object for DHCP server.
Interface: Specify the interface where DHCP server connects.
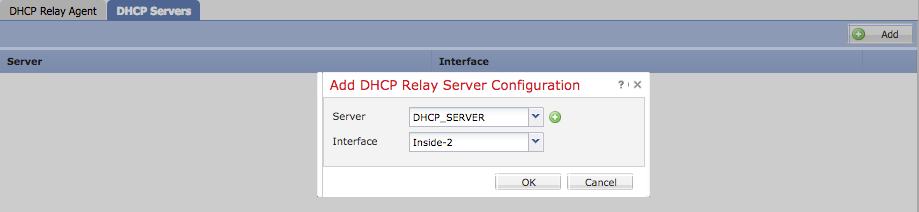
Click OK to save the configuration.
Click the Save button to save the platform setting. Navigate to Deploy option, select the FTD appliance where you want to apply the changes & click the Deploy button to start deployment of platform setting.
HTH
Abheesh
- Mark as New
- Bookmark
- Subscribe
- Mute
- Subscribe to RSS Feed
- Permalink
- Report Inappropriate Content
01-05-2019 08:09 AM
I already have the relay configured. But I do not have the set route checked as the DHCP gives out the default gw
- Mark as New
- Bookmark
- Subscribe
- Mute
- Subscribe to RSS Feed
- Permalink
- Report Inappropriate Content
01-06-2019 05:46 PM
Ok, so my issue was because I'm an idiot :).
I fat fingered one of my network objects which had an impact on my access policies, NAT, and interesting traffic for the VPN.
Thanks for the quick reply.
Discover and save your favorite ideas. Come back to expert answers, step-by-step guides, recent topics, and more.
New here? Get started with these tips. How to use Community New member guide
