
- Cisco Community
- Technology and Support
- DevNet
- DevNet Networking
- Networking Blogs
- Network Automation with Plug and Play (PnP) – Part 3
- Subscribe to RSS Feed
- Mark as New
- Mark as Read
- Bookmark
- Subscribe
- Printer Friendly Page
- Report Inappropriate Content
Continuing the story
The first blog in this series gave an overview of network Plug and Play and how it could be used on APIC-EM. The second blog gave examples of how network-device configuration template could be created programmatically and using the REST API, uploaded to the controller along with the PnP rules and projects. This blog provides an "all-in-one" script to tie all the scripts together using a client library called Uniq.
I also cover the code needed to build a Cisco-Spark chat-ops bot to integrate into the PnP API. The output is shown below.
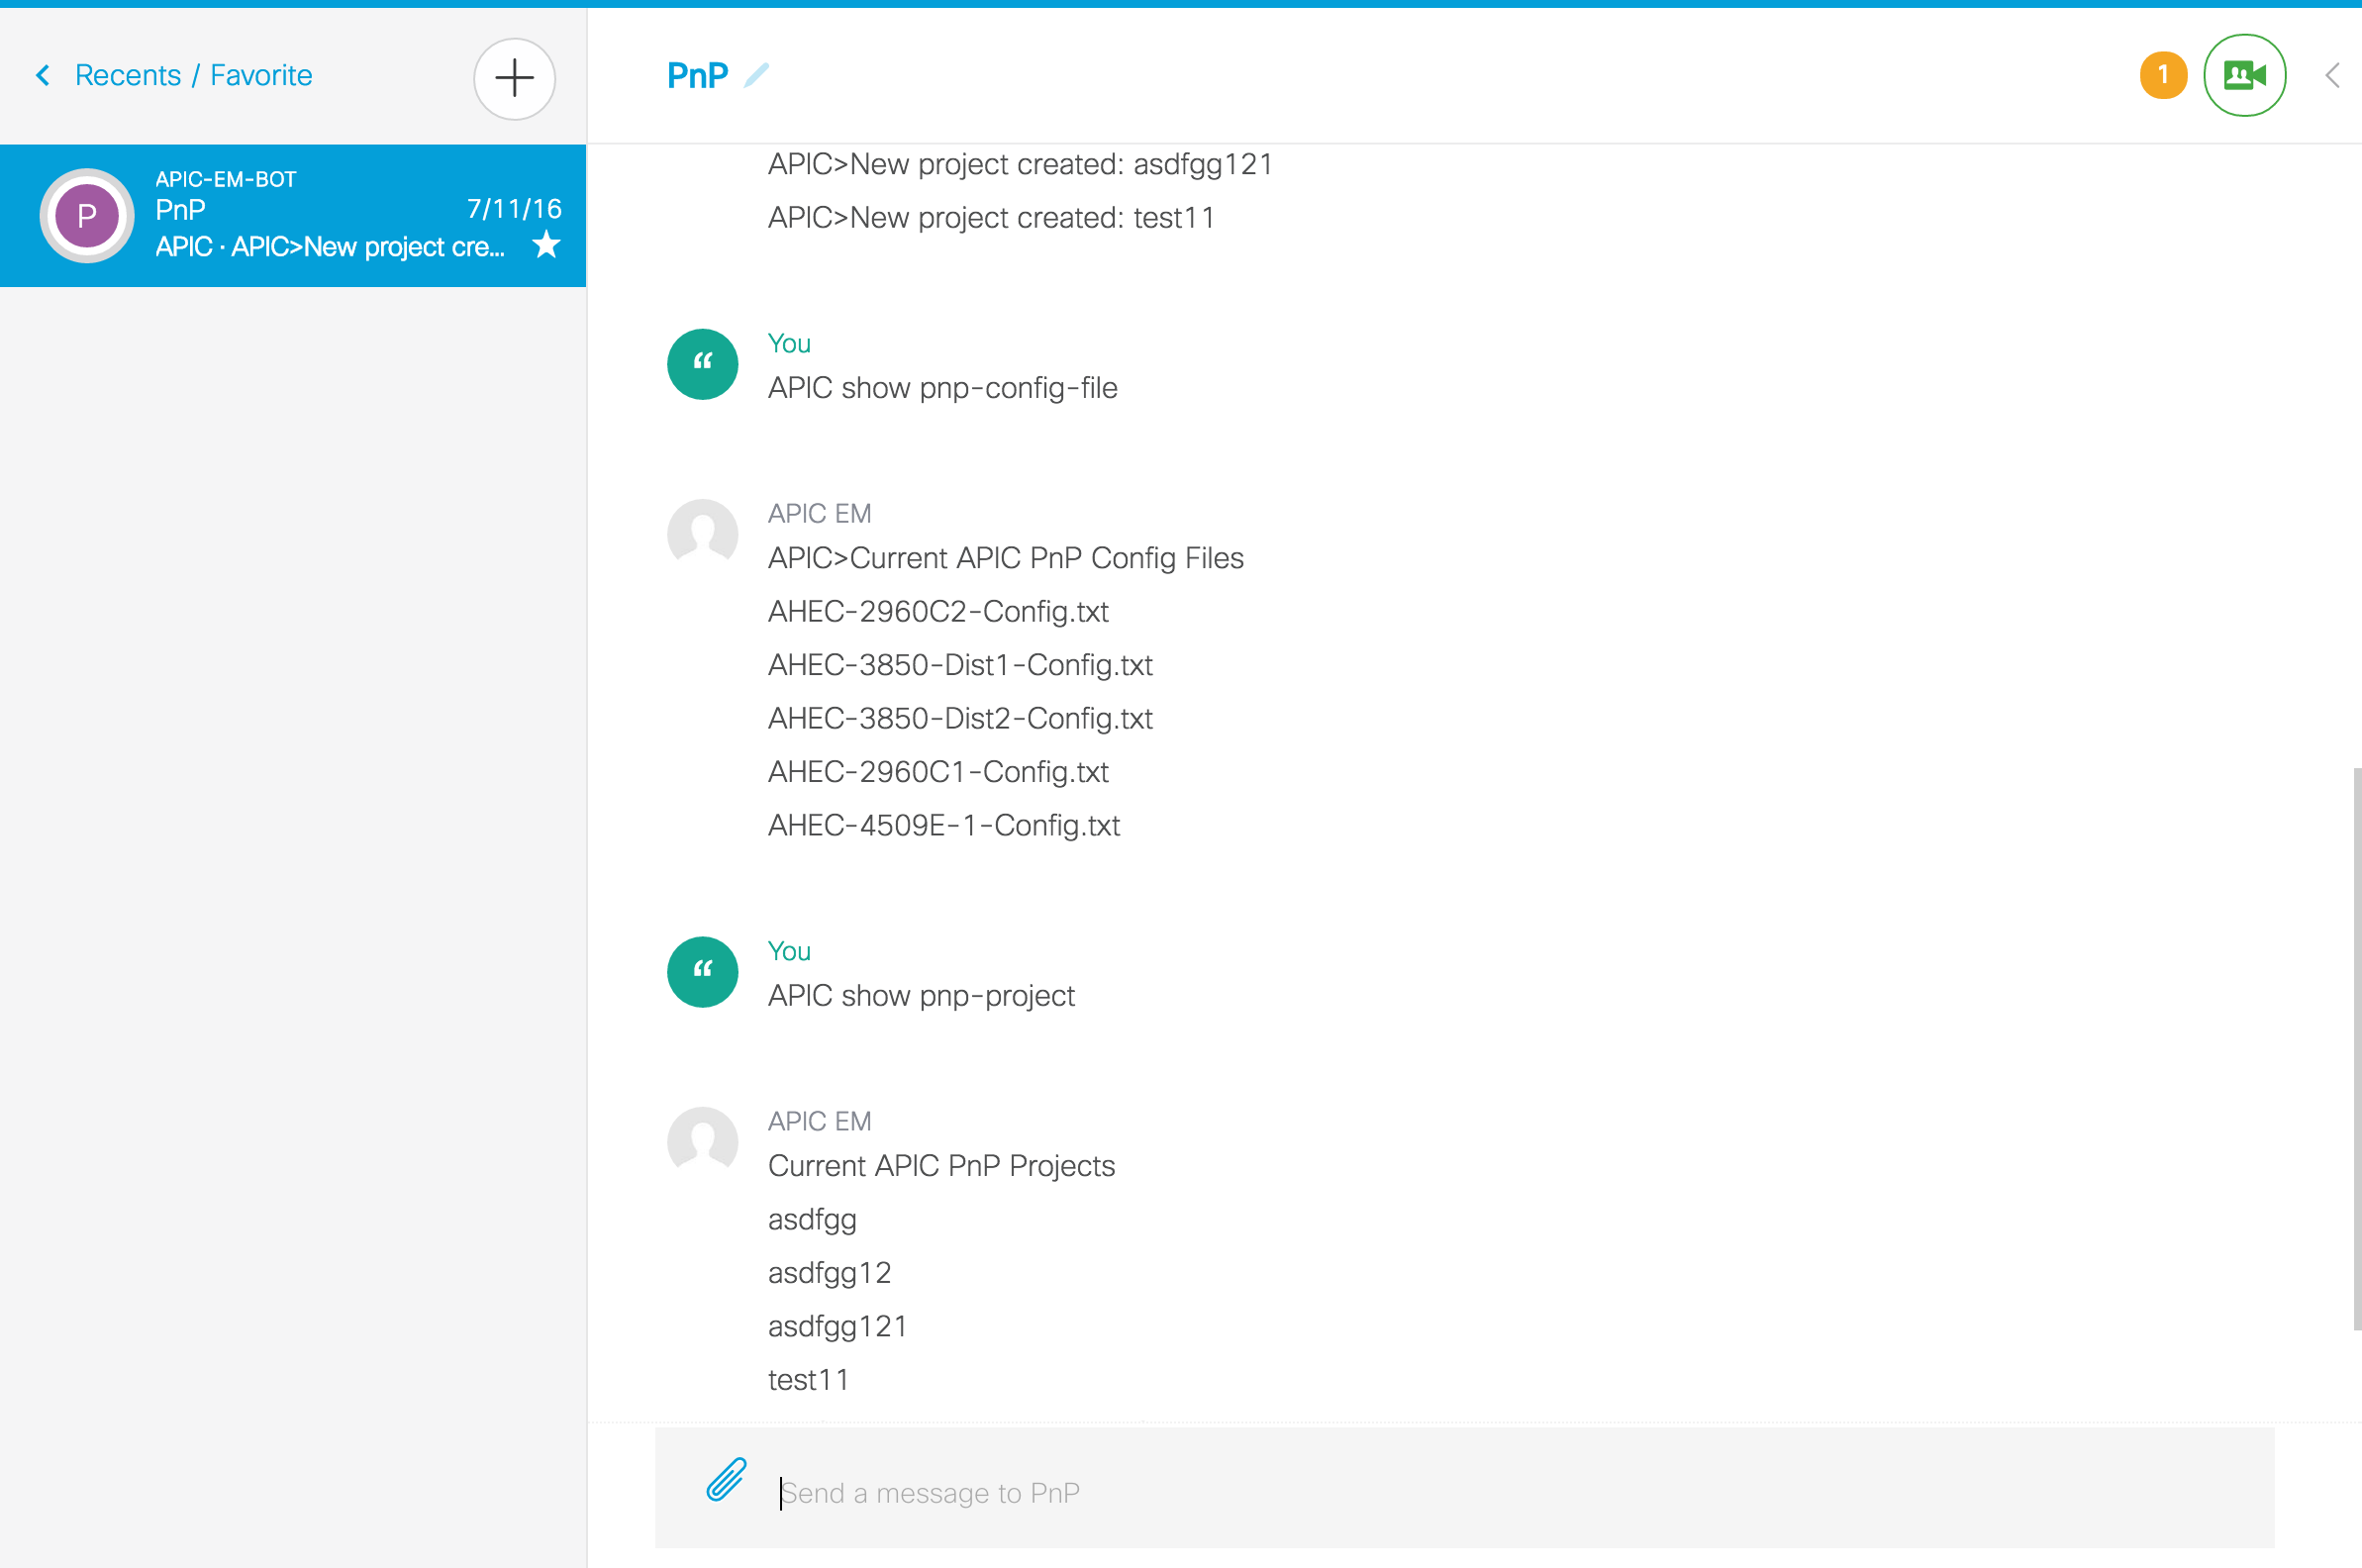
GitHub
As usual, all the source code is in a Github repository. Here are the steps you need to take to download them in a terminal session.
git clone https://github.com/CiscoDevNet/apic-em-samples-aradford.git
cd apic-em-samples-aradford/
cd uniq_samples/code_samples/PnP
Here is what the output should look like when you run the commands above in a command window. NOTE: This is for linux/MAC, windows is outside the scope of this blog.
$ git clone https://github.com/CiscoDevNet/apic-em-samples-aradford.git
Cloning into 'apic-em-samples-aradford'...
remote: Counting objects: 409, done.
remote: Total 409 (delta 0), reused 0 (delta 0), pack-reused 409
Receiving objects: 100% (409/409), 580.75 KiB | 523.00 KiB/s, done.
Resolving deltas: 100% (198/198), done.
Checking connectivity... done.
$ cd apic-em-samples-aradford/
$ cd uniq_samples/code_samples/PnP
$ ls
00_get_project.py __init__.py pnp_config.py
01_create_project.py __pycache__ suffix.py
02_delete_project.py bot work_files
Installing Uniq
Cisco has recently published a client library for APIC-EM. It does require python3. As per recommended best practice I am going to use a virtual environment for installing custom packages. Here are the commands you need to use in a terminal window:
virtualenv -p python3 env
source env/bin/activate
pip3 install uniq
Here is the output from running those commands:
$ virtualenv -p python3 env
Running virtualenv with interpreter /usr/local/bin/python3
Using base prefix '/Library/Frameworks/Python.framework/Versions/3.4'
New python executable in /private/tmp/adam/env/bin/python3
Also creating executable in /private/tmp/adam/env/bin/python
Installing setuptools, pip, wheel...done.
$ source env/bin/activate
(env)$ pip3 install uniq
Collecting uniq
Downloading uniq-1.2.0.20-py3-none-any.whl (521kB)
100% |████████████████████████████████| 522kB 1.1MB/s
Collecting requests>=2.6.0 (from uniq)
Using cached requests-2.10.0-py2.py3-none-any.whl
Installing collected packages: requests, uniq
Successfully installed requests-2.10.0 uniq-1.2.0.20
(env)$
Automatic Creation of Configuration Files
As discussed in blog2, a jinja2 template is used to aid the generation of configuration files. The config_template.jnj file you can see there are two variables: "hostname" and "ipAddress". These correspond to columns in the inventory.csv file. You could have as many variables as you like.
hostname {{hostName|lower}}
enable password cisco123
!
username cisco password 0 cisco123
no aaa new-model
int vlan 1
ip address {{ipAddress}}
!
end
It is critical to have "end" as the last statement in the file.
Here is an example of running this script. The output files are stored in the "work_files/configs" directory. Notice that a suffix has been added to the filenames to make them unique. As the example scripts are using a sandboxapic in the cloud, multiple people can be running the scripts at a time. This suffix should be unique, so you do not clash with other users. In production you would not do this.
Script for Creating/Uploading
In this blog all of the steps are combined into one script. A template file is created, it is uploaded to the controller, a project is created and a rule is added to the project.
$ python3 10_create_and_upload.py
{'site': 'Sydney', 'serialNumber': '12345678901', 'hostName': 'sw01', 'ipAddress': '10.10.10.101', 'platformId': 'WS-C2960X-48FPD-L'}
created file: work_files/configs/sw01-config-6230
creating project:Sydney-6230
[
{
"pkiEnabled": true,
"serialNumber": "12345676230",
"hostName": "sw01",
"configId": "44e5e148-a64b-48b0-a321-76e5ff1008f4",
"platformId": "WS-C2960X-48FPD-L"
}
]
{"message":"Success creating new site device(rule)","ruleId":"a740c94a-2a07-4f05-8c54-8eb54b547046"}
<SNIP>
A file is created in "work_files/configs/sw01-config-6230. A project is created called "Sydney-6230", and a rule created using the configId of the file "sw01-config-6230".
Uniq client library
The first thing needed is a client manager to interact with the controller API. The file in the parent directory "../login.py" contains the code to do this:
def login():
    """ Login to APIC-EM northbound APIs in shell.
    Returns:
        Client (NbClientManager) which is already logged in.
    """


    try:
        client = NbClientManager(
                server=APIC,
                username=APIC_USER,
                password=APIC_PASSWORD,
                connect=True)
In the code we open a client manager called "apic" that will be used to make all of the REST APIC calls. Below is a simple example of uploading a configuration file.
Note the apic.file.uploadFile call. This is using the file API, and the uploadFile method.
def upload_file(apic, filename):
    file_id = is_file_present(apic, "config", os.path.basename(filename))
    if file_id is not None:
        print ("File %s already uploaded: %s" %(filename, file_id))
        return file_id

    file_result = apic.file.uploadFile(nameSpace="config", fileUpload=filename)
    file_id = file_result.response.id
    return file_id
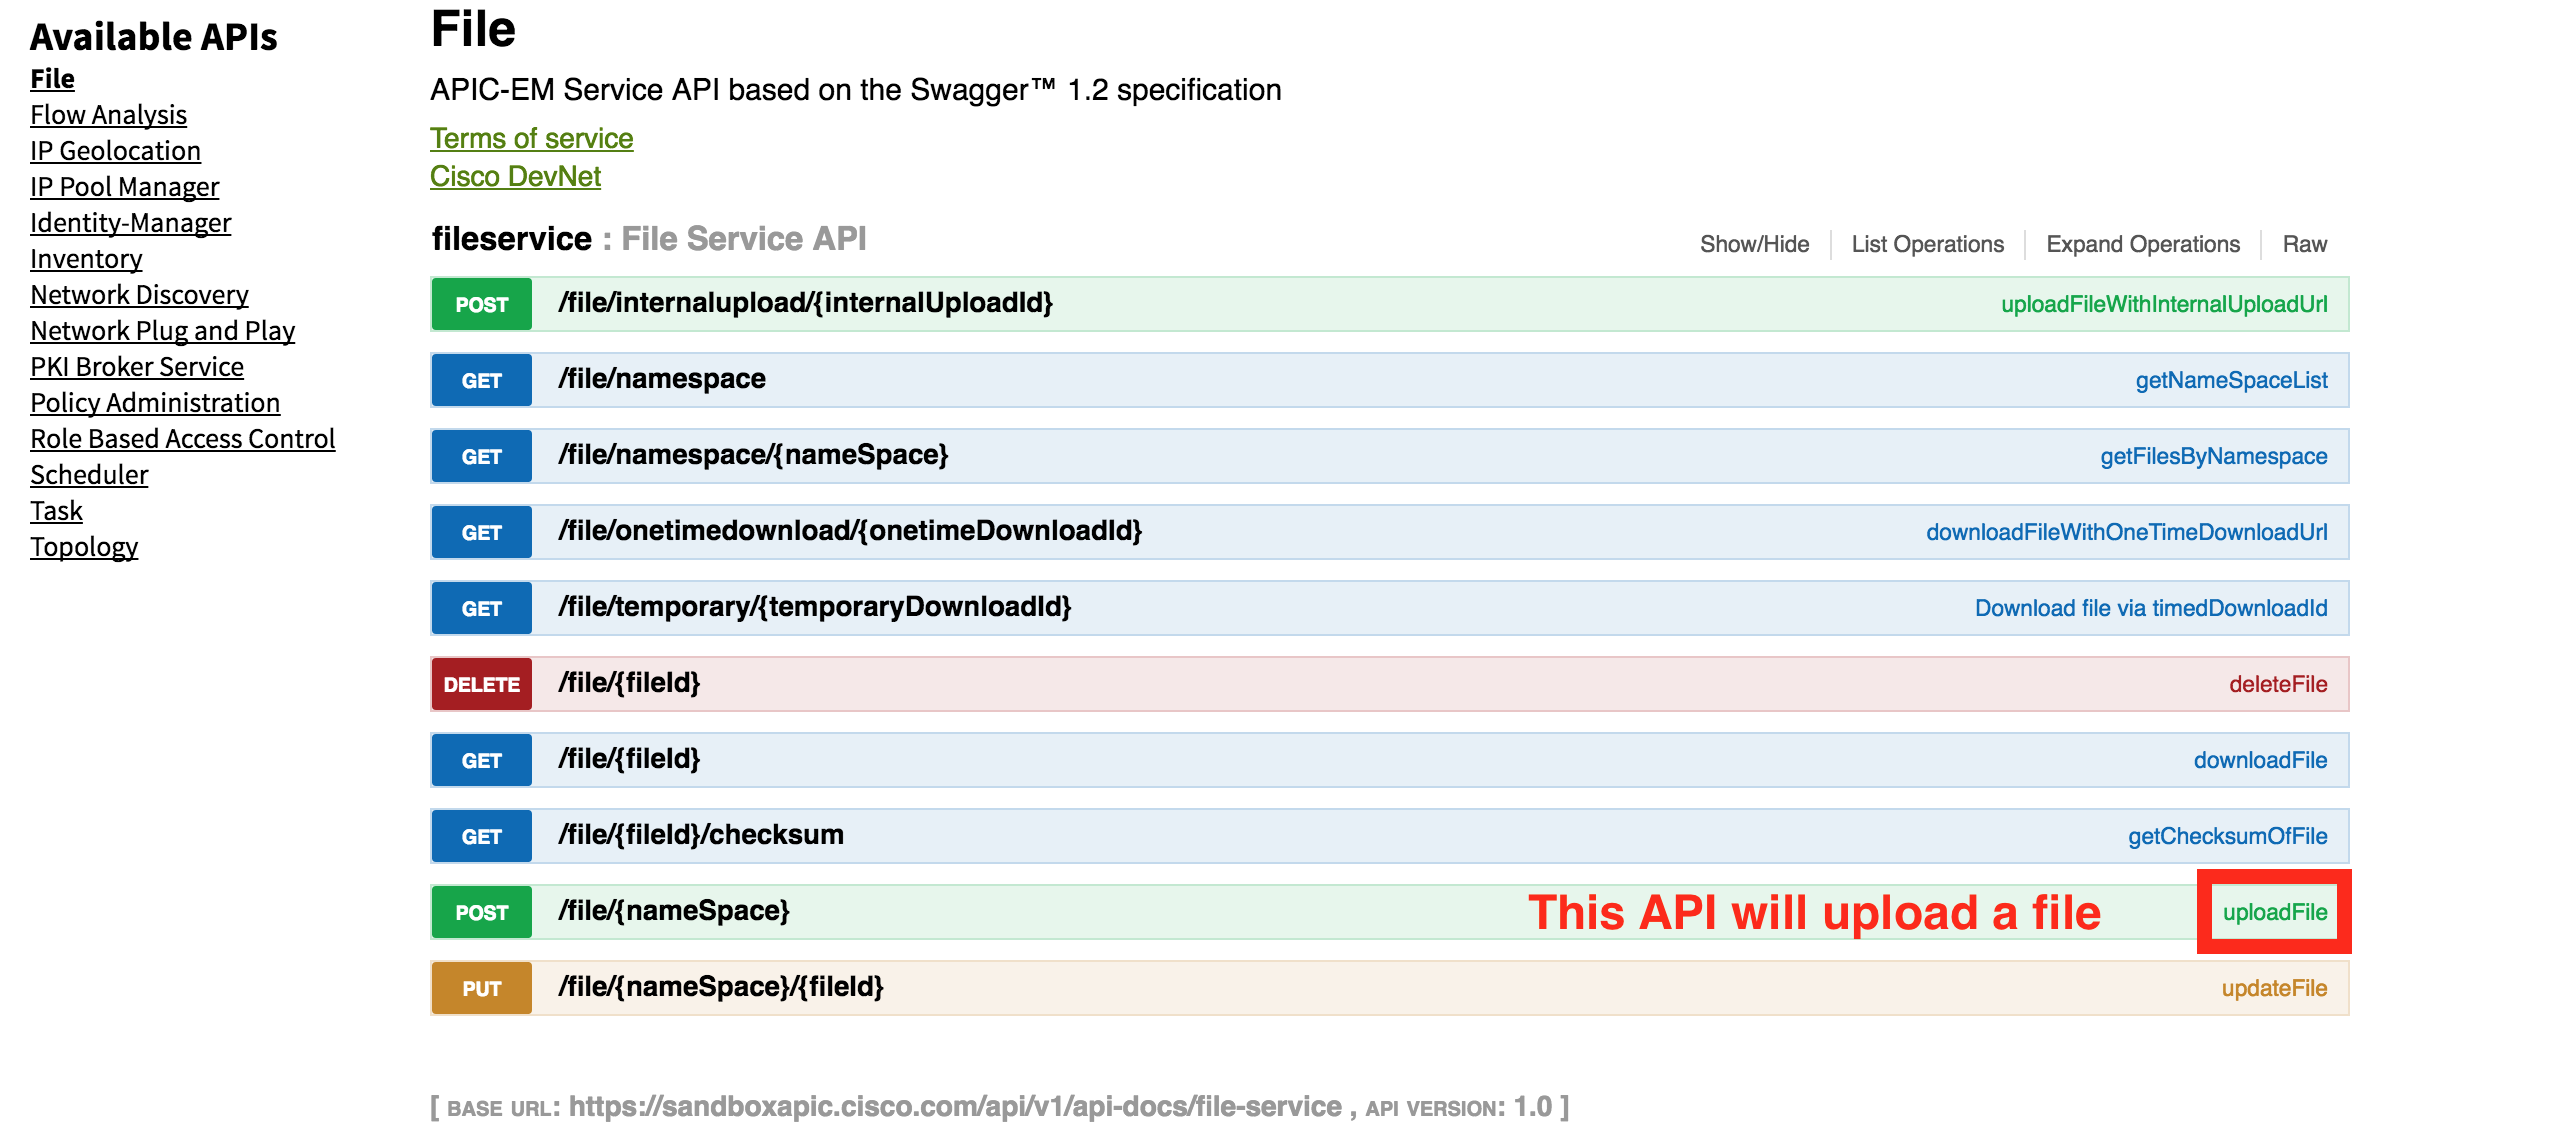
Looking at swagger, you can see how this call was generated. You can see "file" is the collection of filesystem API. "uploadFile" in red box is the call required to upload a file to the controller. Obviously it is a POST call.
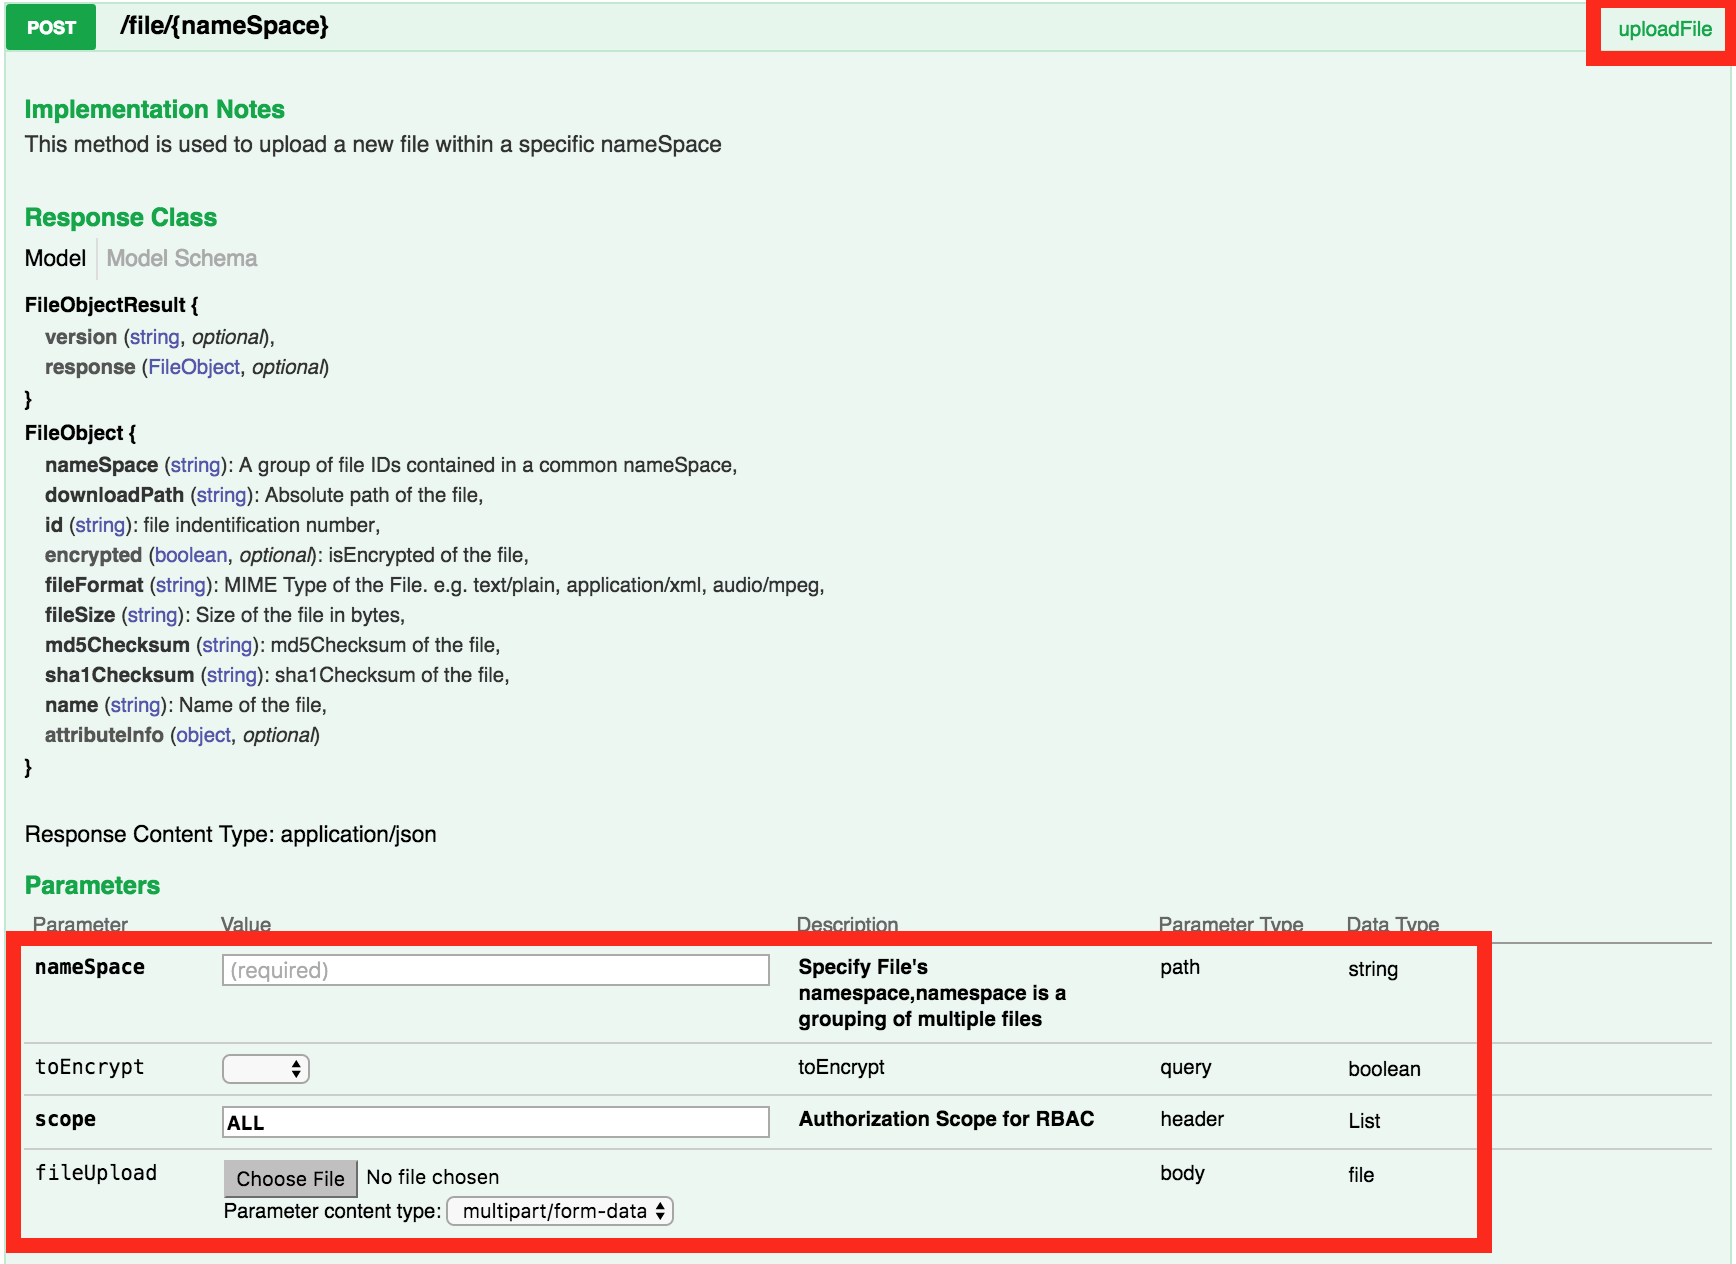
Click on the /file/{namespace} POST API, to see the details of which parameters can be provided. Both "nameSpace" and "fileUpload" are used in the earlier call.
Asynchronous API Calls
The /file API are synchronous, meaning they block until the call is complete, then return the status and the id of the resource that was created. For example, when uploading a file, you will not see a response until the file upload is complete. For a large file, this might take a while.
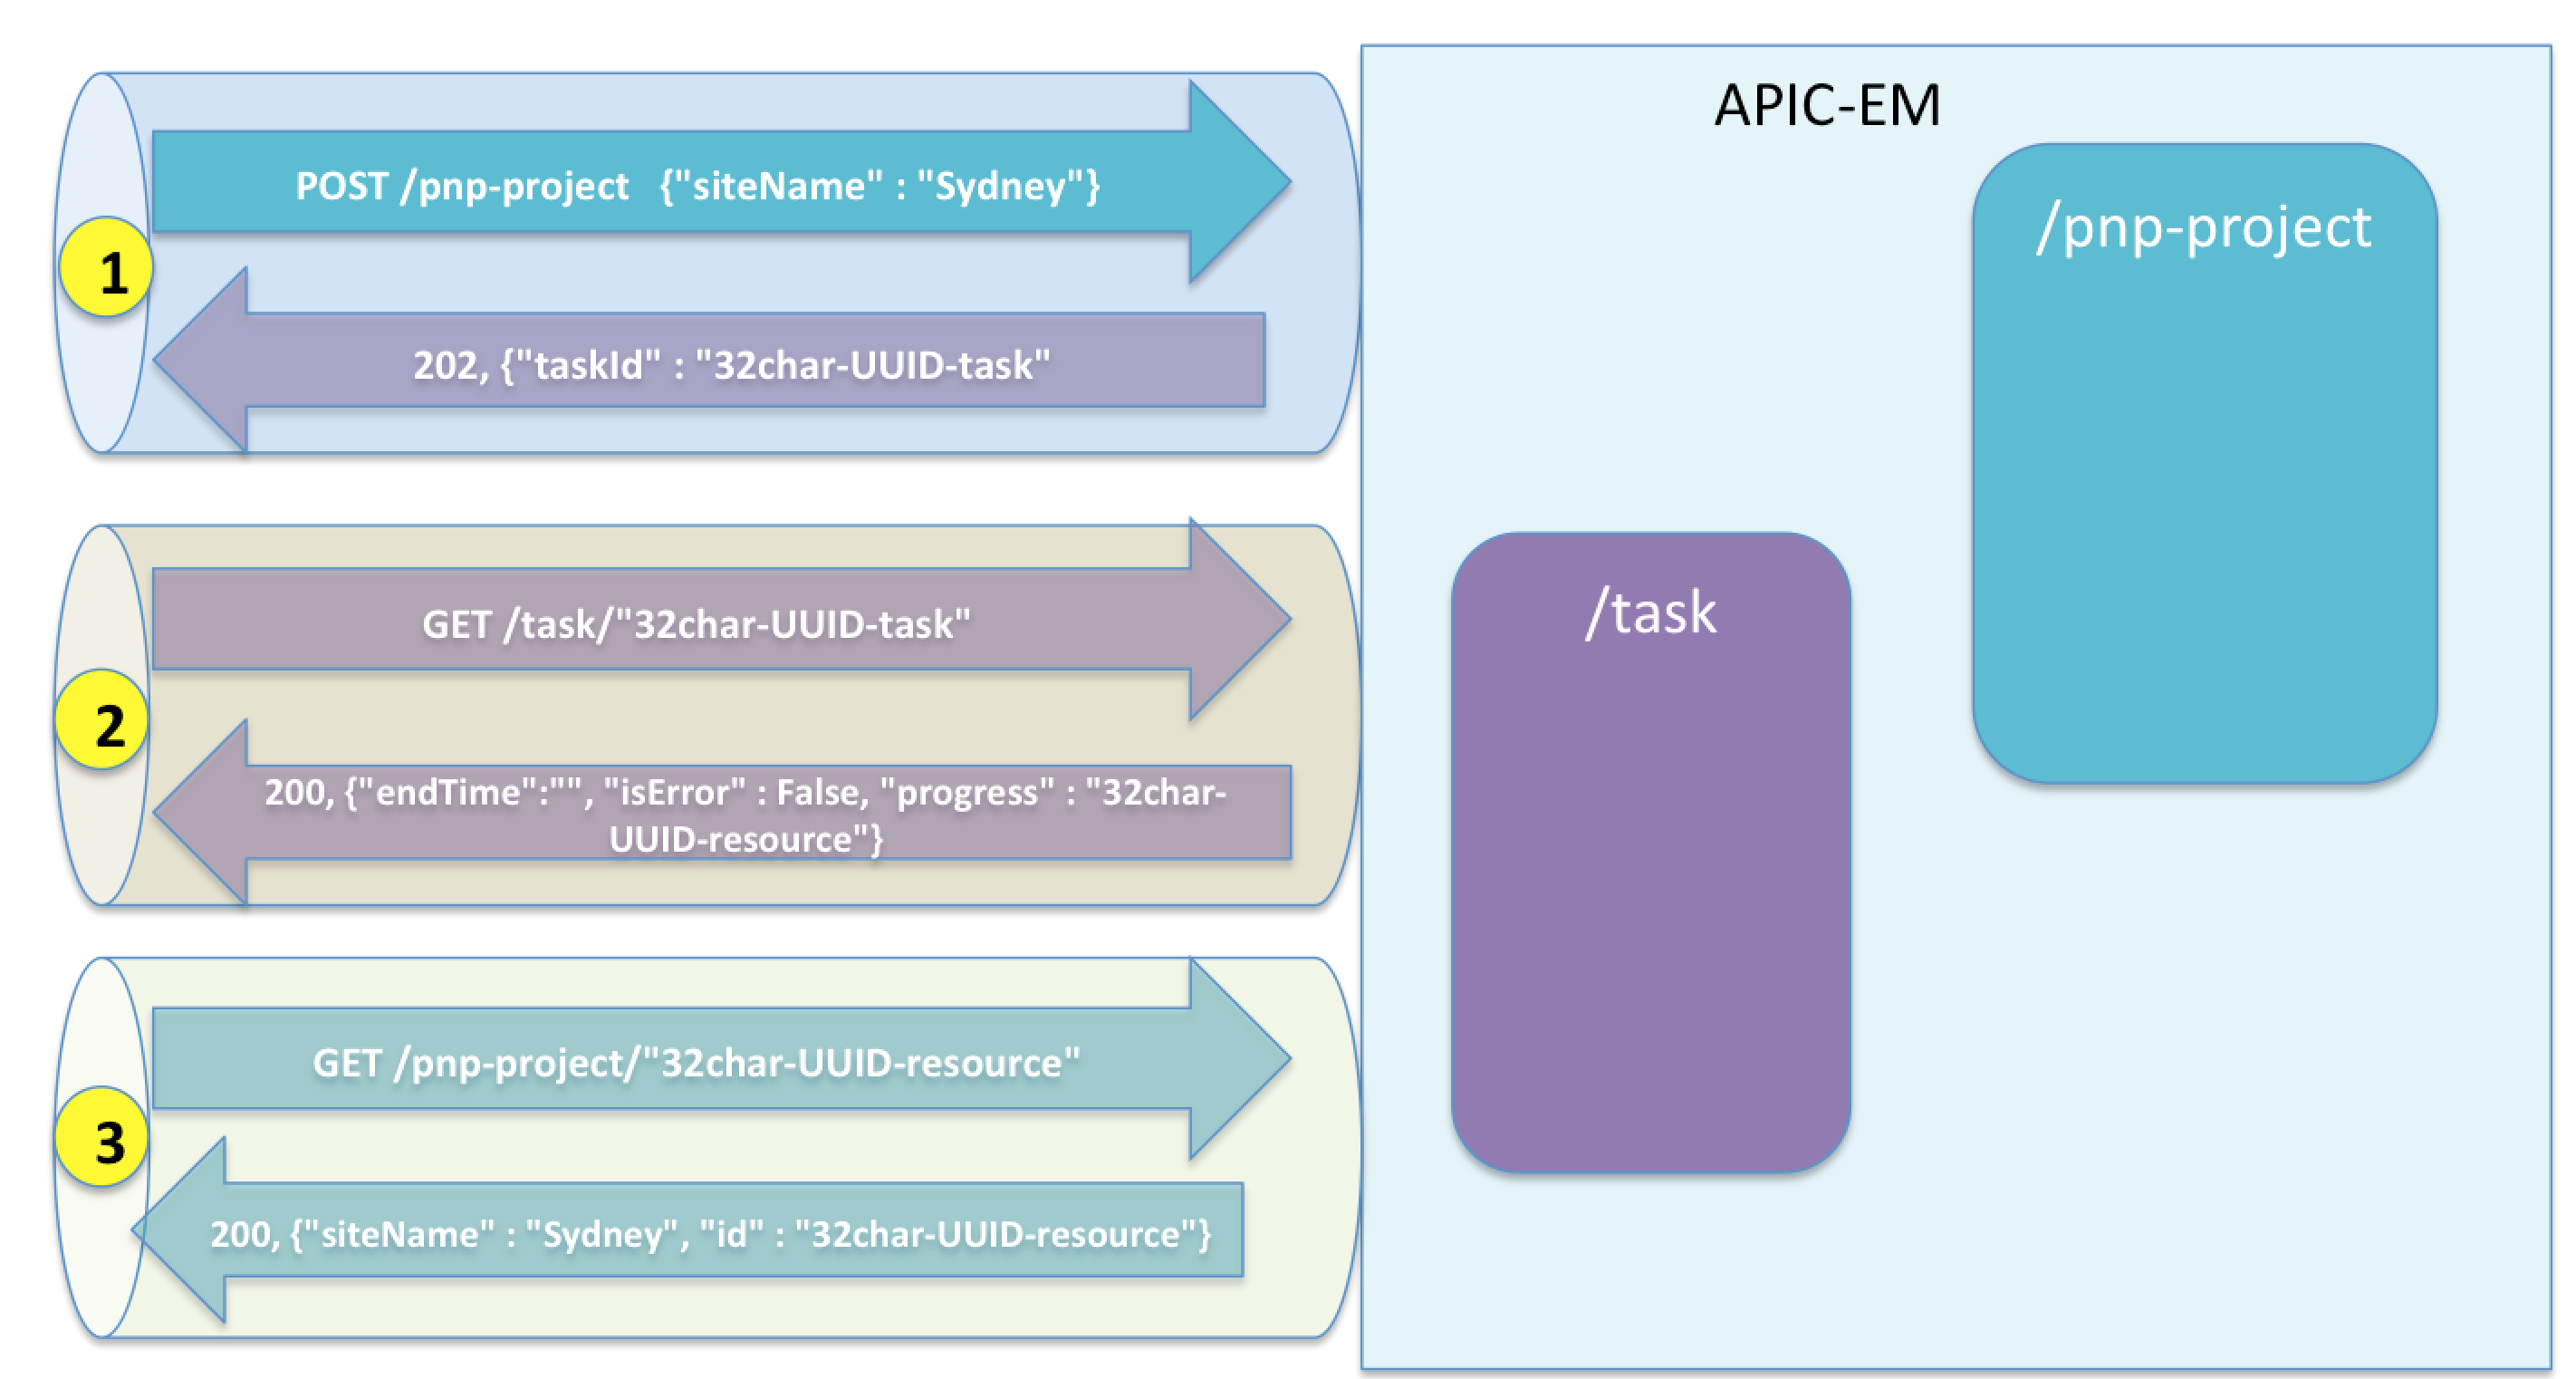
All other POST/PUT/DELETE API calls are asynchronous, meaning they return a 202 response code and a taskId for the request made. For example, to create a new pnp-project, with a "siteName":"Sydney", you would make a POST to /pnp-project, you would expect a 201 HTTP response code, with the UUID of the resource. Instead the following happens:
- The POST will return you will get a taskId.
- GET the /task/taskId and the body have a key "endTime" which indicates the task is complete and "isError" which shows the error status. If the task completed without error, "progress" will be the UUID for the pnp-project (<pnp-project-id>). Longer running tasks may require GET requests, until they complete.
- GET /pnp-project/<pnp-project-id> will return the newly created resource.
Uniq simplifies task management with the wait_for_task_complete method. The id of the project that was created is in the "progress" attribute (it is the "siteId" attribute).
def lookup_and_create(apic, project_name):
    project_name = name_wrap(project_name)
    project = apic.pnpproject.getPnpSiteByRange(siteName=project_name)

    if project.response != []:
        project_id = project.response[0].id
    else:
        # create it
        print ("creating project:{project}".format(project=project_name))
        pnp_task_response= apic.pnpproject.createPnpSite(project=[{'siteName' :project_name}])
        task_response = apic.task_util.wait_for_task_complete(pnp_task_response, timeout=5)

        # 'progress': '{"message":"Success creating new site","siteId":"6e059831-b399-4667-b96d-8b184b6bc8ae"}'
        progress = task_response.progress
        project_id = json.loads(progress)['siteId']

    return project_id
Cisco Spark Chat-Ops Bot Code
Cisco spark is a collaboration tool that has "room" based messaging. Spark has a powerful API that is easy to integrate. This post is not going to cover every detail for Spark integration, just the highlights for the APIC-EM PnP integration.
There are two parts to the spark integration. The first is the ability to post to a room. This is done for each PnP project created, or when a PnP device rule is provisioned.
The code below shows how this works. You need to get an "authentication token" from https://developer.ciscospark.com/. This is used in the "authorization" header. You also need to know the roomId you are posting to. Spark has an API you can call to get a list of rooms you are a member of, join a room etc.
def post_message(message, roomid):

    payload = {"roomId" : roomid,"text" : message}
    headers = {
    'authorization': AUTH,
    'content-type': "application/json"
    }
    response = requests.request("POST", url, data=json.dumps(payload), headers=headers)
The second part is the ability to issue commands to the bot, and have it respond. For example "apic show pnp-projects". This requires a webhook to integrate to the Spark chatroom (see https://developer.ciscospark.com/ for more information) All SparkRoom messages will be received by My-BOT server. The steps are illustrated below:
- A user types a message "apic show pnp-projects" in the Spark chatroom
- Their spark client client will post the message to the Spark server
- The webhook will POST the messageId and room ID to My-Bot.
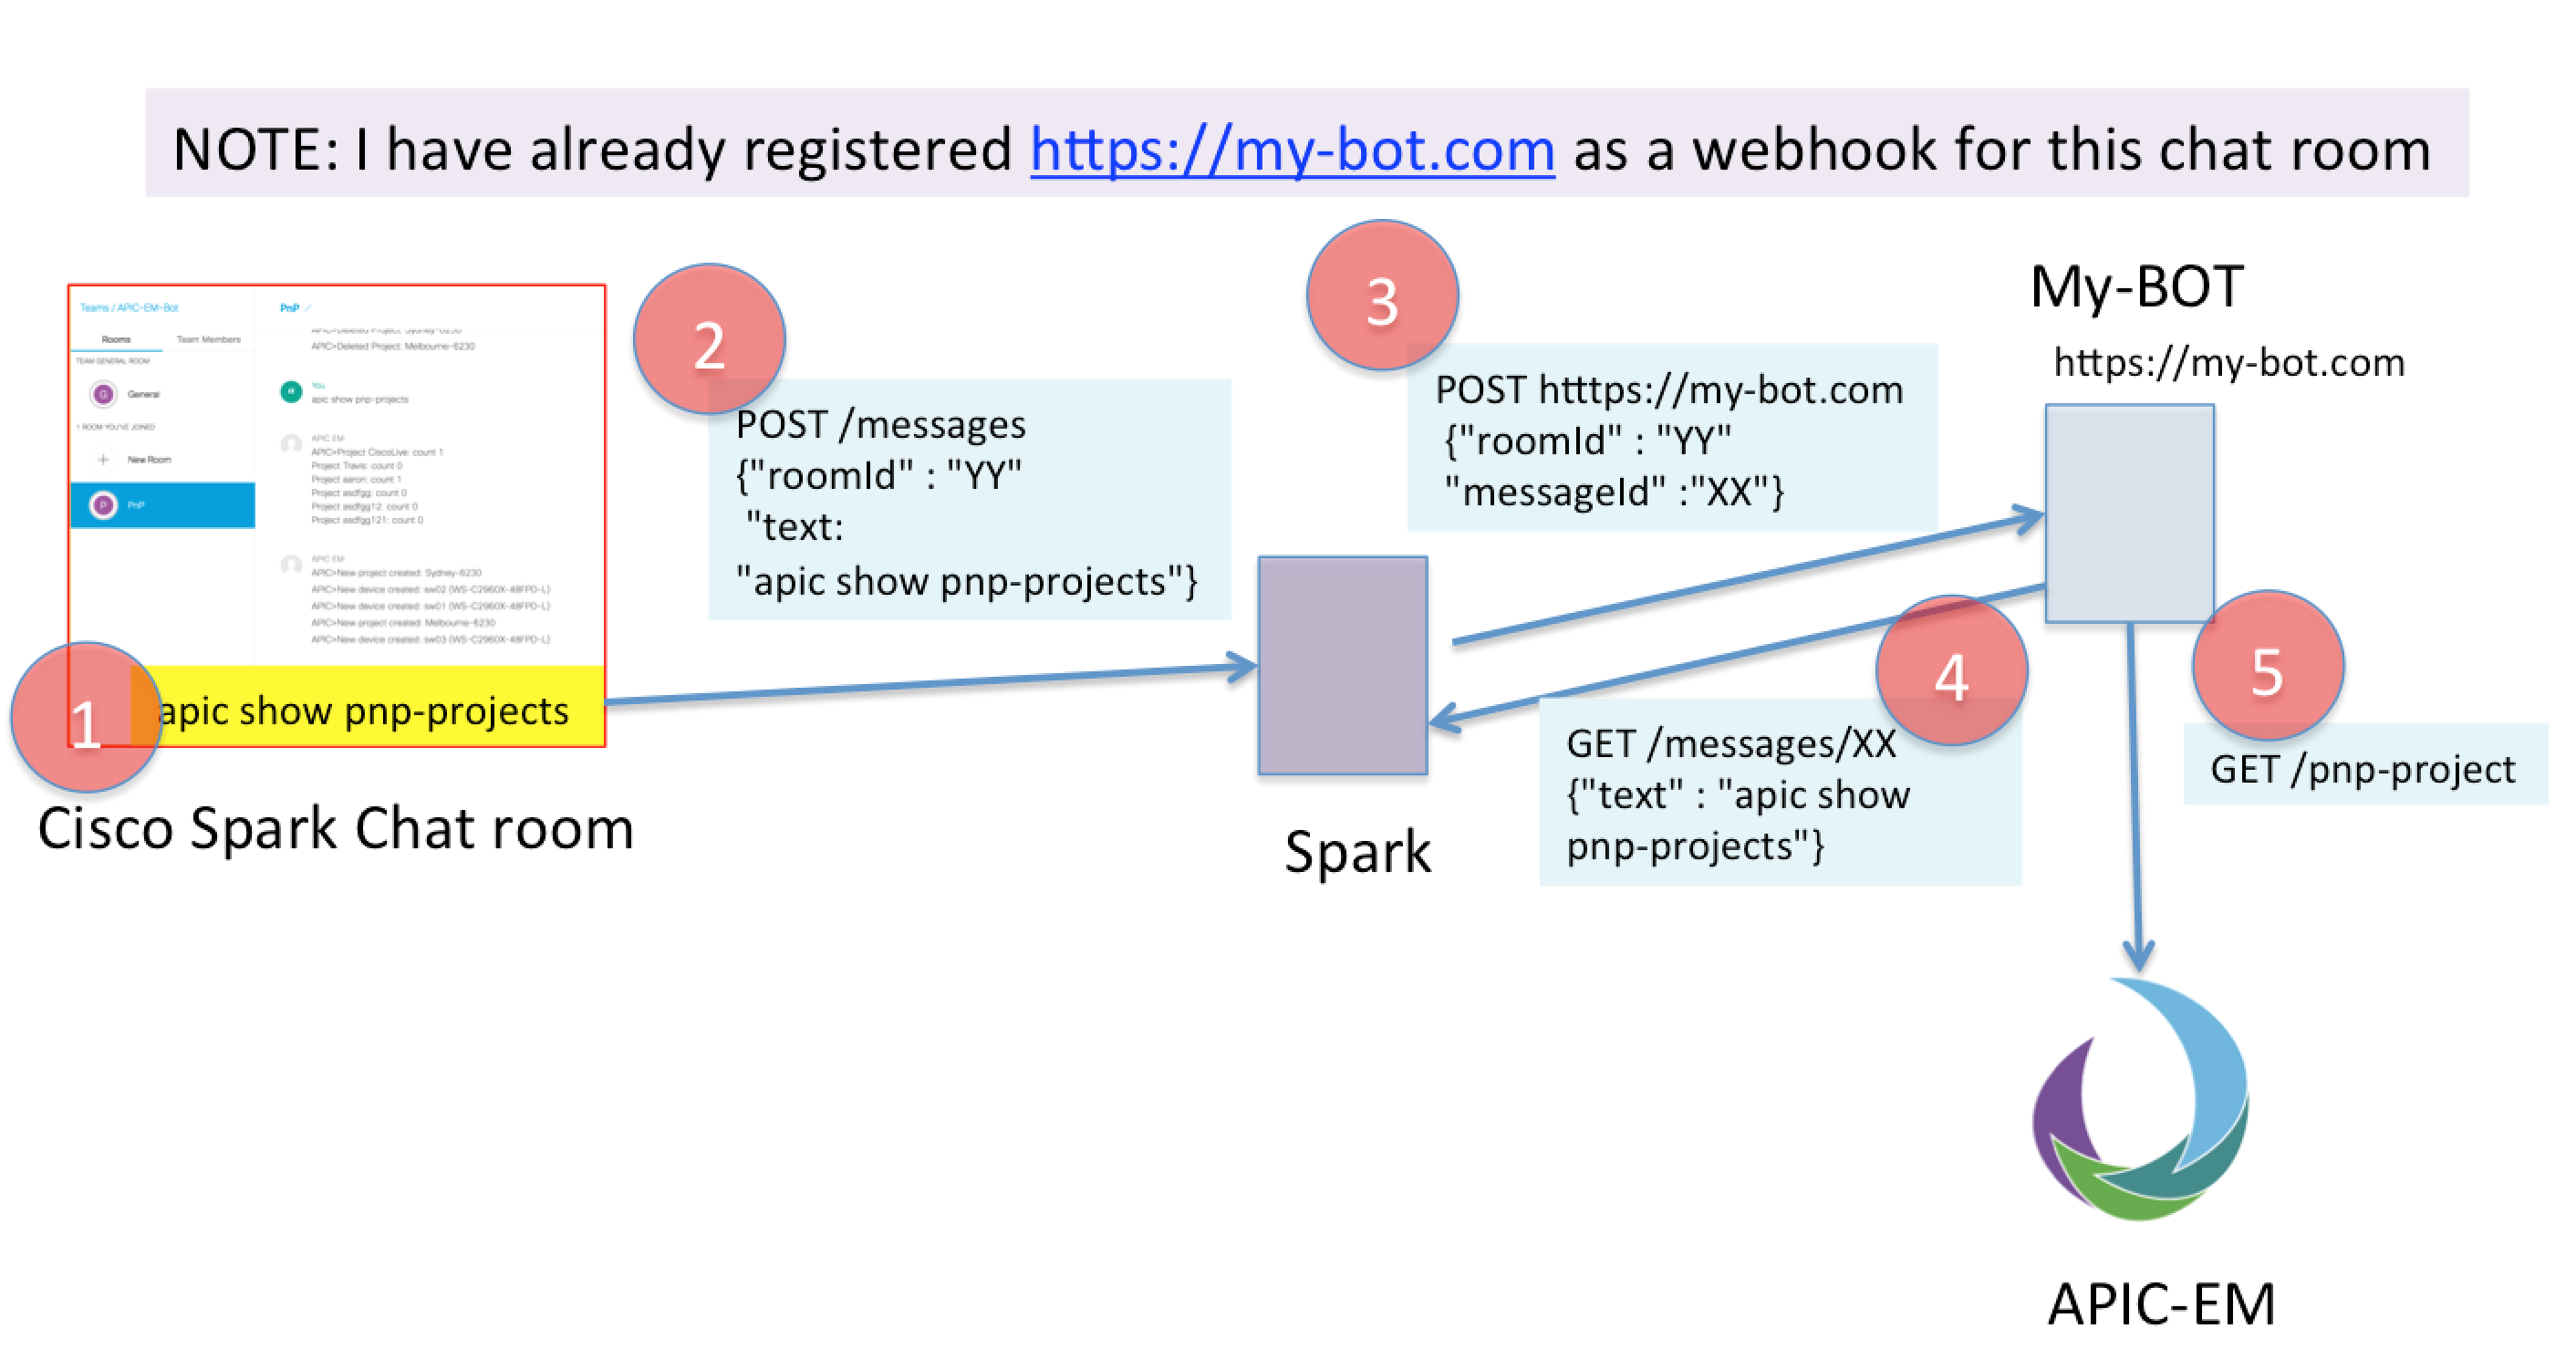
The code to receive the webhook post on My-Bot is shown below (this is step #3)
def bot_webhook():
  messageid = request.json['data']['id']
  roomid = request.json['data']['roomId']

  message = get_message(messageid)
  process_message(message, roomid)
  return jsonify(""), 201
You then need to make an API call to spark to get the contents of the message (Step #4).
url = "https://api.ciscospark.com/v1/messages"

def get_message(messageid):
    messageurl = url + "/" + messageid
    headers = {
      'authorization': AUTH,
      'content-type': "application/json"}
    print ("getting: %s" % messageurl)
    response = requests.request("GET", messageurl, headers=headers)
    response.raise_for_status()

    return response.json()['text']
Next you need to process the messages, for example "apic show pnp-project". This requires an API call to APIC-EM (step #5)
def apic_login():
    apic  = NbClientManager(server="sandboxapic.cisco.com",
  username="devnetuser",
  password="Cisco123!",
  connect=True)
    return apic

def apic_show_pnp_project(apic):
    response = ""
    projects = apic.pnpproject.getPnpSiteByRange()
    for project in projects.response:
        response += "Project {project}: count {count}\n".format(
                            project=project.siteName,
                            count=project.deviceCount)
    return response
The function post_to_spark(message) described earlier can be used to reply to the spark room.
NOTE: ANY messages that are sent to the room (including the ones you post) will be sent to the chat-bot. Make sure you do not auto respond to your own messages! You will end up in a loop.
Self destructing EEM script in configuration
A PnP configuration file is downloaded when the network-device first boots. Some elements of configuration might be time sensitive (e.g. a virtual routing and forwarding (VRF) configuration). In addition, there are some things such as VLAN defined outside the configuration file (e.g. vlan.dat – the vlan database).
To address this problem, an embedded event manager (EEM) script can be put into the configuration file. This contains commands to be run after the configuration is downloaded. To ensure it is only run once, you can tell the EEM script to "self destruct" i.e. remove itself after it has run. The highlighted EEM commands below will:
- Create an EEM script called POST_PNP
- wait 30 seconds
- create vlan 15 on the network-device
- remove itself after executing
line con 0
line vty 0 4
login local
transport input ssh telnet
line vty 5 15
login local
transport input ssh telnet
event manager applet POST_PNP
event timer countdown time 30
action 1.0 cli command "enable"
action 1.1 cli command "config t"
action 1.2 cli command "vlan 15"
action 2.0 cli command "exit"
action 2.1 cli command "no event manager applet POST_PNP"
action 2.2 cli command "end"
action 2.3 cli command "exit
!
end
What Next?
This blog covered more advanced topics such as embedded EEM scripts in the day zero configurations, using a client library (uniq) to make the code more efficient and integrating all of the components into a single tool. It also showed how the API could be used to integrate into a spark chat room (Thanks to Jose Bogarín for that idea)
In the meantime, if you would like to learn more about this, you could visit Cisco Devnet. DevNet has further explanations about this. In addition, we have a Github repository where you can get examples related to PnP.
Thanks for reading
You must be a registered user to add a comment. If you've already registered, sign in. Otherwise, register and sign in.
Find answers to your questions by entering keywords or phrases in the Search bar above. New here? Use these resources to familiarize yourself with the community: