- Cisco Community
- Technology and Support
- Networking
- Networking Knowledge Base
- Creating a CSR, Authenticating a CA and Enrolling Certificates on IOS XE
- Subscribe to RSS Feed
- Mark as New
- Mark as Read
- Bookmark
- Subscribe
- Printer Friendly Page
- Report Inappropriate Content
- Subscribe to RSS Feed
- Mark as New
- Mark as Read
- Bookmark
- Subscribe
- Printer Friendly Page
- Report Inappropriate Content
07-20-2021 08:09 AM - edited 08-06-2022 01:42 PM
Table of Contents
- Table of Contents
- Summary
- PKI Terms \ Definitions
- PKI File Types
- Configuration Steps
- Generate a Key Pair
- Enrolling - Creating the Trustpoint and displaying the Certificate Signing Request
- Authenticating - Informing the device about the Certificate Authority
- Importing - Importing the newly obtained Switch Identity Certificate
- Troubleshooting
- References \ Other Documentation
Summary
There are a number of reasons you will need to install a certificate on to an IOS \ IOS XE device. Some of these include Certificate Based MACsec, RADIUS over DTLS or may be accessing the web-based management console and not wanting to use a self-signed certificate. Public Key Infrastructure (PKI) systems allow for an easy and safe method to secure the identity of computers and network devices and businesses understand that having PKI enables a variety of new methods to enable security.
PKI Terms \ Definitions
Authenticate - in IOS, IOS XE and ASA this is the process of installing the Certificate Authorities Certificate into the Trustpoint, this creates the trusted authority that will issue the host its identity certificate
CA - Certificate Authority -a component of a Public Key Infrastructure that authenticates and issues certificates. Typically a host will send a Certificate Signing Request to a Certificate Authority and the Certificate Authority or one of its Subordinates will issue an Identity certificate to the host.
CDP - Certificate Revocation Distribution Point - this is where a host can look up the Certificate Revocation List, typically a file retrieved via LDAP or HTTP.
CRL - Certificate Revocation List -electronic document typically stored on a web server that contains a list of revoked certificates.
CSR - Certificate Signing Request - an encoded file that includes the identity and the public key from the host that created it. Certificate Signing Requests are sent to Certificate Authorities.
Import -importing is a configuration technique where the identity certificate that was obtained from the Certificate Authority is installed into the IOS, IOS XE, ASA device
Elliptic Curve keys – Next Gen Public key cryptography system. An EC key pair contains Private and public keys. Typical key lengths are 128, 256, 392 & 512. Elliptic curve is preferred over RSA due to the shorter key lengths being cryptographically equivalent or stronger than the longer RSA keys lengths.
Enroll - the process of creating and displaying a certificate signing request
Key Pair - consist of public keys which may be known to others and private keys which may never be know to any device except the owning host.
PKI - Public Key Infrastructure -
RSA keys – Public key cryptography system. An RSA key pair contains Private and public keys. Typical key lengths are 1024, 2048, 4096. Modern cryptography uses 2048 & 4096 key lengths. Keys longer than 4096 are not frequently used today.
Subordinate – subordinate can be interchangeably used with Intermediate CA.
Trustpoint – a binding point for a specific certificate authority that is trusted by the IOS or IOS XE, trustpoints can be for Root CAs that have self-signed certificates or for Subordinate Certificate Authorities.
Trustpool – a built-in list of trusted Certificate Authorities, the CA Certificates in the trustpool of modern devices have a Certificate Expiration date 15 – 70 years out
X.509 - a standard defining the format of public key certificates
PKI File Types
*.cer – typically a PEM formatted Base64, ASCII certificate
*.crt – typically a PEM formatted Base64, ASCII certificate
*.der – binary form of a certificate
*.pem – typically a PEM formatted Base64, ASCII certificate
PKCS#7 – also known as P7B – a Base64, ASCII file that contains certificates and Intermediate CA certificates, does not include private keys
PKCS#8 – a Base64, ASCII file that contains a private key
PKCS#12 – also known as PFX – a binary format for storing the server certificate, intermediate certificate and private key in one file. Typically used on MS Windows to import \ export certificates and private keys.
Configuration Steps
Generate a Key Pair
There are pros and cons to RSA vs EC Keys. Typically I prefer using Elliptic Curve certificates however they may be not be supported in every single application. The commands below will create a 256 bit Elliptic Curve Key Pair and \ or a 4096 bit RSA Key Pair. Elliptical curve ciphers use much shorter key lengths and provide similar strength as RSA keys with a much longer length.
!
! Elliptic Curve
crypto key generate ec keysize 256 label my-256ec-key
!
! RSA
crypto key generate rsa modulus 4096 label my-4096rsa-key
!
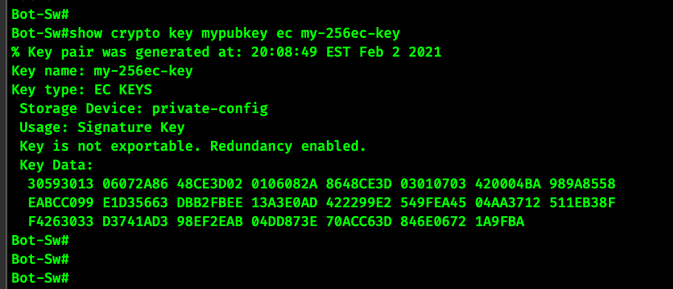
You can view the key you just created like this.
!
show crypto key mypubkey ec my-256ec-key
!
Sometimes you may need to delete these key pairs, in order to do that you need to zeroize them. We do NOT need to do that now, this is just for example.
!
crypto key zeroize ec my-ec256-key
!
Enrolling - Creating the Trustpoint and displaying the Certificate Signing Request
Prior to creating the Certificate Signing Request (CSR) the device should have a real name, not Switch# or Router#. Give the device a hostname and configure a domain name. Then we can create the Trustpoint. In this example, I've commented out the RSA key pair so this CSR will be created using the EC keys. If you need to use the RSA key pair just remove the !.
!
configure terminal
!
hostname My-Switch
ip domain name my-network.com
!
! This is all identifying information about the switch.
! This is all put into the CSR.
crypto pki trustpoint my-trustpoint
  enrollment terminal pem
  subject-name C=US, ST=Pennsylvania, L=My-Town, O=My-Org, OU=My-Department, CN=My-Switch.my-network.com
  subject-alt-name my-switch.my-network.com
  serial-number none
  ip-address none
  revocation-check none
  eckeypair my-256ec-key
  !rsakeypair my-4096rsa-key
end
!
NOTE: The subject-alt-name only works with Enterprise CA in IOS XE 17.8. See this document for details.
Now that we have created the Trustpoint we can display the CSR to the screen. Answer Yes when asked to display the Certificate Request to the terminal. In most cases, you will take this output, save it to a file and pass it along to the Certificate Administrator in your organization or upload it to a third-party certificate vendor.
!
! This displays the Certificate Signing Request (CSR) to the terminal
configure terminal
  crypto pki enroll my-trustpoint
!
After we provide the CSR to the Certificate Authority we should expect to receive two files back, the Identity certificate for the host itself and a Certificate from the issuing Certificate Authority. If you have an option you want these files to be in base-64 format.
Authenticating - Informing the device about the Certificate Authority
Now that you've submitted the CSR to a Certificate Authority you should have received your certificate back. Certificates come in all shapes and sizes, please take a look at the PKI file types to help determine what your provider gave you.
Typically in a PKI there is one Root CA and multiple Subordinate or Issuing CAs. For this purpose, we need to authenticate using the Subordinate or Issuing CA's cert. We need to install the Authenticating CA certificate first so later when we install the Identity certificate the device can validate the Identity Cert.
!
configure terminal
  crypto pki authenticate my-trustpoint
!
Here is an example of a Certificate Chain. Here we see the Root CA, the Subordinate or Issuing CA, and the Device or Host Certificate. The Root CA only issues certificates to its Subordinates. It's the Issuing CA that gives certificates to the devices. Subordinate CAs can issue tens of thousands of certificates to end hosts. In the above screenshot we just installed the Subordinate CA Certificate.
Importing - Importing the newly obtained Switch Identity Certificate
We are at the final step. Importing the certificate is taking the identity certificate file that was given to us by the third-party provider and installing it into the trustpoint.
!
configure terminal
crypto pki import my-trustpoint certificate
!
Now we have successfully completed the process. We created the CSR, Authenticated the CA, and Imported the Identity Certificate to the IOS XE device. The certificate can be used for a multitude of reasons.
Troubleshooting
openssl is included in OSX and *nix operating systems and is a very powerful tool when looking into CSRs and Certificates. The web has tools to do things like this too but I'd prefer to keep it local when possible.
Inspect a Certificate Signing Request
openssl req -text -noout -verify -in my-csr.csr
Inspect a Certificate
openssl x509 -in certificate.crt -text -noout
Note: Removing -in will allow you to past the Base 64 text from the console.
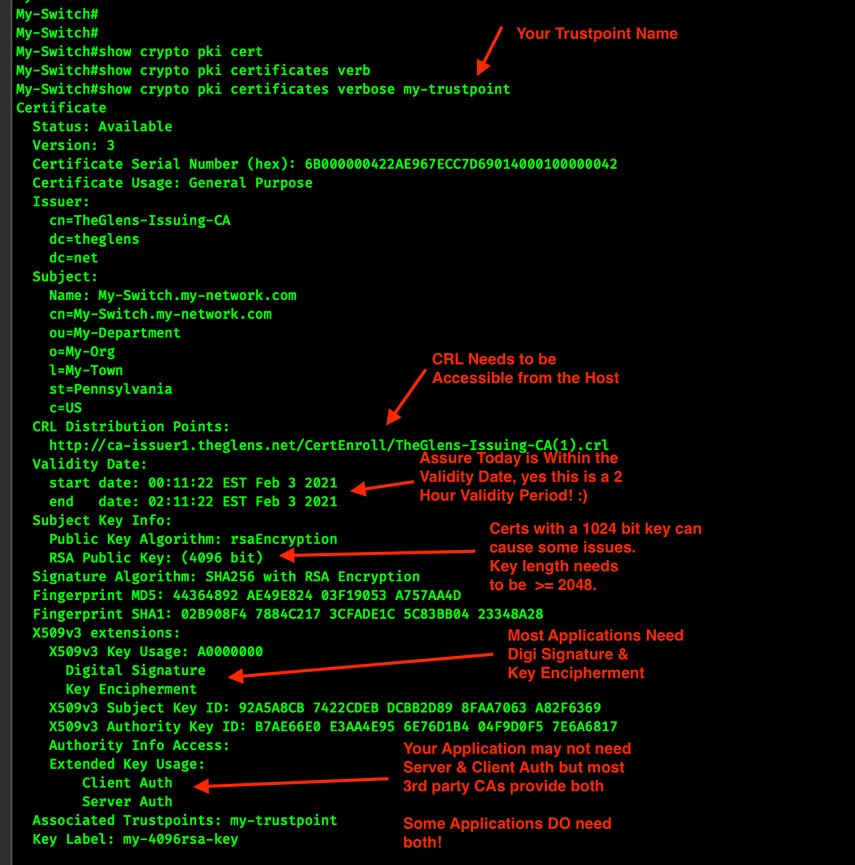
Review the contents of the certificate on the host.
!
show crypto pki certificates verbose my-trustpoint
!
References \ Other Documentation
Please see this other document I wrote that explains how to create Elliptic Curve certificates on Cisco ASAs.
- Mark as Read
- Mark as New
- Bookmark
- Permalink
- Report Inappropriate Content
Hi!
I am trying to generate a certificate through my private CA using a terminal ("enrollment terminal pem") for HTTPS access. But using this way there is no SAN field in the certificate from the CA (example: DNS Name=domain.com, DNS Name=host.domain.com). This is not consistent with the policy in Chrome or Safari, so the certificate is not considered as valid:
"NET:: ERR_CERT_COMMON_NAME_INVALID" - Chrome,
"certificate name does not match input" - Safari.
Command "fqdn" under "crypto pki trustpoint" do not affect the result in any way.
Command "subject-alt-name" work only with "enrollment selfsigned", but i need to generate CSR for CA.
Is there any solution? May be i am missing something...
Thank you.
- Mark as Read
- Mark as New
- Bookmark
- Permalink
- Report Inappropriate Content
Same here,
Not including SAN in the CSR makes the certificate to return "No secure" in Chrome and FF.
You mean tehre is no way to create aan insternally signed certificate if nor running 17.8 or above?
Now that 17.9.1 is out I will give this a try, but I think I couldn't upgrade till the end of the year.
Regards.
Jesus
- Mark as Read
- Mark as New
- Bookmark
- Permalink
- Report Inappropriate Content
I found the way to do that.
Create the CSR on a external server and import it.
Find answers to your questions by entering keywords or phrases in the Search bar above. New here? Use these resources to familiarize yourself with the community:


