- Cisco Community
- Technology and Support
- Security
- Security Knowledge Base
- Google Suite Guest SSO (Single Sign On) with ISE via SAML for Chromebooks
- Subscribe to RSS Feed
- Mark as New
- Mark as Read
- Bookmark
- Subscribe
- Printer Friendly Page
- Report Inappropriate Content
")
")
- Subscribe to RSS Feed
- Mark as New
- Mark as Read
- Bookmark
- Subscribe
- Printer Friendly Page
- Report Inappropriate Content
05-22-2017 06:50 AM - edited 01-04-2019 08:25 AM
- Introduction
- Prerequisite
- Configuration Overview
- Optional Configurations for better end user experience
- Optional Configurations for group/attribute matching
- Troubleshooting
- Caveats
- End User Experience
- ISE Live Log
Introduction
Note: Starting with Chromebook v66, it is possible to do SSO for 802.1X. Please see Chromebook 802.1X SSO for more information.
Chromebooks have become a dominant platform for much of the K-12 environment in the US. While it makes great sense for the district management to choose Chromebooks over other platforms, it presents a unique problem for the network/security administrators that are managing the network security for the school districts. The challenge is that there is no easy way to enforce each of the Chromebook to use unique identification to login to the network. In the case of MS Windows, one could force the O/S to utilize the Windows login account to be used for Network login, which provides SSO for the users, yet also provides visibility of users to the network administrators. However, with Chromebooks, there is no way to do the same as evident from the issue being tracked here: https://bugs.chromium.org/p/chromium/issues/detail?id=386606. To circumvent the issue, some admins have resorted to instruct the users to connect to the wireless network manually themselves after they receive their Chromebook. While feasible, it only works in an environment where the Chromebook are assigned to a student for a prolonged period and does not work for environments where the Chromebook are shared by multiple students throughout the day, not to mention that password expiry policy often results in additional support calls from the students. Alternatively, some admins have used WPA/WPA2 PSK (Pre-Shared Key) or static username/password combination to authenticate to the network, forfeiting network visibility as every Chromebook logon is seen identical aside from the MAC addresses. Due to lack of visibility, admins cannot effectively enforce differentiated policies based on user accounts nor they can easily track down a user when policy violation occurs on the network nor they can track down an asset for inventory purposes. ISE provides unique solution to the problem by utilizing SAML Guest authentication feature to identify user behind the devices, thus providing visibility into the users for the network and security administrators. This is done by utilizing Open SSID, WPA/WPA2 PSK, or WPA/WPA2 802.1X combined with SAML guest authentication with ISE. In this setup, ISE Guest portal is used as SAML Sp (Service Provider) and the Google Suite is used as IdP (Identity Provider).
This document describes how to configure Cisco ISE to provide SSO on the ISE guest access portal via Google Suite account via SAML. This allows network administrators to see who is logged in to the network on both the WLC and the ISE. Also contains optional configurations to streamline the user experience by auto pop-up of browser upon login and auto-click of the SSO link. This document covers additional configuration to make the Chromebook SSO working on an existing guest setup and will utilize default ISE settings when applicable.
Prerequisite
Already have working Google Suite with test users
Fresh ISE 2.2 install (This document was written while testing with ISE 2.2, but should also work with ISE 2.1)
Working WLC with CWA Guest access running 7.6+ for DNS ACL feature (Preferably running 8.2+ as it provides 20 DNS ACE per ACL as opposed to 10 ACE in the previous versions)
Configuration Overview
-
ISE: Add WLC as RADIUS Client
-
ISE: Enable Default Authorization Policy for guest access
-
ISE: Create SAML identity source
-
ISE: Create Guest portal to use SAML
-
ISE: Take note of SAML Sp settings
-
G-Suite: Create SAML App to use ISE
-
ISE: Import G-Suite SAML metadata into ISE SAML identity store
-
WLC: Configure RADIUS Server
-
WLC: Configure Redirect ACL
-
WLC: Configure WLAN
Quick video showing the configuration flow:
ISE: Add WLC as RADIUS Client
-
Go to Administration > Network Resources > Network Devices > Add
-
Provide Name, IP Address, and the RADIUS shared key for the WLC and save
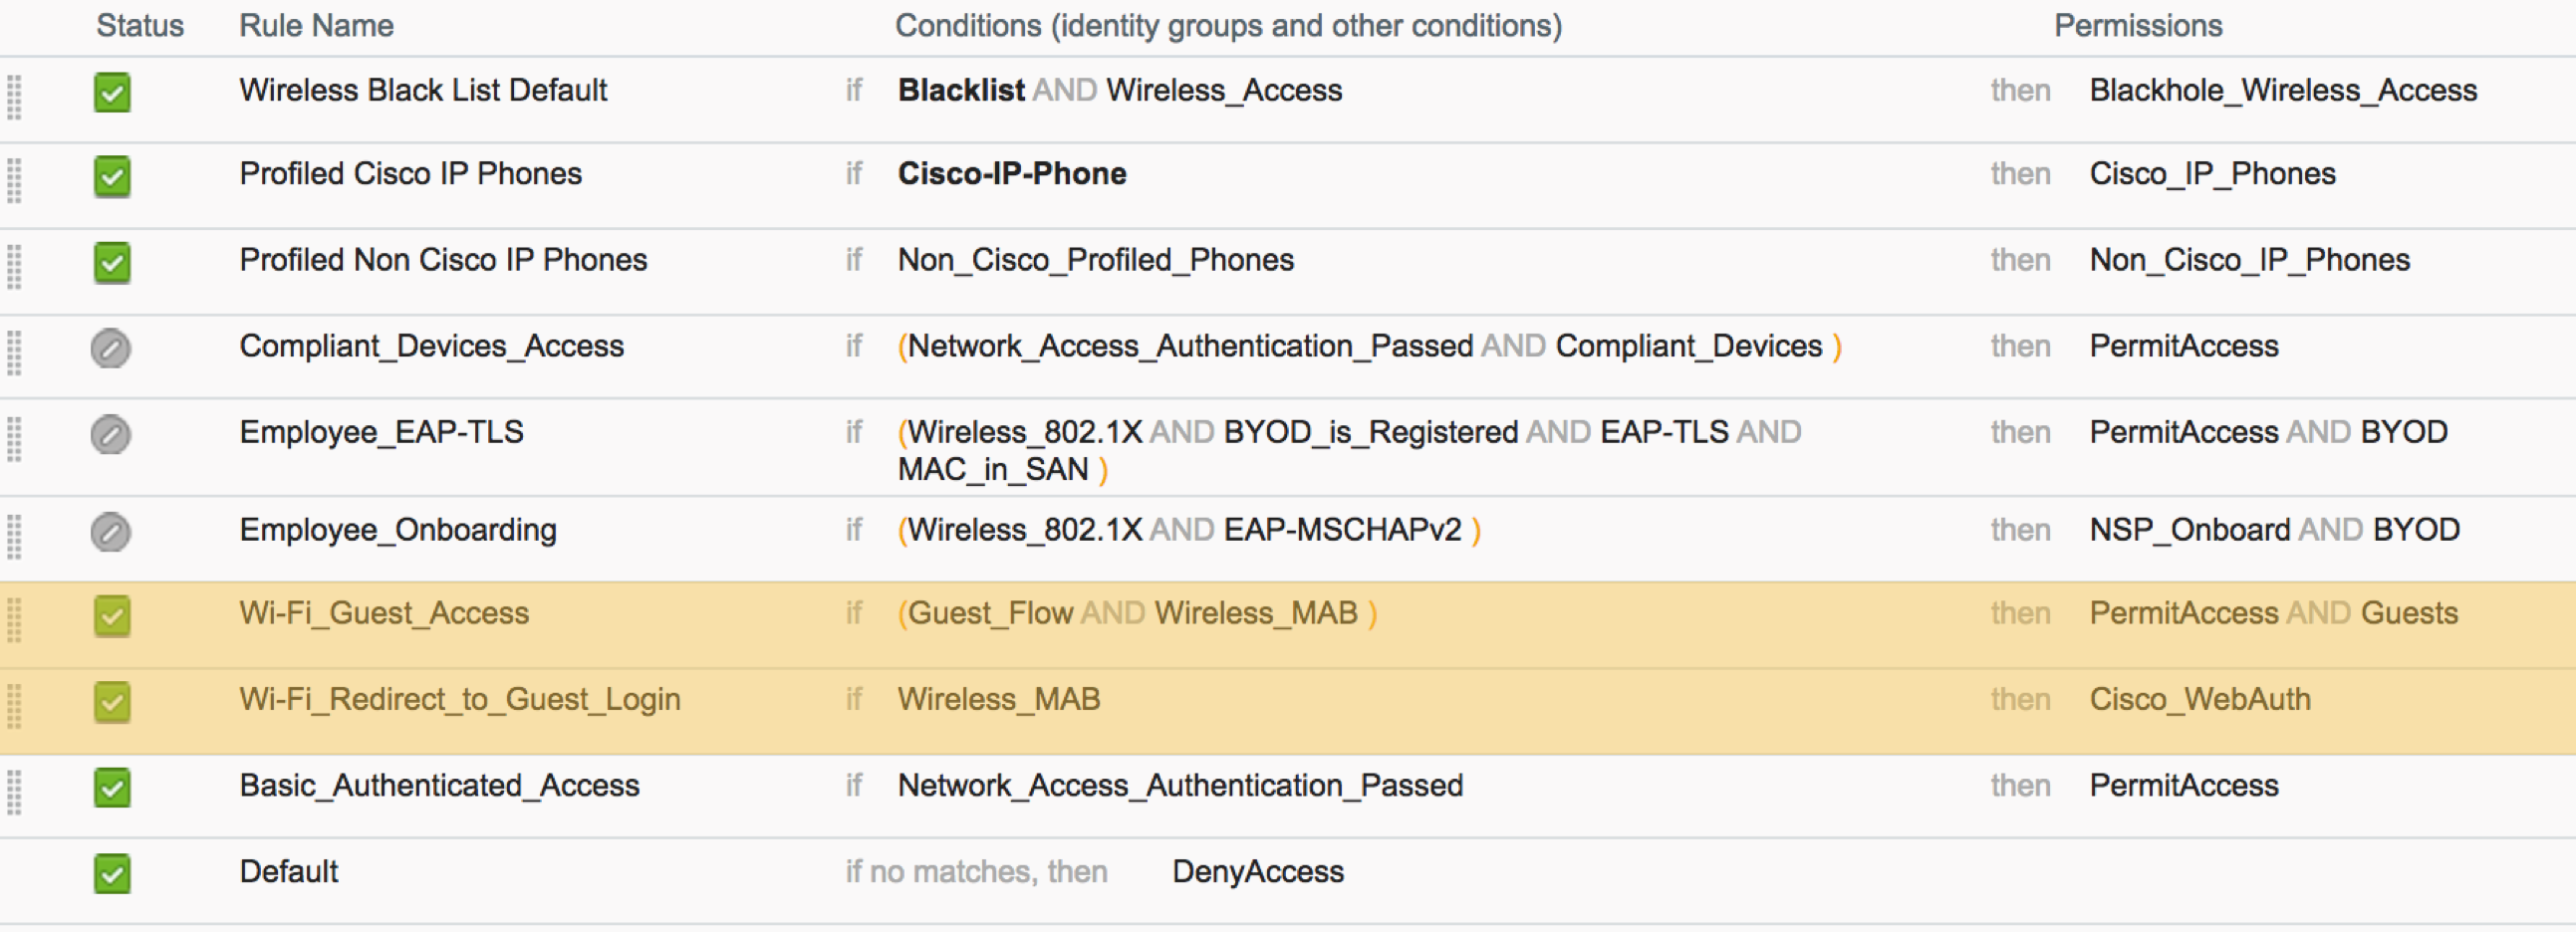
ISE: Enable Default Authorization Policy for guest access
- Go to Policy > Authorization
- Click on 'Edit' for 'Wi-Fi_Guest_Access' and 'Wi-Fi_Redirect_to_Guest_Login' rule. Click on the status field to mark both rules to be active
- (Optional) If using 802.1X WLAN, add an additional condition for 'WiFi_Guest_Access' rule to check 'CWA:CWA_Username' Ends With the Google domain name that is being configured (I.e. wonderlandisd.org). This ensures both 802.1X identity and the SAML (WebAuth) identity are visible in the live log and via pxGrid.
- Click Save
ISE: Create SAML identity source
-
Go to Administration > System > External Identity Sources > SAML Id Providers, click on Add
-
Enter ‘Google_SAML’ in the Id Provide Name, click Save
ISE: Create Guest portal to use SAML
-
Go to Work Centers > Guest Access > Portals & Components > Guest Portals, click on Create
-
Select Sponsored-Guest Portal and click Continue…
-
Enter Google_SSO in the Portal Name
-
Expand Portal Settings, select Google_SAML from the Authentication method pull down menu
-
Expand Acceptable Use Policy (AUP) Page Settings, uncheck ‘Include and AUP page’
-
Expand Guest Device Registration Settings, uncheck ‘Automatically register guest devices’
-
Expand Post-Login Banner Page Settings, uncheck ‘Include a Post-Login Banner Page
-
(Optional) Expand Authentication Success Settings, change accordingly to send user after the SSO is completed
-
Scroll up and click Save
-
Click Close to go back to the list of Guest Portals
-
Click on the Self-Registered Guest Portal (default)
-
Expand Login Page Settings, Uncheck ‘Allow guests to create their own accounts’, Check ‘Allow the Following identity-provider guest portal to be used for login’ and select Google_SSO from the drop down list
-
Expand Acceptable Use Policy (AUP) Page Settings, uncheck ‘Include and AUP page’
-
Expand Guest Device Registration Settings, uncheck ‘Automatically register guest devices’
-
Scroll up and click Save
ISE: Take note of SAML Sp settings
-
Go to Administration > System > External Identity Sources > SAML Id Providers, click on Google_SAML
-
Click on Service Provider Info. tab
-
Click on Export button
-
Save the ‘Google_SAML.zip’ file
-
With the file manager on your PC/OSX, expand the ‘Google_SAML.zip’ file
-
Use notepad or text editor and open up the Google_SSO.xml file
-
Take note of the two values; entityID and Location. Location value is multi-valued. Take note of the Location value with the host name instead of IP address. See below for example:
entityID="http://CiscoISE/4a089df2-3ede-11e7-97dd-0242ebf188ae"
Location="https://ise22.example.com:8443/portal/SSOLoginResponse.action"
G-Suite: Create SAML App to use ISE
-
Logon to the Google Suite account as a google admin user
-
From Home, go to Apps > SAML Apps > Click on ‘+’
-
Select ’SETUP MY OWN CUSTOM APP’ on the bottom
-
Click on ‘Download’ button user Option2, IDP metadata
-
Save the file to the local HDD, we will import this into ISE SAML settings
-
Click Next
-
Enter ISE-Guest as application name and click NEXT
-
For ACS URL, enter the ‘Location’ value that was noted from the Google_SAML.xml file above
-
For Entity ID, enter the ‘entityID’ value that was noted from the Google_SAML.xml file above
-
Click NEXT, then FINISH
-
Click OK on the pop up
-
Select the 3 dot icon and choose ‘ON for everyone’
-
Click ‘TURN ON FOR EVERYONE’
ISE: Import G-Suite SAML metadata into ISE SAML identity store
-
Go to Administration > System > External Identity Sources > SAML Id Providers, click on Google_SAML
-
Click on Identity Provider Config. tab
-
Click on Choose File button
-
Select IDP Metadata that was downloaded from the Google Suite during the step above
-
Click Save
WLC: Configure RADIUS Server
-
Go to Security > AAA > RADIUS > Authentication > New...
-
Enter server IP, RADIUS key, Enable CoA, and change the server timeout to 5 seconds and click Apply
-
Go to Security > AAA > RADIUS > Accounting > New...
-
Enter server IP, RADIUS key, and change the server timeout to 5 seconds and click Apply
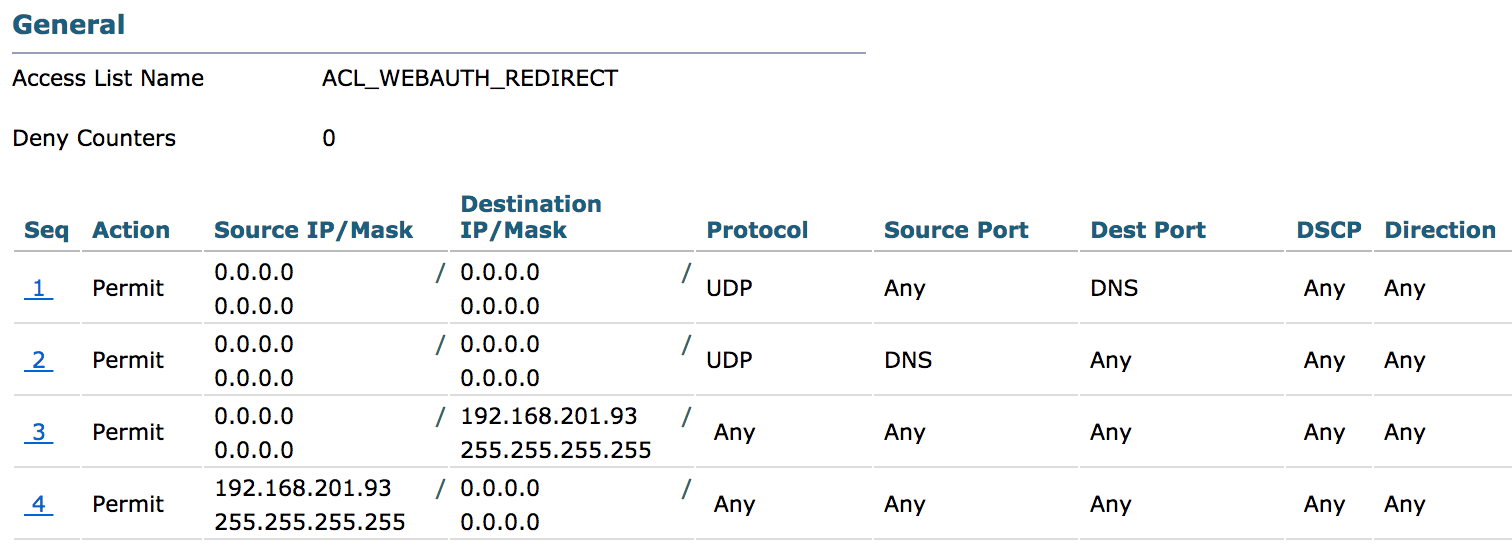
WLC: Configure Redirect ACL
Go to Security > Access Control Lists > Access Control Lists > New
- Enter 'ACL_WEBAUTH_REDIRECT' for the name and click Apply
- Click on 'ACL_WEBAUTH_REDIRECT'
- Click on 'Add New Rule' and add ACE to allow DNS and access to ISE node (See below example), click Apply
-
Hover mouse next to the 'ACL_WEBAUTH_REDIRECT' and select 'Add-Remove URL'
-
Add following entries one by one and click on 'Back'
.google.co
accounts.youtube.com
gstatic.com
.googleapis.com
.appspot.com
ggpht.com
market.android.com
android.pool.ntp.org
.googleusercontent.com
.google-analytics.com
WLC: Configure RADIUS Server
-
Go to WLANs > Select 'Create New' and click on 'Go'
-
Add profile name and SSID name
-
Click on Apply
-
Check Enabled for Status
-
Select appropriate interface
-
Click on 'Security' tab under WLAN
-
Select 'None' for the Layer 2 Security
-
(Optional) If running WLC 8.3+ and would like to use WPA/WPA2 PSK to encrypt traffic on the WLAN, select WPA+WPA2 for the Layer 2 Security
-
Select 'MAC-Filtering'
-
(Optional) If WPA+WPA2 was selected previously, select PSK for Authentication Key Management and enter PSK for the WLAN in the PSK Format area
-
Select 'AAA Servers' tab
-
Select RADIUS server that was added to the WLC in the previous step for both Authentication and Accounting servers
-
Click 'Advanced' tab under WLAN
-
Check AAA Override
-
For NAC State, select ISE NAC (or RADIUS NAC for older version of WLC)
-
Check DHCP Profiling and HTTP Profiling for 'RADIUS Client Profiling'
-
Click Apply
Optional Configurations for better end user experience
Following three settings can be used to provide better user experience by allowing the SAML flow to be auto initiated when the user logs in to the Chromebook. The first optional setting forces auto SSO by opening up a browser window upon a user logging in to the Chromebook. The second optional setting provides auto clicking for the SSO link using a javascript. And, the third optional setting ensures the ISE guest portal page certificate is trusted by the Chromebook in case ISE self-signed certificate is used. Last step is optional if 3rd party CA signed certificate is used for the portal.
Make browser auto popup when user signs in to the Chromebook
-
Logon to the Google Suite account as a google admin user
-
From Home, go to Device Management > Chrome > User Settings
-
Scroll down to the 'Startup' section and locate the 'Pages to Load on Startup' setting and enter any http (Non-secure) site that is not part of google domains (i.e. http://www.cisco.com)
-
Click Save
Hide login portal and auto click SSO link
-
Logon to the ISE GUI
-
Go to Administration > System > Admin Access > Settings > Portal Customization
-
Select ‘Enable Portal Customization with HTML and JavaScript’ and click Save
-
Go to Work Centers > Guest Access > Portals & Components > Guest Portals
-
Click on the Self-Registered Guest Portal (default)
-
Click on the Portal Page Customization on the top
-
Select Pages > Login from the left side and go to the section that shows ‘Google_SSO’
-
Check the ‘as link’ next to the ‘Alternative Login Portal’
-
Click on ‘X’ right next to the Icon to remove the icon
-
Under Optional Content 2 box
-
Click on the ‘Toggle HTML Source’ button on the Optional Content 2 box area
-
Paste in following Javascript
<script>
$(document).ready(function(){
$('#idp-login-link-text-container').trigger('click');
$('[id="page-login"]').hide();
});
</script>
-
Click on the ‘Toggle HTML Source’ button on the Optional Content 2 box area again, the script will disappear (But it is still applied. If applied correctly the preview pane on the right hand side will show that the page is blank)
-
Scroll up and click Save
Make Chromebook trust ISE Self-Signed certificate
-
Logon to the ISE GUI
-
Go to Administration > System > Certificates > Certificate Management > System Certificates
-
Click on Generate Self Signed Certificate
-
Select DNS Name for ’Subject Alternative Name (SAN)’ and enter the ISE host name in the box
-
Select 2048 for Key length and SHA-256 for Digest to Sign With
-
Check Portal: Use for Portal
-
Select ‘Default Portal Certificate Group’
-
Click Submit
-
Select Yes when prompted to replace existing certificate
-
ISE node will be restarted to use the new certificate
-
Once ISE is back up, login to the Admin GUI
-
Go to Administration > System > Certificates > Certificate Management > System Certificates
-
Check the certificate that is shown as used by ‘Portal’ and click 'Export'
- Leave setting as ‘Export Certificate Only’ and Click Export
- Save it to the local HDD. We will import this certificate into the Google Suite
- Logon to the Google Suite account as a google admin user
- Go to Device Management > Device Settings > Network
- Click Certificates
- Click Add Certificate
- Select the one exported from ISE in step above
- Check 'Use this certificate as an HTTPS certificate authority' check box
- Click Save
Optional Configurations for group/attribute matching
At the time of writing, the Google IdP cannot include group information in the SAML assertion. As a workaround, following settings can be used to configure the G-Suite to send user attribute during SAML flow where ISE can be configured to utilize it for authorization condition. It is useful if one needs to provide differentiated access to certain groups of users. For instance, students are assigned an ACL or a security group tag that is different from faculty members.
Note: Currently SAML assertion for group/attribute patching is possible when the WLAN is configured as Open or WPA/WPA2 PSK.
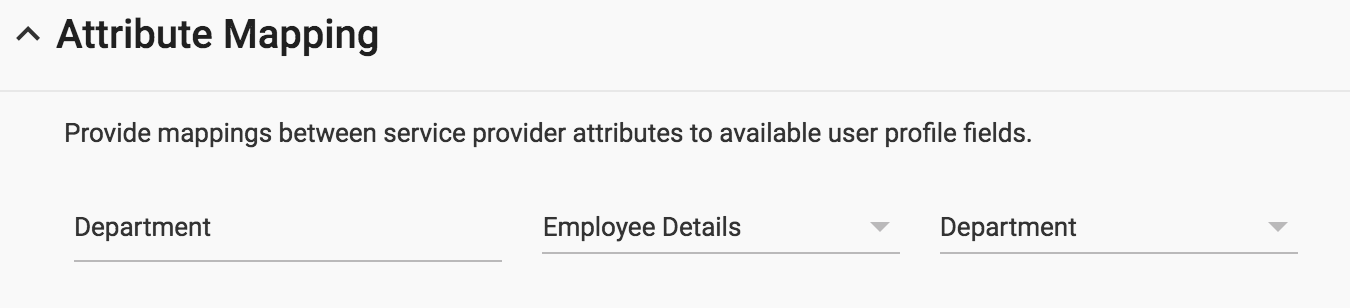
Configure G-Suite to include additional attribute during SAML flow
- Logon to the Google Suite account as a google admin user
- From Home, go to Apps > SAML Apps > Click on 'ISE-Guest'
- Click on 'Attribute Mapping'
- Enter Department, Select 'Employee Details', then select 'Department'
- Click Save
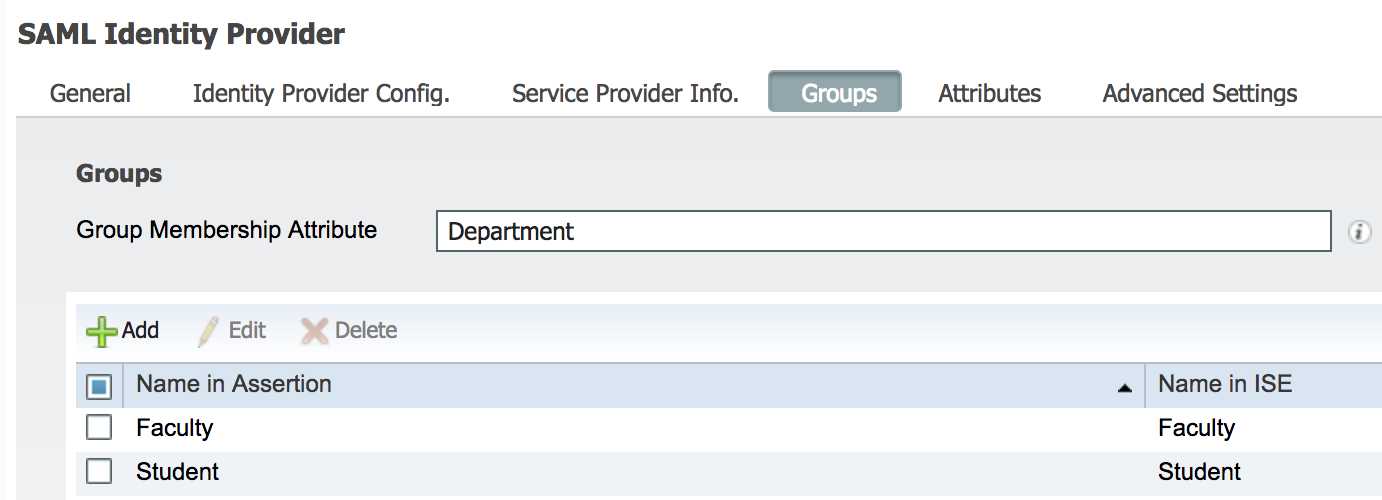
Configure ISE to map the attributes to ISE attributes
- Logon to the ISE GUI
- Go to Administration > System > External Identity Sources > SAML Id Providers, click on 'Google_SSO'
- Click on 'Groups' tab
- Enter 'Department' in the 'Group Membership Attribute' box
- Click on 'Add' below and add Department names used in the G-Suite Below Showing few examples
- Click Save. The newly added Authorization condition is now available in the policy rules.
Troubleshooting
Common issues
Chrome browser complains about the certificate
- Make sure the ISE portal certificate is using SHA256 and includes a SAN field. ISE default installation uses SHA1, so if using self-signed certificate, one has to issue a new certificate
- Check chrome policy to ensure that it is using latest policy
- On the client PC, in the URL bar, enter ‘chrome://policy’
- If the policy is stale, click on ‘Reload Policies’ button to renew policy
When SSO link/button is clicked, the user gets Application is not enabled error
- Validate that the Chromebook being used is being managed by the G-Suite
- Validate that the user is using the managed user account that is member of the domain
- After enabling SAML on the G-Suite, it may take 24 hours to propagate the settings to all users. Even for small organization, it may take 30 minutes
- Validate SAML setting between ISE and G-Suite SAML App
If the SSO link/button is visible but unclickable
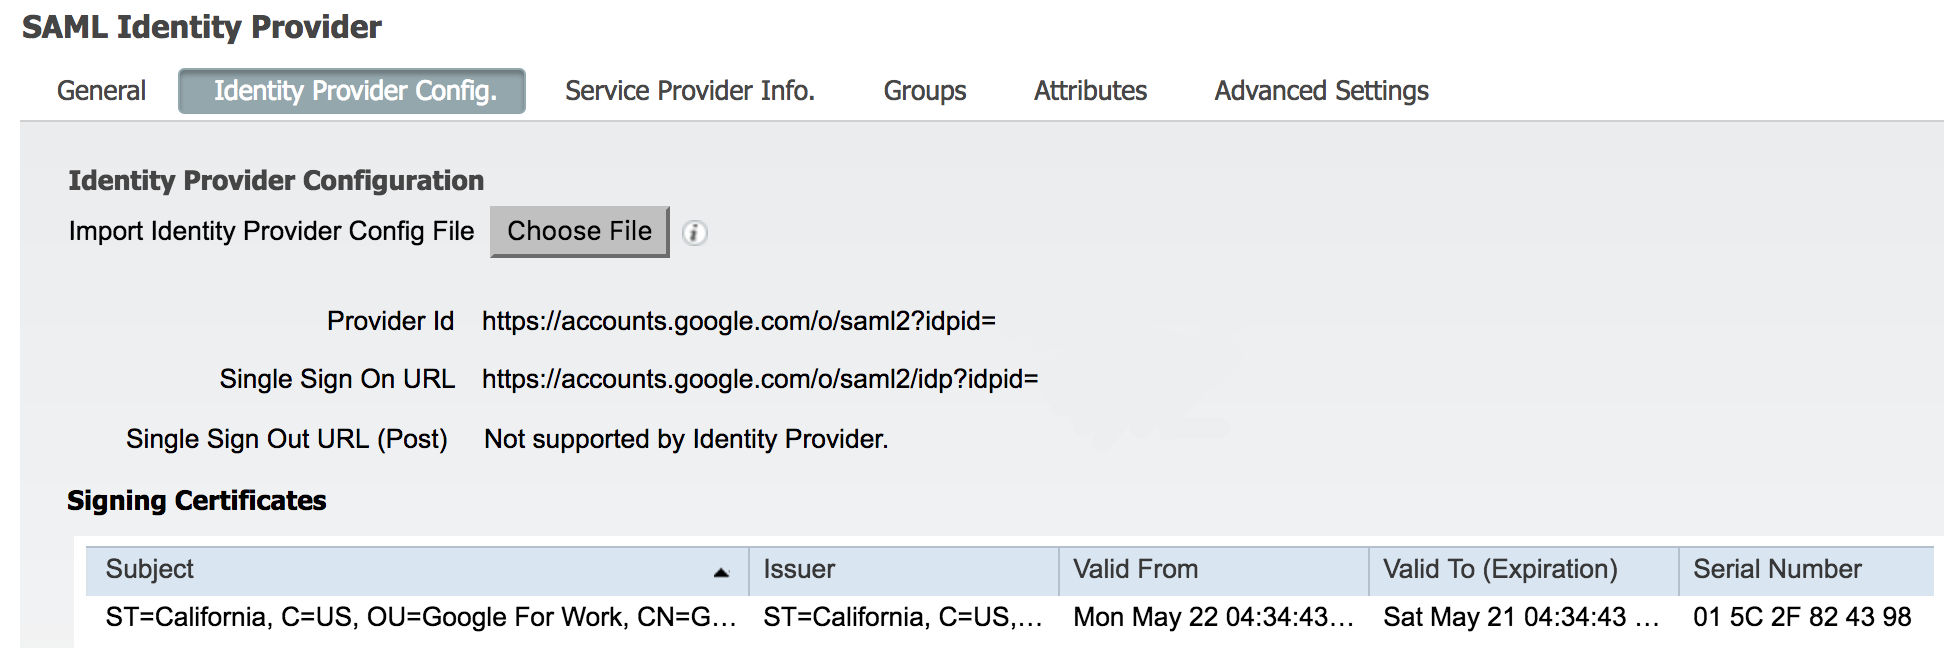
- Validate SAML IdP setting on the ISE. It should look similar to the following
Debugging
Enable debug guestaccess, portal-web-action
Enable trace for SAML
Open two separate SSH access to ISE and run
terminal length 0
show logging application ise-psc.log tail
and on the second SSH
terminal length 0
show logging application guest.log tail
Caveats
Shared Chromebook
At the time of writing the Google as SAML IdP doesn't support logout. Thus, when multiple users are sharing the same Chromebook as is with the case in many K-12 environments, there is a opportunity that when the time between the first user logging off and a second user logging is too short, the second user may assume the identity of the first user in the ISE and WLC view. This does not mean the second user has access to google apps and resources. If one needs to minimize the possibility of such incidents, one can reduce the idle timeout for the WLAN to be short enough to clear out the sessions while the Chromebook is transferred to new student during class breaks. In addition to the short idle-timeout, multiple sign-in access setting on the G-Suite needs to be setup accordingly. The setting can be changed by logging into the G-Suite and going to 'Device Management > Chrome > User Settings > User Experience > Multiple Sign-in Access' settings.
End User Experience
Without Optional Configuration
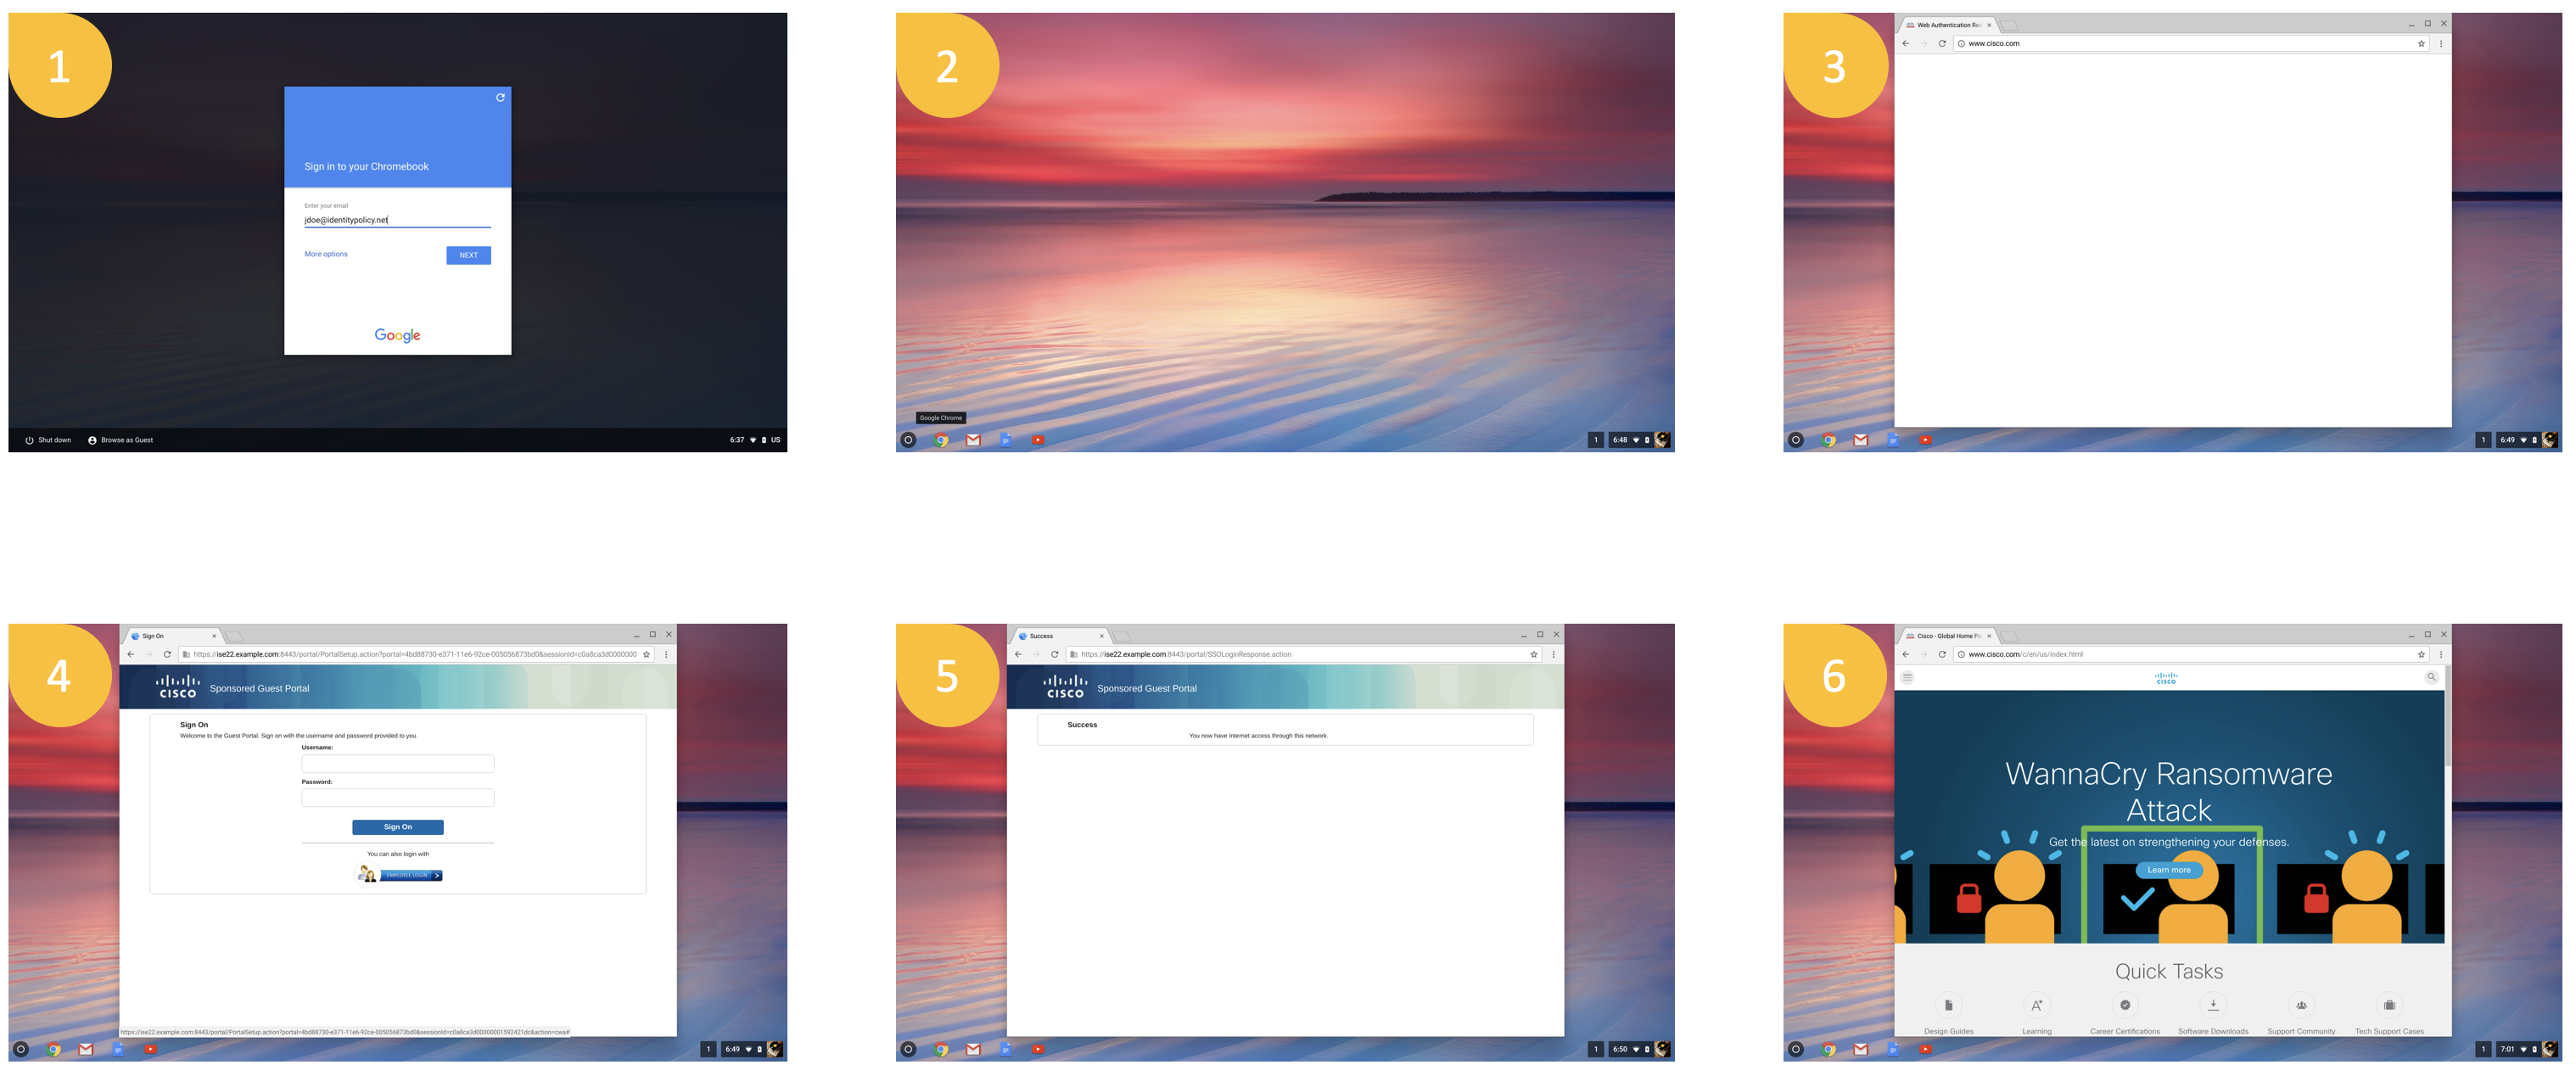
- User enters google ID to log in to the Chromebook (Chromebook is booted up and it associates to open SSID and ISE assigns 'Cisco_WebAuth' Authorization Profile that redirects any web request to ISE WebAuth portal page while allowing access to G-Suite related sites for policy download and user login)
- Once on the desktop, user opens up a browser window and tries to go to a non Google related site (If using the automated JS in the optional section above, this and the next 2 steps happens automatically when user logs in to Chromebook)
- User is redirected to ISE portal page
- User clicks on SSO link/button
- SAML completes and user is presented with Success page
- User now has Internet access
With Optional Configuration

- User enters google ID to log in to the Chromebook (Chromebook is booted up and it associates to open SSID and ISE assigns 'Cisco_WebAuth' Authorization Profile that redirects any web request to ISE WebAuth portal page while allowing access to G-Suite related sites for policy download and user login)
- Browser auto pops-up upon login and SAML completes and user is presented with Success page
- User now has Internet access
ISE Live Log


")
- Mark as Read
- Mark as New
- Bookmark
- Permalink
- Report Inappropriate Content
The link for the video is invalid. Please fix the link:
Quick video showing the configuration flow:
The above link does not work.
Thanks for taking a look at it!
- Mark as Read
- Mark as New
- Bookmark
- Permalink
- Report Inappropriate Content
Re-uploaded video. Thanks for letting us know.
- Mark as Read
- Mark as New
- Bookmark
- Permalink
- Report Inappropriate Content
Hi howon,
i have just find this article, i want to deploy this the solution to my company.
could you help me provide what license can i buy from cisco. ( base, advanced, etc..)
thank you so much.

")
")
- Mark as Read
- Mark as New
- Bookmark
- Permalink
- Report Inappropriate Content
https://www.cisco.com/c/dam/en/us/products/collateral/security/identity-services-engine/guide_c07-656177.pdf
- Mark as Read
- Mark as New
- Bookmark
- Permalink
- Report Inappropriate Content
thank you for your reply,
i am needing use Guest feature for authenticate all client via google suite in my company.
i have found a lot of necessary information in your link.
thank you so much
- Mark as Read
- Mark as New
- Bookmark
- Permalink
- Report Inappropriate Content
Hi!
Will it work with other devices except Chromebooks?
- Mark as Read
- Mark as New
- Bookmark
- Permalink
- Report Inappropriate Content
please open a new community question and will discuss there
Find answers to your questions by entering keywords or phrases in the Search bar above. New here? Use these resources to familiarize yourself with the community: