- Cisco Community
- Technology and Support
- Networking
- Wireless
- Context-Aware calibration help
- Subscribe to RSS Feed
- Mark Topic as New
- Mark Topic as Read
- Float this Topic for Current User
- Bookmark
- Subscribe
- Mute
- Printer Friendly Page
Context-Aware calibration help
- Mark as New
- Bookmark
- Subscribe
- Mute
- Subscribe to RSS Feed
- Permalink
- Report Inappropriate Content
04-26-2010 12:21 PM - edited 07-03-2021 06:45 PM
I am trying to calibrate a new install that has 1 x 4404, 1 x WCS , 1 x MSE , ~50 1142's
I have everything installed and it all works but everytime I try to calibrate the wireless using Cisco Context-Aware Service Configuration Guide
Release 6.0 Chapter 7 Context-Aware Planning and Verification I get an error...
Anyone have any idea?
- Labels:
-
Other Wireless Topics
- Mark as New
- Bookmark
- Subscribe
- Mute
- Subscribe to RSS Feed
- Permalink
- Report Inappropriate Content
04-27-2010 09:42 AM
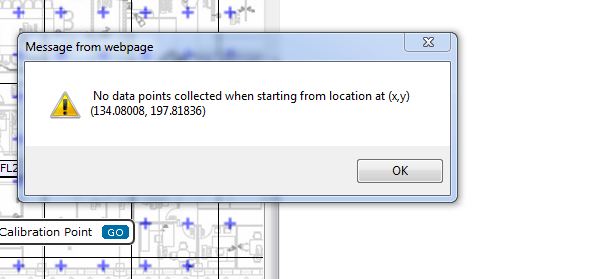
Can you do a larger screen shot so I can see the settings? Are you doing this part of the calibration:
a. ![]() To do a point collection, follow these steps:
To do a point collection, follow these steps:
1. ![]() Select Point from the Collection Method drop-down menu and check the Show Data Points check box if not already checked. A calibration point pop-up appears on the map.
Select Point from the Collection Method drop-down menu and check the Show Data Points check box if not already checked. A calibration point pop-up appears on the map.
2. ![]() Position the tip of the calibration point pop-up at a data point (+) and click Go. A panel appears showing the progress of the data collection.
Position the tip of the calibration point pop-up at a data point (+) and click Go. A panel appears showing the progress of the data collection.

Note ![]() Rotate the calibrating client laptop during data collection so that the client is detected evenly by all access points in the vicinity.
Rotate the calibrating client laptop during data collection so that the client is detected evenly by all access points in the vicinity.
3. ![]() When the data collection is complete for a selected data point and the coverage area is plotted on the map, move the calibration point pop-up to another data point and click Go.
When the data collection is complete for a selected data point and the coverage area is plotted on the map, move the calibration point pop-up to another data point and click Go.
Note ![]() The coverage area plotted on the map is color coded and corresponds with the specific wireless LAN standard used to collect that data (see legend at left). Additionally, the progress of the calibration process is indicated by two status bars above the legend, one for 802.11a/n and one for 802.11b/g/n.
The coverage area plotted on the map is color coded and corresponds with the specific wireless LAN standard used to collect that data (see legend at left). Additionally, the progress of the calibration process is indicated by two status bars above the legend, one for 802.11a/n and one for 802.11b/g/n.
Note ![]() To delete data points, click Delete and move the black square that appears over the appropriate data points. Resize the square as necessary by press and hold Ctrl and moving the mouse.
To delete data points, click Delete and move the black square that appears over the appropriate data points. Resize the square as necessary by press and hold Ctrl and moving the mouse.
4. ![]() Repeat steps a1 to a3 until the calibrations status bar of the relevant spectrums (802.11a/n, 802.11b/g/n) display as done.
Repeat steps a1 to a3 until the calibrations status bar of the relevant spectrums (802.11a/n, 802.11b/g/n) display as done.
Note ![]() The calibration status bar indicates data collection for the calibration as done, after roughly 50 distinct locations and 150 measurements have been gathered. For every location point saved in the calibration process, more than one data point is gathered. The progress of the calibration process is indicated by two status bars above the legend, one for 802.11b/g/n and one for 802.11a/n.
The calibration status bar indicates data collection for the calibration as done, after roughly 50 distinct locations and 150 measurements have been gathered. For every location point saved in the calibration process, more than one data point is gathered. The progress of the calibration process is indicated by two status bars above the legend, one for 802.11b/g/n and one for 802.11a/n.
Discover and save your favorite ideas. Come back to expert answers, step-by-step guides, recent topics, and more.
New here? Get started with these tips. How to use Community New member guide
