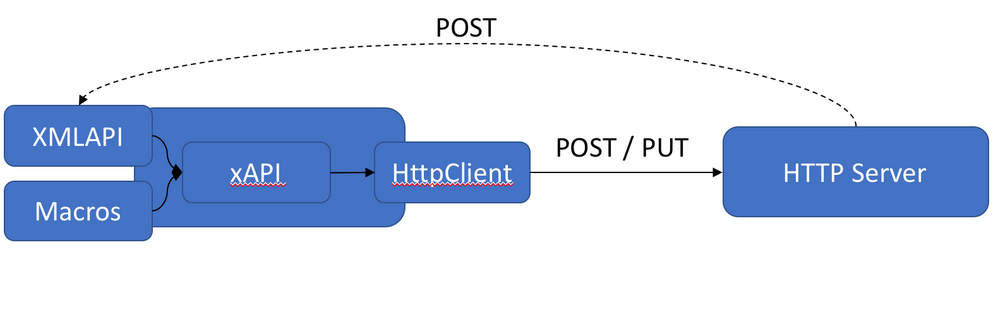
The new streamer component requires to listen to SIP connections, the streamer server must have a valid certificate for TLS connection.
Configure the listening interface of the streamer and the SIP TCP and TLS ports to listen on using the following command.
hq-cms> streamer sip listen a 6000 6001
Configure the certificates to be used for the SIP streamer. Specify the key file, certificate, and CA trust bundle.
hq-cms> streamer sip certs cmscert.key cmscert.cer Chain-CA.cer
Optionally select the quality for streaming
hq-cms> streamer sip resolution 720p

Enable the streamer. All message must show "SUCCESS" as below displayed below.
hq-cms> streamer enable

Verify the streamer status.

Configuring the Stream URI via the API.
Once the new SIP streamer is enabled, it can be configured and used in the Call Bridge using the sipStreamerUri API parameter specified in the API call profile object.
On the web GUI of the CMS navigate to Configuration > API.
In the Filter section, type “callprofile”
Click the Create new button to create a new CallProfile or edit the existing profile and populate the following information.


Add the created callProfile above to the /system/profiles. This is a global configuration and the configured "sipStreamerUri" will be used for streamer operation.
Click return to object field.
In the Filter section, type “system”.
Click the View or edit button for system profiles.
Then select Choose Next to the field for callProfile, and then Select the callProfile previously created
Click Modify.


By default, Wowza Streaming Engine requires that RTMP-based encoders such Cisco Meeting Server provide a source username and password before they can connect to a live application and publish a live stream. Complete the following steps to create a source account and manage source authentication.
First to connect to Wowza Streaming Engine Manager, from the Admin-PC, open a web browser and type the url http://10.1.5.128:8088.


In Wowza Streaming Engine Manager, click Server and then click Source Authentication.
Click Add Source.
Add Source UserName : cmsuser and Password : cisco. Click Add. This account will be used later on the cospaces of Cisco Meeting Server. This source account is used to authenticate connections from Cisco Meeting Server to live applications in Wowza Streaming Engine.


In the section Application , click Source Security, and then click Edit.
Under the source type RTMP, select Require password authentication.
Under Client Restrictions, You can control which IP addresses encoders can connect from. Click Save.


To connect the Cisco Meeting Server to Wowza Streaming Engine and publish a live stream, we need a stream URL.
To retrieve this URL, we need the following application connection settings:
- Server URL : rtmp://10.1.5.128:1935/live
- Stream Name : a unique name to identify the stream for example clcnf.
- Username : cmsuser
- password : cisco
On the Cisco Meeting Server we need to configure the stream URL in the following format instead:
rtmp://[source-user-name]:[source-password]@[wowza-ip-address]:[port]/[application-name]/stream-name
In this scenario, it should be : rtmp://cmsuser:cisco@10.1.5.128:1935/live/clcnf
To retrive the stream URL’s informations, see in the Application Connection Settings information in the right of the web page and use this information in the CMS streamer 's configuration to connect it to Wowza Streaming Engine.

In the Filter section, type “cospace”.
Click the object ID for jdoe Meeting Space.
Modify the space to add “StreamURL”. The 'streamURL' in the following format: rtmp://cmsuser:cisco@10.1.5.128:1935/live/clcnf
Click Modify.


From the jdoe-pc, access the jdoe space and click the Join button.


From the jsmith-pc, access the jsmith space, and click the Join a meeting button.
Enter the Meeting ID of the jdoe space 51001. Click the Join meeting button.


From the jdoe-pc, Click the Meeting Control Icon on the right-hand side of the video screen.
This will expand to show the Recording and Streaming Control. Click the Streaming button.

After a couple of seconds, notice the Streaming button will go to a solid blue dot to indicate the streaming has started.

To verify that Wowza Streaming Engine is receiving the published stream, complete the following steps in Wowza Streaming Engine Manager.
Click Incoming Streams in the the live application.
You should see the stream clcnf listed with a status of Active.


On the cmayer-pc, open the CMS Live Stream using VLC, enter the stream URL rtmp://cmsuser:cisco@10.1.5.128:1935/live/clcnf.

Meeting content is being streamed to cmayer-pc.

From the HQ-CMS, navigate to Logs > Event Logs. Verify that an outgoing SIP call is sent to CMS Streamer. The stream URL is sent via SIP header in the contact field.

Navigate to Status > Calls, verify that in addition to jdoe and jsmith calls, the sip streaming call is also connected.

Send the stream to YouTube from Wowza Streaming Engine
After creating a Live application in Wowza Streaming Engine, we can send the stream to YouTube.
Under the Application section, navigate to the application live. Click Stream Targets, and then click Add Stream Target.

Under Third-Party Target Destinations, click YouTube Live. YouTube receives the stream over RTMP.

On the YouTube Live Configuration page, configure the following informations:

Stream Target Name : A descriptive name for this target setup in Wowza Streaming Engine.
Source Stream Name : The name of the incoming source stream, specified when you connected the source stream such as Cisco Meeting Server Streamer to Wowza Streaming Engine, that will be sent to YouTube. The source stream name in this scenario is clcnf. (rtmp://cmsuser:cisco@10.1.5.128:1935/live/clcnf)
Destination Application Name : The name of the YouTube application in the Stream URL. YouTube uses the application name live2. (located in the URL stream rtmp://a.rtmp.youtube.com/live2), you can retrieve the application name in the YouTube Live Control page under the Stream Settings.
Destination Port : The port number for the stream connection. The default RTMP connection is 1935.
Destination Stream Name : The name of the stream in the Stream key field located on the YouTube Live Control page under the Stream Settings.
Destination Application Instance : Not Required
Destination Host : The address of the YouTube server in the Stream URL field rtmp://a.rtmp.youtube.com/live2, In this scenario the destination host is a.rtmp.youtube.com.


Username and Password : The YouTube username and password for authentication.
Click the Add this target button.

Finally we must enable the Stream Targets feature for the Wowza Streaming application.
In the section of the application name live, click Stream Targets, and then click Enable Stream Targets. Click OK to confirm.


When the Stream Targets feature is enabled, the target status on the Stream Targets page displays the status of Waiting which means that the target is enabled but isn't yet pushing the stream to the YouTube.

From the jdoe-pc, access the jdoe space and click the Join button.


Click the Meeting Control Icon on the right-hand side of the video screen.
This will expand to show the Recording and Streaming Control. Click the Streaming button.

After a couple of seconds, the streaming starts successfully as shown by the blue color of the Streaming button.

Access the Wowza Streaming Engine Manager. The target status on the Stream Targets page displays the status of Active. Wowza Streaming Engine successfully connected to the YouTube target and is actively pushing the stream.

To verify that YouTube is receiving the stream, go to the YouTube Live Control page and the YouTube channel. The stream is received successfully.


")