


Turn on suggestions
Auto-suggest helps you quickly narrow down your search results by suggesting possible matches as you type.
Showing results for
- Cisco Community
- Technology and Support
- Collaboration
- Collaboration Blogs
- Cloud xAPI - Webex Edge for Devices - CE9.10.x
2474
Views
20
Helpful
0
Comments
Options
- Subscribe to RSS Feed
- Mark as New
- Mark as Read
- Bookmark
- Subscribe
- Printer Friendly Page
- Report Inappropriate Content
12-16-2019
06:38 AM
Getting started with Cloud xAPI
Soon Christmas again.. :). At the time of writing this article, the feature is not available for on-premises deployments, but as soon as Webex Edge for devices is ready and released with CE9.10.0 its good to go (~Jan 2020). Cloud users can also use this as guidance since the feature is already there, but it meant as a tease for onpremise deployments.
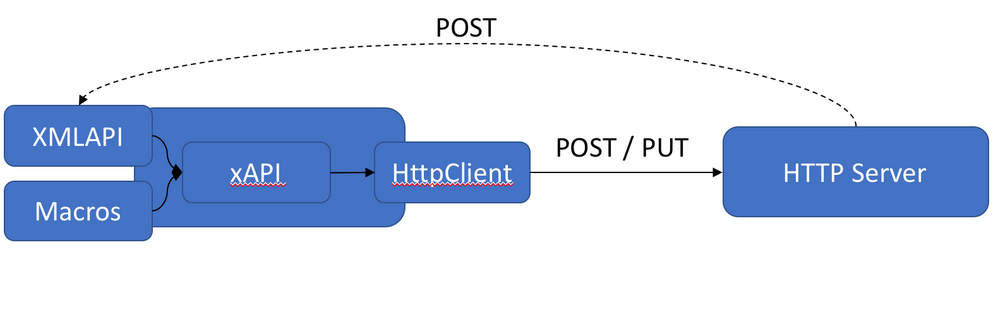
So what is Cloud xAPI? If you have devices registered in the Webex Cloud (Control Hub) this has been available for a while now, but with CE9.10.0 it is now possible to link a device to the cloud providing a small set of cloud features to an on-premises device (se the admin guide for how to link a device to the Webex Cloud). This is kind of cool since it is opening up for using the Cloud xAPI on-premises(!), which basically means you get access to xStatus and xCommand using a user / admin or bot accesstoken depending on the accesslevel granted by a Control Hub admin (What about xConfiguration you say? - sorry not yet available.. but there are some cool things you can do with just xCommand as well and local macros). I decided to experiment a little with this feature to give you a place to start.
Read more on how to link a device to the cloud when the documentation is released in January. It is not available at the time of writing this anyway. But for existing cloud devices:
It all starts by an admin granting access to a user or a bot in Control Hub. Useful guide: https://developer.webex.com/docs/api/guides/xapi
Once that is done you can go to https://developer.webex.com and read more about the device API's there but I will just jump straight into this with a couple of example requests. I use python 3.7 in my examples, I also have written an app to make device management easier via a bot (Webex Bot Manager) but first lets look at the basics.
Python class for testing the Device APIs
When you have granted access to a user or a bot you can use the access token to list the devices that the bot or user have access to. Note the below class is just an example on how you can get started, feel free to use the examples to get started with your own solutions.
import requests
import urllib3
import json

urllib3.disable_warnings(urllib3.exceptions.InsecureRequestWarning)

# Device API class
class DeviceAPI:
    def __init__(self, auth):
        self._authHeader = self.genHeader(auth)
        self._apiUrls = {'status': 'https://api.ciscospark.com/v1/device/xapi/status',
                         'command': 'https://api.ciscospark.com/v1/device/xapi/command',
                         'devices': 'https://api.ciscospark.com/v1/devices'
                         }

    # Create authorization header
    def genHeader(self, auth):
        return {'Authorization': 'Bearer ' + auth, 'Content-type': 'application/json'}

    # Create device list
    def getDevicesList(self):
        url = self._apiUrls['devices']
        return self.get(url)

    def showDevices(self):
        devices = self.getDevicesList()
        for i in devices['items']:
            print("{}:{}".format(i['id'], i['displayName']))

    # Returns the xStatus of a specific device
    def getStatus(self, deviceId, keyPath):
        url = self._apiUrls['status']
        return self.get("{}?name={}&deviceId={}".format(url, keyPath, deviceId))

    def sendCommand(self, keyPath, payload):
        url = self._apiUrls['command']
        print("{}/{}".format(url, keyPath))
        return self.post("{}/{}".format(url, keyPath), payload)

    def get(self, url):
        return requests.get(url, headers=self._authHeader, verify=False).json()

    def post(self, url, payload):
        return requests.post(url, headers=self._authHeader, data=payload, verify=False).json()

#users = {'edge-test': '<access token>'}
devices = DeviceAPI(users['edge-test']
Ok, so the above class will just simplify the requests a little bit so its easier to use.
Referring to the above class I can add the following to the script to list my devices (using json.dumps to pretty print it):
devicelist = devices.getDevicesList()
print(json.dumps(devicelist, indent=4, sort_keys=True))
{
    "items": [
        {
            "activeInterface": "LAN",
            "capabilities": [],
            "connectionStatus": "connected_with_issues",
            "displayName": "My System",
            "errorCodes": [
                "audiopairingnoise",
                "ntpstatus"
            ],
            "id": "Y2lzY29zcGFyazovL3VzL0rFVklDRS9lZDc3YTFmZC03NzkyLTQ4YTktODc2MS04OGUzYmMyZjRjNDg",
            "ip": "10.10.10.1",
            "mac": "2C:31:24:61:5C:4C",
            "orgId": "Y2lzY29zcGFyazovL3VzL09SRfFOSVyBVElPTi80NTdhZDZiMS01OWNjLTQyOGQtYTRkNy03MmU4ZDdjZDY5ODk",
            "permissions": [
                "xapi"
            ],
            "placeId": "Y2lzY29zcGFyazovL3VzL1BMQUNFuzQ1N2FkNmIxLTU5Y2MtNDI4ZC1hNGQ3LTcyZThkN2NkNjk4OTpmMjM2Y2MwZi0wNjIyLTQ1NTgtYThkYi1jY2RhNTBhNWE3ZjI",
            "primarySipUrl": "",
            "product": "Cisco Webex Room 55",
            "serial": "FTT2130035A",
            "sipUrls": [
                ""
            ],
            "software": "ce 9.10.0 0a25d810acf 2019-12-09",
            "tags": []
        }
    ]
}
Ok, I only have one device, but its quite a bit of information following in the device list. This info can be used for whatever purpose but the part I am looking for in this request is the "id" field which is the deviceId. Implementing this into the bot app where I have filtered out the fields that I need I could be getting something like this by just using a bot (this is just to give you an idea of what you can do):
Once you get the device id you can start requesting statuses and commands. Since I only have one device I will just pick the first device entry in the array.
payload = json.dumps({"deviceId":devicelist['items'][0]['id'],
                      "arguments": {"Number":"mohm@cisco.com"} })

result = devices.sendCommand('dial', payload)
print(json.dumps(result, indent=4, sort_keys=True))
https://api.ciscospark.com/v1/xapi/command/dial
{
    "arguments": {
        "Number": "mohm@cisco.com"
    },
    "deviceId": "Y2lzY29zcGFyazovL3VzL0rFVklDRS9lZDc3YTFmZC03NzkyLTQ4YTktODc2MS04OGUzYmMyZjRjNDg",
    "result": {
        "CallId": 7,
        "ConferenceId": 6
    }
}
The device will dial the specified number. If the command has arguments, they must be included else you will get a malformed payload error. For commands without arguments, you can either send arguments:{} or only the deviceId. The payload must contain the deviceId to execute the command on the correct device.
payload = json.dumps({"deviceId":devicelist['items'][0]['id']})
result = devices.sendCommand('audio.microphones.mute', payload)
print(json.dumps(result, indent=4, sort_keys=True))
https://api.ciscospark.com/v1/xapi/command/audio.microphones.mute
{
    "deviceId": "Y2lzY29zcGFyazovL3VzL0rFVklDRS9lZDc3YTFmZC03NzkyLTQ4YTktODc2MS04OGUzYmMyZjRjNDg",
    "result": {}
}
A blank result indicates that the request was successful.
Implemented in the bot app you could control the commands sending the different variables that is needed.
Getting the status of a device is even easier, it´s just a GET request towards the keypath. With status you can also use wildcards that allow you to get all statuses under a certain key.part. Commands have to be exact in order to work, the commands will not return any schema data so you need to know the exact key path unless you build it in some other way, it is certainly possible. Continuing on the script using the same class as above:
deviceid = devicelist['items'][0]['id']

result = devices.getStatus(deviceid, 'systemunit.uptime')
print(json.dumps(result, indent=4, sort_keys=True))
{
    "deviceId": "Y2lzY29zcGFyazovL3VzL0rFVklDRS9lZDc3YTFmZC03NzkyLTQ4YTktODc2MS04OGUzYmMyZjRjNDg",
    "result": {
        "SystemUnit": {
            "Uptime": 437881
        }
    }
}
You can use the * as a wildcard and get all the items you want under a specific key or just grab the full status:
result = devices.getStatus(deviceid, 'systemunit.*')
{
    "deviceId": "Y2lzY29zcGFyazovL3VzL0rFVklDRS9lZDc3YTFmZC03NzkyLTQ4YTktODc2MS04OGUzYmMyZjRjNDg",
    "result": {
        "SystemUnit": {
            "Hardware": {
                "Module": {
                    "CompatibilityLevel": "0",
                    "SerialNumber": "<snip>"
                },
                "Monitoring": {
                    "Temperature": {
                        "Status": "Normal"
                    }
                }
            },
            "Notifications": {
                "Notification": [
                    {
                        "Text": "OK",
                        "Type": "SoftwareUpgradeOK",
                        "id": 1
                    }
                ]
            },
            "ProductId": "Cisco Webex Room 55",
            "ProductPlatform": "Room 55",
            "ProductType": "Cisco Codec",
            "Software": {
                "DisplayName": "<snip>",
                "Name": "s53200",
                "OptionKeys": {
                    "Encryption": "True",
                    "MultiSite": "False",
                    "RemoteMonitoring": "True"
                },
                "ReleaseDate": "",
                "Version": ""
            },
            "State": {
                "NumberOfActiveCalls": 0,
                "NumberOfInProgressCalls": 0,
                "NumberOfSuspendedCalls": 0
            },
            "Uptime": 438170
        }
    }
}
result = devices.getStatus(deviceid, '*')
The above will return the full xStatus from the device. And this is how it can be done via bot communication:
So what are the use-cases for this?
It can be quit useful to automate certain things, like for example branding. Note that the Cloud xAPI currently has no support for Multiline commands (like the "body" attribute - but hopefully this will be implemented soon), this means that you cannot currently add macros or custom GUI using multiline commands. But you can use the new "UserInterface Branding Fetch" command to change the branding images using the Cloud xAPI.
Configuration is not supported in the Cloud xAPI. Only status and commands are currently supported at the time of writing this.
But I wanted to show you how you can use the Cloud xAPI together with local macros by triggering custom events. So lets just create our own way of configuring the device then. I add the following macro to my device:
const xapi = require('xapi');

function parse(event) {
    return JSON.parse(event);
}

xapi.event.on('Message Send Text', event => {
    event = event.replace(/'/g,'"');
    try {
        var config = parse(event);
        for (var key in config) {
            xapi.config.set(key, config[key]);
        }
    } catch(e) {
        console.log(e);
    }
});
Ok, this may seem a little weird.. but it is a way to make the macro do something based on an incoming event. With the command path message.send (that will generate a custom event). So my custom event is in the form of a JSON blob, which is parsed by the macro and inserted into xapi.config.set(). This will allow me to send configurations as a custom event through the Cloud xAPI. So lets assume the above macro is running on my device, which it is.. haha (I am just trying to keep it very simple for example purposes so the macro needs a bit more work if its supposed to work properly).
From my script I am sending the follwing to the Cloud xAPI:
payload = json.dumps({"deviceId":devicelist['items'][0]['id'],
                      "arguments": {"Text":"{\"SystemUnit Name\":\"New Device Name\" }"}})

result = devices.sendCommand('message.send', payload)
print(json.dumps(result, indent=4, sort_keys=True))
Ok, so you see the key is message.send and the text value is the command path: SystemUnit Name, and the value of that key is the actual configuration value "New Device Name". I want to change the device name to New Device Name but it is a configuration and therefore not normally available via the Cloud xAPI so the macro takes care of business.
This macro will allow any configuration but you can also restrict it to certain configuration actions. For example, the macro can listen for a keyword (not the actual command) and run a set of configurations based on the event:
const xapi = require('xapi');

xapi.event.on('Message Send Text', event => {
    if (event === "signage") {
      xapi.config.set("Standby Signage Mode", "On");
      xapi.config.set("Standby Signage Audio", "On");
      xapi.config.set("Standby Signage URL", "http://mysignageurl");
      xapi.command("Standby Halfwake");
    }
});
So now the macro becomes much less complicated and can trigger a series of actions based on the keyword that comes from the Cloud xAPI.
So from the above python script example:
payload = json.dumps({"deviceId":devicelist['items'][0]['id'],
                      "arguments": {"Text":"signage"}})

result = devices.sendCommand('message.send', payload)
print(json.dumps(result, indent=4, sort_keys=True))
Sending this will trigger the macro to do the config / command sequence. Imagine what you can do with this when you can trigger many actions in a macro from a single Cloud xAPI request. That sure can automate a lot of zZZ things :) I will let you think about this over Christmas so the creative ideas can be born. My examples only touches the surface, but the use-cases are endless - depending on your creativity.
Merry Christmas!
Labels:
You must be a registered user to add a comment. If you've already registered, sign in. Otherwise, register and sign in.
Getting Started
Find answers to your questions by entering keywords or phrases in the Search bar above. New here? Use these resources to familiarize yourself with the community:
Customers Also Viewed These Support Documents