
Turn on suggestions
Auto-suggest helps you quickly narrow down your search results by suggesting possible matches as you type.
Showing results for
- Cisco Community
- Technology and Support
- Collaboration
- Collaboration Blogs
- Webrtc demo system
9413
Views
10
Helpful
2
Comments
Options
- Subscribe to RSS Feed
- Mark as New
- Mark as Read
- Bookmark
- Subscribe
- Printer Friendly Page
- Report Inappropriate Content
11-25-2013
09:46 AM
The following document will help you connect your Web Browser to an existing Video or Audio System. This demo describes the steps needed to connect a WebRTC capable Web Browser, (Google Chrome, Google Chrome Canary, FireFox, FireFox Nightly) to an existing Audio and Video system (Cisco TelePresence Server, McuWeb, Cisco Codian MCU.)
The components used in this demo are:
- Google Chrome Canary
- Telestax (WebSockets application)
- Telestax Sip Servlet (Opencall B2BUA)
- Doubango sipML5 client (customized)
- Doubango webrtc2sip (Media converter VP8 to H.264)
Components | Version |
Google Chrome Canary | 33 canary |
Mobicents | mss-2.0.0.FINAL-jboss-as-7.1.2.Final |
Opencall sip servlet B2BUA | opencall-1.1.0-BELADOR |
WebSockets sip servlet | websockets-sip-servlet-2.1.0-20121108.113957-1 |
Doubango webrtc2sip | webrtc2sip 2.6.0 |
Doubango sipML5 | sipML5 Doubango version 203 |
Architecture
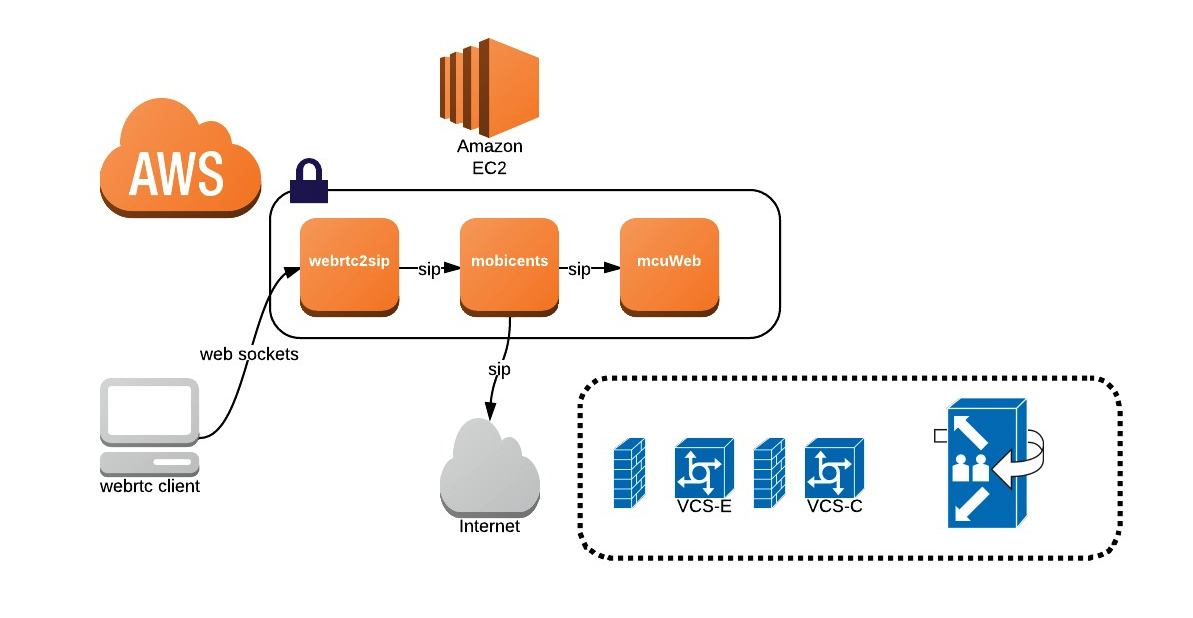
By using Doubango SipML5 we utilize HTML5 SIP client entirely written in JavaScript. The client is used to connect to any SIP or IMS network from WebRTC-capable browser to make and receive audio/video calls. This SIP client registers to Telestax WebSockets Sip Servlet via WebSockets protocol that runs on top of Mobicents Server. For more information please review TeleStax:
https://code.google.com/p/sipservlets/wiki/HTML5WebRTCVideoApplication

Usage
In order to dial from your web browser you have two options:
- Utilize pre-defined parameters (Demo system)
- Configure your own parameters and dial to any public or local SIP URI
Utilize pre-defined parameters (Demo system)
No need to deploy any component, you will be using pre-deployed systems in Amazon AWS.
1) Access:
http://webrtc.ramennetworks.com/
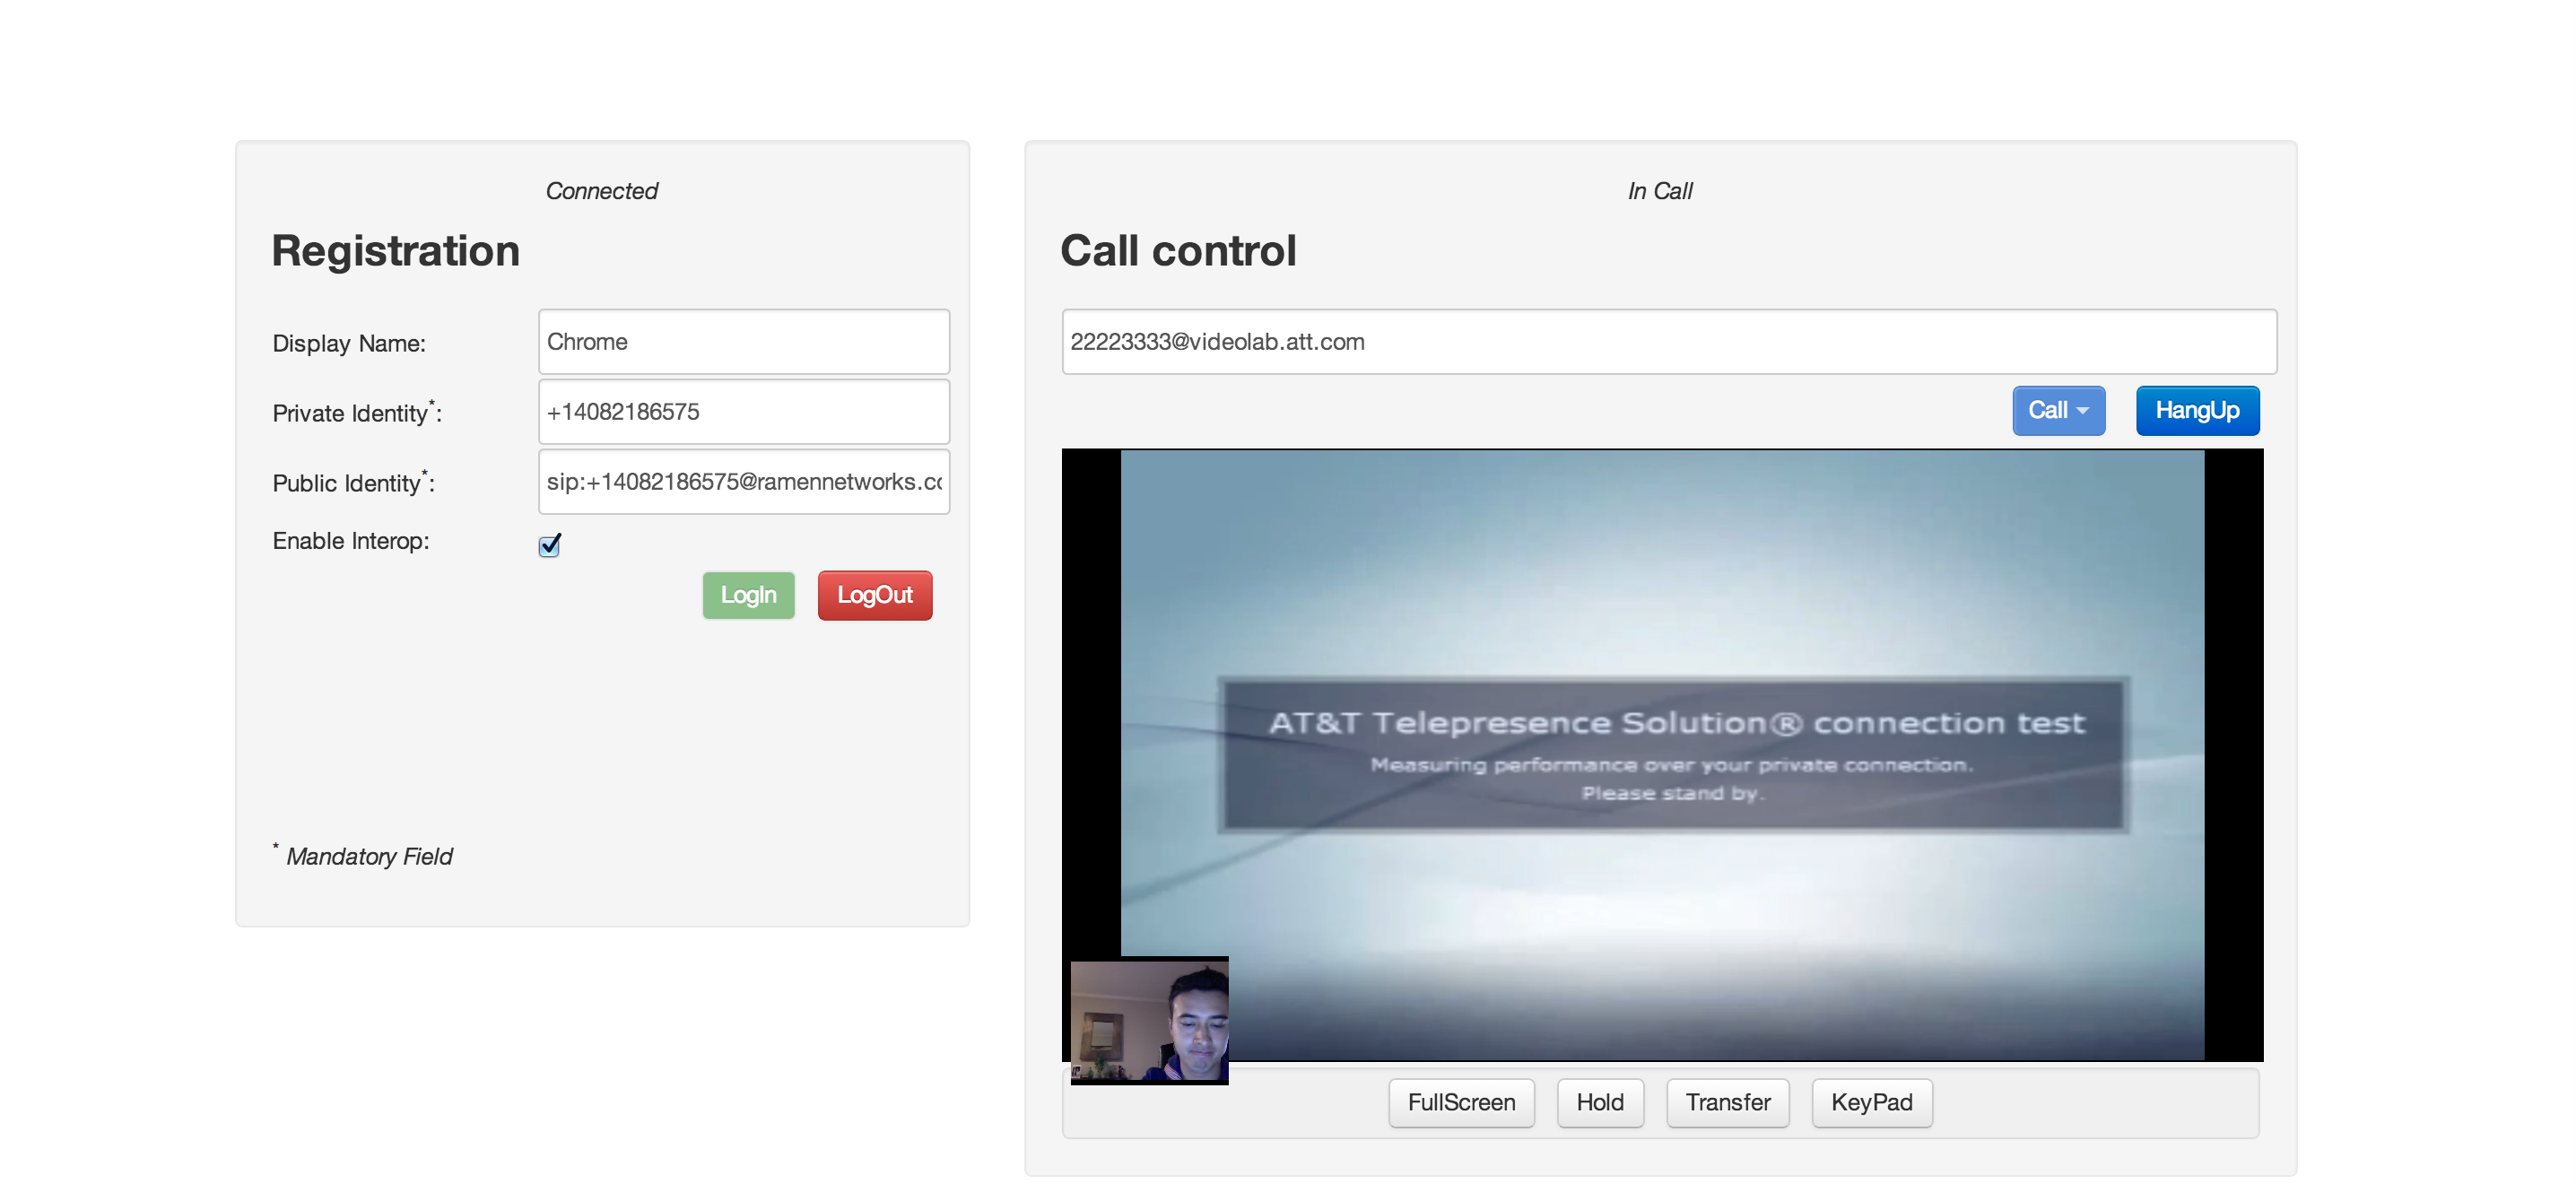
2) Configure parameters
Parameter | Description | Recommended value |
Display Name: | Caller Name | Chrome |
Private Identity*: | Calling number | +14082221000 |
Public Identity*: | From URI | |
| Enable Interop | Enable H.264 support | Enable |
This modified HTML page is already configured to use Amazon AWS servers. You can enable Developer mode JavaScript console view in Web Browser to see values.
sipRegister() (index):353
s_websocket_server_url=ws://webrtc2sip.ramennetworks.com:5062 tsk_utils.js?svn=20:116
s_sip_outboundproxy_url=tcp://172.31.46.56:5060 tsk_utils.js?svn=20:116
b_rtcweb_breaker_enabled=yes
3) Login
4) Dial number
You can use any valid SIP URI. Example: 22223333@videolab.att.com,testcall@video.att.com
Configure your own parameters and servers and dial to any public or local SIP URI
Access via HTTP the following page:
From there click on Enjoy our live demo.
Parameter | Description | Recommended value |
Display Name: | Caller Name | Chrome |
Private Identity*: | Calling number | +14082221000 |
Public Identity*: | From URI | sip:+14082221000@opencall.org |
Password: | Password | 14082221000 |
Realm*: | Domain | 172.31.46.56 |
If you want to enable H.264 codec you need to go to expert mode and enter the following:
Parameter | Description | Recommended value |
Enable RTCWeb Breaker | Enables webrtc2sip utilization | Enabled |
WebSocket Server URL | webrtc2sip server | ws://webrtc2sip.ramennetworks.com:5062 |
SIP outbound Proxy URL | mobicents websockets sip servlet | tcp://172.31.46.56:5060 |
Deploying
The following table describes the steps necessary steps to deploy this system:
| Components | Deployments steps |
| Google Chrome Canary | Install |
| Mobicents | Download, Install, Configure |
| Opencall | Download, Configure, Deploy |
| WebSockets Sip Servlet | Download, Deploy |
| Doubango webrtc2sip | Download, Install, Configure |
| Doubango sipML5 | Configure |
Installation
Google Chrome installation
- Download and Install Google Chrome
https://www.google.com/intl/en/chrome/browser/
Mobicents installation
- Download Mobicents 2.0 Jboss
http://sourceforge.net/projects/mobicents/files/Mobicents%20Sip%20Servlets/
- Extract Mobicents file
mss-2.0.0.FINAL-jboss-as-7.1.2.Final-1349104459.zip
- Download configuration file standalone-sip.xml
http://github.com/spicyramen/opencall/blob/Development/config/standalone-sip.xml
Move standalone-sip.xml file to this director:
mss-2.0.0.FINAL-jboss-as-7.1.2.Final/bin and
mss-2.0.0.FINAL-jboss-as-7.1.2.Final/standalone/configuration
- Obtain local system information
Obtain local IP address information and define which NIC system will be using ifconfig
Example:
ifconfig
lo0: flags=8049<UP,LOOPBACK,RUNNING,MULTICAST> mtu 16384 options=3<RXCSUM,TXCSUM> inet6 fe80::1%lo0 prefixlen 64 scopeid 0x1 inet 127.0.0.1 netmask 0xff000000 inet6 ::1 prefixlen 128gif0: flags=8010<POINTOPOINT,MULTICAST> mtu 1280stf0: flags=0<> mtu 1280en0: flags=8863<UP,BROADCAST,SMART,RUNNING,SIMPLEX,MULTICAST> mtu 1500 ether 20:c9:d0:42:af:7d inet6 fe80::22c9:d0ff:fe42:af7d%en0 prefixlen 64 scopeid 0x4
inet 192.168.1.69
netmask 0xffffff00 broadcast 192.168.1.255 media: autoselect status: activep2p0: flags=8843<UP,BROADCAST,RUNNING,SIMPLEX,MULTICAST> mtu 2304 ether 02:c9:d0:42:af:7d media: autoselect status: inactive
- Verify iptables or firewall is open for ports 5060,5061 and 5062.
- Start Mobicents server
Go to the following folder in order to start Mobicents server:
mss-2.0.0.FINAL-jboss-as-7.1.2.Final/bin
- Run the command:
./standalone.sh -b 192.168.1.69 -c standalone-sip.xml &
Opencall Installation
- Download Opencall war file
https://github.com/spicyramen/opencall/blob/Development/target/opencall-1.1.0-BELADOR.war
- Create Opencall folder
Create opencall folder in mss-2.0.0.FINAL-jboss-as-7.1.2.Final/standalone/configuration
Example:
mkdir mss-2.0.0.FINAL-jboss-as-7.1.2.Final/standalone/configuration/opencall
- Download and configure Opencall server init file (opencall.ini)
https://github.com/spicyramen/opencall/blob/Development/config/opencall.ini
Configure proper file location inside Opencall.ini define path for Opencall server routing rules.
MODE=1
RULE_LIMIT=100
FILELOCATION=/Users/gogasca/Documents/OpenSource/Development/Java/Mobicents/mss-2.0.0.FINAL-jboss-as-7.1.2.Final/standalone/configuration/Opencall/Opencallrules.cfg
- Download and configure Opencall server call routing rules
https://github.com/spicyramen/opencall/blob/Development/config/opencallrules.cfg
- Deploy opencall war file
Move Opencall war file to the Mobicents deployment folder:
mss-2.0.0.FINAL-jboss-as-7.1.2.Final/standalone/deployments
Verify Opencall war is deployed successfully, verify Opencall log and server log file in log folder: the Opencall log file is named: Opencall-engine.log, server log is server.log
Example:
- Server
21:55:33,724 INFO [org.jboss.as.server] (ServerService Thread Pool -- 29) JBAS018559: Deployed "
opencall-1.1.0-BELADOR.war.deployed"
- Opencall log
16:10:32.095 INFO [Opencall] [Thread-160] | Opencall engine has started succesfully.
- Deployment folder
opencall-1.1.0-BELADOR.war.deployed
WebSockets Installation
- Download Websockets war file*
*File may be already included in Mobicents zip file, so this instruction may not be required.
- Deploy WebSockets war file
Move Opencall war file to the Mobicents deployment folder:
mss-2.0.0.FINAL-jboss-as-7.1.2.Final/standalone/deployments
Verify Websockets war is deployed successfully, verify server log file in log folder: the server log file is named: server.log
- Server
21:55:33,723 INFO [org.jboss.as.server] (ServerService Thread Pool -- 29) JBAS018559: Deployed "websockets-sip-servlet-2.1.0-20121108.113957-1.war"
- Deployment folder
websockets-sip-servlet-2.1.0-20121108.113957-1.war.deployed
Webrtc2sip Installation
Follow the instructions described here, if you want to enable media conversion:
You have the option to install from source or install the packages:
http://autostatic.com/installing-webrtc2sip-on-ubuntu-1204#building_from_source
Configuration
Mobicents configuration
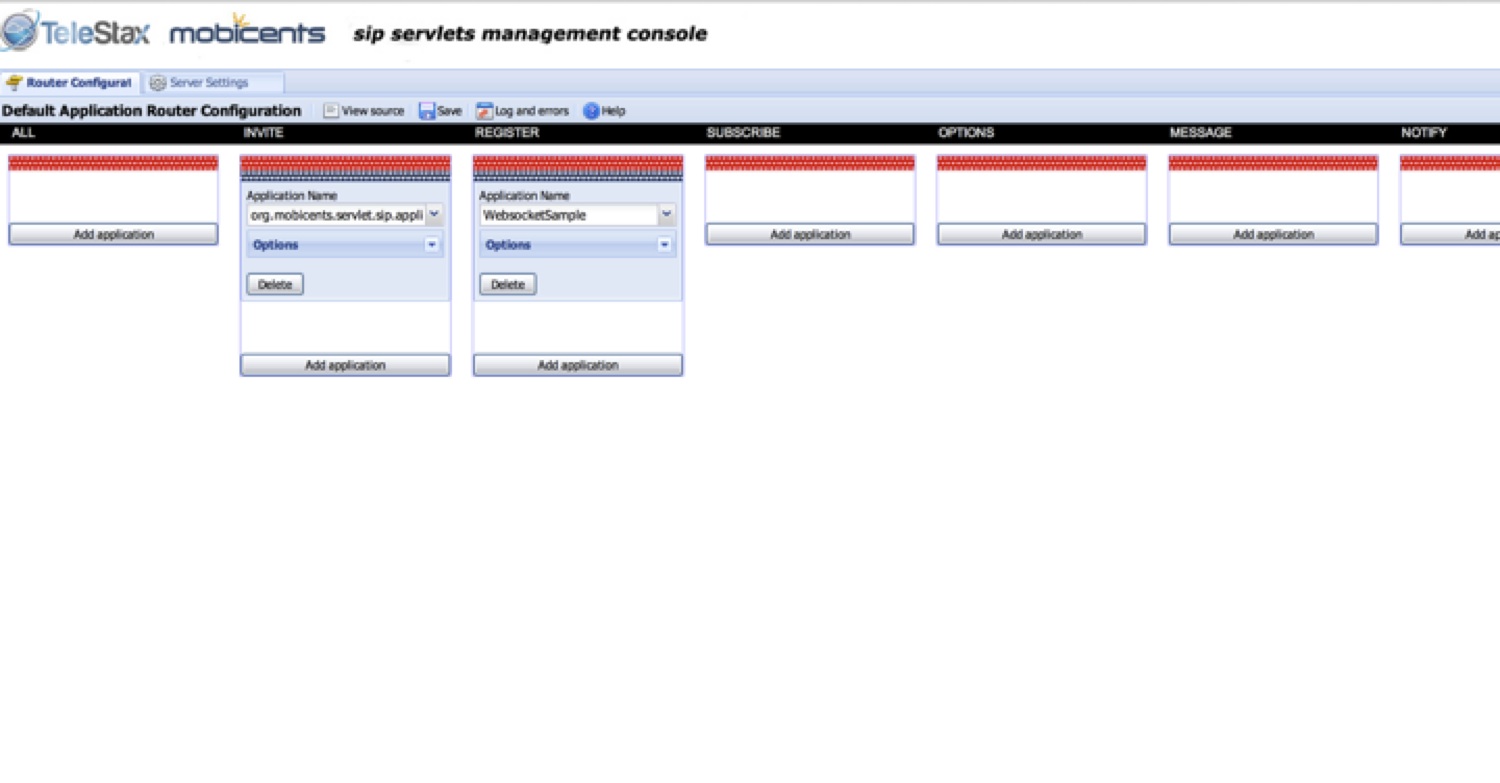
For Mobicents please make sure you configure configuration file properly.
Configure your Default Application Router Configuration and define the proper Application Name.
INVITE: Opencall
REGISTER: WebSockets
Opencall configuration
Configure opencall.ini and define the initial system configuration settings
Configure opencall.ini and define the System Routing rules in order to connect Mobicents to your external system.
Opencall System Configuration
Opencall server will look for opencall.ini located:
mss-2.0.0.FINAL-jboss-as-7.1.2.Final/bin and mss-2.0.0.FINAL-jboss-as-7.1.2.Final/standalone/configuration/opencall in order to start succesfully
opencall.ini
MODE
1 - LOCAL FILE
2 - DB (MYSQL DB)
3 - LOCAL RULES (BUILT-IN) (Not implemented)
DB TYPE
DB TYPE
1 - MYSQL TODO
2 - MONGO DB TODO
3 - MICROSOFT SQL SERVER TODO
MODE 1 must have FILEROUTINGRULES
MODE 2 must have DBTYPE,DBHOSTNAME,DBPORT,DBNAME,DBUSERNAME and DBPASSWORD
MODE 3 does not need any parameters (Not implemented)
Example:
MODE=1
RULE_LIMIT=100
CALLTRANSFORMS=/usr/local/src/mobicents/mss-2.0.0.FINAL-jboss-as-7.1.2.Final/standalone/configuration/opencall/opencalltransforms.cfg
CALLRULES=/usr/local/src/mobicents/mss-2.0.0.FINAL-jboss-as-7.1.2.Final/standalone/configuration/opencall/opencallrules.cfg
CALLROUTELIST=/usr/local/src/mobicents/mss-2.0.0.FINAL-jboss-as-7.1.2.Final/standalone/configuration/opencall/opencallroutelists.cfg
DBTYPE=1
DBHOSTNAME=localhost
DBPORT=3306
DBNAME=opencall
DBUSERNAME=root
DBPASSWORD=
Opencall Route Configuration
Opencall have the option to read call routing rules from a configuration file or from a MySQL DB.
This document describes how to configure opencallrules.cfg to provide call routing rules in order to connect to your system.
Mandatory parameters:
RULE = NUMERIC
PRIORITY = NUMERIC
TYPE = REGEX, WILDCARD, NUMERIC
STRING = VALUE
TARGET = IP ADDRESS, HOSTNAME, _DNS_, ROUTELIST
Optional
PORT and TRANSPORT is not configurable when using _DNS_ lookup
PORT and TRANSPORT is not configurable when using RouteList, you can define parameters there.
Rule Entries Order
RULE NUMBER,RULE PRIORITY, RULE TYPE, MATCH STRING,TARGET, PORT TARGET, TRANSPORT
Example:
ROUTE=("1","10","NUMERIC","14082186000","110.10.0.210","5060","UDP")
ROUTE=("2","5","REGEX","(.*)@videolab.att.com","_DNS_")
ROUTE=("3","10","NUMERIC","201","172.31.43.74","5060","TCP")
ROUTE=("4","10","WILDCARD","20X","172.31.43.74","TCP")
ROUTE=("5","10","WILDCARD","10X","110.10.0.200")
ROUTE=("6","10","WILDCARD","XXXXXXXX","videoalpha.att.com")
ROUTE=("7","10","WILDCARD","XXXXXXXX","videolab.att.com","WSS")
ROUTE=("8","100","WILDCARD","20X","110.10.0.210","5060")
ROUTE=("9","50","WILDCARD","0115255!","110.10.0.200","5060")
ROUTE=("10","50","WILDCARD","0115233!","110.10.0.200","5060")
ROUTE=("11","1","NUMERIC","+525553259000","110.10.0.200","5060")
ROUTE=("12","1","WILDCARD","4XX","110.10.0.220","5060")
ROUTE=("13","100","REGEX","(.*)@.*","_DNS_")
ROUTE=("14","5","REGEX","(.*)@videolab.att.com","_DNS_","5061")
ROUTE=("15","5","REGEX","(.*)@videolab.att.com","_DNS_","TCP")
ROUTE=("16","100","REGEX","(.*)@videolab.att.com","12.5.4.3","TCP")
- Verify Opencall war file is deployed successfully.
$ pwd
/Users/gogasca/Documents/OpenSource/Development/Java/Mobicents/mss-2.0.0.FINAL-jboss-as-7.1.2.Final/standalone/deployments
$ ls -al
-rw-r--r-- 1 root root 11 Feb 28 2013 jolokia.war.deployed
-rw-r--r-- 1 root root 1169838 Nov 6 07:58 opencall-1.1.0-BELADOR.war
-rw-r--r-- 1 root root 26 Nov 6 07:58 opencall-1.1.0-BELADOR.war.deployed
-rw-r--r-- 1 root root 8870 Jul 16 22:33 README.txt
-rw-rw-r-- 1 root root 408732 Nov 6 00:37 sip-servlets-management.war
-rw-r--r-- 1 root root 27 Nov 6 00:37 sip-servlets-management.war.deployed
-rw-rw-r-- 1 root root 649785 Nov 6 00:35 websockets-sip-servlet.war
-rw-r--r-- 1 root root 26 Nov 6 00:35 websockets-sip-servlet.war.deployed
WebSockets configuration
- After verifying websockets war file is deployed successfully, you can proceed to configure sipML5
$ pwd
/usr/local/src/mobicents/mss-2.0.0.FINAL-jboss-as-7.1.2.Final/standalone/deployments
$ ls -al
-rw-r--r-- 1 root root 11 Feb 28 2013 jolokia.war.deployed
-rw-r--r-- 1 root root 1169838 Nov 6 07:58 opencall-1.1.0-BELADOR.war
-rw-r--r-- 1 root root 26 Nov 6 07:58 opencall-1.1.0-BELADOR.war.deployed
-rw-r--r-- 1 root root 8870 Jul 16 22:33 README.txt
-rw-rw-r-- 1 root root 408732 Nov 6 00:37 sip-servlets-management.war
-rw-r--r-- 1 root root 27 Nov 6 00:37 sip-servlets-management.war.deployed
-rw-rw-r-- 1 root root 649785 Nov 6 00:35 websockets-sip-servlet.war
-rw-r--r-- 1 root root 26 Nov 6 00:35 websockets-sip-servlet.war.deployed
Chrome configuration
- Open Chrome and verify you have network connectivity to Internet and local server where Opencall is running.
SipML5 configuration
The live demo doesn't require any installation and can be used to connect to any SIP server using UDP, TCP or TLS transports. Open the following URL and start provisioning information. Open the following URL:
Labels:
2 Comments
You must be a registered user to add a comment. If you've already registered, sign in. Otherwise, register and sign in.
Getting Started
Find answers to your questions by entering keywords or phrases in the Search bar above. New here? Use these resources to familiarize yourself with the community:
Customers Also Viewed These Support Documents