- Cisco Community
- Technology and Support
- Collaboration
- Collaboration Knowledge Base
- Automatically Deploying CUCI-IBM Plug-ins
- Subscribe to RSS Feed
- Mark as New
- Mark as Read
- Bookmark
- Subscribe
- Printer Friendly Page
- Report Inappropriate Content
- Subscribe to RSS Feed
- Mark as New
- Mark as Read
- Bookmark
- Subscribe
- Printer Friendly Page
- Report Inappropriate Content
on
05-15-2013
01:31 AM
- edited on
03-25-2019
06:30 PM
by
ciscomoderator
![]()
Introduction
Cisco has provided client side plug-in integrations for the standalone and Notes integrated versions of Sametime for many years. The newest Cisco plug-in “CUCI-IBM-Sametime” adds, amongst other features, an Audio/Video softphone, which makes it easy to establish communications with other telephony and video devices. As interest grows in an integrated companywide Unified Communications platform that uses Cisco plug-ins to link the IBM and Cisco domains together at some point the following question will arise; “how do we actually roll out Cisco plug-ins”?
During most proof of concepts the plug-ins are usually manually installed, client by client using the local plug-in installation options, but this is clearly not practical for a production environment.
Thus, the aim of this informal document is to walk you through a mass deployment example for the two consumption models for Sametime:
- Lotus Notes configured with an integrated Sametime sidebar.
- A standalone Sametime Connect client
Note: This application note relates to the client side plug-ins that are available from Cisco Connection Online (CCO) but does not cover the installation of the WebEx Sametime plug-in, which is deployed using WebEx Productivity Tools.
Two Different Approaches
The Cisco Sametime plug-ins are deployed differently depending on whether your organization uses the standalone Sametime Connect client or utilises Sametime from the integrated Notes sidebar. The two deployment examples highlighted in this document either use Domino or Sametime Server management tools.
Note: The two laboratory tested deployment scenarios in this application note are intended as an unsupported guide for customers and partners and the information presented comes for laboratory testing. As the IBM tools described later in this document are intended for generic IBM and 3rd party plug-in
roll outs, any specific functional and troubleshooting questions about these tools should be addressed by your IBM support team.
The two approaches identified by this document are not necessarily the only mechanisms available to deploy 3rd party (Cisco) plug-ins into a Sametime environment. Experienced IBM administrators may recommend alternative approaches more suited to their own customized environment.
The IBM SW versions used for testing were: Domino 8.5.2, Notes 8.5.3 and Sametime 8.5.2.
Notes Integrated Sametime Sidebar
The tested deployment approach for integrated Sametime clients is to utilise Notes widgets to centrally roll out the Cisco plug-ins. There are a number of widget definitions available on the web but in the context of a Cisco plug-in a widget is simply a XML file that references a plug-in (for example, CUCI-IBM-Sametime) and also includes additional informational elements such as the plug-in version number. Sample widget files are provided later in this document. An overview of the deployment process is shown below:
Figure 1 – An Overview of the Deployment Process
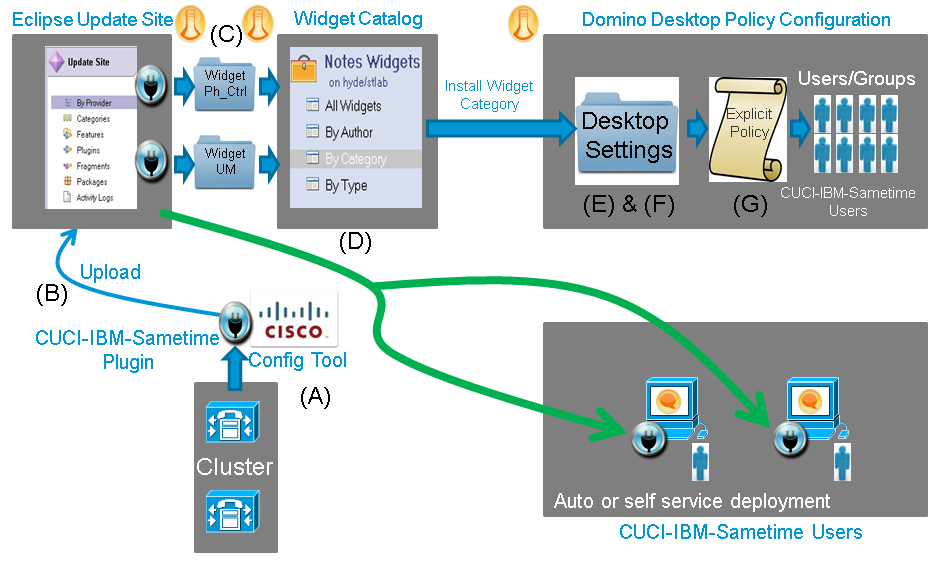
The steps used in the test lab to push the Cisco plug-ins to the lab clients were as follows:
Step A – Configure the Cisco Plug-in
The client side plug-ins that are downloaded from CCO ship with a configuration utility that is used to set the parameters required for the customer’s specific Cisco and Sametime environments. Detailed configuration guidance can be found here:
http://www.cisco.com/en/US/partner/products/ps12774/tsd_products_support_configure.html
Step B – Upload the Cisco Plug-in to the Domino Eclipse Update Site
Domino 8.X provides an Eclipse Update site template that allows you to create a NSF-based plug-in store for the Cisco (and any other) plug-ins. The instructions that explain how to initialise the plug-in repository are provided here:
By following the steps provided in the Domino documentation you will be able to upload your configured plug-ins as shown below.
Figure 2 – Importing Plug-ins to the Update site
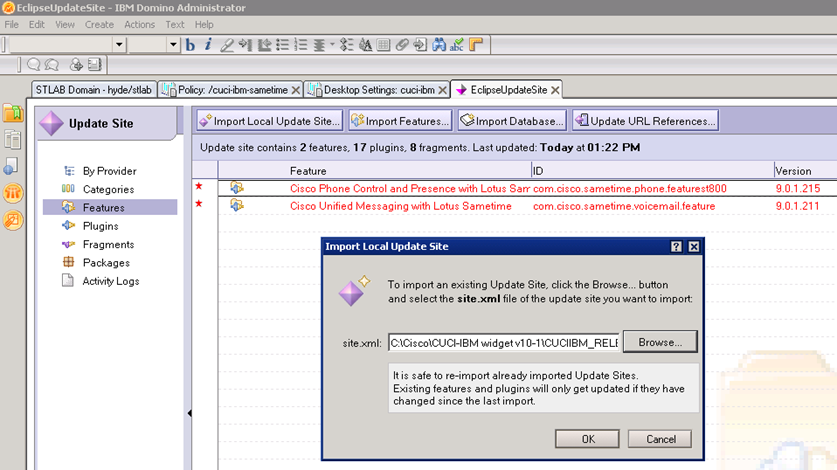
In the lab example shown above, it can be seen that CUCI-IBM-Sametime uploads as two separate plug-ins, one listed as Phone Control and Presence and the second as Unified Messaging. This is the same naming convention as the older (non Client Services Framework) enabled plug-ins, but you can identify the CUCI-IBM-Sametime plug-in by its 9.X (or above) version number.
As there are two plug-ins in the update store, two Notes widgets are created in Step C to install each plug-in separately.
Step C – Create the Cisco Plug-in widget’s XML file
The following Cisco plug-in widget file was used for the CUCI-IBM-Sametime Phone Control element. In the Cisco lab environment the XML widget files were stored on the Domino server in an appropriately named windows folder. The text highlighted in bold is specific to the lab configuration:
<?xml version="1.0" encoding="UTF-8"?>
<webcontextConfiguration version="1.1">
<palleteItem id="com.cisco.sametime.phone.featurest800" imageUrl=""
providerId="com.ibm.rcp.toolbox.prov.provider.ToolboxProvisioning"
title="cuci-ibm phone control"
url="nrpc://hyde.stlab.net/__802579b400578e10/site.xml">
<preferences>
</preferences>
<data>
<installManifest>
<![CDATA[
<install>
<installfeature description="cuci-ibm phone control"
id="com.cisco.sametime.phone.featurest800"
name="cuci-ibm phone control"
required="true">
<requirements>
<feature id="com.cisco.sametime.phone.featurest800" version="9.0.1.215"/>
</requirements>
</installfeature>
</install>
]]>
</installManifest>
</data>
</palleteItem>
</webcontextConfiguration>
The information required to customize your XML widget is easily obtained from the Eclipse Update Site.
Figure 3 – Identifying the XML file’s plug-in settings

The “cuci-ibm phone control” text is simply an administrator defined label and is used in the “title”, “Installfeature” “description” and “name” fields.
For completeness the CUCI-IBM-Sametime Messaging widget is shown below:
<?xml version="1.0" encoding="UTF-8"?>
<webcontextConfiguration version="1.1">
<palleteItem id="com.cisco.sametime.voicemail.feature" imageUrl=""
providerId="com.ibm.rcp.toolbox.prov.provider.ToolboxProvisioning"
title="cuci-ibm messaging"
url="nrpc://hyde.stlab.net/__802579b400578e10/site.xml">
<preferences>
</preferences>
<data>
<installManifest>
<![CDATA[
<install>
<installfeature description="cuci-ibm messaging"
id="com.cisco.sametime.voicemail.feature"
name="cuci-ibm messaging"
required="true">
<requirements>
<feature id="com.cisco.sametime.voicemail.feature" version="9.0.1.211"/>
</requirements>
</installfeature>
</install>
]]>
</installManifest>
</data>
</palleteItem>
</webcontextConfiguration>
Step D – Add the Cisco widget to the Domino Widget Catalog
Domino 8.X supports a native Widget Catalog which can be created using the following IBM documentation:
Figure 4 – The Domino Widget Catalog

When you add each widget to the Domino catalog you will be taken to the following screen. Fill out the title and description and add the XML file as shown below:
Figure 5 – Adding a Cisco Widget to the Catalog
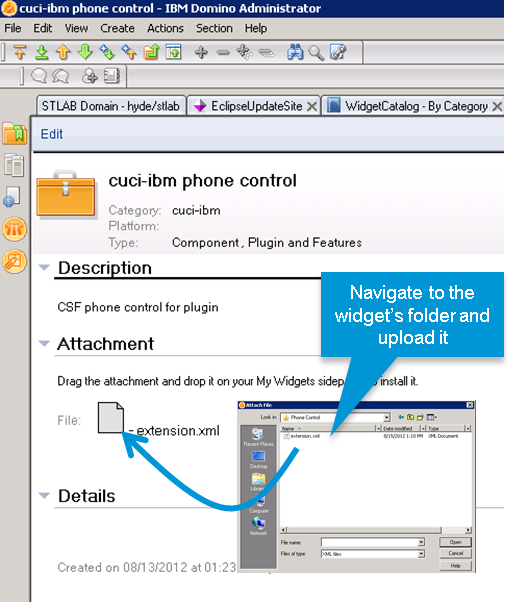
An important administrative consideration is the creation of a Widget Category. As shown in the Figure above the Category used in the Cisco lab was labelled “cuci-ibm”. In large scale deployments, where you might need to create different plug-in files associated with different Cisco Unified Communications Manager clusters, you will create multiple widgets; the widgets for each different cluster should be placed into differently labelled Categories.
Recommendation: create your own meaningful category label so it is easily identified for use during the policy based deployment procedure described in the following steps.
Step E – Configure the desktop settings for the Cisco widget
After the successful completion of Step D the Cisco plug-ins are ready for deployment via the Notes widgets you have created. Lotus Notes desktop policy settings will now be used to make the widgets available, to the distributed client population. The Domino desktop settings are created and accessed from the People & Groups tab via a Domino Administrator client. See below:
Figure 6 – Accessing Settings via the People & Groups Tab
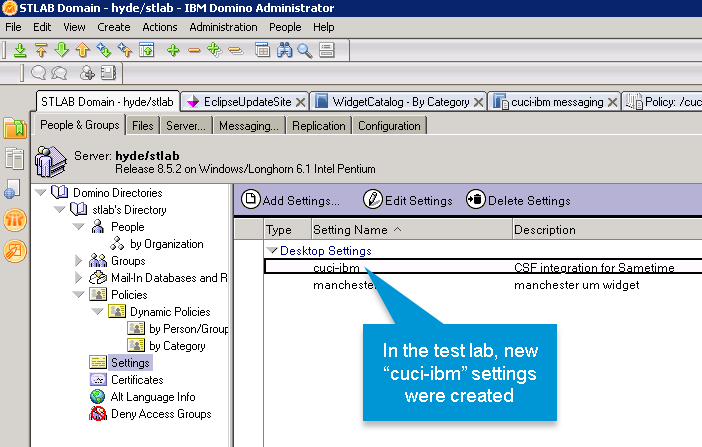
In the Cisco lab the cuci-ibm Widget settings were configured as shown in the following diagram.
Figure 7 – cuci-ibm Widget Desktop Settings
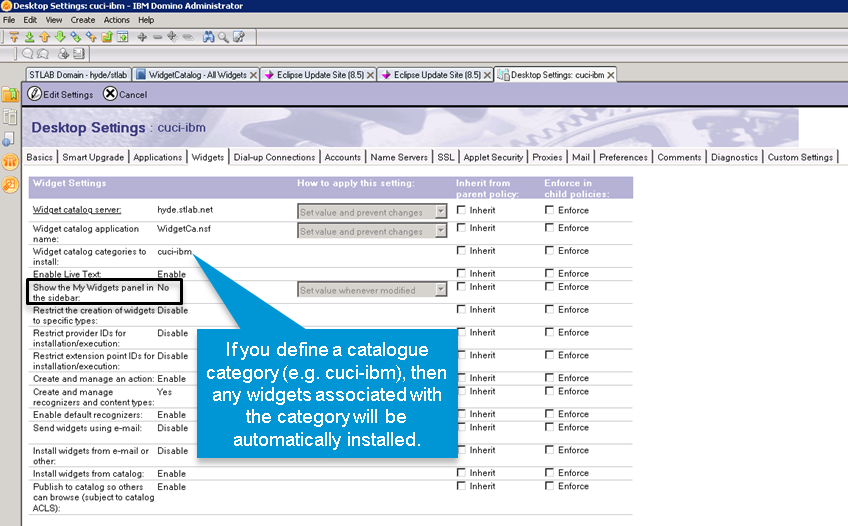
The IBM documentation states that when the Widget desktop settings document includes a catalog category” then any associated widgets will be automatically deployed and updated the next time the Lotus Notes user logs into their client.
Step F – Configure a managed plugin_customization_ini setting for the roll out
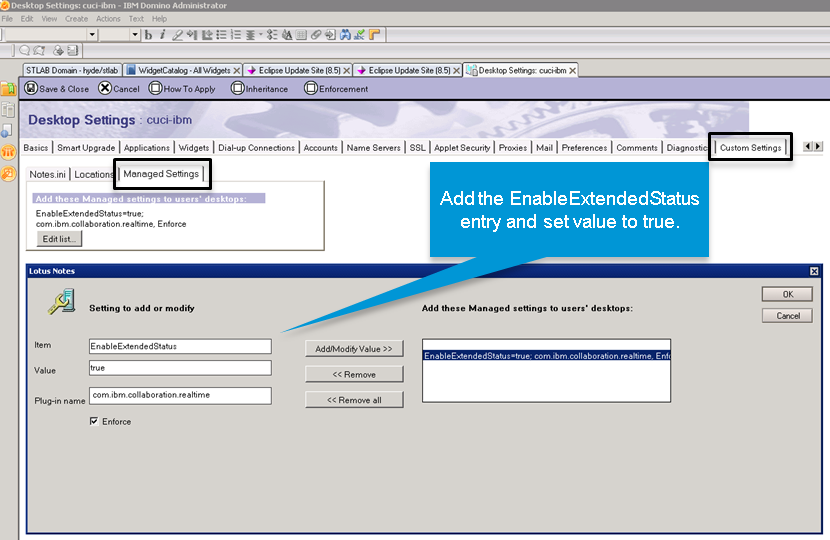
To support 3rd party presence capabilities, such as a CUP controlled onhook/offhook phone status icon, the Sametime client needs the EnableExtendedStatus setting (normally found in the Sametime client’s “plugin_customization.ini file) set to enabled. From Sametime version 8.5.1 and above, this parameter is no longer enabled by default and needs to be configured during the plug-in deployment. There are many ways this might be achieved, in the Cisco lab the “Custom Settings” tab was used to automatically set EnableExtendedStatus=true.
Figure 8 – Adding the EnableExtendedStatus=true to the cuci-ibm settings
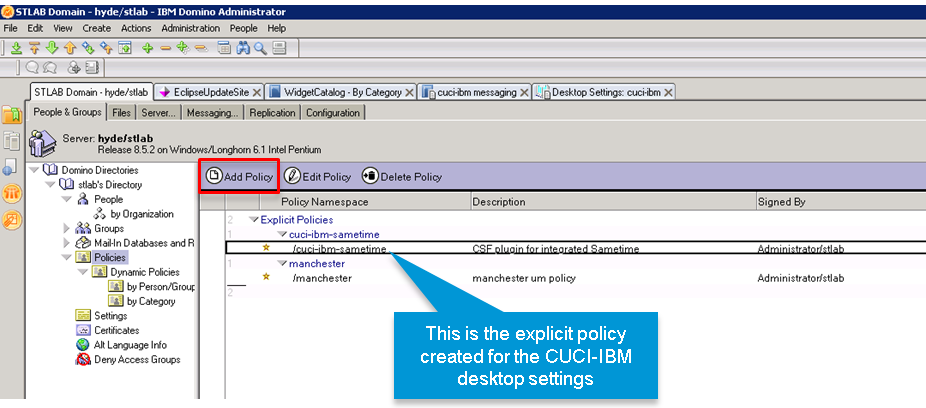
Step G – Create an explicit desktop policy; then assign users
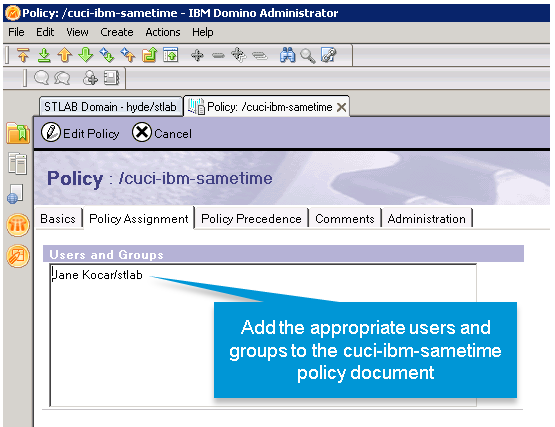
To install the plug-ins you will need to assign the Desktop Settings that contain the Widgets and Custom Settings to a policy document that is applied to the target user community.
In the Cisco lab a specific Explicit Policy document was created as shown below:
Figure 9 – Adding the cuci-ibm-sametime Policy Document
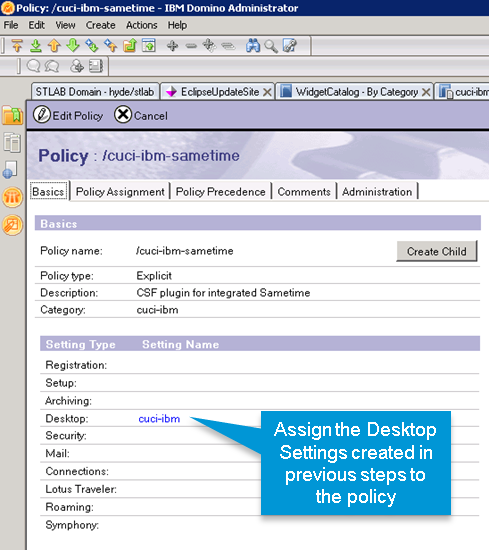
During the policy document creation you need to assign the Desktop Settings that include the Widgets and Custom Settings defined in earlier steps.
Figure 10 – Assign the cuci-ibm Desktop Settings to the Policy Document
You then need to add the CUCI-IBM-Sametime users to the policy document. There are a couple of ways this can be done. The first is to add the policy assignment directly to an individual’s Person document or the second is to use the IBM recommendation (determined from pop up messages in Domino), which is to add the names and groups of CUCI-IBM-Sametime users directly into the policy document via the Policy Assignment tab.
Figure 11 – Assign the CUCI-IBM-Sametime plug-in users to the Policy Document
At this point if the widget is properly formatted, the Desktop Settings are correctly configured and the appropriate users have been assigned to the policy you are ready to begin testing the deployment.
Testing the desktop settings
Auto Deployment
As previously mentioned when you add Cisco widgets to a specific category and include it in the Widgets configuration created in the Desktop Settings document, the widget and then by association the CUCI-IBM-Sametime plug-ins will be deployed, assuming WidgetCatalog Replication and Sync is enabled appropriately, the next time the user logs onto their Notes client. To test automatic installation, perform the following:
- Install the Notes 8.5.3 client and upgrade the Sametime sidebar to 8.5.2
- Add the Notes user to the CUCI-IBM-Sametime policy document
- Log onto the Notes client. After a short period of time you should receive the plug-in installation window. You may need (depending on your plug-in_customization.ini or policy settings) to manually select “Install this plug-in”.
Figure 12 – Plug-in Install window
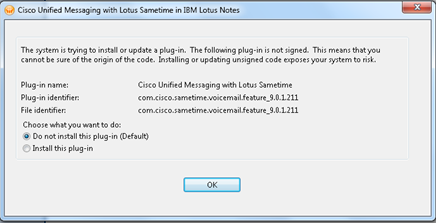
Remember if you create two widgets there will be two plug-ins to install and the end user may receive a separate install window for each plug-in.
Self Service Deployment:
Alternatively if a self service installation model is preferred then one way of achieving this is to set the “Show the My Widgets panel in the sidebar” to Yes. The end user can then “browse the widget store” from the integrated Sametime client and install the widgets by dragging and dropping them into the “My Widgets” window.
Figure 13 – Self Service Deployment

You can force the Sametime client to ignore the signature warning (shown in Figure 12 above) and automatically install the plug-in by add the following commands into the plugin_customization.ini file:
- com.ibm.rcp.security.update/EXPIRED_SIGNATURE_POLICY=ALLOW
- com.ibm.rcp.security.update/UNSIGNED_PLUG-IN_POLICY=ALLOW
- com.ibm.rcp.security.update/UNTRUSTED_SIGNATURE_POLICY=ALLOW
Note: There are also policy settings in Domino that can be used to ignore the unsigned plugin warning and force an automatic install.
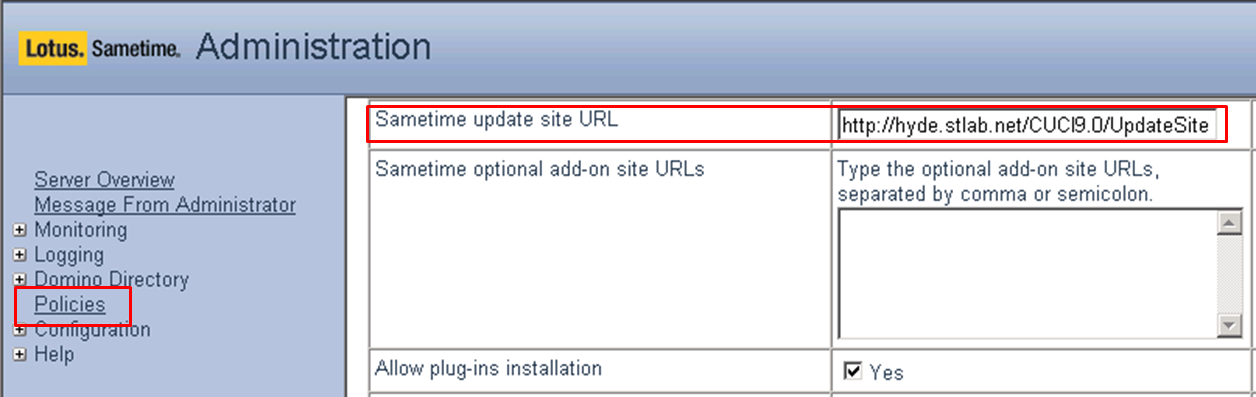
Standalone Sametime Connect
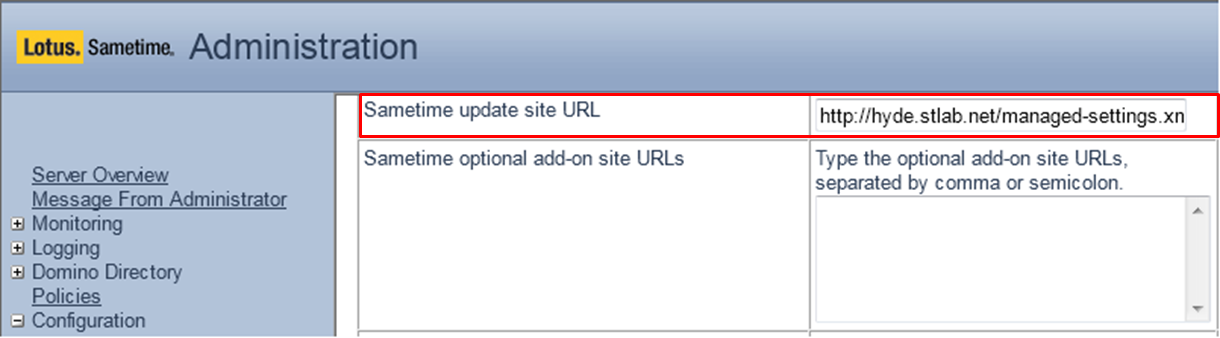
The deployment approach for the standalone Sametime Connect client relies on the generic “update site URL” tool available on the Sametime server. The basic configuration procedure is to place the configured plug-in on a HTTP share (this could be the HTML directory on the Sametime server) and then insert the URL of the plug-in location into the Sametime server field shown in the diagram below. The “update site URL” field is available in each separate Sametime policy.
For a large scale environment where there might be separate CUCM clusters (and hence different versions of the Cisco plug-ins), you will need to create different Sametime policy groups for the different CUCM clusters and then ensure the appropriate users are assigned to them.
Fig 14 – Sametime Server Update Site URL
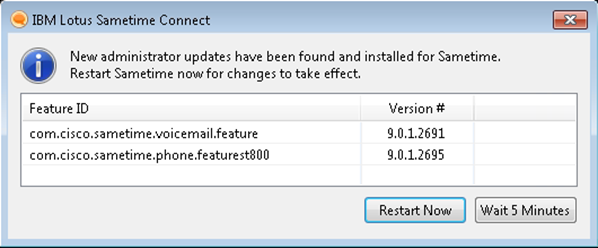
After a server restart, the Cisco plug-in will be deployed and installed shortly after a user has logged onto their Sametime client. They will then be prompted to restart their client.
Figure 15 – Restart the Sametime Client
As is the case for the Sametime Integrated sidebar option for Notes, 3rd party presence support requires the configuration of the EnableExtendedStatus feature. From Sametime versions 8.5.1 and above, this parameter is no longer enabled by default and needs to be configured during the plug-in deployment. One way of achieving this is to create an XML file (managed-settings.xml) that contains the EnableExtendedStatus=true definition, place it on a HTTP share and then use the Sametime Server’s Update site URL tool to push the “plug-in_customization.ini” configuration out to the clients.
Figure 16 – Deploying the EnableExtendedStatus=true Parameter
An example “manage-settings.xml” file is provided below:
<?xml version="1.0" encoding="utf-8"?>
<ManagedSettings>
<settingGroup name="com.ibm.collaboration.realtime">
<setting name="enableSUT" value="false"/>
<setting name="enableTelephonyStatus" value="false"/>
<setting name="enableExtendedStatus" value="true"/>
</settingGroup>
</ManagedSettings>
Using the methodology provided above it should be noted that the roll out of the Cisco plug-ins for Sametime versions 8.5.1 and above requires two separate installation phases, the first one for the plug-in install and the second for the EnableExtendedStatus=true update.
Find answers to your questions by entering keywords or phrases in the Search bar above. New here? Use these resources to familiarize yourself with the community: