- Cisco Community
- Technology and Support
- Collaboration
- Collaboration Knowledge Base
- Integrate IM&Presence (Jabber) with Call Manager (FQDN,DNS,Jabber, Phone CTI control)
- Subscribe to RSS Feed
- Mark as New
- Mark as Read
- Bookmark
- Subscribe
- Printer Friendly Page
- Report Inappropriate Content
- Subscribe to RSS Feed
- Mark as New
- Mark as Read
- Bookmark
- Subscribe
- Printer Friendly Page
- Report Inappropriate Content
05-01-2016 07:58 AM - edited 03-12-2019 10:22 AM
WINDOWS SERVER
Windows server initial configuration to support (AD and DNS resolution(FQDN))
-In this example I will use Windows Server 2008 Enterprise R2.
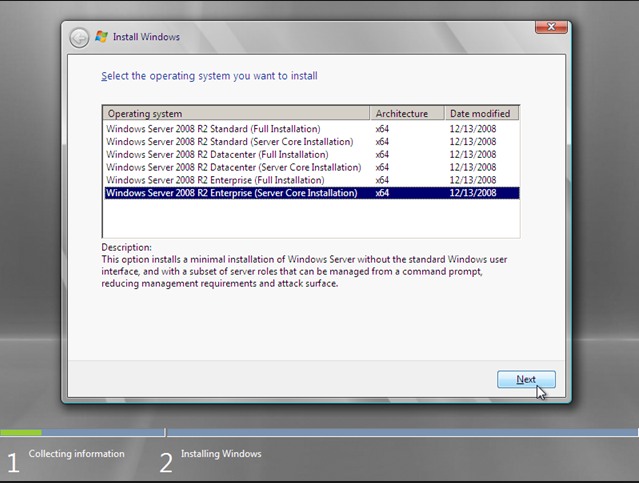
2-When the installation of Windows Server completes go ahead and proceed with the following steps:
1-Go to Start>
2-Control Panel (You can press Windows button + Pause button on the keypad)>
3-Now on System go ahead and click on "Change Settings"
++Under Computer name Tab click "Change"
++Type the desire name that you would be using for the server.
I used the following name:
Computer name= Win-Server
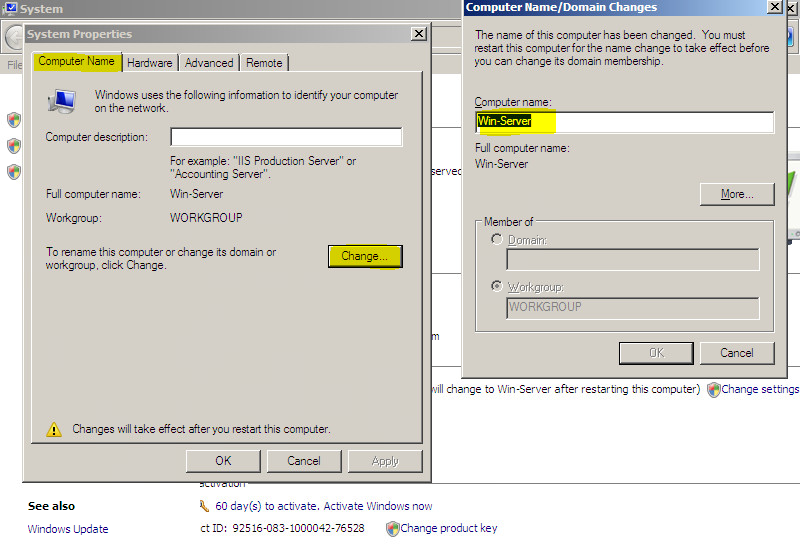
+++After making this change windows will ask you to reboot the PC, please "skip" this step for now and go ahead and change the IP of your PC to the desire IP that you will use for the server+++
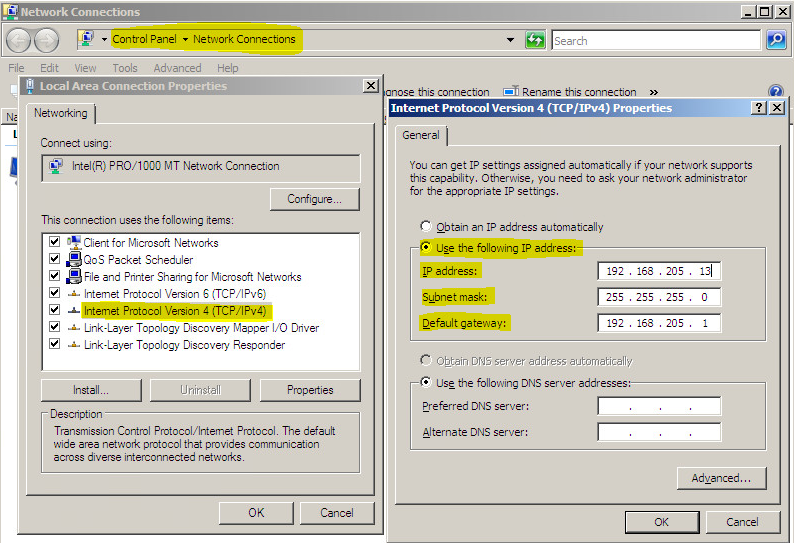
++++++ Now you can REBOOT your computer for changes to take effect ++++++
4-When server comes back go to Server Manager > Roles > Add Roles > Next.
-Under Select Server Roles select "Active Directory Domain Services"
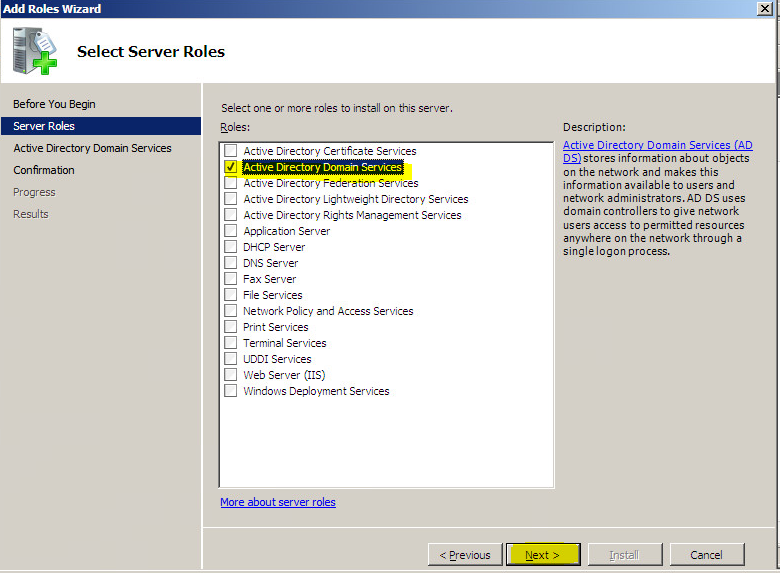
+++Click next> Install; at this point Active directory services would be installing on the Server+++
5- After getting the services installed you will need to enable the fully functional domain controller from (dcpromo.exe)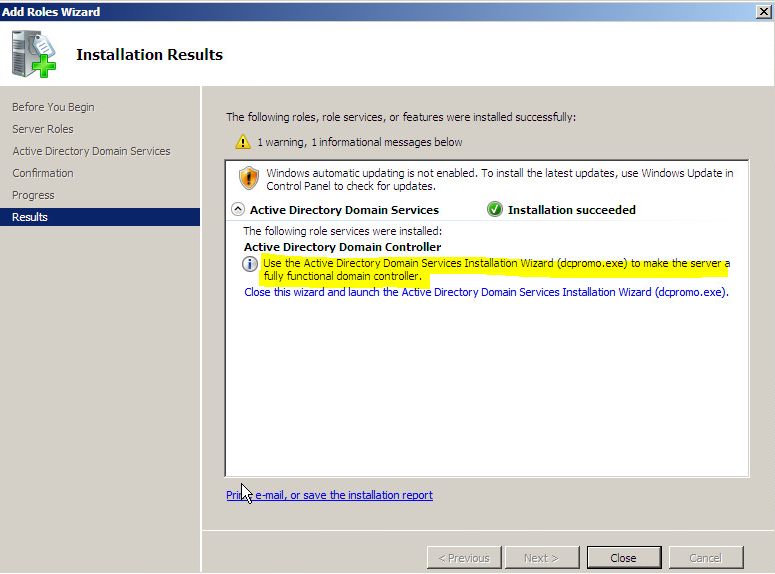
+++++++++Go to start and type dcpromo and click enter+++++++++
Now you will start the activation of the domain services on your server go ahead and click next.
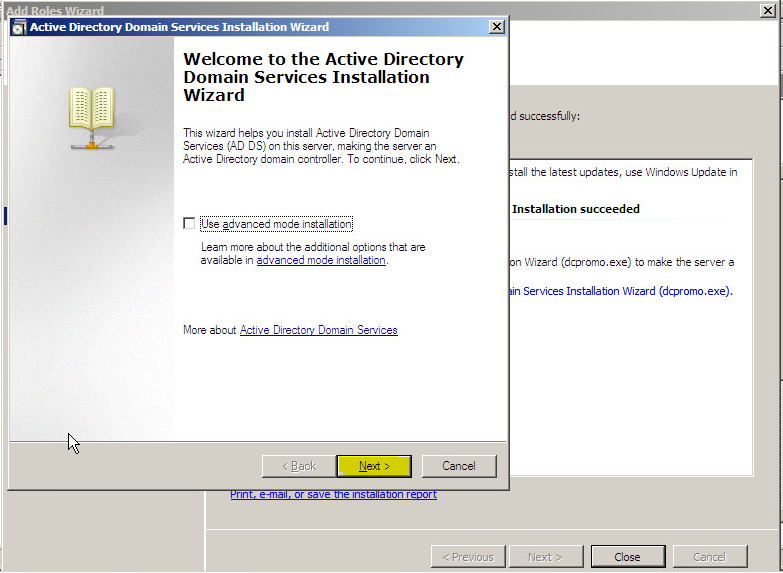
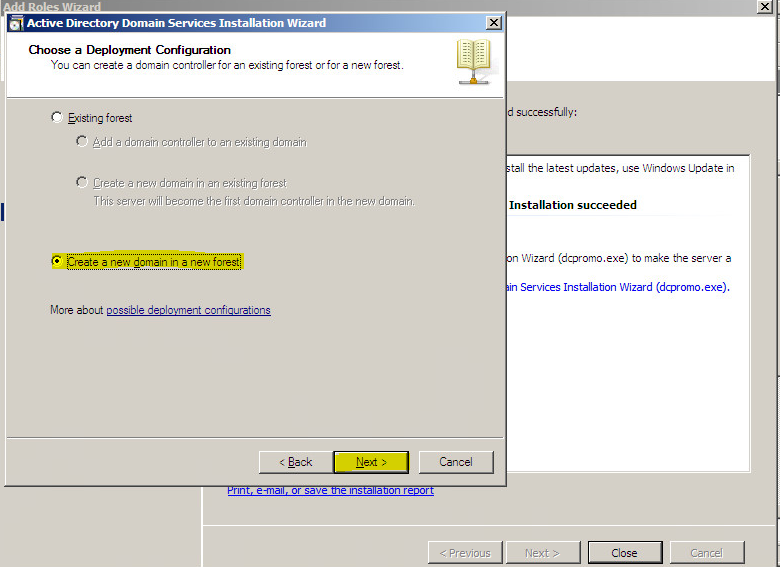
+++Continue activating the services by clicking on next> and now select where it says "create a new domain in a new forest" and next +++
Now you would be creating the domain that you will use (This is used for FQDN functionality). I will use "gerson.com" click next and select Forest functional level to "Windows server 2008 R2"
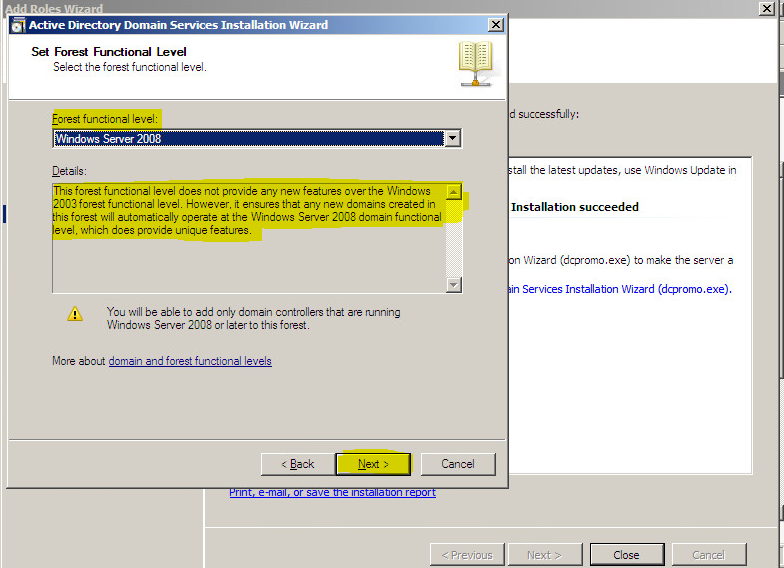
++++Now Click next and select DNS server and click next. You will get a warning just select yes and continue++++
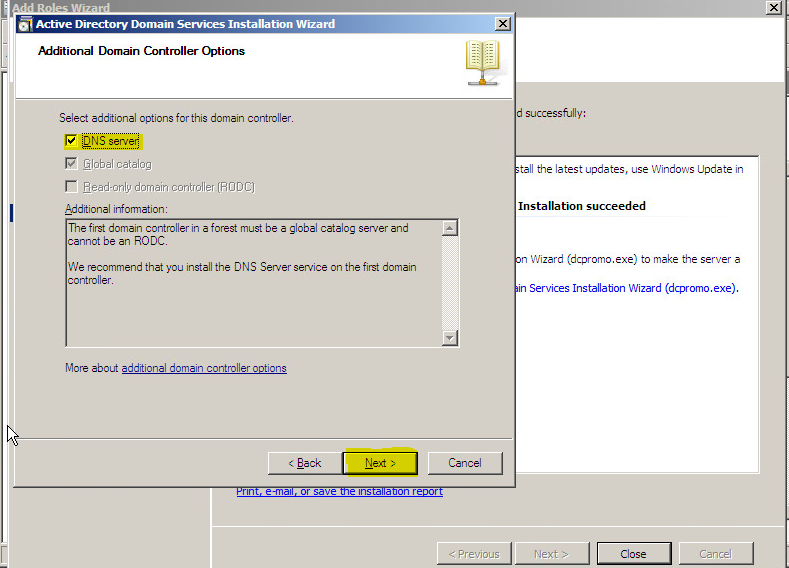
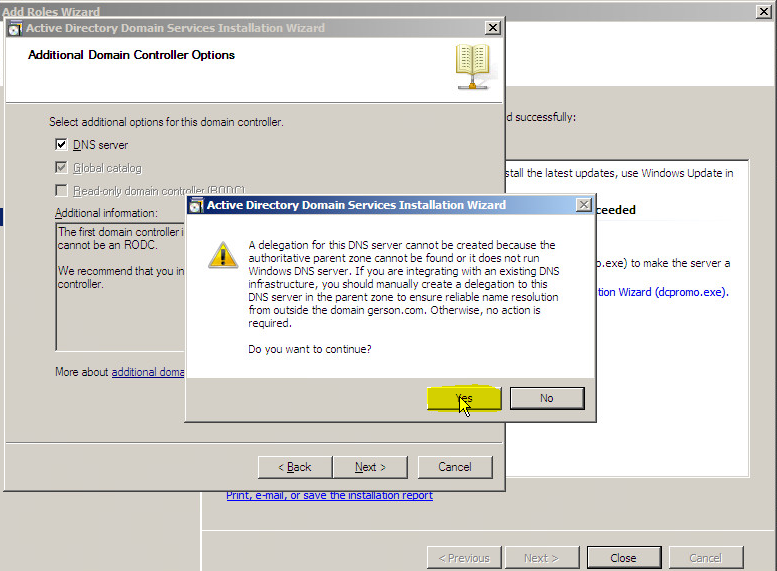
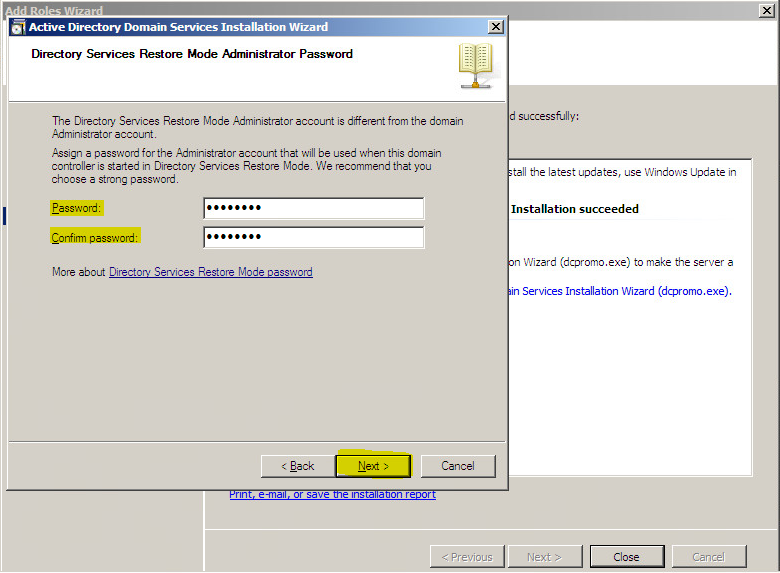
++++ Continue with the activation clicking next> now you will need to type a password for the Administrator account and click next > next ++++
++++ The activation will continue and in a few minutes your server would be ready to use "Active Directory and DNS" ++++
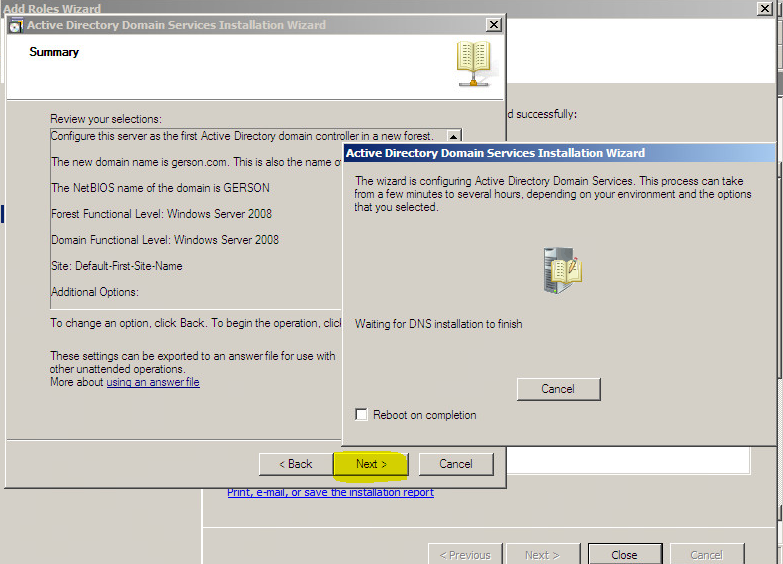
+++++++Activation of domain service is complete now click finish+++++++
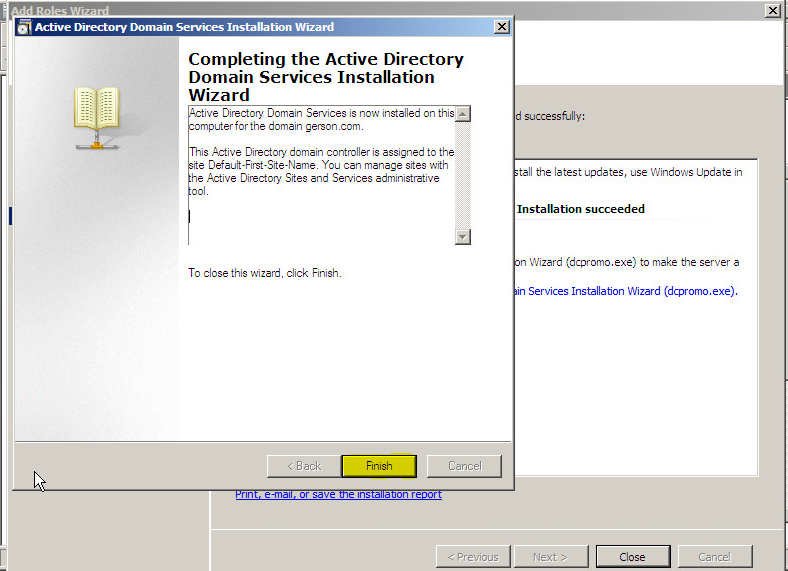
6- When the server comes back now we have Domain Services and DNS fully functional. Lets configure a short-cut to get the services that we need to accomplish the integration of Jabber with Call Manager. (AD and FQDN)
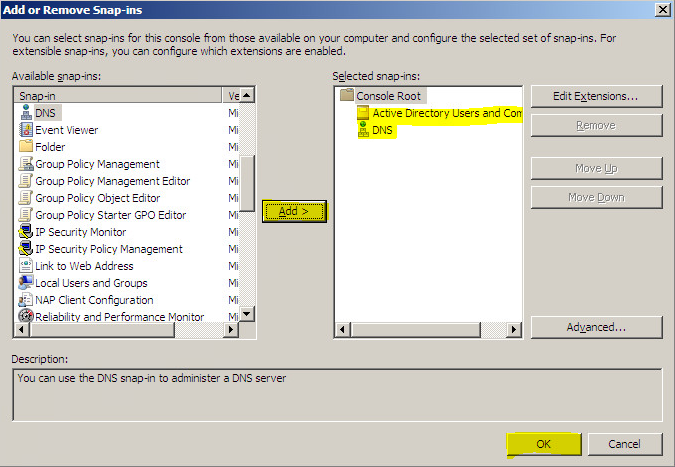
-Now go to start and type "mmc" and press enter; this will access the console root from where we would be able to select the services that we will be using. Go to File> Add/Remove Snap-in...
Now Select:
-Active Directory and Computers.
-DNS.
++++ Move them to the right by clicking on "Add" and then Ok ++++
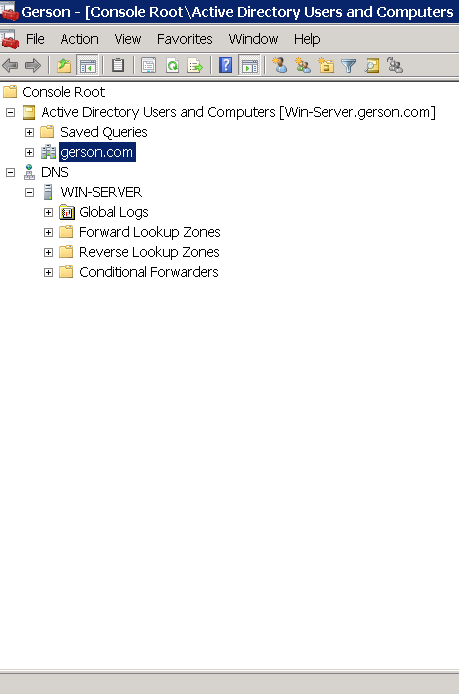
Now you will be able to have your customized Console root to access services. You can go back to file> save as > and save it on your desktop for future access.
DNS Configuration (FQDN)
DNS configuration to support FQDN resolution for Call Manager and CUPS
Deployment:
Windows Server= 192.168.205.13/24
Call Manager= 192.168.205.11
Hostname= CUCM-PUB01
IM&Presence server= 192.168.213.99
Hostname= CUPS-P01
1- Now having the Windows Server fully functional lets go to DNS and click "+" then on WIN-Server click "+" go to Forward Lookup Zones > click the domain name (gerson.com) at this point on the right side of the console root you would be able to see some files that are added by default.

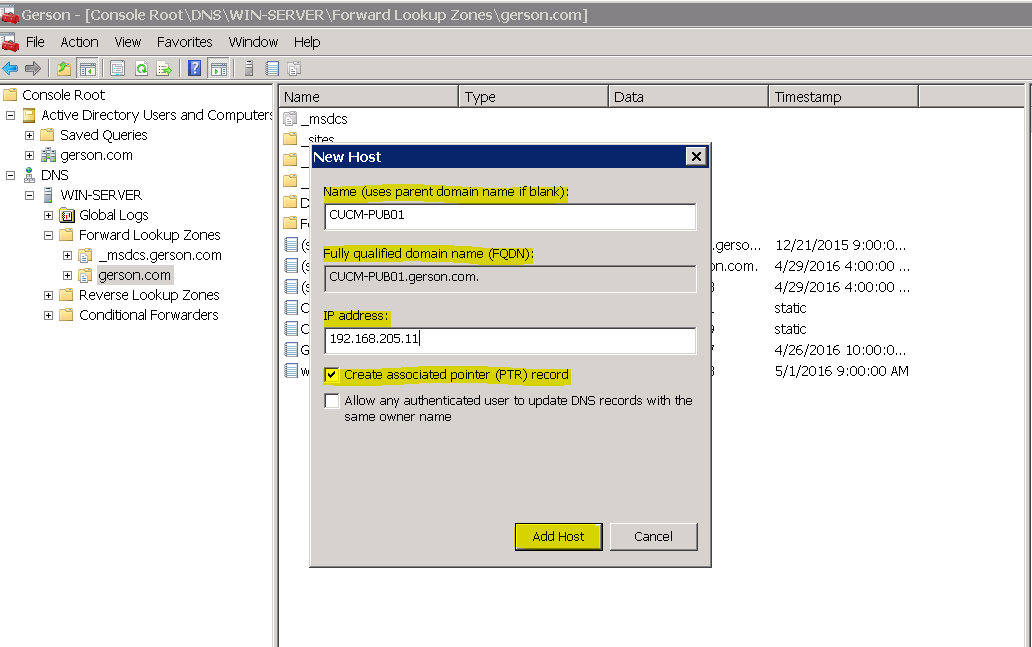
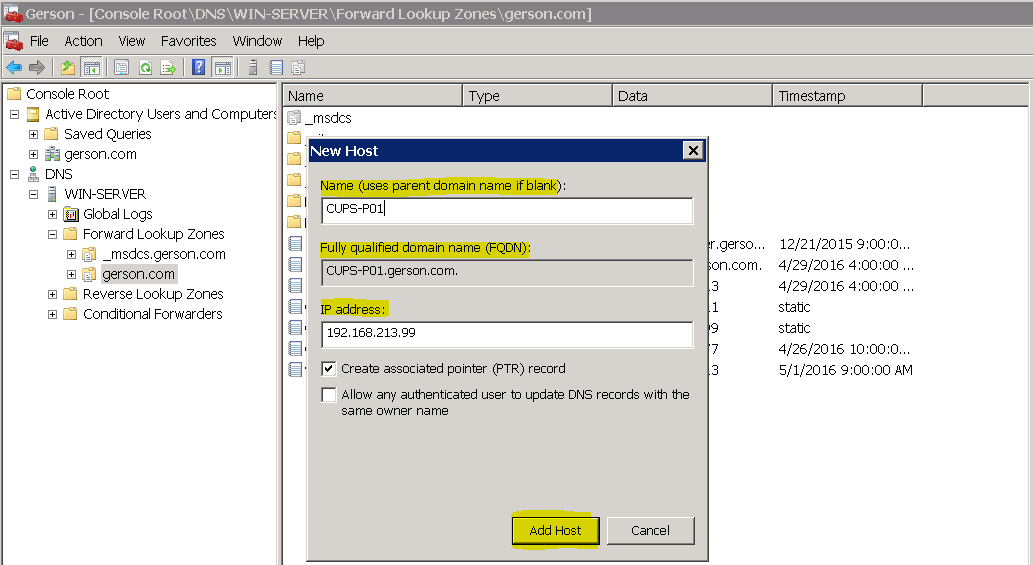
2- After selection the domain in our example (gerson.com) go to the right where default files are located and right click >New Host (A or AAAA)......
++Fill out the information with the following parameters:
-Name= <hostname>
-Ip_address= The desire IP address that you want to use for the host.
-Make sure to select "Create associated pointer (PTR) record"
++Click Add Host
<Call Manager FQDN configuration>
<IM&Presence Server FQDN configuration>
+++For new zones (Subnets) you can go to Reverse Lookup Zones and add a new zone by a right click > New Zone>++
Reverse Lookup Zones
Normal DNS queries are forward lookup queries, they request
the IP address that corresponds to a fully qualified domain name. A reverse lookup
is the opposite of a forward lookup: It returns the fully qualified domain name of
a host based on its IP address.
New Zone is configured when FQDN is used.
"The Active Directory Installation wizard does not automatically add a reverse
lookup zone and PTR resource records, because it is possible that another server,
such as the parent server, controls the reverse lookup zone. You might want to add
a reverse lookup zone to your server if no other server controls the reverse lookup
zone for the hosts listed in your forward lookup zone. Reverse lookup zones and PTR
resource records are not necessary for Active Directory to work, but you need them
if you want clients to be able to resolve FQDNs from IP addresses. Also, PTR resource
records are commonly used by some applications to verify the identities of clients."
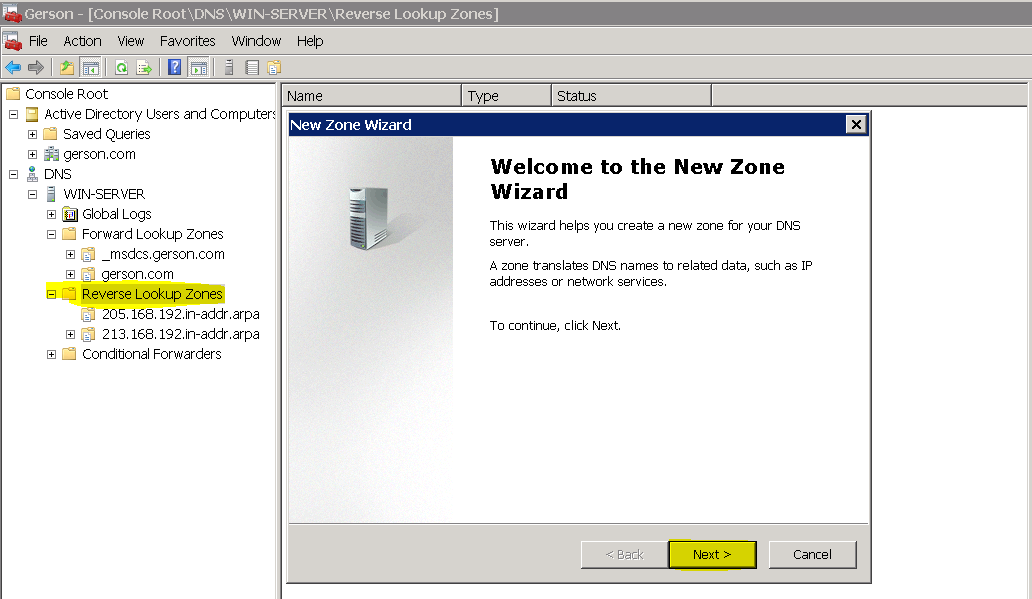
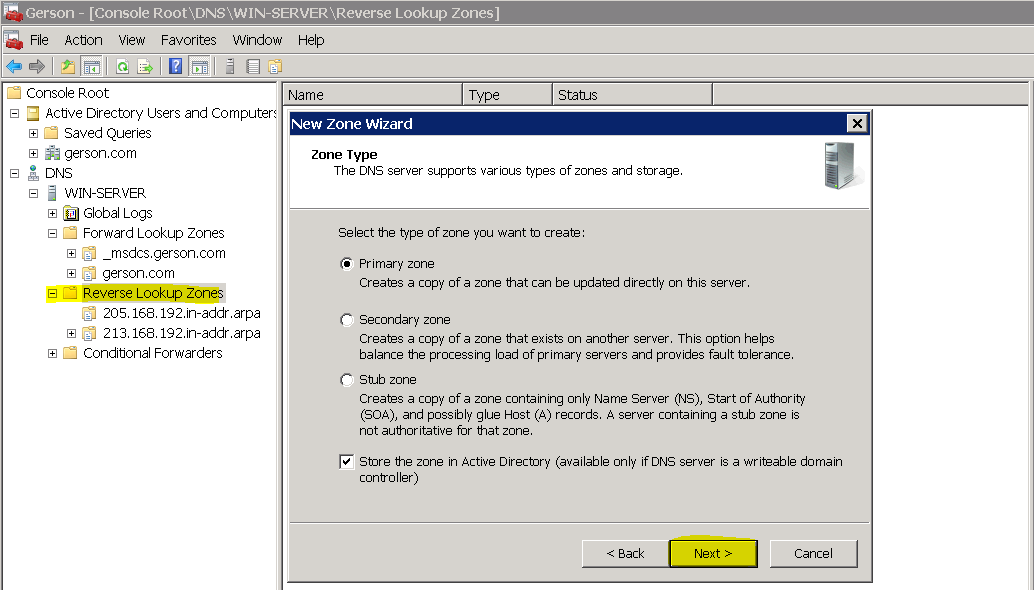

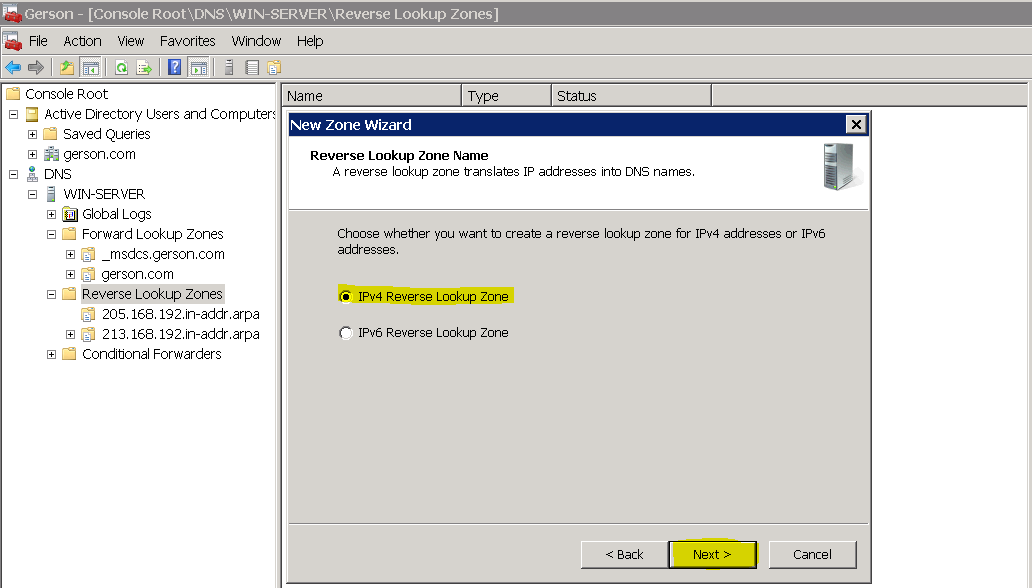
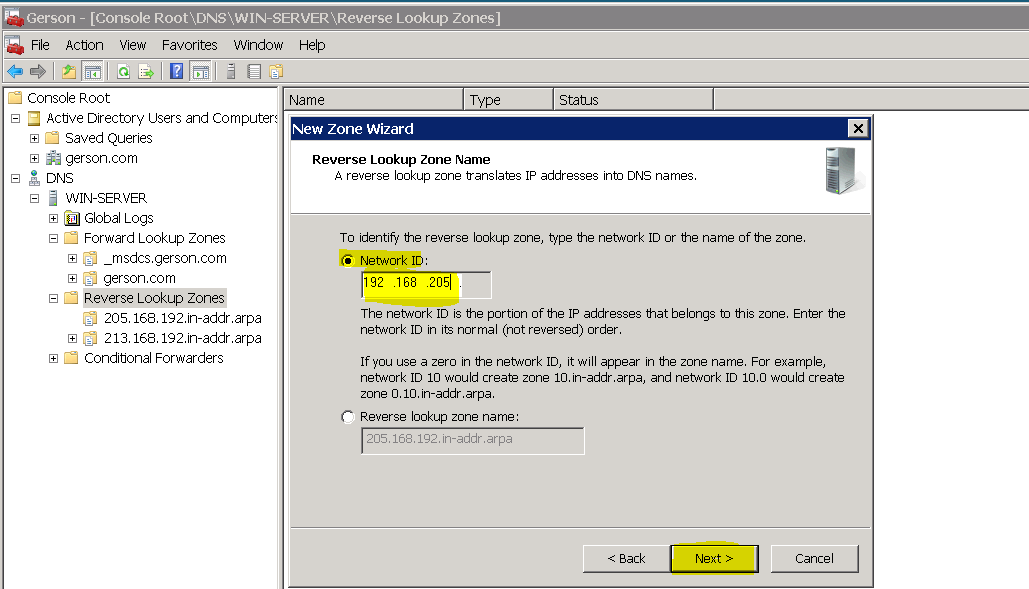
++ At this point we will be good with DNS resolution and FQDN resolution.+++++
Configure "FQDN" and "DNS" on CLI
Configuring DNS and Hostname on CUCM/IM&Presence server over CLI.
1-Open a SSH session for both servers:

Commands
+Command to configure DNS server:
admin: set network dns primary < DNS server ip>
+Command to configure hostname:
admin: set network hostname <hostname>
+Command to configure domain:
admin: set network domain <domain> (example gerson.com)
Note= After making those changes reboot the servers.
To verify the changes after the reboot you can run the following command:
admin: show network eth0 details
CUPS Server verification
CUCM Server verfication
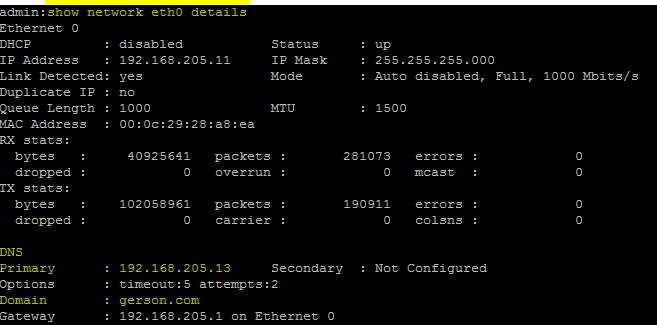
Configuring FQDN (Fully qualify Domain Name) on Call Manager.
Link= https://supportforums.cisco.com/document/12927561/how-change-your-call-manager-server-ip-use-fqdn
(This explanation if from the link above made by myself using different information (hostnames and IP; however use it only as a guide)
1- Go to System > Server (Modify the IP with the FQDN)
FQDN= (Hostname+domain)
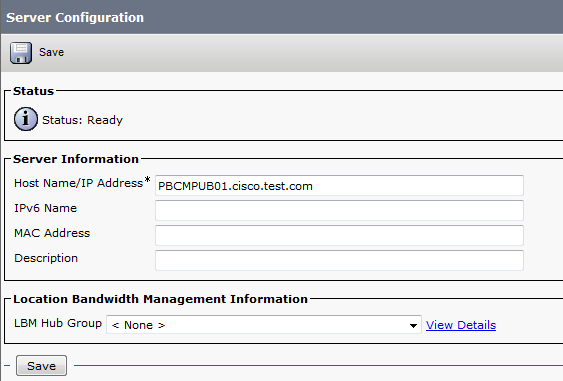
2- Access the "CLI" on the PUB and configure the correct hostname using the following command "set network hostname <hostname>"
Note= This command regenerates the certificates due the network change
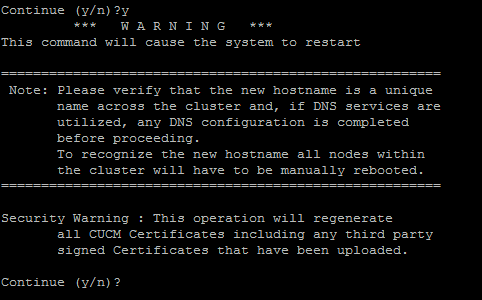
Note= Make sure DNS is already set for hostname resolution.3- Reboot the server. Command "utils system restart"
Note= Make sure to schedule a maintenance window or apply the change after business hours.4- When the server comes back on line go to the CLI and verify the new information using the following commands:
4.a "show myself" (This command will show us the correct hostname)
****************************************
Machine Name : PBCMPUB01 ----> New hostname
account name : admin
privilege level : 4
command count : disabled
logging setting : disabled
****************************************
4.b "show network eth0 details" (This command will show us the correct domain name)
**************************************************************************
Ethernet 0
DHCP : disabled Status : up
IP Address : 132.158.245.200 IP Mask : 255.255.255.000
Link Detected: yes Mode : Auto disabled, Full, 10000 Mbits/s
Duplicate IP : no
Queue Length : 1000 MTU : 1500
MAC Address : 00:50:56:aa:2b:db
RX stats:
bytes : 146277020 packets : 262474 errors : 0
dropped : 0 overrun : 0 mcast : 6002
TX stats:
bytes : 40968236 packets : 224571 errors : 0
dropped : 0 carrier : 0 colsns : 0
DNS
Primary : 132.158.49.2 Secondary : 132.158.127.210
Options : timeout:5 attempts:2
Domain : cisco.test.com
Gateway : 132.158.245.254 on Ethernet 0
**************************************************************************
+++Notice that now we have the complete FQDN in use "PBCMPUB01.cisco.test.com"+++-The last step will be check that the certificate shows up the correct information from the new parameters added above.
4.c "show web-security"
[Version: V3
Serial Number: 75BC0A26FEDB173956069BF44B98B99E
SignatureAlgorithm: SHA1withRSA (1.2.840.113549.1.1.5)
Issuer Name: L=Palm Bay, ST=Florida, CN=PBCMPUB01.cisco.test.com, OU=NSO, O=Cisco Corp, C=US
Validity From: Mon Aug 10 14:32:57 EDT 2015
To: Sat Aug 08 14:32:56 EDT 2020
Subject Name: L=Palm Bay, ST=Florida, CN=PBCMPUB01.cisco.test.com, OU=NSO, O=Cisco Corp, C=US
Key: RSA (1.2.840.113549.1.1.1)
Key value: 3082010a028201010097d840ebce927a1f6c88cafe5d7afe2e633c3d844187d
[ Extension: KeyUsage (OID.2.5.29.15)
Critical: false
Usages: digitalSignature, keyEncipherment, dataEncipherment, keyAgreement, keyCertSign,
Press <enter> for 1 line, <space> for one page, or <q> to quit
]
[
Extension: ExtKeyUsageSyntax (OID.2.5.29.37)
Critical: false
Usage oids: 1.3.6.1.5.5.7.3.1, 1.3.6.1.5.5.7.3.2, 1.3.6.1.5.5.7.3.5,
]
[
Extension: SubjectKeyIdentifier (OID.2.5.29.14)
Critical: false
keyID: 87b435fa1faa5f2cc3aadea9b0181b04b6786cdb
]
Signature:
0000: 0d 7d 2a 94 c3 92 c9 9b 83 cd ba 07 73 e5 49 b7 [.}*.........s.I.]
0010: 6b 39 cc 93 5f 7d 70 61 76 cf e1 dd 6f f6 da 49 [k9.._}pav...o..I]
0020: 4d 5b 4b 1c e6 b4 c2 a3 91 61 3a 39 fa 3f d5 59 [M[K......a:9.?.Y]
0030: b0 ef c4 77 e5 35 b3 34 94 6a 3e f8 96 dc 6c b2 [...w.5.4.j>...l.]
0040: ff 8d 48 49 70 02 08 1c 27 44 56 1b 18 36 b9 8c [..HIp...'DV..6..]
0050: af 53 57 a3 83 6a 73 e9 a9 ff 1b 34 f7 72 37 bd [.SW..js....4.r7.]
0070: bf 18 6e 8c dd 1e 7b 2d 37 73 0c e7 58 87 b0 2f [..n...{-7s..X../]
0080: ab dd 7e e7 b4 c7 76 92 29 68 54 ad 4b 6e db 43 [..~...v.)hT.Kn.C]
0090: 83 a4 27 cb 30 22 44 03 94 c6 83 db b2 ab 60 9a [..'.0"D.......`.]
Press <enter> for 1 line, <space> for one page, or <q> to quit
00b0: 0c 40 9e 23 a6 77 93 86 fc 7c a5 b1 29 92 49 cb [.@.#.w...|..).I.]
00c0: 84 ab 3a 18 39 6b 12 1e 34 2a 53 38 0c 70 b8 68 [..:.9k..4*S8.p.h]
00d0: 40 f9 4a 1e 63 f2 ac bc 67 4f 22 f6 06 07 58 e6 [@.J.c...gO"...X.]
00e0: 22 61 7b 64 8e 4a d1 c2 84 27 da b5 c9 7b e9 bf ["a{d.J...'...{..]
00f0: dc 4e 65 01 c5 28 7d f1 d0 c0 80 d3 c8 06 84 61 [.Ne..(}........a]
********************************************************
Certificate Information:
Organization: Cisco Corp
Organization Unit: NSO
Locality: Palm Bay
State: Florida
Country: US
Valid From: August 10, 2015
Valid To: August 08, 2020
Issuer: PBCMPUB01.cisco.test.com, Cisco Corp
Serial Number:75BC0A26FEDB173956069BF44B98B99E
Notice that the Serial Number must match.
Configuring FQDN (Fully qualify Domain Name) on CUPS.
1-Go to System >Cluster Topology > Under "DefaultCUPSubcluster" you will have your server's name/Ip click edit.

++ Now you can go ahead and add/verify the complete FQDN that you are using on your server.
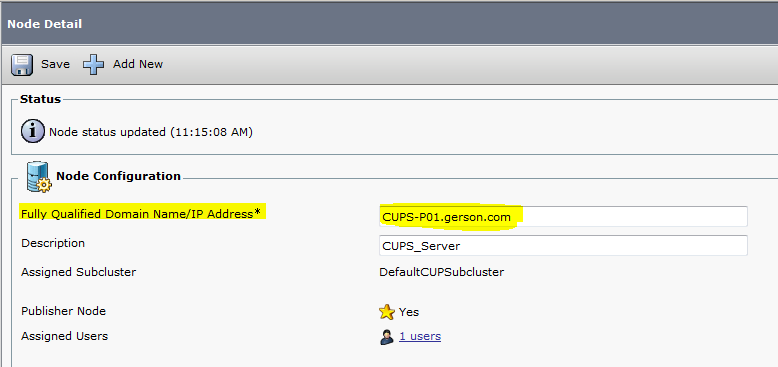
+++ At this point your CUPS server would be ready for integration with Call Manager.
Note= Before you can very this information and modify it, you have to integrate the IM&Presence server with Call Manager using the correct AXL user and password a long with the Call Manager security password to integrate it to the Cluster.
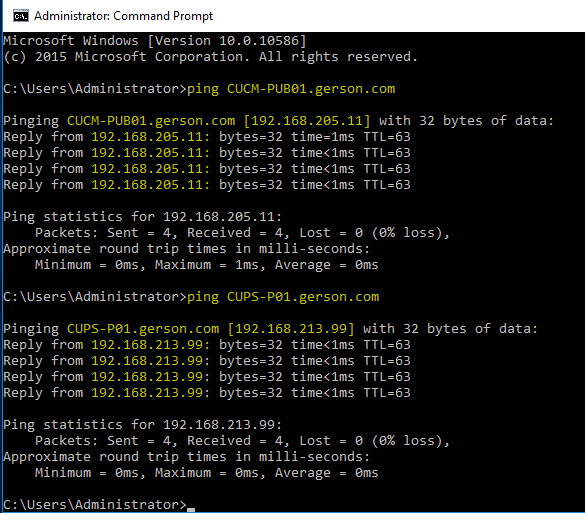
Verifying FQDN resolution.
-Make sure that the PC from were you are using the ping command has already the proper DNS IP address configured to reach out it.
Call Manger= CUCM-PUB01.gerson.com
IM&Presence server= CUPS-P01.gerson.com
Integration: CUCM and IM&Presence
Integrating Call Manager with IM&Presence Server
1- Turn on "Cisco CTIManager Service" Serviceability> tools> Service Activation >Cisco CTIManager.
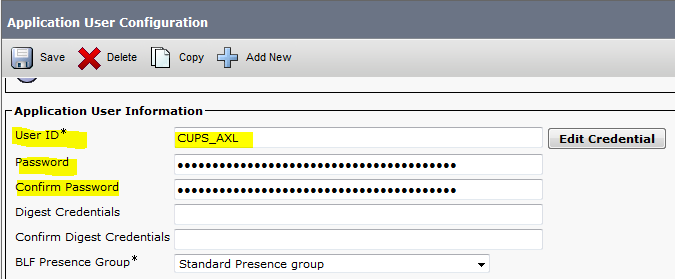
2- Create a "AXL-user", this user will be use also on CUPS Server.
-Go to Cisco Unified CM Administrator> Uer Management> Application user > Add new .
-Create User ID= CUPS_AXL (example)
-Set up a password. (Important, save it)
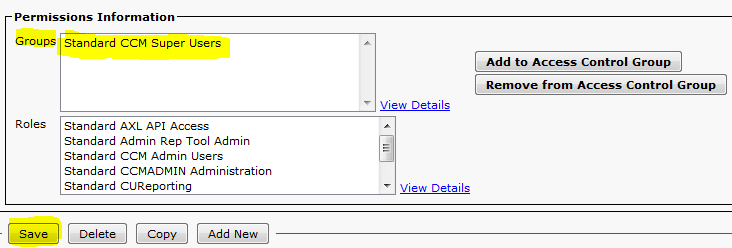
-Groups= Standard CCM Super Users.
-Save
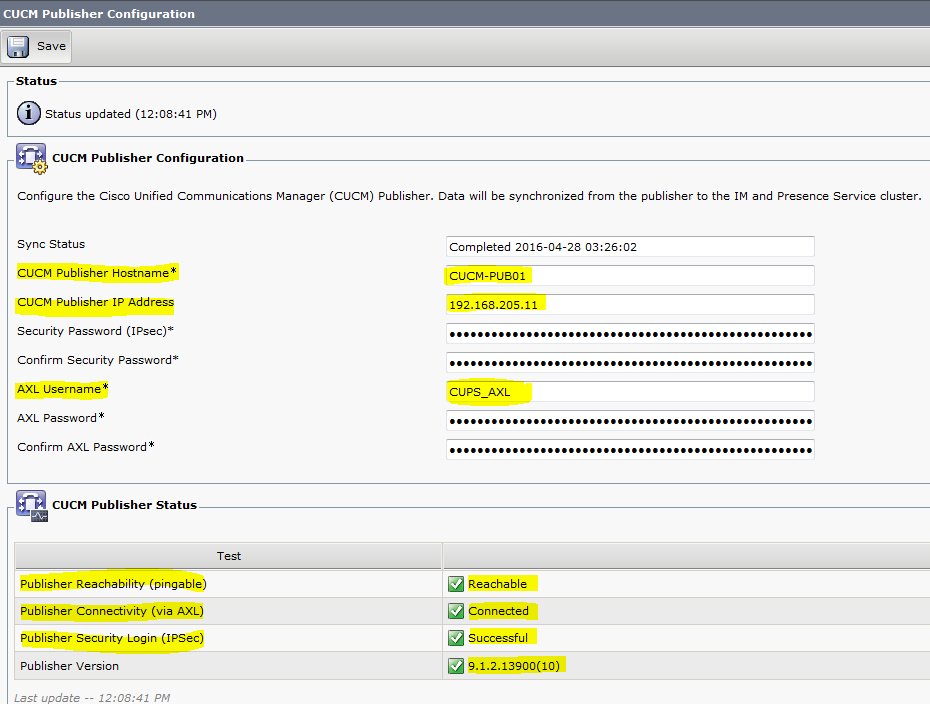
3-Go to the IM&Presence server and fill out the requested information.

4- Now is time to add the AXL user and password configured before in Call Manager.

5-On this step you need to put the "Security Password" from your Call Manager server use to add other servers example Subscribers.
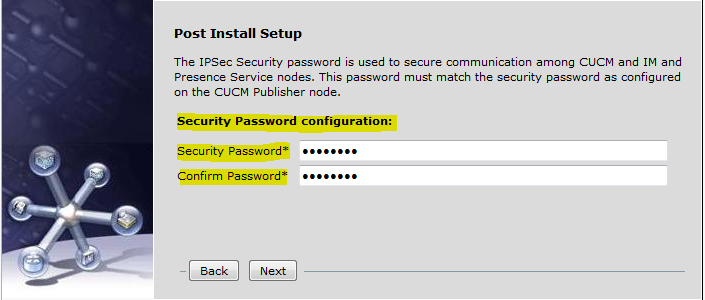
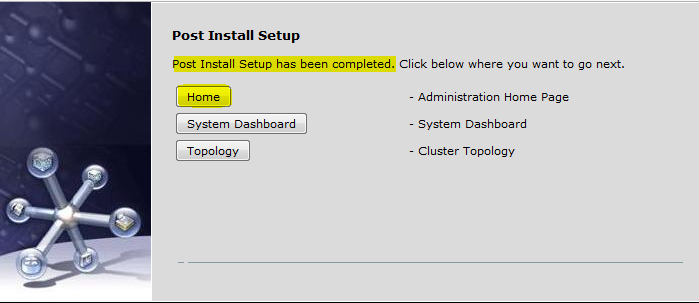
6- Initial integration is complete now click on Home.
Service Activation:
Make sure to activate services on CUPS. Go to Cisco Unified IM and Presence Serviceability > Tools> Service Activation.
++ At this point you should be able to verify connectivity between Call Manager and CUPS server. Go check connectivity go to System> CUCM Publisher.
Configuring Call Manager to manage Cisco Jabber (Cisco Jabber Application)
1- Now on Call Manager go to CM Administration> User Management> User Settings> UC Service> Add New.
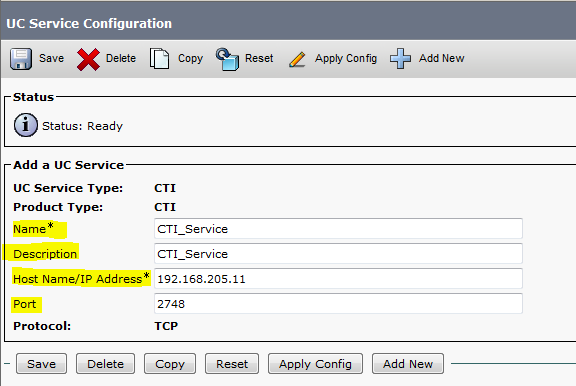
-At this point and for our basic configuration we will be adding the following services:
*-IM and Presence (Jabber)
*-CTI (CTI control of phones)
*- Directory
Note= You can also configure Voicemail and other services on this page.
Services:
-IM and Presence Service

CTI Service
Directory Service

2- Now on Call Manager go to CM Administration> User Management> User Settings> Service Profile> Add New.
-On this Page go ahead and select the UC services created above. Set those as primary.
Directory Service using UDS (Cisco User Data Services)
Important: Under Directory service make sure to have the following parameters check:
-(x)Use UDS for Contact Resolution
-(x)Use Logged On User Credential

Directory Service using LDAP
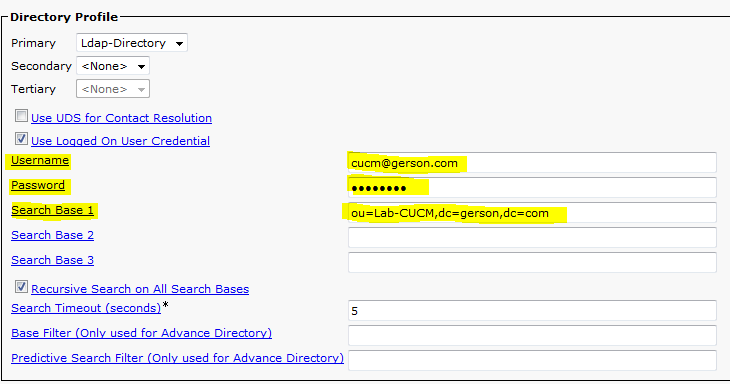
Note= In case you would like to use EDI instead of UDS you also have the option to integrate directory lookup through LDAP Server by configuring the LDAP parameters on the directory configuration.
Notice that UDS service is unchecked and and Ldap user name, Search Space and password has been configured.
3- Now got to Device > Phone> Add New > Cisco Unified Client Services Framework.
This CSF will need to have the following aspects:
Phone configuration page:
Device Name
Phone Button Template
Owner (Associate it to an user)
SIP Profile
Device Security Profile
Line Configuration Page:
DN
PT
CSS
Allow Control of Device from CTI (Check)
Users Associated with Line (Associate the line with the user)
Note= The user that you use need to have the CSF associated.
Go to User Management> End User> select the user and check Controlled Devices (Here you need to include the CSF configured)
4- At this point you should be able to see the End users that you have configured on the Call Manager data base (Local Users) or imported from LDAP (AD) server.
Call Manager endusers:

IM&Presence Server endusers:

5- At this point you will be able to download Cisco Jabber software for Windows.
Integration: IM&Presence with CUCM
Configuring CUPS server to use CTI.
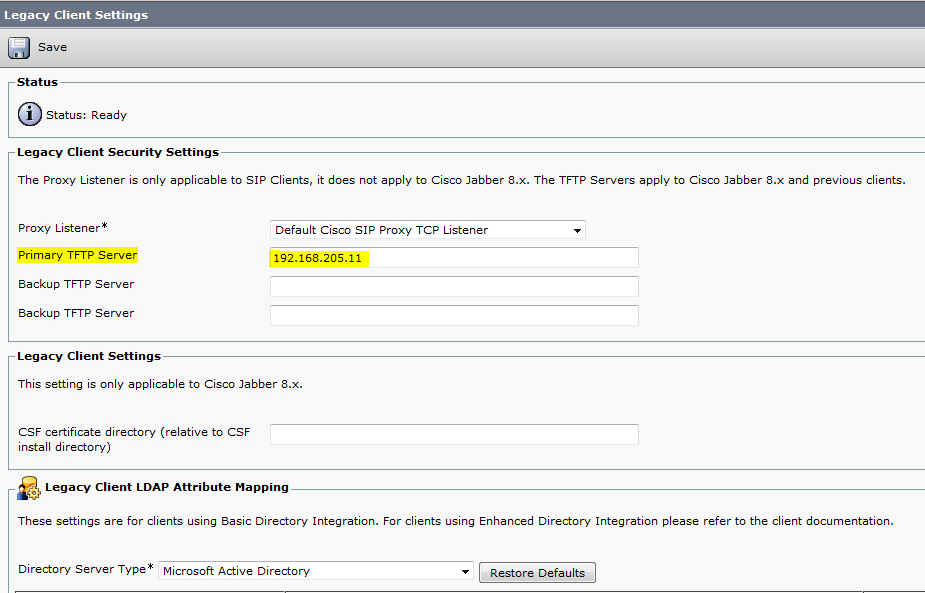
1-Go to applications>legacy clients>settings and Set TFTP <CUCMIP>
2-Go to applications>legacy clients>CCMCIP Profile > New.
-Primary CCMCIP Host and Secondary.
Note= If you have only 1 host go ahead and add the same as secondary as it is required. (Call Manager Server's Ip)
- Server Certificate Verification= Any Certificate.
-Add users that will be managing CTI phones to the USer in Profile

Cisco Jabber
Configuring Cisco Jabber software.
1- When you download the Cisco Jabber software and you try to log in, this software is going to give you a message saying that can not contact the server please add it manually going to "Advance Settings"

++ This could be the easiest way to access and contact your IM&Presence server; however there is another way to make this happens without adding manually the IP address of the CUPS serve everything you try to log in to IM&Presence server to use Jabber.
1- Access your Windows Server.
2-Go to DNS> gerson.com and right click on the right.
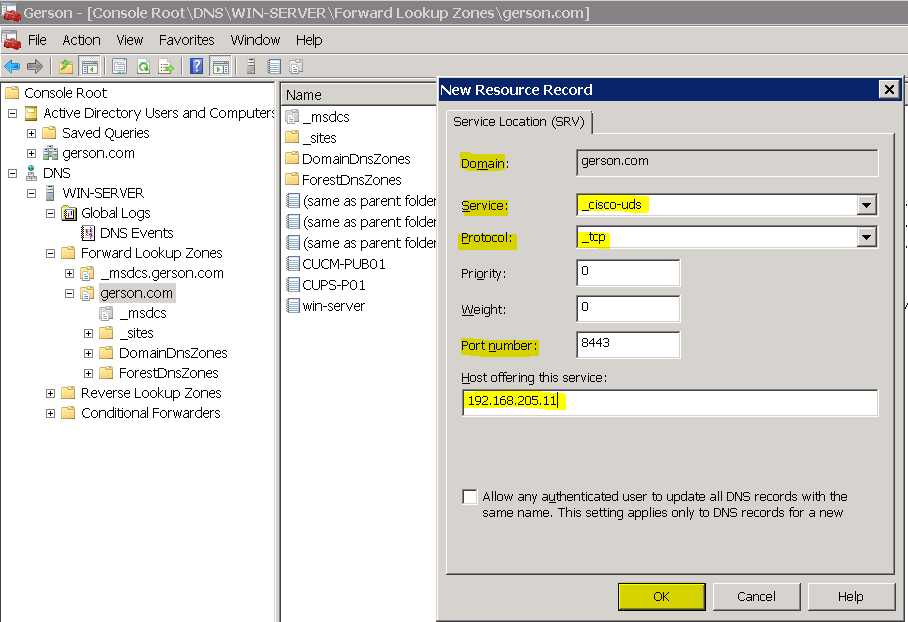
Here we are going to add a static route on the DNS for allow the PC to automatically get access to the server as long with Directory information over UDS.
UDS
-Performs the user queries against the UDS service on Communications Manager.
EDI
-Performs the user queries to the configured LDAP server.
3-When you do the right click go to Other New Records.. and Select Service Location (SRV) > Create Records...
-Make sure Domain is fine
-Service= _cisco-uds
-Protocol= _tcp
-Port= 8443
-Host offering this service= <Cucm-Server>
++ To verify DNS resolution for SRV type go ahead and access Command Prompt and do the following commands:
C:\Users\Administrator>nslookup (enter key)
> set type=srv
> _cisco-uds._tcp.<domain>

Using Cisco Jabber Software
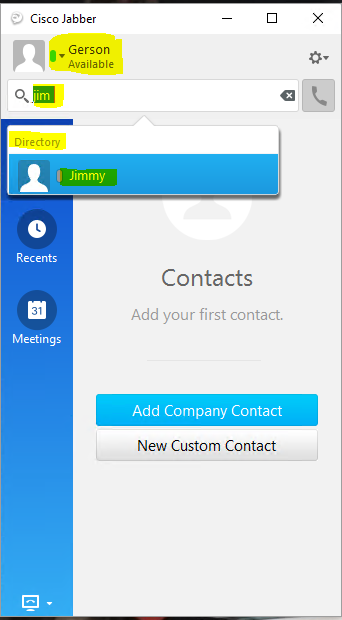
1- Log in to Cisco Jabber using the user name (Local on Call Manager or Imported from Ldap server) to log in to jabber Software.

-At this point you should be able to fully log in to Cisco Jabber and have access to the directory.
CTI Calls
Control phones over CTI
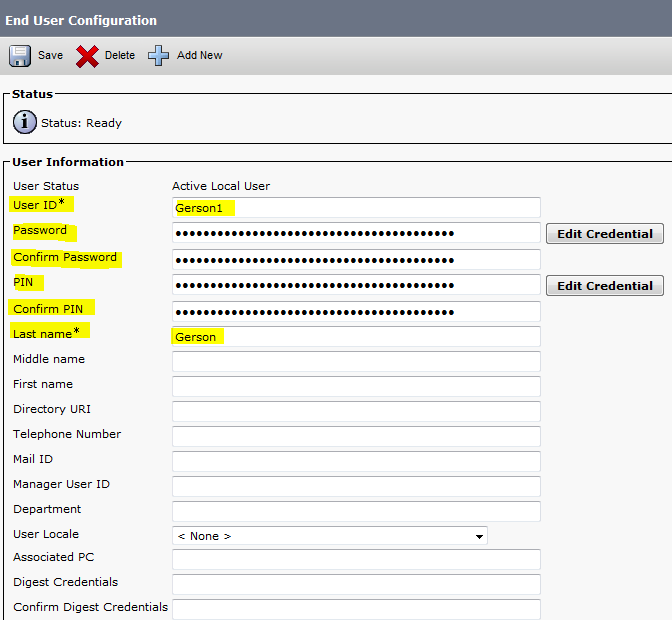
1- Go to the user on Call Manager and assign the following access control groups:
-Standard CCM End Users
-Standard CTI Enabled
-Standard CTI Allow Control of Phones supporting Connected Xfer and conf
-Standard CTI Allow Control of Phones supporting Rollover Mode
-Standard CTI Allow Control of All Devices

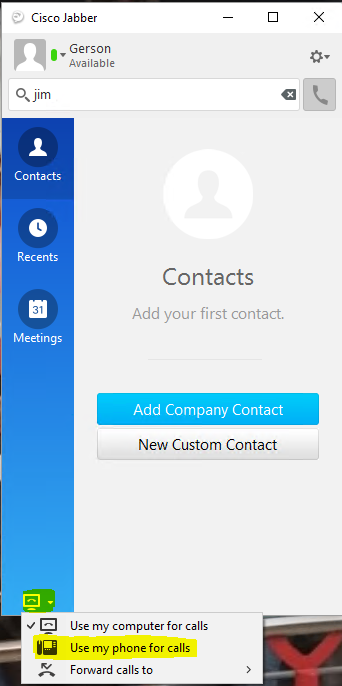
-Now after adding those access controls to the user you should be ready to control the phone using CTI, go ahead and log out and log in into Jabber >Go to the little on the left bottom corner and select "use my phone for calls"
++At this point Jabber should be fully functional and you sould be able to make and received calls ++++
Incoming call (CTI):

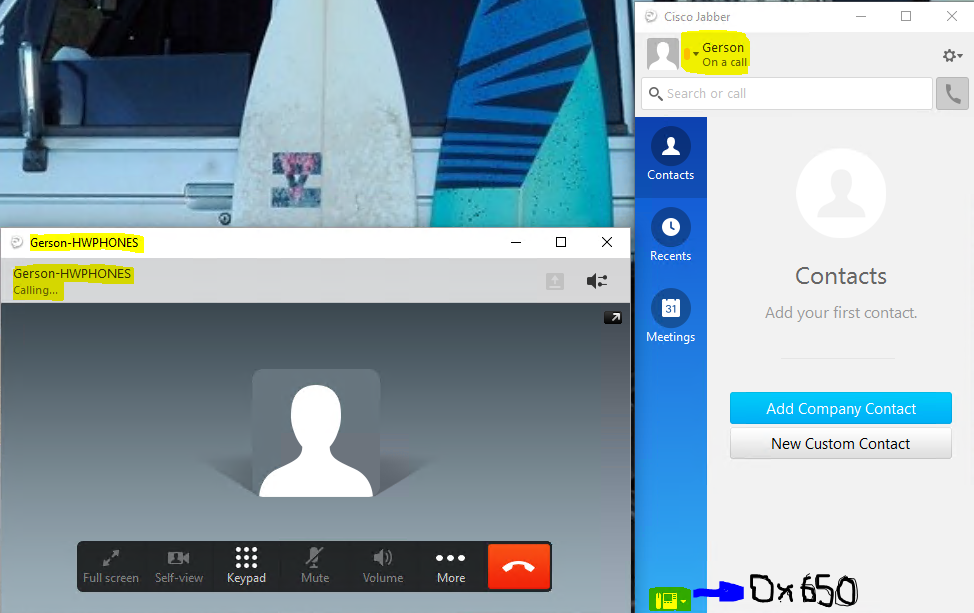
Outgoing Call (CTI):
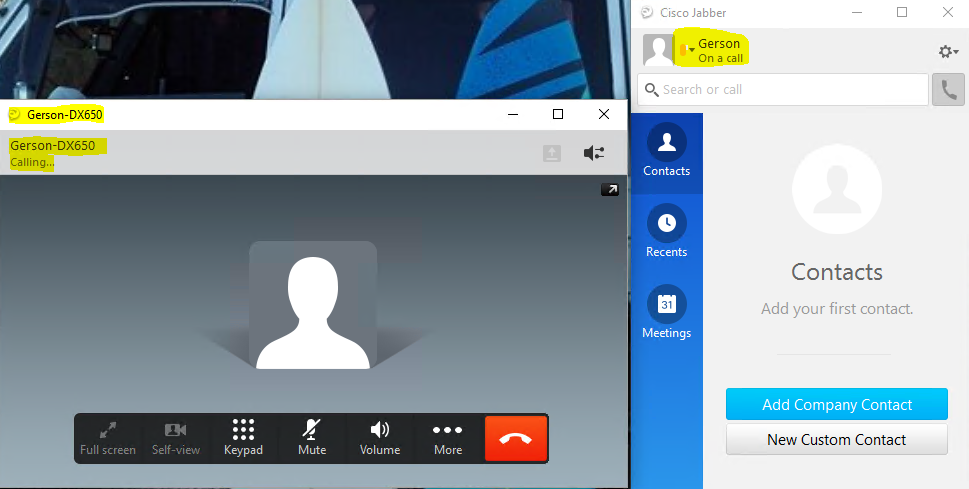
Outgoing call using CTI control
"Thank you very much for checking"
When you feel like giving up, remember why you held on for so long in the first place '
Related links:
Regards,
Gerson Fabian Morales Marin (gersomor)
Find answers to your questions by entering keywords or phrases in the Search bar above. New here? Use these resources to familiarize yourself with the community: