In version 1.2 of the Nexus 1000V we introduced L3 based connectivity for control traffic between the VSM and its VEMs. We did this because in some environments it’s just not possible to have L2 connectivity between VSM and all the VEMs that will be attached.
It was still a best practice to use L2 based control but we offered L3 based connectivity for customers that needed it.
Going forward you will see situations where we need L3 based control over L2. Why? Well for one as we introduce integration with other products using L3 allows us to be more flexible in our deployments. L3 control is also easier to troubleshoot. You can use simple tools like ping to verify network connectivity between the VSM and VEM.
The downside is that it requires a VMK interface on the ESX host and an IP address. This is yet another management interface that you have to deal with.
The goal of this write up is to show you how to setup L3 control between the VSM and VEM.
The Nexus 1000V VSM VM has 3 network interfaces.
- Control (control0)
- Management (mgmt0)
- Packet
When setting up L3 control you have two options.
- L3 control through VSM mgmt0 interface (default)
- L3 control through VSM control0 interface
Several important notes
- When setting up L3 control both “control and packet” traffic are forwarded over the same interface. In L3 control mode the packet nic does not get used on the VM, but don’t delete it. The VM still expects that nic to be present.
- Also control0 and mgmt0 use a different VRF. If you use control0 you will need to setup a route in the default VRF.
n1kv-l3# show vrf interface
Interface VRF-Name VRF-ID
control0 default 1
mgmt0 management 2
When should I use dedicated VSM Control interface for L3?
- If you want to isolate your control and management to the VSM VM.
- If you want your control interface to be a in different subnet than the management interface
Sample topology
- VSM is in a 172.18.217.x subnet in VLAN 2
- My ESXi hosts are in 192.168.10.x in VLAN 10 and 192.168.11.x in VLAN 11
Configure the VSM for L3 control
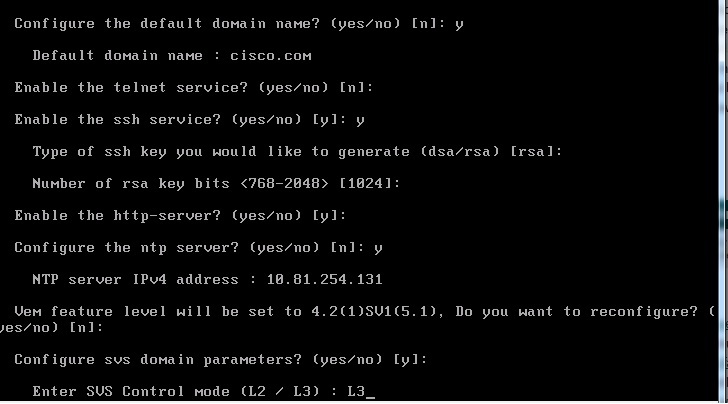
When running setup on a newly created VSM choose L3 when you get to the following question during setup.

At this point the VSM is configured for L3 but it will be using the mgmt 0 interface.
n1kv-l3# show svs domain
SVS domain config:
Domain id: 43
Control vlan: 1
Packet vlan: 1
L2/L3 Control mode: L3
L3 control interface: mgmt0
Status: Config push to VC failed (communication failure with VC).
In L3 mode control and packet vlans will show as vlan 1. No need to change these. You can also see that the L3 control interface is mgmt0.
Now that we have the L3 control configured on the VSM, continue with normal setup.
- Configure VSM to vCenter connectivity
- Configure uplink port-profiles
One note about your uplink port-profile: You need to create and allow the VLAN that your ESX hosts will use to communicate to the VSM. My ESX hosts are going to communicate on VLAN 10 and VLAN 11 using a VMK interface in the 192.168.10.x and 192.168.11.x subnets. My uplink port-profile needs to look like the following
port-profile type ethernet uplink
vmware port-group
switchport mode trunk
switchport trunk allowed vlan 10,11,150-152
no shutdown
system vlan 10,11
state enabled
VLAN 10 and 11 are allowed and set as a system VLAN.
Next we need to create a veth port-profile for the VMK interfaces that will be used for L3 control. I need to create 2 veth port-profiles. One for hosts in VLAN 10 and another for hosts in VLAN 11.
N1kv-l3(config-port-prof)# port-profile type veth L3-control-vlan10
n1kv-l3(config-port-prof)# switchport mode access
n1kv-l3(config-port-prof)# switchport access vlan 10
n1kv-l3(config-port-prof)# vmware port-group
n1kv-l3(config-port-prof)# no shutdown
n1kv-l3(config-port-prof)# capability L3control
n1kv-l3(config-port-prof)# system vlan 10
n1kv-l3(config-port-prof)# state enabled
n1kv-l3(config-port-prof)# port-profile type vethernet L3-control-vlan11
n1kv-l3(config-port-prof)# switchport mode access
n1kv-l3(config-port-prof)# switchport access vlan 11
n1kv-l3(config-port-prof)# vmware port-group
n1kv-l3(config-port-prof)# no shut
n1kv-l3(config-port-prof)# capability L3control
n1kv-l3(config-port-prof)# system vlan 11
n1kv-l3(config-port-prof)# state enabled
Now comes the easy part. We need to make sure that ESXi hosts can ping the VSM so we know they have network connectivity. With L2 control there was no easy way to verify network connectivity between the VSM and VEMs.
Next add the ESXi hosts to the Nexus 1000V in VMware vCenter. If you have VUM installed the VEM modules will automatically get loaded. If you don’t have VUM installed you will need to manually install the VEM modules on the ESXi hosts.
When you add the host, it will show up in VMware vCenter as added, but it will not show up as a module on the VSM until you add a VMK interface to the veth port-profile.
Do I need a dedicated VMK interface for control?
No. We are prefectly fine with customers migrating the mgmt vmk interface from the ESXi host to the VEM and using that interface. There have been changes on the VEM and VSM to better deal with higher latency networks and drops. Actually migrating the mgmt vmk interface makes life easier because there is no concern about needing to add static routes.
Create and add the VMK interface to the veth port-profile
Once you add the vmknic interface to either the L3-control-vlan10 or L3-control-vlan11 port-profile the VEM will know that it now has a way to communicate with the VSM. The VEM should show up on the VSM with a "show module" command and the VMK interface will show up with "show int virtual"
Note: We only support a single VMK interface per host to be assigned to the L3capability port-profile.
That's it for getting L3 control working with mgmt 0 on the VSM.
How about a quick example with control0
This time we will use
- Mgmt0 172.18.217.245/24 on VLAN 2
- Control0 192.168.150.10/24 on VLAN 150
- ESX hosts on 192.168.10.x/24 on VLAN 10
- ESX hosts on 192.168.11.x/24 on VLAN 11
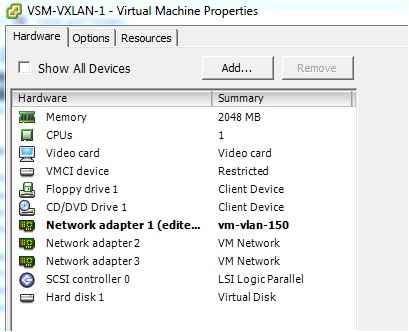
Make sure control 0 NIC is on the right VMware port-group

Assuming a new install and you set L3 control in the setup script we pick up with configuring control 0.
n1kv-l3(config)# int control 0
n1kv-l3(config-if)# ip address 192.168.150.10 255.255.255.0
Next change the SVS domain to use control0 instead of mgmt0
n1kv-l3(config-if)# svs-domain
n1kv-l3(config-svs-domain)# svs mode L3 interface control0
See if you can ping the 192.168.150.10 interface from the ESXi hosts. You should not be able to since we have not yet set a default route for the default VRF.
n1kv-l3(config)# vrf context default
n1kv-l3(config)# ip route 0.0.0.0/0 192.168.150.1
Now add the hosts to the Nexus 1000V and you should be set.
You can verify with “show module” and “show module vem counters” to verify you are getting heartbeat messages between the VSM and VEM.
Troubleshooting:
Some quick troubleshooting tips for L3 control
First make sure that you have “capability L3control” in your veth port-profile that the VMK interface will be connected to. Without that the VSM does not know that L3 control is supposed to be used on that port-profile.
Second make sure you have the right system VLANs in the eth and veth port-profile.
On the ESXi hosts you can use "vemcmd show port-drops ingress/egress", "vemcmd show stats" and "vemcmd show packets" to see if you are receiving packets on the control VMK interface. On the VSM you can run "show module vem counters" to see if you are receiving packets from the VEMs.
Remember that L3 controls uses UDP and port 4785 for both tx and rx. Keep this in mind for any firewalls that might be present.
