You’re not from around these parts, are you?... Well - that’s okay! So you may be a developer or engineer looking to arm your DevOps tool belt with a spread of Cisco tech and APIs to play with? The DevNet Sandbox may be the tool for you.
Using and mastering key DevOps tools are career accelerators. After years of building and rebuilding motorcycles in my humble garage I’ve learned having the right tool is the difference between hitting frustrating walls and having fun building a well preforming bike. Contrary to motorcycles, there’s thousands of DevOps that are constantly changing and growing, while the time available to research these tools remains constant. We hope to transform the DevNet Sandbox into a simple DevOps tool core to DevNet and your Cisco development needs to accelerate your development cycle.
As a new user, the DevNet Sandbox can be overwhelming at first glance. First you must understand the concept of our “Sandboxes.” We love the name Sandbox as it implies a place where you’d see kids playing and constructing whatever pops into their imagination. Inside of a Sandbox you can configure, build, integrate, and test whatever you desire! There are no risks inside of the “walls” of a sandbox, no bullies to kick down your sand castle. Unlike a child’s Sandbox, our environments are totally private and accessible from anywhere with internet access. We stand up a basic infrastructure, dropping in the highlighted Cisco technology you chose and include supporting machines to make the lab hum. Everything is baselined, so the moment you “tunnel” into the Sandbox you now have development environment that is ready to rumble!
Put shortly, the DevNet Sandbox provides private labs filled with Cisco Technology to realize your imagination - of course in the form of any API call, integration, configuration test, or something you conjure up! 
To help ease the process of getting started, here are a few steps to reserve your first Sandbox:
- Visit https://developer.cisco.com/sandbox and login to DevNet. Only DevNet users may use the Sandbox, so now’s a good time to create an account and register if you haven’t already. (it’s free!)
- Press the ‘Get Started’ button on https://developer.cisco.com/sandbox. This launches our lab catalog showing you what Cisco Technologies we offer
- Set your timezone correctly. Click your username in the top right, select “Current Location” and set appropriately

- Spend a few minutes browsing the catalog and pick a lab you’d like to try. (Make sure to pick a lab where the button says “Reserve” and not “AlwaysOn.” (Curious about AlwaysOn labs versus reservations? Check out Dan’s blog - Always On Labs and Reservation Based Labs: What's the Difference?)
- Press the “Reserve” button on the lab, a small dialog box will appear.
- Configure the reservation settings as needed. The most important field on this form is start time and duration. While the default for most labs is two hours, you can select and set this up to one week.

- Press the reserve button - after some processing you’ll see a topology for your Sandbox. Our automation can take anywhere from five minutes to an hour to baseline and provision labs. Most labs are under 30 minutes for setup time.
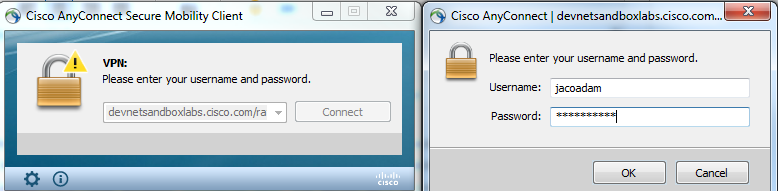
- Make sure you’ve got AnyConnect VPN client installed. Download here. You should have an email informing that we’re setting up your lab. You’ll find the link to download AnyConnect and install directions there as well.
- Monitor your email for a secondary “Your DevNet Sandbox Lab is Ready!” message from us. Copy the supplied VPN URL and credentials. Startup AnyConnect, plug in the info and press connect.
<sidenote>
I wanted to pause and make a few comments about the VPN tunnel. You can think of connecting to this VPN like adding a remote network that your PC can access. A tunnel is created where all traffic is encrypted and encapsulated to protect any data traversing the tunnel. As far as your computer knows, you’ve essentially updated the routing table and added a new network. Once connected to the VPN, just pretend that all of the lab equipment is another local network. Neither your PC nor lab equipment is even aware that traffic flows through a tunnel.
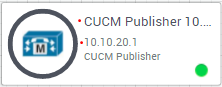
If you want to ping a server in the lab at 10.10.20.1, just ping 10.10.20.1! The server is right there and you’ve got full access just like it’s on another local subnet!
</sidenote>
10. Navigate back to the Sandbox Topology in your browser (Lost your active session? Once in the catalog select "Lab Management > Reservations to bet back the Sandbox). Look at each resource name, and IP address. Try pinging each device. If that works, try connecting to any interface the resource offers, (could be an API interface, SSH session, Web UI or RDP session depending on what it is). Remember - all of these servers are on their own small network which you’re accessing through the VPN tunnel. Access them the same way you’d interface with a server that was locally patched into your network.
If you successfully made it through these 10 steps you are connected to the Sandbox! Now it’s time to leverage the equipment to achieve whatever goal that caused you to seek out the Sandbox.
Still having trouble getting connected to this lab? Drop me a comment below and I’ll help get you started! Also feel free ask any sandbox questions on the Sandbox Community Forum.
Signing off,
Jacob
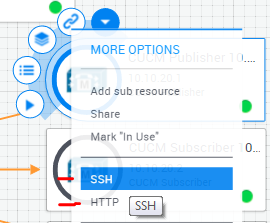
Bonus: Most labs allow client-less SSH and Remote Desktop connections to resources. Hover on the resource, click the drop down arrow and look for the connection methods (such as Telnet, SSH, RDP etc.). Selecting this will open a new browser tab and initiate the connection.