- Cisco Community
- Technology and Support
- Data Center and Cloud
- Nexus Dashboard
- Visual Guide for Template and Schema Config in NDO Version 4.X
- Subscribe to RSS Feed
- Mark Topic as New
- Mark Topic as Read
- Float this Topic for Current User
- Bookmark
- Subscribe
- Mute
- Printer Friendly Page
Visual Guide for Template and Schema Config in NDO Version 4.X
- Mark as New
- Bookmark
- Subscribe
- Mute
- Subscribe to RSS Feed
- Permalink
- Report Inappropriate Content
06-19-2023 02:24 AM - edited 06-19-2023 02:45 AM
Summary:
==========
The objective of this document is to facilitate the configuration process for templates and schemas, which has undergone significant changes in Nexus Dashboard Orchestrator (NDO) version 4.X. My aim is to share a visual guide that simplifies the setup of templates and schemas, ensuring a smoother transition to the updated version.
In this post, I have covered the following topics to provide a comprehensive guide:
- Navigation to NDO
- Selection of Schemas
- Creation and Selection of Templates
- Associating Templates to the Sites
- Object Creation
- Drift Reconciliation
Navigation to NDO:
===============
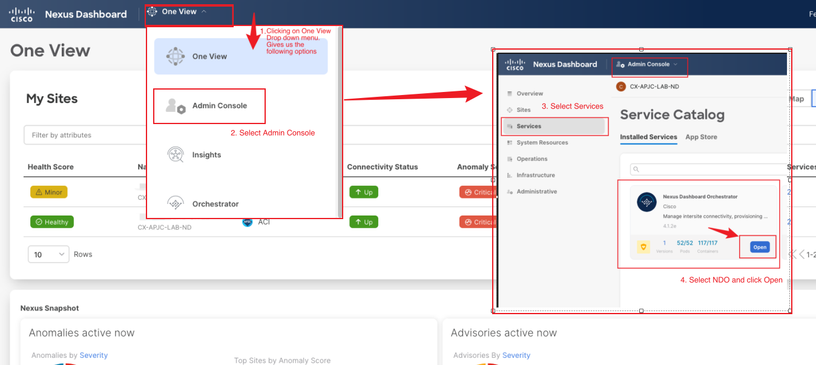
To access the Nexus Dashboard and select the NDO service, please follow the steps below:
- Open your web browser and navigate to the Nexus Dashboard login page.
- Once logged in select the "Admin console" from the Drop-down menu.
- Locate and click on the "Services" option in the left navigation menu.
- From the list of services, locate and select "Nexus Dashboard", click on open to proceed.
Selection of Schemas:
================
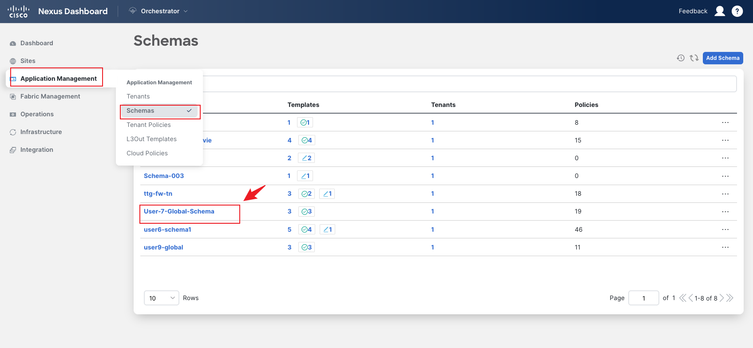
After accessing NDO, please follow these steps to configure a schema:
- In the left pane of NDO, click on "Application Management".
- From the expanded options, select "Schemas".
- A list of available schemas will be displayed. Locate and choose the specific schema that you wish to configure by clicking on it.
- If you want to create a new Schema, locate the "Add Schema" button on the right side of the window, click on it to initiate the Schema creation process.
Creation and Selection of Templates:
=============================
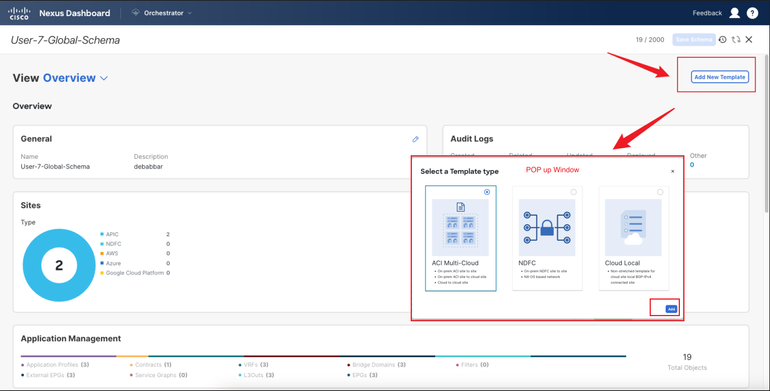
After creating a schema in NDO, you will be in the Schema View where you can proceed to create a new template or modify an existing one. Here are the steps:
To create a new template:
- In the Schema View, look for the "Add New Template" option and it will open a pop-up window.
- Within the pop-up window, select the appropriate Template type from the available options.
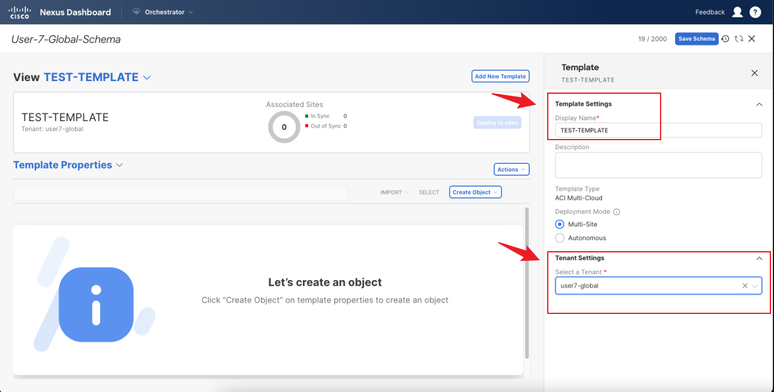
- After selecting the "Add New Template" option and opening the template creation pop-up window, locate the "Template Properties" section on the right pane of the GUI.
- Within the "Template Properties" section, enter the desired "Display Name" for the template.
- In the same "Template Properties" section, select the correct "Tenant" to which the template belongs. This ensures that the template is associated with the appropriate tenant within the NDO environment.
To Select an existing template:
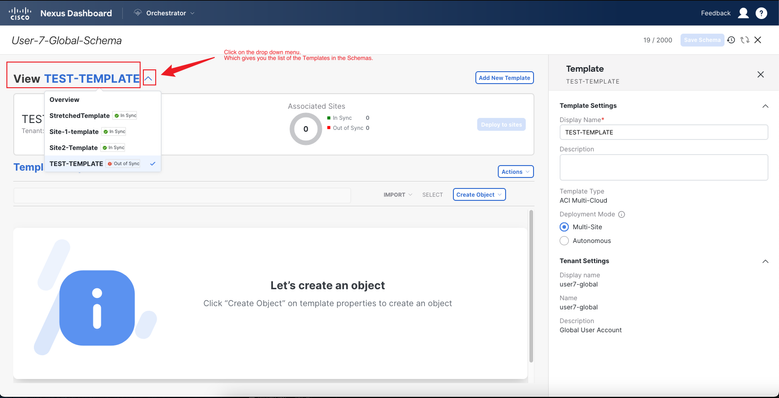
- In the Schema View, locate the drop-down menu labeled "View" (usually located near the top of the screen).
- Click on the drop-down menu and select the specific template you want to modify from the list of available templates.
Associating Templates to Sites:
========================
To associate a Site with the Template in NDO, follow these steps:
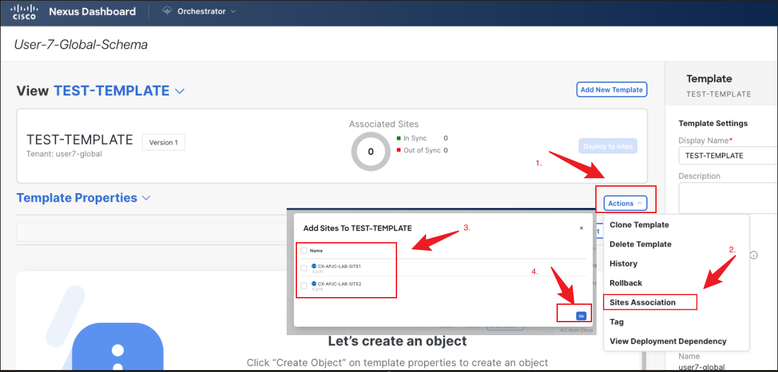
- In the Template View, locate the "Actions" button, click on it to open the a drop down menu.
- From the dropdown menu, select "Site Association" to proceed with associating sites.
- A window or dialog box will appear displaying available sites.
- Select the respective sites from the list that you want to add the template to and confirm by selecting "OK".
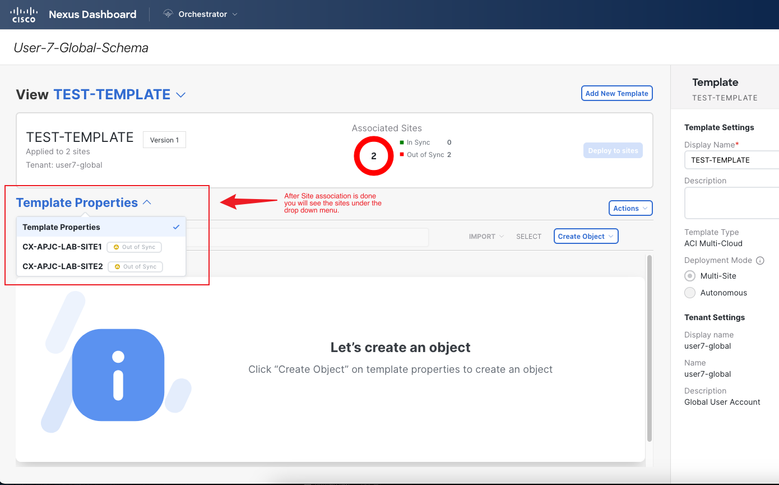
After successfully associating sites with the template in NDO, you will be able to view the associated sites in the Template Properties.
Object Creation:
===============
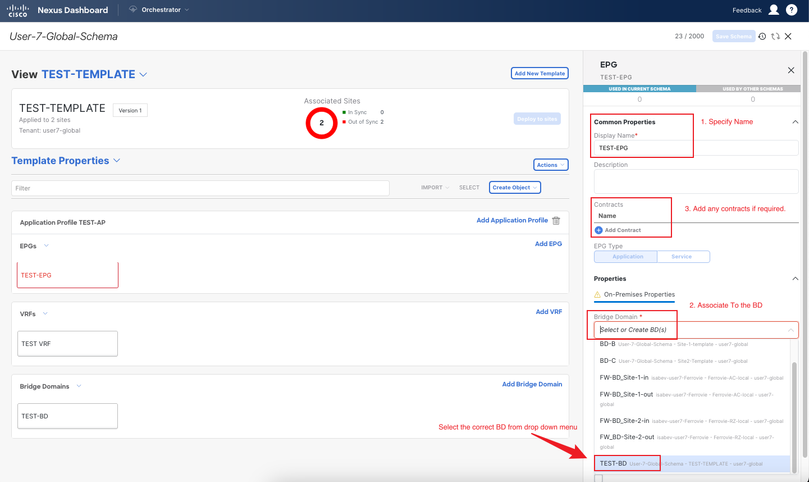
To add objects to a template in NDO and modify their properties, follow these steps:
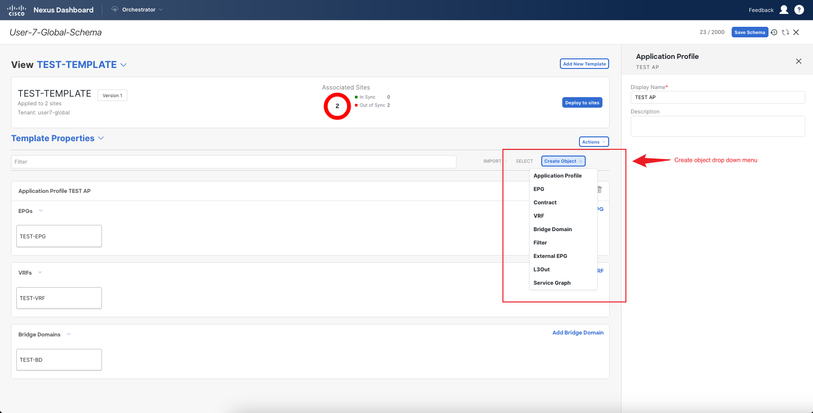
- In the Template View, locate the "Create Object" drop-down menu.
- Click on the drop-down menu to reveal a list of available objects that can be created within the template.
- From the list, select the specific object that you want to create for the template.
- After selecting the object, you can use the right pane of window to modify the properties of the object.
Sample configuration of an EPG Creation:
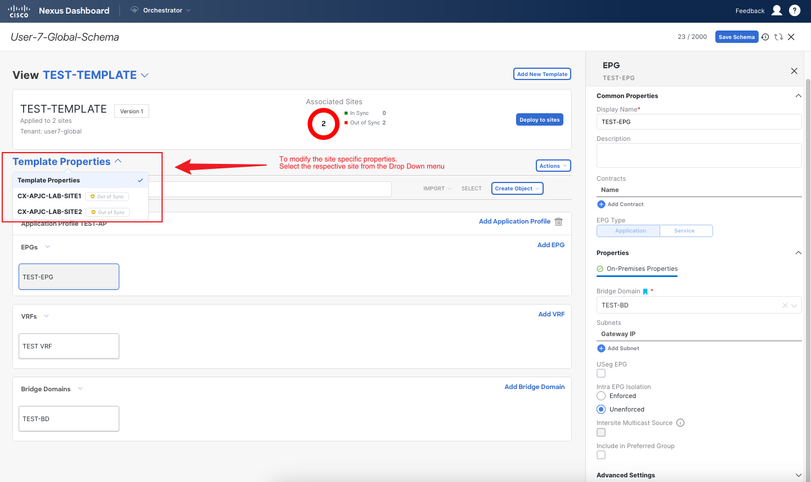
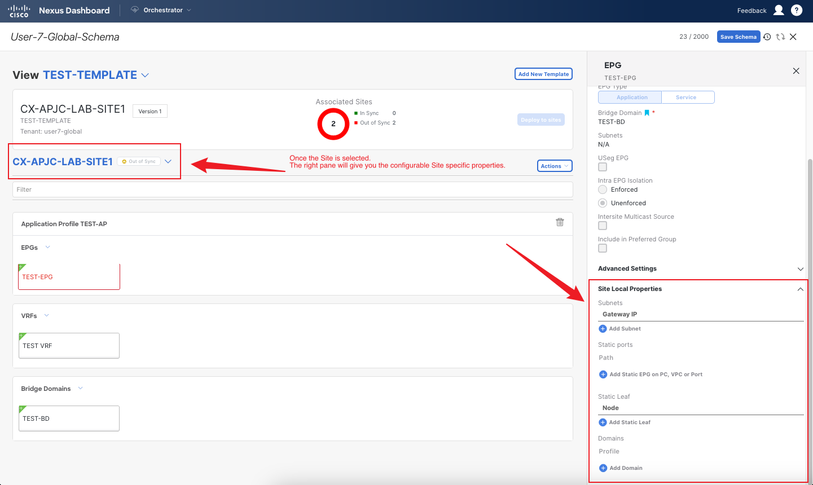
To modify the site local properties for a specific Object in Template, follow these steps:
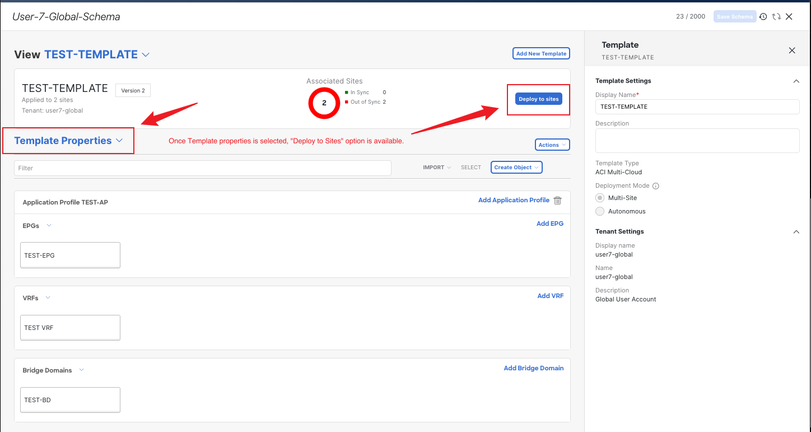
- In the Template View, locate the Template Properties drop-down menu.
- Click on the drop-down menu to reveal a list of Sites associated with the Template.
- Within the site local properties for the chosen Template, locate the specific object that you want to modify or configure.
- Select the object and you will have the access to its properties in the right pane of the window.
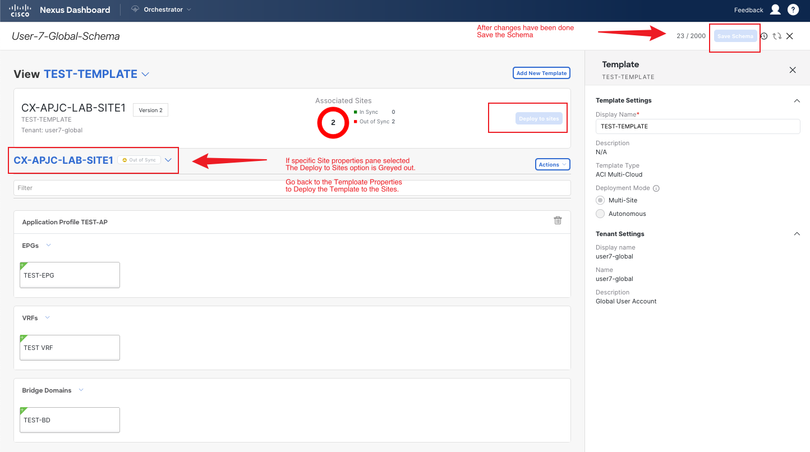
- Save the configuration of the Schema and Deploy to site after selecting the "Template-Properties" from the Drop-Down Menu.
Drift Reconciliation:
===============
If you have imported a backup from MSO to NDO, the drift reconciliation option is available to compare and synchronize configurations. Here are the steps involved:
- In the Template View, locate the Template Properties drop-down menu.
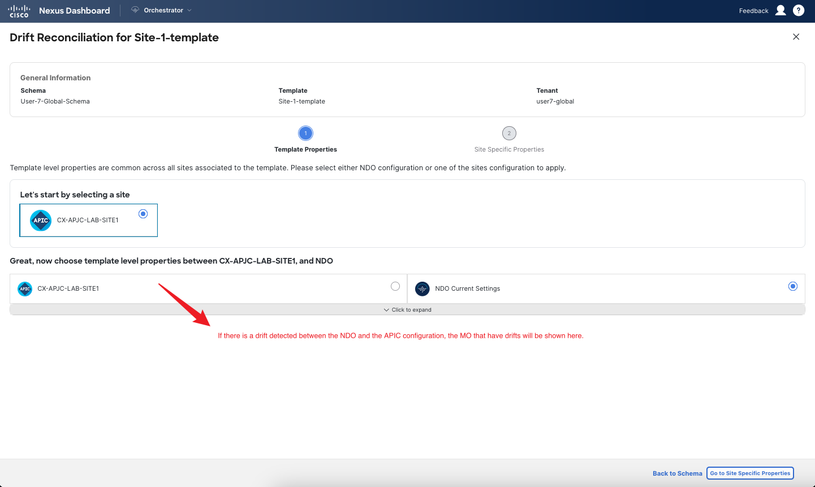
- Click on the drop-down menu to reveal a list of options, and select the "Drift Reconciliation" option.
- A new window will open, presenting the drift reconciliation functionality.
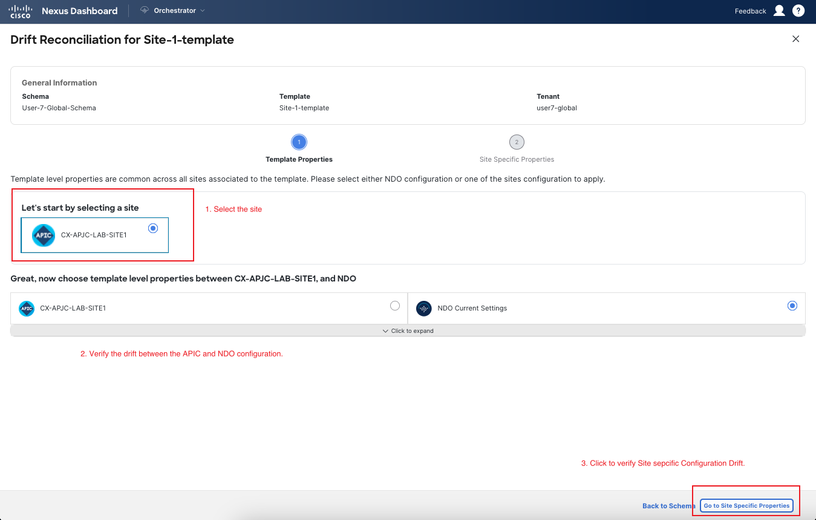
- Select the respective site you want to compare the configuration between the APIC and NDO.
- Within the window, you will find radio buttons that allow you to choose either NDO or APIC configuration to keep. Select the appropriate option based on your preference.
- At the bottom right corner of the window, you can check the site-specific properties to identify any drift in those properties.
- Please note that, currently, you can only choose one site as the source of truth for template properties. Exercise caution and carefully select the site before proceeding.
- Importantly, any properties that are not present in NDO will not be erased or deleted from the APIC during the drift reconciliation process.
We hope that this document serves as a valuable guide, helping you navigate the GUI and facilitating a smooth and effortless migration process. Our aim is to provide comprehensive assistance, ensuring that your transition is seamless and devoid of any complications. Should you have any further questions or require additional support, please do not hesitate to reach out.
- Labels:
-
Nexus Dashboard Orchestration
Discover and save your favorite ideas. Come back to expert answers, step-by-step guides, recent topics, and more.
New here? Get started with these tips. How to use Community New member guide


