- Cisco Community
- Technology and Support
- Security
- Security Knowledge Base
- Exploring Remote Access VPN (Easy VPN) on Cisco Router with Cisco Secure ACS 5.x
- Subscribe to RSS Feed
- Mark as New
- Mark as Read
- Bookmark
- Subscribe
- Printer Friendly Page
- Report Inappropriate Content
- Subscribe to RSS Feed
- Mark as New
- Mark as Read
- Bookmark
- Subscribe
- Printer Friendly Page
- Report Inappropriate Content
on
02-15-2011
07:20 AM
- edited on
08-30-2017
08:11 PM
by
nivmanoh
![]()
- Easy VPN
- Problem Description
- Configuring the Easy VPN Server
- Configuring Cisco Secure Access Control System 5.x for Easy VPN Group (Mode Configuration) and Xauth authentication
- Conclusion
- Reference Links
Introduction
There are times when you want your employees to have a secure access to your corporate network resources through your Cisco router, along with the option to centrally manage their access with easy and manageable configuration rollout on Cisco routers. Allowing remote users to access corporate resources using IPSec on Cisco routers can be implemented with a feature called Easy VPN.
Easy VPN
The main advantage of Easy VPN is that IPSec policies are centrally managed on the server (Head end router providing IPSec feature) and are pushed to client devices. This policy push is known as Mode Configuration. This requires minimum configuration on the end-user side. The IPSec policies can be configured on a RADIUS server and then downloaded to an Easy VPN server, further reducing configuration required on the Easy VPN server.
In this article we will focus on the Easy VPN server configuration required when we want IPSec policies to be pushed from a Cisco Secure Access Control Server 5.x as our RADIUS server.
Since this is client server architecture in which we have a Cisco router as an Easy VPN Server, performing the responsibility of a server, the client end responsibility is fulfilled by:
- Cisco VPN Client (software), or
- A Cisco router configured as a Easy VPN remote
Problem Description
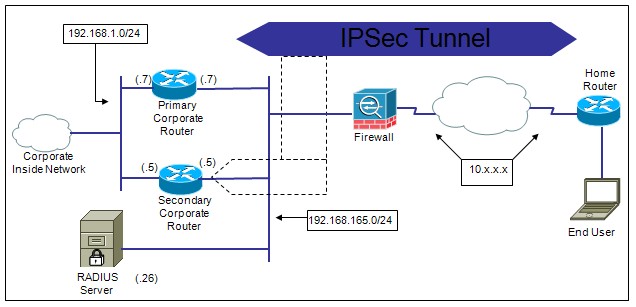
Before getting into configuration, let’s look at a typical scenario. Suppose that some employees in your organization work remotely and are often required to access information on the corporate network. Up until now they would dial up to get their work done. Due to the increased risk of data theft, you are now required to stop the dial-up access for remote workers and must come up with a solution to provide secure access to corporate resources. Since you already have a Cisco router, you can use it as a server to provide IPSec services allowing remote workers to connect using a client (in our case it will be Cisco VPN client for Windows).
The following figure summarizes our scenario. In this scenario we have two head-end routers: one with the role of primary Easy VPN server and the other as a secondary Easy VPN server.
Let us look at the configuration for Easy VPN Server and RADIUS server.
Configuring the Easy VPN Server
- Configure the Easy VPN server to the lookup policy from the RADIUS server.
|
enable configure terminal !--- Enable AAA aaa new-model !--- Configure RADIUS server radius-server host 192.168.165.26 key cisco !--- For Xauth with RADIUS server aaa authentication login ezvpn-authen group radius !--- For Mode Configuration from RADIUS server aaa authorization network ezvpn-author group radius
ip radius source-interface FastEthernet0 |
In this configuration the command ‘aaa authorization network ezvpn-author group radius’ tells us that the configuration for Easy VPN group (policies) must be downloaded from a RADIUS server.
Since you are using the RADIUS server for the policy download, it makes sense to add the user’s authentication from the RADIUS server, too. So we have included Xauth, as you can see in the command ‘aaa authentication login ezvpn-authen group radius’. Authentication (Xauth) and authorization (RADIUS server policy download) for both lists are called in later in the configuration. At this stage we have simply defined the authentication and authorization lists; currently they are not being called or applied anywhere.
The command ‘ip radius source-interface FastEthernet0’ ensures that any RADIUS request sent from the router to the RADIUS server contains the source IP (NAS-IP-Address) as the router’s FastEthernet0 IP address.
- Because this is IPSec you must configure the IPSec policies for Phase I and
Phase II.
|
!--- Phase I policies crypto isakmp policy 1 encr aes 256 authentication pre-share group 2 !--- Since Cisco VPN Client sends ID as group name crypto isakmp identity hostname
!--- Phase II policy crypto ipsec transform-set ezvpn-transform esp-aes 256 esp-sha-hmac |
- Configure the Mode configuration and Xauth.
|
!--- Since client’s IP is not always known, the Dynamic map is required crypto dynamic-map ezvpn-dynamic-map 1 set transform-set ezvpn-transform reverse-route
!--- Configuration for Xauth and Mode Configuration crypto map ezvpn-map client authentication list ezvpn-authen crypto map ezvpn-map isakmp authorization list ezvpn-author crypto map ezvpn-map client configuration address respond crypto map ezvpn-map 1 ipsec-isakmp dynamic ezvpn-dynamic-map
!--- Applying crypto map interface FastEthernet0 ip address 192.168.165.7 255.255.255.0 crypto map ezvpn-map |
You can also instruct the device to add a static route dynamically for the connecting remote clients. In this example we have achieved it with the command ‘reverse-route’.
Problem Description (continued…)
Before you move ahead to next configuration step, let’s add more information in our problem description. Now we are required to allow two sets or groups of remote users to connect to the corporate network. Each set must be assigned a different IP address. Most important, the remote users of one group should not be allowed to connect using the profile of the other group, because each group has a unique set of policies for accessing the corporate network.
- Assign the IP address for the remote clients.
If you intend to assign a particular IP address to each user from the RADIUS server, then this step can be skipped. Otherwise, this step is essential as remote clients must have an IP address in order to be able to connect. Here we will create two local IP pools on router.
|
ip local pool group1-pool 172.16.1.1 172.16.1.254 ip local pool group2-pool 172.16.2.1 172.16.2.254 |
Because you are using the split tunneling feature in the current scenario, we need ACLs to specify interesting traffic. Also, in order to simulate an internal network we will create two loopback interfaces. A reference is made to these configurations later in this article.
|
interface Loopback0 ip address 172.16.12.1 255.255.255.0
interface Loopback1 ip address 172.16.13.1 255.255.255.0
access-list 100 permit ip 192.168.1.0 0.0.0.255 any access-list 100 permit ip 172.16.12.0 0.0.0.255 any
access-list 101 permit ip 192.168.1.0 0.0.0.255 any access-list 101 permit ip 172.16.13.0 0.0.0.255 any |
That is it! We are done with the Easy VPN server configuration.
The next part of the puzzle that we need to put together with the Easy VPN server configuration is the RADIUS server configuration.
Problem Description (continued…)
Let us be more specific about the requirement so that we can configure our RADIUS server. In our requirement we need to create two group policies:
- ezvpn-group1
- ezvpn-group2
Policy for ‘ezvpn-group1’:
o Users connecting to this profile should be greeted with the banner ‘Welcome! You are connected through profile ezvpn-group1.’
o Users connecting to this profile should use the group password as ‘group1password’.
o Users connecting to this profile should be assigned an IP address from the network 172.16.1.0/24.
o Users connecting to this profile should be assigned the domain name ‘dep1.cisco.com’.
o Users should be assigned DNS servers 4.2.2.2 and 4.2.2.3.
o Users should be assigned WINS servers 192.168.1.10 and 192.168.1.11.
o Users should only be allowed to terminate VPN on FastEthernet0 of the router.
o Ensure that PFS is enabled for this group.
o Backup Easy VPN server should be 192.168.165.5.
o IP traffic from client should be encrypted for network 192.168.1.0/24 and 172.16.12.0/24 only. All other traffic should go through the remote clients’ LAN.
Policy for ‘ezvpn-group2’:
o Users connecting to this profile should be greeted with the banner ‘Welcome! You are connected through profile ezvpn-group2.’
o Users connecting to this profile should use the group password as ‘group2password’.
o Users connecting to this profile should be assigned an IP address from the network 172.16.2.0/24.
o Users connecting to this profile should be assigned the domain name ‘dep2.cisco.com’.
o Users should be assigned DNS servers 4.2.2.1 and 4.2.2.4.
o Users should be assigned WINS servers 192.168.1.15 and 192.168.1.16.
o Users should only be allowed to terminate VPN on FastEthernet0 of the router.
o Backup Easy VPN server should be 192.168.165.5.
o IP traffic from the client should be encrypted for network 192.168.1.0/24 and 172.16.13.0/24 only. All other traffic should go through the remote clients’ LAN.
o Maximum number of users that can connect to ‘ezvpn-group2’ should be limited to 25.
o Maximum simultaneous connection for a user on group ‘ezvpn-group2’ should be restricted to one.
User’s policy
o There will be a user called ‘user1’. This user should only be allowed to connect with ‘ezvpn-group1’; this is to ensure that ‘user1’ always gets only the policies defined on Easy VPN group ‘ezvpn-group1’.
o There will be a user called ‘user2’. This user should only be allowed to connect with ‘ezvpn-group2’‘ this is to ensure that ‘user2’ always gets only the policies defined for Easy VPN group ‘ezvpn-group2’. ‘user2’ should also be allowed to save its Xauth account password on the remote access client software.
Before you start configuring the RADIUS server, let’s take a moment to understand the component that will make it work. In order to make it work you must send a certain RADIUS AV pair. In this article I am assuming that you already know how to configure the Easy VPN server group locally on a Cisco IOS router. For an Easy VPN group to allow remote clients to connect, you must define it somewhere and define its policies underneath it, as explained in following document:
When you move a group and policy to a RADIUS server, the same concept applies; the only difference is that everything is configured on the RADIUS server rather than locally on a router. The following tables provide you with the local policy element mapping with RADIUS AV pair mapping.
Group level policy elements:
|
Feature |
Local command |
RADIUS AV pair |
|
Pre-shared key |
Key |
Cisco-avpair = “ipsec:key-exchange=<preshared-key>” |
|
DNS Servers |
Dns |
Cisco-avpair = “ipsec:dns-servers=<IP-1> <IP-2>…” |
|
WINS Servers |
Wins |
Cisco-avpair = “ipsec:wins-servers=<IP-1> <IP-2>…” |
|
Domain name |
Domain |
Cisco-avpair = “ipsec:default-domain=<domain-name>” |
|
IP Pool |
Pool |
Cisco-avpair = “ipsec:addr-pool=<pool-name-on-router>” |
|
Network mask |
Netmask |
Framed-Netmask |
|
Split tunnel |
Acl |
Cisco-avpair = “ipsec:inacl=<acl#>” |
|
Restrict access to an interface |
access-restrict |
Cisco-avpair = “ipsec:access-restrict=<interface name>” |
|
Firewall presence check |
firewall are-u-there/ policy check-presence |
Cisco-avpair = “ipsec:firewall=1” |
|
CPP |
firewall policy |
Cisco-avpair = “ipsec:cpp-policy="<policy-name>"” |
|
Allow local LAN access |
Include-local-lan |
Cisco-avpair = “ipsec:include-local-lan=1” |
|
Allow users to save password |
save-password |
Cisco-avpair = “ipsec:save-password=1” |
|
Define backup gateway |
backup-gateway |
Cisco-avpair = “ipsec:ipsec-backup-gateway=<backup-gateway-ip>” |
|
Allow PFS |
Pfs |
Cisco-avpair = “ipsec:pfs=1” |
|
Browser proxy |
browser-proxy |
Cisco-avpair = “ipsec:browser-proxy=<broser-proxy-name>” |
|
Maximum number of users allowed on a group |
max-users |
Cisco-avpair = “ipsec:max-users=<number>” |
|
Maximum simultaneous connection allowed |
max-logins |
Cisco-avpair = “ipsec:max-logins=<number>” |
|
IPSec banner |
Banner |
Cisco-avpair = “ipsec:banner=<Banner text>” |
|
Auto upgrade |
auto-upgrade |
Cisco-avpair = “ipsec:auto-update="<OS> <url> <version>"” |
|
Split DNS |
split-dns |
Cisco-avpair = “ipsec:split-dns=<domain-name>” |
User level policy elements:
|
Feature |
RADIUS AV pair |
|
Group lock |
Cisco-avpair = “ipsec:user-vpn-group=<group-name>” |
|
Allow user to save password |
Cisco-avpair = “ipsec:user-save-password=1” |
|
Allow local LAN access for user |
Cisco-avpair = “ipsec:user-include-local-lan=1” |
|
IP address for user |
Framed-IP-Address |
|
Network mask |
Framed-Netmask |
Requirements for Easy VPN Group configuration on RADIUS server:
- Easy VPN Group on RADIUS server should be created as a user on RADIUS database. The name of the user account should be the one that will be used by the end users to connect.
- The password for the account must be ‘cisco’. This is a special identifier that is used by the router for RADIUS purposes.
- The policy elements are defined on this user using the RADIUS AV pair as shown in group-level policy elements.
- Minimum attributes that must be configured on Easy VPN Group user:
- IETF attribute 06 – Service Type as Outbound
- IETF attribute 64 – Tunnel-Type as IP ESP
- IETF attribute 69 – Tunnel-Password with value as the pre-shared key for the Easy VPN group. In the case of digital certificates this attribute is not required.
OR
-
- Cisco AV pair “ipsec:key-exchange=ike”
- Cisco AV pair “ipsec:tunnel-type=ESP”
- Cisco AV pair “ipsec:key-exchange=<preshared-key>”. This is not required in the case of digital certificates.
In this scenario we will use the mandatory Cisco AV pair attributes.
In addition to the above-mentioned attributes we must ensure that the remote user has an IP address in order to communicate over VPN.
-
- Cisco AV pair “ipsec:addr-pool=<pool-name>” on Easy VPN Group to specify the pool name from which the IP should be assigned. Alternatively, we can configure IETF attribute 08- Framed-IP-Address defined on Xauth user account to specify a particular IP address to be assigned.
Note: Only the group-level RADIUS AV pair must be used for the user account that represents the Easy VPN Group. Any user-level-exclusive attribute defined on the Easy VPN Group user account may result in connection failure.
Requirement for Xauth user account on RADIUS server:
- The user account for Xauth will be a normal user account with the restriction that no group-level RADIUS AV pair attributes are configured on it. Only user-level RADIUS AV pair should be configured when required. Configuring group-level RADIUS AV pair on an Xauth user account may lead to connection failure.
Configuring Cisco Secure Access Control System 5.x for Easy VPN Group (Mode Configuration) and Xauth authentication
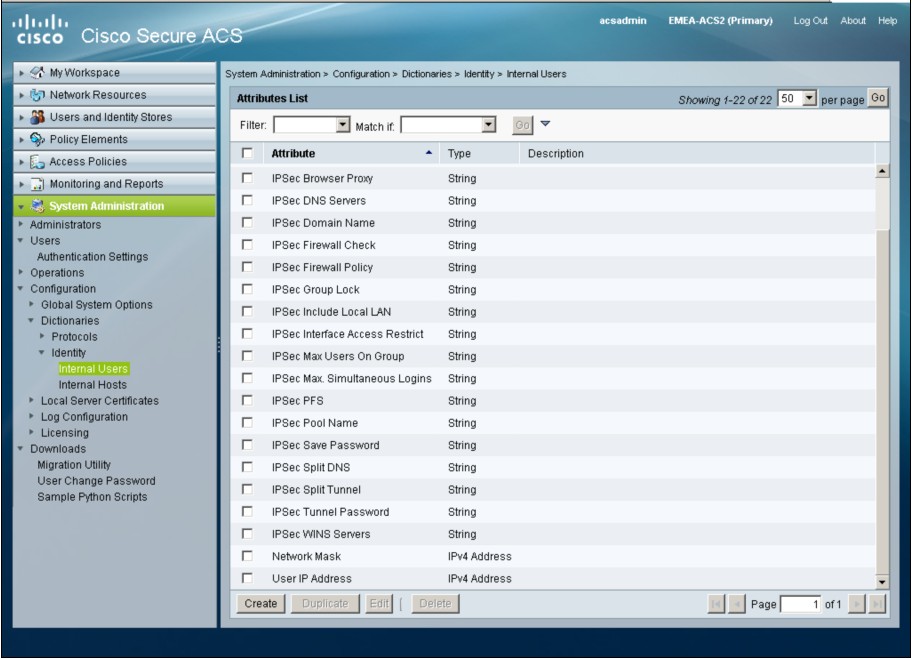
There are many ways to configure CSACS 5.x to get the Easy VPN configuration to work. I will illustrate one approach. We are already aware of the RADIUS AV pairs that must be configured on a RADIUS user account to get the Easy VPN configuration to work. I will first create a reference for those attributes under Internal Users.
Step 1. On CSACS 5.x go to System Administration > Configuration > Dictionaries > Identity > Internal Users. Click ‘Create’ to create the minimum required attributes as discussed above or all the attributes mentioned as per your requirements. For Cisco AV pairs choose Type as String with Maximum Length depending on the total length of the attribute. In this example I kept all Cisco AV pairs at a maximum of 256. For Framed-IP-Address and Framed-Netmask, Type should be IPv4 Address. After you have configured the attributes, the list will display as shown here.
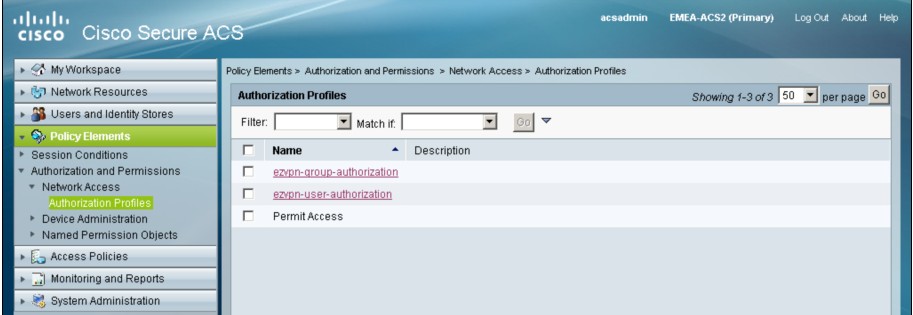
Step 2. Create ‘Authorization Policies’: one for the Easy VPN Group and one for the Easy VPN Xauth users. On CSACS 5.x go to Policy Elements > Authorization and Permissions > Network Access > Authorization Profiles. In our scenario I created ‘ezvpn-group-authorization’ and ‘ezvpn-user-authorization’, as shown in this screen.
The content of the policies should be according to the Group-level policy elements table and User-level policy elements table for Authorization Profile ‘ezvpn-group-authorization’ and ‘ezvpn-user-authorization’ respectively under ‘RADIUS Attributes’ section of Authorization policies. The actual RADIUS AV pairs must be mapped with the corresponding Internal Users attribute. This is the section that binds the Internal User attributes with the actual RADIUS AV pair attributes.
For example, if you need to bind the Internal User attribute ‘IPSec Tunnel Password’ (Created in Step 1) with a RADIUS Cisco AV pair, do the following:
- Dictionary Type: RADIUS-Cisco
- RADIUS Attribute: cisco-av-pair
- Attribute Type: String
- Attribute Value: Dynamic
- From the drop-down menu choose ‘Internal Users’ and click ‘Select’ to choose ‘IPSec Tunnel Password’.
Similarly, for the RADIUS IETF attribute Framed-Netmask, do the following:
- Dictionary Type: RADIUS-IETF
- RADIUS Attribute: Framed-IP-Netmask
- Attribute Type: IPv4 Address
- Attribute Value: Dynamic
- From the drop-down menu choose ‘Internal Users’ and click ‘Select’ to choose ‘Network Mask’. ‘Network Mask’ was the Internal User attribute created in Step 1.
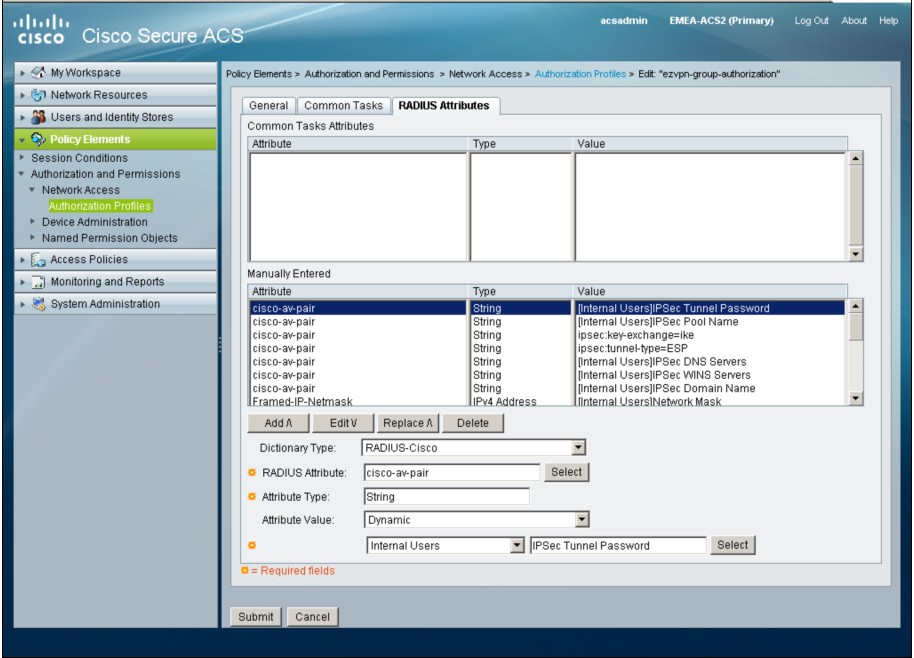
There are certain attributes whose value will not change and will remain constant; they can be configured as static. In our scenario it is the Cisco AV pair “ipsec:key-exchange=ike” and “ipsec:tunnel-type=ESP”.

Similarly, ‘ezvpn-user-authorization’ will look as shown in the screen below.

Step 3. Create two ‘Identity Groups’: one for the Easy VPN Group as ‘EzVPN Groups’ and one for the Xauth users as ‘EzVPN Users’. Go to Users and Identity Stores > Identity Groups as shown in the screen below.

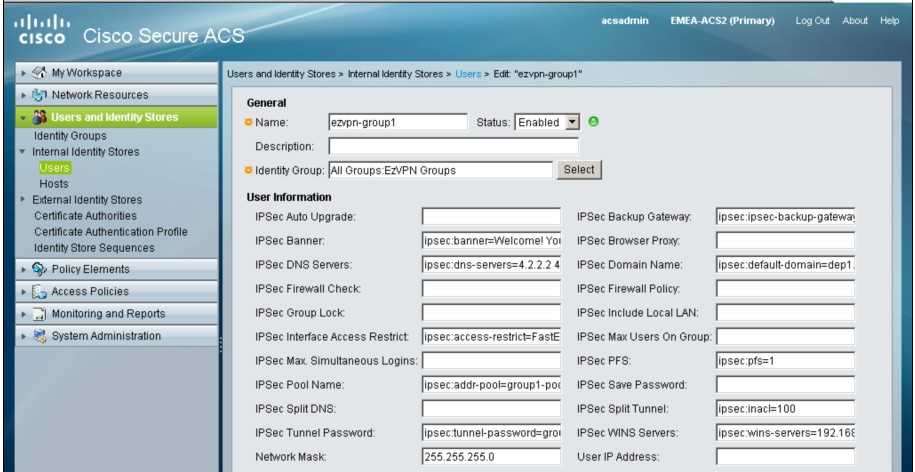
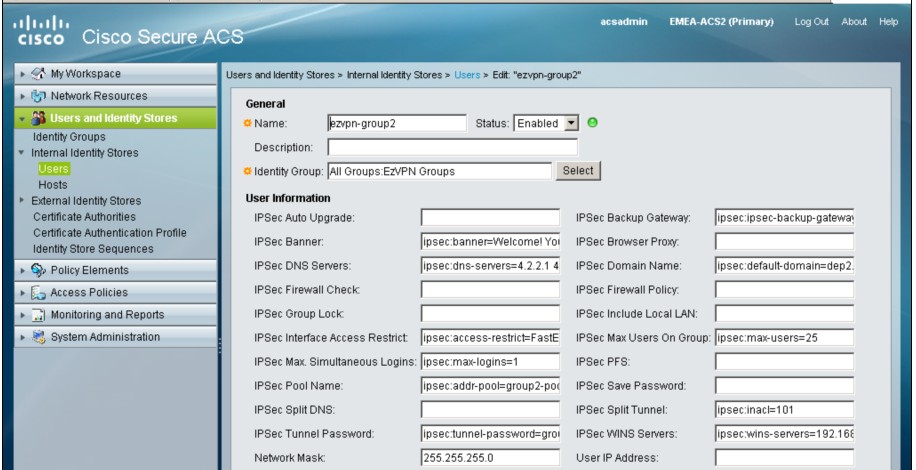
Step 4. Create two user accounts for the Easy VPN Groups as ‘ezvpn-group1’ and ‘ezvpn-group2’ each with password ‘cisco’. Go to Users and Identity Stores > Internal Identity Stores > Users. Make both users part of the Identity Group ‘EzVPN Groups’. Configure the attributes as described in the Problem Description for each group. This is the section where we specify the real RADIUS/Cisco AV pair attributes for the Mode Configuration. This is where the policies are configured and changed on the fly as the requirement changes, with minimal involvement of the Easy VPN server routers and IPSec remote clients.
This screen shows the Easy VPN Group configuration for user ‘ezvpn-group1’.
This screen shows the Easy VPN Group configuration for user ‘ezvpn-group2’.
Step 5. Create remote access user accounts ‘user1’ and ‘user2’ with their respective passwords. Make these user accounts part of the Identity Group ‘EzVPN Users’. Configure the attributes as per the problem description.
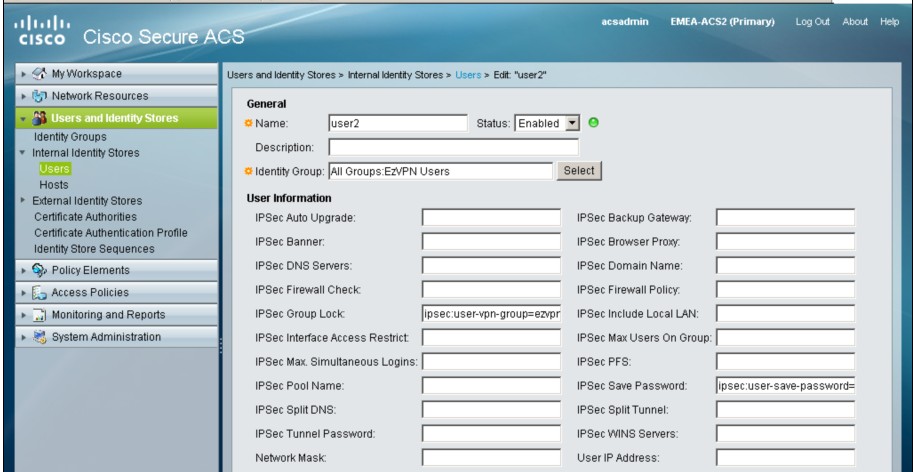
Since ‘user1’ should only be allowed to connect using the ‘ezvpn-group1’ profile, we need to specify the attribute ‘ipsec:user-vpn-group=ezvpn-group1’ under the Internal Users attribute ‘IPSec Group Lock’ as shown in the screen below.

Do the same for ‘user2’. In addition we need to allow this user the capability to save the password. To enable the save password feature we also configured the Cisco AV pair as ‘ipsec:user-save-password=1’ as shown below.
Step 6. Create two ‘Access Services’: one for the Easy VPN Group ‘ezvpn-group’ and one for the Xauth Users ‘ezvpn-users’. Go to Access Policies > Access Services.
Access Service Name: ezvpn-group
Service Type: Network Access
Included Policies: Identity & Authorization
‘ezvpn-group’ Identity: ‘Single result selection’ and ‘Identity Source’ as ‘Internal Users’.
‘ezvpn-group’ Authorization: Create a rule ‘Rule-group-authorization’ with condition, if ‘Identity Group’ is ‘EzVPN Groups’ then Authorization Policy ‘ezvpn-group-authorization’ must be applied.
Access Service Name: ezvpn-users
Service Type: Network Access
Included Policies: Identity & Authorization
‘ezvpn-group’ Identity: ‘Single result selection’ and ‘Identity Source’ as ‘Internal Users’.
‘ezvpn-group’ Authorization: Create a rule ‘Rule-group-authorization’ with condition, if ‘Identity Group’ is ‘EzVPN Users’ then Authorization Policy ‘ezvpn-user-authorization’ must be applied.
Step 7. Create two ‘Service Selection Rules’: one for the Easy VPN Group and one for the Xauth Users. Go to Access Policies > Access Services > Service Selection Rules.
Rule Name: Rule-ezvpn-group
Protocol: match RADIUS
Compound Condition: ((RADIUS-IETF:NAS-IP-Address = 192.168.165.7 Or RADIUS-IETF:NAS-IP-Address = 192.168.165.5) And RADIUS-IETF:Service-Type match Outbound)
Result: Access Service: ezvpn-group
Rule Name: Rule-ezvpn-user
Protocol: match RADIUS
Compound Condition: ((RADIUS-IETF:NAS-IP-Address = 192.168.165.7 Or RADIUS-IETF:NAS-IP-Address = 192.168.165.5) And RADIUS-IETF:Service-Type match Virtual)
Result: Access Service: ezvpn-users
Ensure that the rule ‘Rule-ezvpn-group’ is above the rule ‘Rule-ezvpn-user’ and that no other rule could provide a match before an Easy VPN group authentication reaches the rule ‘Rule-ezvpn-group’ or an Xauth user reaches the rule ‘Rule-ezvpn-user’.
At this stage we are done with the RADIUS server configuration for Mode Configuration and Xauth authentication. Next, you need to configure the remote access VPN clients.
For ‘ezvpn-group1’ profile:
Connection Enty: EzVPN - Group 1
Host: 192.168.165.7
Authentication: Group Authentication: Name: ezvpn-group1
Authentication: Group Authentication: Password: group1password
Authentication: Group Authentication: Confirm Password: group1password
For ‘ezvpn-group2’ profile:
Connection Enty: EzVPN - Group 2
Host: 192.168.165.7
Authentication: Group Authentication: Name: ezvpn-group2
Authentication: Group Authentication: Password: group2password
Authentication: Group Authentication: Confirm Password: group2password
Before concluding this article, let’s also look at the accounting part. For the current scenario we would require following commands on the Easy VPN Server router.
|
!--- Accounting list aaa accounting network ezvpn-acct start-stop broadcast group radius
!--- Calling Accounting list in crypto map for Easy VPN user tracking crypto map ezvpn-map client accounting list ezvpn-acct |
Here are some show commands to help you through.
|
!--- To check IKE Phase I status show crypto isakmp sa !--- To check IPSec SA’s details show crypto ipsec sa !--- To show all connected groups usage show crypto session group !--- To show groups and their members show crypto session summary !--- To show crypto session for xauth or pki-aaa username show crypto session username <username> !--- To show detailed information about group and crypto peers show crypto session detail !--- To show brief on groups and users connected show crypto session brief |
Conclusion
Controlling policy for remote access through a RADIUS server is only a single example among multiple available. There is lot that can be achieved with a RADIUS server and AAA protocol. This not only helps in centralizing everything but helps you strengthen your security posture. If a policy needs to be updated, the time it takes to propagate the updated policies is greatly reduced. This could result in lowering operational costs in the long run.
Reference Links
http://www.cisco.com/en/US/products/ps6120/products_configuration_example09186a0080930f21.shtml
- Mark as Read
- Mark as New
- Bookmark
- Permalink
- Report Inappropriate Content
Hello!
ipsec:key-exchange=<preshared-key>
This parameter is incorrect, write this:
ipsec:tunnel-password=<preshared-key>
- Mark as Read
- Mark as New
- Bookmark
- Permalink
- Report Inappropriate Content
Rule Name: Rule-ezvpn-user
Protocol: match RADIUS
Compound Condition: ((RADIUS-IETF:NAS-IP-Address = 192.168.165.7 Or RADIUS-IETF:NAS-IP-Address = 192.168.165.5) And RADIUS-IETF:Service-Type match Virtual)
Result: Access Service: ezvpn-users
also RADIUS-IETF:Service-Type match Virtual is incorrect, should be RADIUS-IETF:NAS-Port-Type match Virtual
Find answers to your questions by entering keywords or phrases in the Search bar above. New here? Use these resources to familiarize yourself with the community: