- Cisco Community
- Technology and Support
- Wireless - Mobility
- Wireless - Mobility Knowledge Base
- Wireless Sniffing in Windows 7 with Netmon 3.4 (Deprecated)
- Subscribe to RSS Feed
- Mark as New
- Mark as Read
- Bookmark
- Subscribe
- Printer Friendly Page
- Report Inappropriate Content
- Subscribe to RSS Feed
- Mark as New
- Mark as Read
- Bookmark
- Subscribe
- Printer Friendly Page
- Report Inappropriate Content
05-02-2011 03:52 PM - edited 11-18-2020 02:54 AM
- Introduction
- Tested adapters/drivers
- Install Netmon 3.4
- Sniff wireless packets from a channel
- Analyze with Wireshark
- Problems
Introduction
With Microsoft Network Monitor (Netmon) 3.4 in Windows 7, one could perform 802.11a/b/g wireless sniffing, using a standard wireless adapter. The file saved from Netmon can be read by latest (1.5 and above) Wireshark, though not in OmniPeek.
Since Netmon is no longer supported in later versions of Windows, and since it is unable to capture frames modulated in 802.11n or 802.11ac, it is of very limited utility nowadays. One who wishes to perform an over the air capture should use a more functional sniffing method, such as Mac OS X, Wireshark with AirPcap, or OmniPeek with a MediaTek USB adapter.
Netmon 3.4 is supported with XP SP3; however, it does not support wireless sniffing when running XP. As to Vista/Win8, experience is mixed; a reliable source reports that wireless sniffing does work in 64-bit Vista on a Macbook with BCM43xx 1.0 adapter. Netmon is no longer supported as of Windows 10.
Tested adapters/drivers
- An Intel 6300 running drivers 13.2.1.5 and 13.5.0.6, and an Intel 6205 running 14.2.0.10 and 15.9.1.2. These adapters works well with 11a/g but do not support 11n.
- A Linksys WUSB600Nv1 with Ralink driver 3.0.10.0. This driver says that it supports 11n (which function I didn't test). It seemed to report all packets as having an RSSI of -50, and as being of data rate "3.5 Mbps".
- An Atheros AR9285 with driver 8.0.0.258. Driver reports 11n support (not tested.) RSSI values and data rates look sound.
- A Cisco CB21AG with Atheros driver 1.0.0.120 - this also reported weird data rates (1Mbps showed up as "116 Mbps" and 11 Mbps as "124 Mbps".)
Install Netmon 3.4
Download Netmon 3.4 from Microsoft. If running Win7 64bit, get and install NM34_x64.exe. You'll have to log off and back on again after installing.
Sniff wireless packets from a channel
Note: if using PROSet for Win7, set it to "Use Windows to Manage WiFi". Otherwise, PROSet is apt to take control of the adapter out from under Netmon, and you will wind up sniffing the wrong channel.
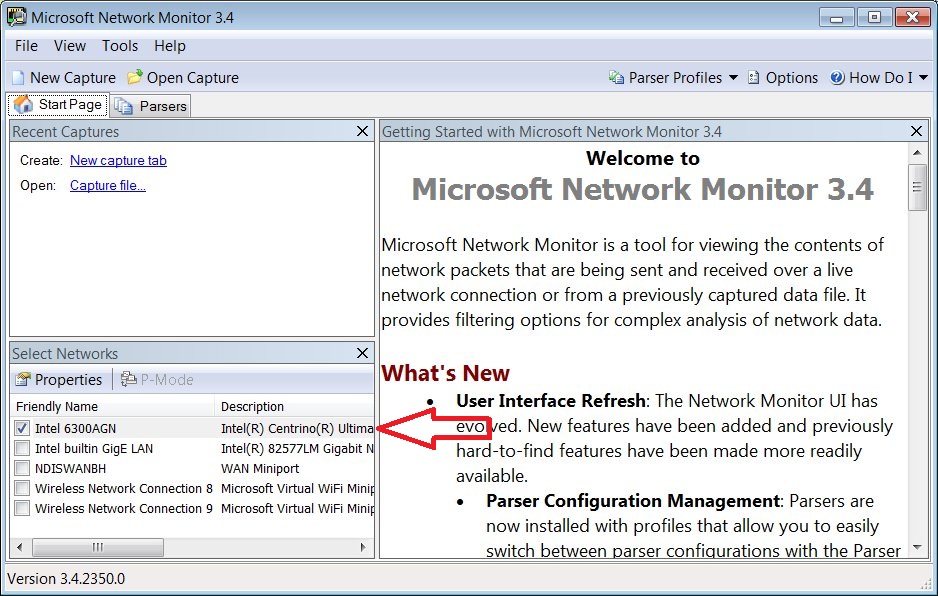
Launch Netmon. Check the wireless adapter of interest, and uncheck the others.

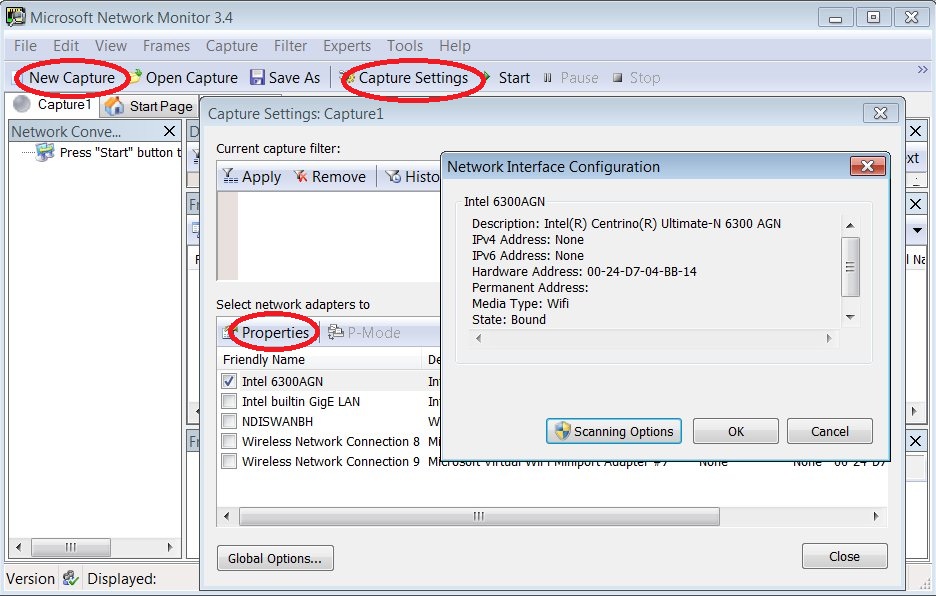
Click the New Capture button, then the Capture Settings button. This pops up the Capture Settings window. Highlight the adapter of interest and click Properties which pops up the Network Interface Configuration window.

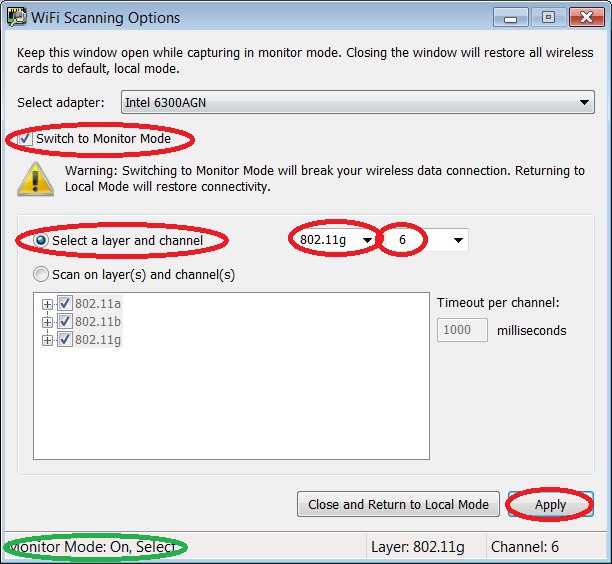
In the Network Interface Configuration window, click [Scanning Options]. This pops up the WiFi Scanning Options window. Check Switch to Monitor Mode. Select the Select a layer and channel button. Select the band and channel of interest. (With Intel, use "11a" for 5GHz and "11g" for 2.4GHz.)
Click [Apply]. Important: do not click [Close and Return to Local Mode], but keep the WiFi Scanning Options window up all the time you're capturing the sniff.

Now (keeping the WiFi Scanning Options window open), go back to the Network Interface Configuration window and click [OK] to get rid of it. [Close] the Capture Settings window. Back in the main Network Monitor window, click Start.
This should now cause NetMon to capture all wireless frames. Sometimes though it will just sit there and not capture any frames. When this happens, try restarting NetMon, disabling/reenabling the adapter, etc.
When done, click [Stop] and use File -> Save as to save the .CAP file.
Analyze with Wireshark
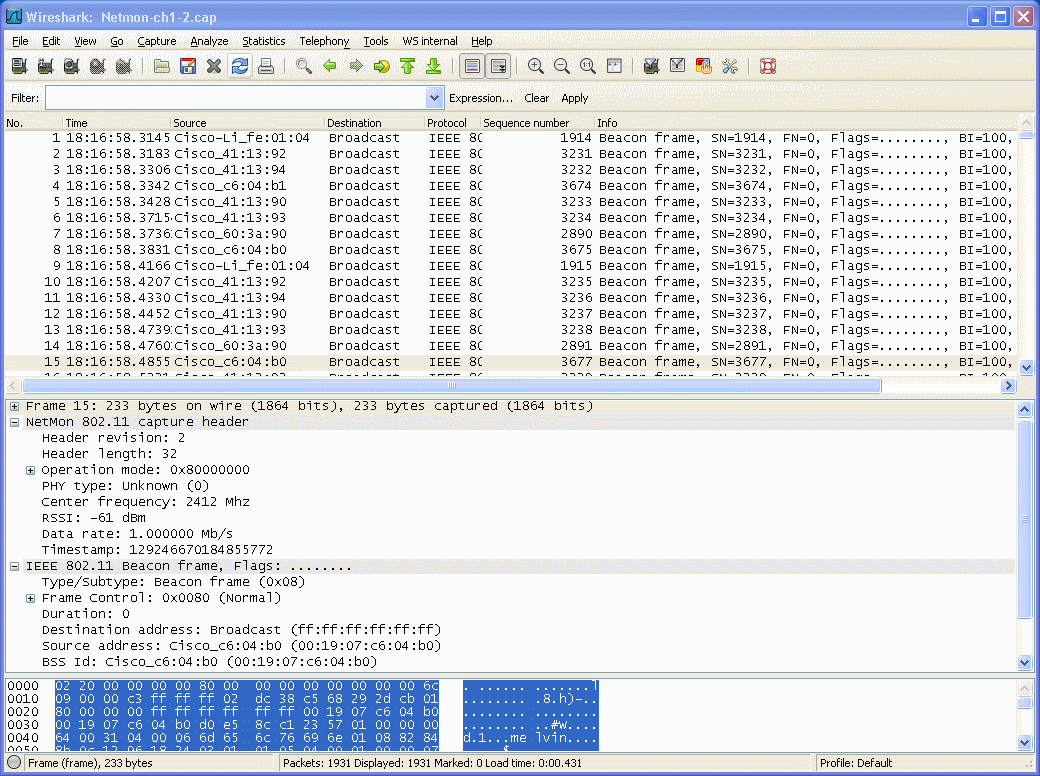
Wireshark up through 1.4.x cannot read a Netmon 2 format file. However, latest Wireshark (1.5 and above) can. The screenshot below is from Wireshark 1.5.1.

Problems
Netmon recently just stopped being able to see my wireless adapter - it simply was not present in the Netmon start page, even though it was up and working fine. Rebooting did not help. Uninstalling Netmon Parsers, then Netmon, then reinstalling NetMon 3.4, then logging off, then logging back on, did work.
If Netmon isn't sniffing on the right channel, then make sure that you restart Netmon and follow the steps above exactly. One you've started setting up a capture session and have set the channel via the WiFi Scanning Options window, Netmon will not track subsequent changes in that window.
- Mark as Read
- Mark as New
- Bookmark
- Permalink
- Report Inappropriate Content
thanks Aaron for sharing this useful information.
- Mark as Read
- Mark as New
- Bookmark
- Permalink
- Report Inappropriate Content
+5 Aaron Leonard!
BTW, in case it does not demtect any interface, then you ust runn it as "Administrator"
Right click , "run as administrator"
- Mark as Read
- Mark as New
- Bookmark
- Permalink
- Report Inappropriate Content
Great work Aaron!
- Mark as Read
- Mark as New
- Bookmark
- Permalink
- Report Inappropriate Content
Thank you for a great tutorial.
- Mark as Read
- Mark as New
- Bookmark
- Permalink
- Report Inappropriate Content
Thanks!
Initial attempts with Win8 Surface Pro do not looking promising.
- Mark as Read
- Mark as New
- Bookmark
- Permalink
- Report Inappropriate Content
Thanks for the update. (This confirms my resolution to avoid Win8 as long as I can
- Mark as Read
- Mark as New
- Bookmark
- Permalink
- Report Inappropriate Content
Muy bueno el tutorial! Una gran ayuda. ![]()
Muchas gracias.
![]()
Find answers to your questions by entering keywords or phrases in the Search bar above. New here? Use these resources to familiarize yourself with the community: