- Cisco Community
- Technology and Support
- Collaboration
- Collaboration Applications
- update Webex 1.5.1.6 to 2.5 MR3
- Subscribe to RSS Feed
- Mark Topic as New
- Mark Topic as Read
- Float this Topic for Current User
- Bookmark
- Subscribe
- Mute
- Printer Friendly Page
- Mark as New
- Bookmark
- Subscribe
- Mute
- Subscribe to RSS Feed
- Permalink
- Report Inappropriate Content
04-30-2015 08:52 AM - edited 03-17-2019 05:07 PM
Hi Hello
Could you someone tell me what is the process for to do the update from 1.5.1.6 to 2.5MR3, I dont have idea about this, somebody has screenshot the step by step.
thank you!!
Jaime Molina
Solved! Go to Solution.
- Labels:
-
Webex Meetings
Accepted Solutions
- Mark as New
- Bookmark
- Subscribe
- Mute
- Subscribe to RSS Feed
- Permalink
- Report Inappropriate Content
05-01-2015 01:12 PM
Hi Jaime,
If you need to rebuild RAID on the UCS server in order to increase capacity and deploy 2.5 system, that means all the 1.5 VMs will have to be removed (and save 1.5 Admin VM's Hard Disk 4 VMDK file).
Hence, once RAID is rebuilt, ESXI host installed and re-added to vCenter, you will be deploying new CWMS 2.5 VMs and completing the manual upgrade process by transfering Hard Disk 4 VMDK file before powering ON 2.5 VMs.
Per Planning guide, CWMS 2.5 requires 1.5TB of total disk space for new installation (http://www.cisco.com/c/en/us/td/docs/collaboration/CWMS/2_5/Planning_Guide/Planning_Guide/Planning_Guide_chapter_00.html#reference_BA7FE746303149E69A845B5D09C44D9A).
I hope this clarifies it a little bit.
As for advanced VMware options, this is what is noted in official documentation: http://www.cisco.com/c/en/us/td/docs/collaboration/CWMS/2_5/Planning_Guide/Planning_Guide/Planning_Guide_chapter_01.html#reference_39CA21773C2B4CC795075FD7DCFCA25B
-Dejan
- Mark as New
- Bookmark
- Subscribe
- Mute
- Subscribe to RSS Feed
- Permalink
- Report Inappropriate Content
04-30-2015 09:33 AM
Hi Jaime,
- What is the size of your deployment (50, 250, 800, or 2000 users)?
- Do you have High Availability (HA)?
- Do you have Internet Reverse Proxy (IRP)?
- How many UCS servers do you have?
- What is the arrangement of CWMS VMs on per UCS server? (list what VMs exist on each ESXi server in the deployment)
- How much FREE space you have on the datastore that is used by CWMS Admin VM and how much on the rest of the deployment?
- Have you ordered CWMS 2.x installation media (2.5.1.29 OVA file) and licenses via Product Upgrade Tool yet?
- Are your ESXi hosts have NTP Client running, NTP server configured, and NTP set to Start and Stop with Host, and is the time on all the hosts correct and in sync?
- Do you use Standard vSwitch or Distributed vSwitch on your ESXi hosts?
- Is your vCenter fully qualified domain name (FQDN) resolvable on your network? Can you use vSphere client and point it to the FQDN of your vCenter and connect successfully?
Once you have this information, I may be able to provide you with further guidance.
-Dejan
- Mark as New
- Bookmark
- Subscribe
- Mute
- Subscribe to RSS Feed
- Permalink
- Report Inappropriate Content
04-30-2015 10:07 AM
Hi
Thanks a lot for the soon response, my native Lenguage is Spanish, I hope be clear to write on English. The answers about the questions are following:
· What is the size of your deployment (50, 250, 800, or 2000 users)?
Deployment is on 250 users, with Admin, Media and IRP
· Do you have High Availability (HA)?
No
· Do you have Internet Reverse Proxy (IRP)?
Yes
· How many UCS servers do you have?
I have 3 UCS C220
1.- Admin, Media and vCenter
2.- IRP
3.-Call manager
· What is the arrangement of CWMS VMs on per UCS server? (list what VMs exist on each ESXi server in the deployment)
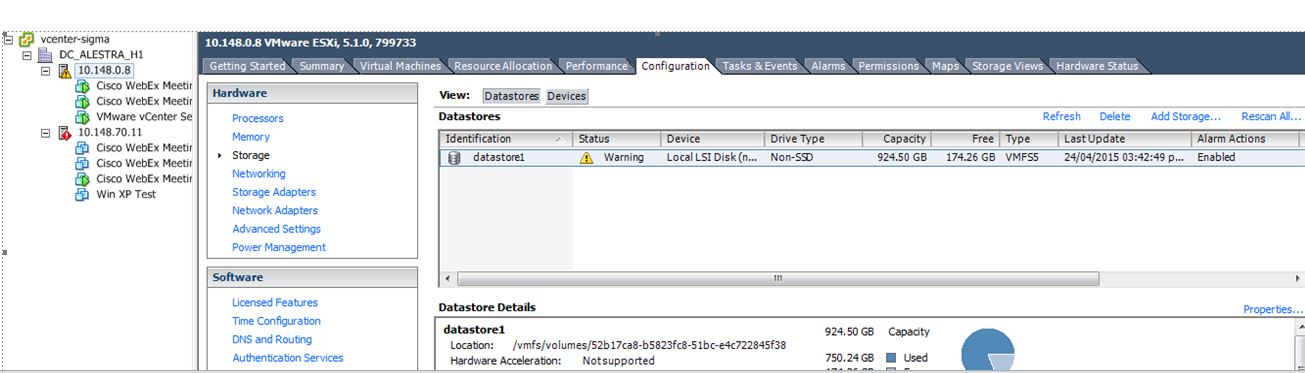
We have 2 ucs 220 , and this is the description of vm machines , im going to add the screenshot.
1.-UCS220 ---- has VCenter , Admin , Media.
2.-UCS220 -----Has IRP
· How much FREE space you have on the datastore that is used by CWMS Admin VM and how much on the rest of the deployment?
Add to screen shoot

· Have you ordered CWMS 2.x installation media (2.5.1.29 OVA file) and licenses via Product Upgrade Tool yet?
No , Do you know the link where I download the ova.
· Are your ESXi hosts have NTP Client running, NTP server configured, and NTP set to Start and Stop with Host, and is the time on all the hosts correct and in sync?
Yes.
· Do you use Standard vSwitch or Distributed vSwitch on your ESXi hosts?
Standar vSwitch
· Is your vCenter fully qualified domain name (FQDN) resolvable on your network? Can you use vSphere client and point it to the FQDN of your vCenter and connect successfully?
Yes
Thank you so much.
- Mark as New
- Bookmark
- Subscribe
- Mute
- Subscribe to RSS Feed
- Permalink
- Report Inappropriate Content
04-30-2015 10:42 AM
Hi Jaime,
Thank you for the information it is very helpful.
Is your 1.5 system currently in production and heavily used?
What is the downtime you can afford with your system?
First thing that you will need to do is update your system to 1.5 MR5 as that is the first pre-requisite for upgrade to 2.x version level. To update to 1.5 MR5, please follow this procedure:
----------------------------------------------
Once you have your system on 1.5 MR5 version, you will need to add more disk space. You currently don't have enough disk space to perform the upgrade to 2.x. You have only 174GB of FREE disk space which is not enough for the upgrade.
I can see you are using local drives on UCS C220 server, so I am not sure how many disk slots you have available in the server to add more drives.
Option 1: If you have enough slots to add 4 new drives in RAID 10 and create total of 1.5 TB or more of available disk space in this new datastore (e.g. 4x 1TB drives will give you 2TB of total disk space), you can use this new datastore to deploy CWMS 2.5 and follow the MANUAL UPGRADE process.
Option 2: If you don't have enough slots to add 4 more drives to create a new datastore, you may need to obtain larger drives to replace existing ones and completely rebuild the RAID on the UCS server. This will require complete deletion of the 1.5 system. If this is something you need to do, important piece is to save somewhere on your network Hard Disk 4 VMDK file of your CWMS 1.5 Admin VM (you can identify what VMDK file is assigned to Hard Disk 4 and it is included in the Manual Upgrade documentation.
Once you let me know what you decided or can do, we can talk about how the upgrade process should be done.
Until you resolve the issue with FREE disk space, you can proceed with ordering CWMS 2.x media and licenses using Product Upgrade Tool. You can check this post out about the details: https://supportforums.cisco.com/document/12110101/ordering-cwms-2x-migration-file-through-product-upgrade-tool
Finally, you can also review the procedure for MANUAL UPGRADE (as that is what I would recommend for your situation) just to know what will need to be done once you resolve the issue with disk space: http://www.cisco.com/c/en/us/td/docs/collaboration/CWMS/2_5/Administration_Guide/Administration_Guide/Administration_Guide_chapter_01010.html#task_98F674E6A232442FAD72C1748A798D47
Here you can find the CWMS 2.5 Administration guide in Spanish if that works better for you: http://www.cisco.com/c/en/us/support/conferencing/webex-meetings-server/products-installation-guides-list.html. Once you access the guide, go to Deployment Guide and then Upgrading the system and then Upgrading the system MANUALLY.
-Dejan
- Mark as New
- Bookmark
- Subscribe
- Mute
- Subscribe to RSS Feed
- Permalink
- Report Inappropriate Content
04-30-2015 01:30 PM
Hi Dejan , Thank you for the response.
This saturday we want to do the upgrade to 1.5MR5, Currently we have the UCS with drives of 500Gb , Do you think that is possible to rebuild the disk in RAID 0 and have 2TB on Disk available for to do the upgrade? or is necesary to add a new drive with larger space for to do the upgrade?
It´s possible to clone the vwmachine to other UCS and follow working fine?
Thank you so much.
Jaime Molina
- Mark as New
- Bookmark
- Subscribe
- Mute
- Subscribe to RSS Feed
- Permalink
- Report Inappropriate Content
04-30-2015 06:47 PM
Hi Jaime,
Unfortunately, per documentation, we support only RAID 5 and RAID 10 configurations for UCS host for Admin and Media VM: http://www.cisco.com/c/en/us/td/docs/collaboration/CWMS/2_5/Planning_Guide/Planning_Guide/Planning_Guide_chapter_00.html#reference_BA7FE746303149E69A845B5D09C44D9A
RAID 1 is supported for UCS server with IRP VM, but that won't be of help in this case.
With that in mind, if you have additional sockets for additional hard drives, if you can add 2x 500GB drives, you could rebuild RAID 10 with 6x500GB drives and get total of 1.5TB of disk space which is a requirement for 2.5 deployment. On this new datastore with total of 1.5TB you can deploy CWMS 2.5 VMs, and perform manual upgrade (of course, as mentioned above, you will need to backup your 1.5 Admin VM Hard Disk 4 VMDK file somewhere off the server until RAID is rebuild and the 2.5 VMs deployed).
As for cloning, unfortunately CWMS doesn't support cloning, vMotion or any of such advanced VMware option being used on CWMS Virtual machines.
I hope this helps.
-Dejan
- Mark as New
- Bookmark
- Subscribe
- Mute
- Subscribe to RSS Feed
- Permalink
- Report Inappropriate Content
05-01-2015 01:02 PM
Thank You Dejan
Just I have a doubt about your comment , if we want to do a upgrade we need have 1.5Tb free since CWMS 1.5.1.6 or 1.5MR5?
On other hand do you have a link where the documentation of cisco says that is not possible to do cloning vmw? this one because the customer is asking us a oficial documentation about this.
Thank you so much.
Jaime Molina
- Mark as New
- Bookmark
- Subscribe
- Mute
- Subscribe to RSS Feed
- Permalink
- Report Inappropriate Content
05-01-2015 01:12 PM
Hi Jaime,
If you need to rebuild RAID on the UCS server in order to increase capacity and deploy 2.5 system, that means all the 1.5 VMs will have to be removed (and save 1.5 Admin VM's Hard Disk 4 VMDK file).
Hence, once RAID is rebuilt, ESXI host installed and re-added to vCenter, you will be deploying new CWMS 2.5 VMs and completing the manual upgrade process by transfering Hard Disk 4 VMDK file before powering ON 2.5 VMs.
Per Planning guide, CWMS 2.5 requires 1.5TB of total disk space for new installation (http://www.cisco.com/c/en/us/td/docs/collaboration/CWMS/2_5/Planning_Guide/Planning_Guide/Planning_Guide_chapter_00.html#reference_BA7FE746303149E69A845B5D09C44D9A).
I hope this clarifies it a little bit.
As for advanced VMware options, this is what is noted in official documentation: http://www.cisco.com/c/en/us/td/docs/collaboration/CWMS/2_5/Planning_Guide/Planning_Guide/Planning_Guide_chapter_01.html#reference_39CA21773C2B4CC795075FD7DCFCA25B
-Dejan
- Mark as New
- Bookmark
- Subscribe
- Mute
- Subscribe to RSS Feed
- Permalink
- Report Inappropriate Content
05-04-2015 10:03 AM
First of all , we have decided to add new storage to UCS 220 and we are going do the process for upgrade to 1.5MR5.
On other hand I have a lot of doubt about the upgrade 2.5, I have a couple of questions.
1.- Have we to use ISO or OVA for the upgrade?
2.- Have we to use the template and put a different ip a our new deploy for vm admin 2.5 , media and IRP?
Sorry for the alot of questions. =)
"Give me six hours to chop down a tree and I will spend the first four sharpening the axe." - Abraham Lincoln
- Mark as New
- Bookmark
- Subscribe
- Mute
- Subscribe to RSS Feed
- Permalink
- Report Inappropriate Content
05-04-2015 10:36 AM
Hi Jaime,
1. For update to 1.5 MR5 you are using the ISO image as the process is considered a MINOR update and is done with the ISO.
Once your system is updated to 1.5 MR5 version, then put it in Maintenance Mode, gracefully shut down the VMs (Power > Shut Down Guest) and then copy CWMS 1.5MR5 Admin VM's Hard Disk 4 VMDK file to a location of the server.
2. Once you have that specific file backed up, you will delete all the VMs and add more storage and rebuild the RAID so you can deploy ESXi.
3. Finally, for the 2.5 upgrade, you will be using CWMS 2.5.1.29 OVA file, as you will need to deploy 2.5 VMs in order to migrate data from 1.5 to 2.5 using Manual Upgrade instructions I've shared with you.
Can you please let me know how you plan to add more storage to the UCS server?
Thank you.
-Dejan
- Mark as New
- Bookmark
- Subscribe
- Mute
- Subscribe to RSS Feed
- Permalink
- Report Inappropriate Content
05-04-2015 02:03 PM
Hi Dejan
Currently we have 4 drives of 500Gbs on RAID 10 , then our plan firts of all , make the update 1.5MR5, after get the 4.vmdk from UCS storage and delete all vmware machines, with this we will have 1.5 Tb and install de 3 VM machines, Admin, Media and IRP with OVA 2.5MR3, following , we will pass the vmdk4 to the UCS for complete the Upgrade.
When you speak about vm Hard Disk 4 Vmdk is the same that i showed ont the screenshot?

Thank you
Jaime Molina
- Mark as New
- Bookmark
- Subscribe
- Mute
- Subscribe to RSS Feed
- Permalink
- Report Inappropriate Content
05-04-2015 02:27 PM
Hi Jaime,
So 4.vmdk is not necessarily the same as Hard Disk 4 VMDK. Please, do the following to identify the appropriate VMDK file that is attached to Hard Disk 4:
| Step 1 | Navigate the inventory in VMware vCenter and find the current Admin virtual machine for your system. |
| Step 2 | Right-click the virtual machine name and select Edit Settings.... The Virtual Machine Properties window is displayed. |
| Step 3 | Select the Hardware tab, then select Hard disk 4. |
| Step 4 | For future reference, copy and paste into another document, the Disk File location. This specifies the location of the VMDK in VMware vCenter. The string is similar to [EMC-LUN10-RAID5] webex-sysA-admin/webex-sysA-admin_3.vmdk. |
This is VERY IMPORTANT, as you must preserve the correct VMDK file (the one attached to Hard Disk 4).
Once you finish with 1.5 MR5 update follow these steps and backup the correct VMDK file:
| Step 1 | Clear your browser cache. Static resources are cached to enhance the performance of web pages; however, the data cached might be incorrect. Therefore, we recommend that you clear your browser cache. |
| Step 2 | Go to the license manager on the original system and generate a license request by selecting System > View more > Manage Licenses. License manager opens in a new tab. |
| Step 3 | Select Generate License Request. A pop-up appears with the license request text. Copy the text and save the license request in a convenient location as it might be necessary to use the manual re-host procedure to reclaim your licenses. This information can also help Cisco to find your licenses. (SeeFulfilling Licenses by using the License Manager.) |
| Step 4 | Login to the Administration site of the original system. |
| Step 5 | Go to the System tab and select Upgrade. |
| Step 6 | Select Major Upgrade. |
| Step 7 | Select Continue to archive the original system data and put the system into maintenance mode. |
| Step 8 | Using the VMware vSphere client, select Power > Shut Down Guest on the virtual machines for the original system. |
Once the VMs are down, copy VMDK file associated to Hard Disk 4 fo CWMS 1.5 Admin Vm.
Once you have that saved somewhere on the network, proceed with deleting 1.5 VMs, and deploying 2.5 VMs from the OVA:
| Step 9 | Deploy all of the upgraded system virtual machines, including Internet Reverse Proxy (IRP) virtual machines. During deployment there is an option to Power on VM after deployment. Verify that this is not checked or that the VMs have been started manually before the next step is complete; otherwise, it will cause the VMs to deploy as a new system and create a new deployment instead of migrating the data. If the VMs are powered on, they must be deleted and redeployed before proceeding. |
| Step 10 | Copy the data from your original system to the Admin virtual machine for the upgraded system. (See Attaching an Existing VMDK File to a New Virtual Machine.) |
| Step 11 | Power on the upgraded Admin virtual machine and write down the deployment URL displayed on the virtual machine console. |
| Step 12 | Power on the other upgraded virtual machines. |
| Step 13 | Enter the deployment URL into a web browser. |
| Step 14 | Select Continue to launch the system setup. The progress of the upgrade is displayed on the deployment URL of the upgraded system and on the VMware console connected to the primary system Admin virtual machine. The VMware console provides the deployment URL to use in case the browser window inadvertently closes during the upgrade process. |
| Step 15 | Wait for the system to come to a good state, then turn off maintenance mode and select Continue. It might take a few minutes for the meeting service to become available. Your system is ready for users to start meetings when all the virtual machines listed on the System Properties page display a status of Good (green). |
| Step 16 | Test the upgraded system. (See About System Testing.) |
Please, let me know of any questions you might have.
-Dejan
- Mark as New
- Bookmark
- Subscribe
- Mute
- Subscribe to RSS Feed
- Permalink
- Report Inappropriate Content
08-05-2015 09:38 AM
Hi dpetrovi , after a long time , we have decided that we are going keep version 1.5 =/
But we have something new, in scan of vulnerabilities appears SSL POODLE ,How can to fix this problem? The only way that we have is update?
Thank you so much!!
- Mark as New
- Bookmark
- Subscribe
- Mute
- Subscribe to RSS Feed
- Permalink
- Report Inappropriate Content
08-05-2015 09:44 AM
Hi Jaime,
If you are staying on 1.5 version level, you should update to 1. 5MR5 to address Shell Shock vulnerability. After 1.5 MR5 update, I would also advise updating to 1.5 MR5 Patch 1 which resolved a highly impacted defect (details here: https://supportforums.cisco.com/announcement/12560261/when-sharing-screenapplication-webex-it-shows-just-gray-screen-other)
-Dejan
- Mark as New
- Bookmark
- Subscribe
- Mute
- Subscribe to RSS Feed
- Permalink
- Report Inappropriate Content
08-06-2015 07:09 AM
Thank you so much , well , for update to 1.5MR5 i have to do this that you said me before
Discover and save your favorite ideas. Come back to expert answers, step-by-step guides, recent topics, and more.
New here? Get started with these tips. How to use Community New member guide